


Mastering Boat Spring Lines for Secure Docking
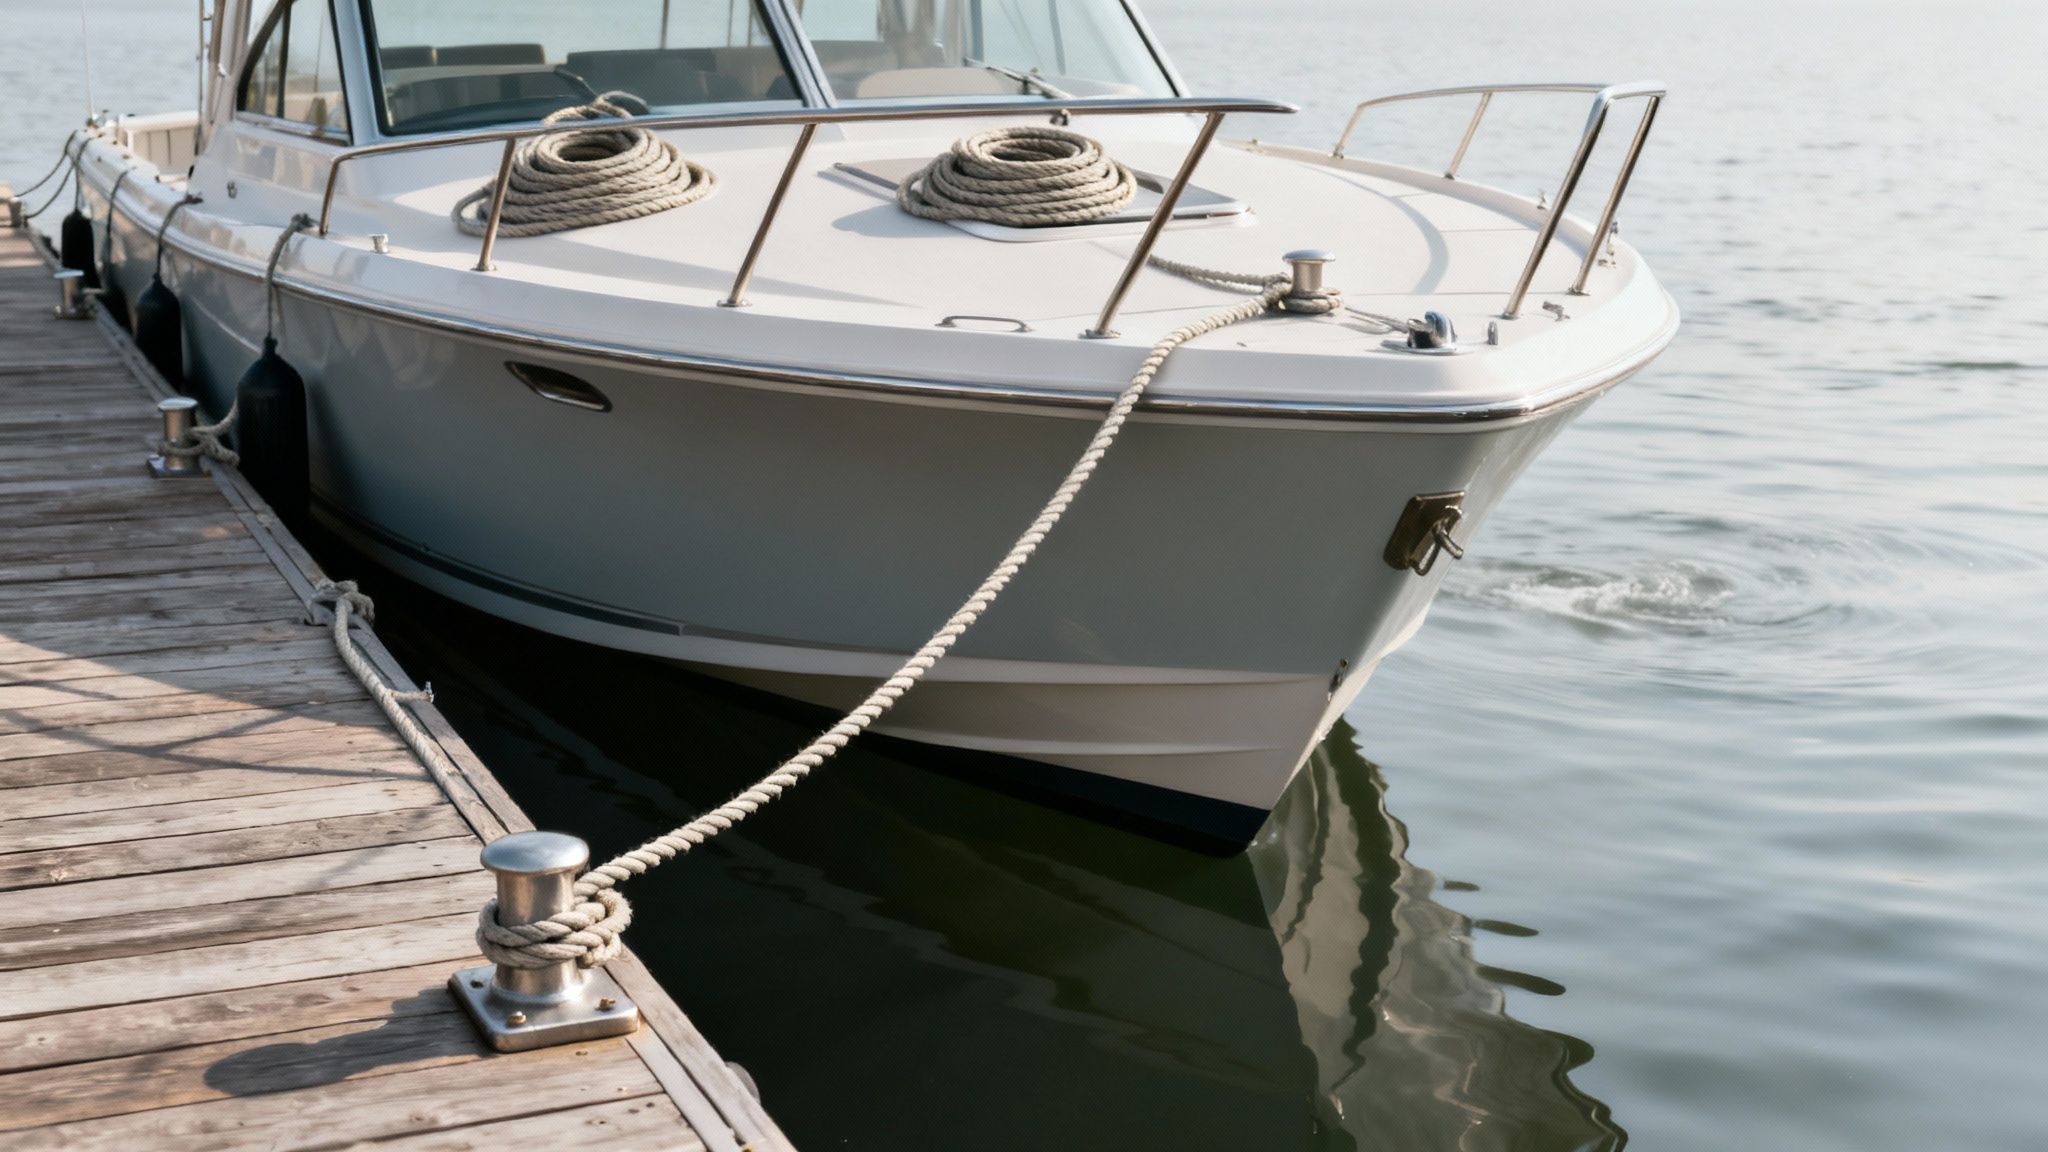
Ever wonder what keeps a boat perfectly snug against the dock, even when the wind and current are doing their best to shove it around? The secret lies in boat spring lines. These are specialized mooring lines that stop the fore-and-aft surging that your standard lines just can't handle. Getting the hang of them is the real key to confident, damage-free docking.
Quick answer: how boat spring lines work
Boat spring lines run diagonally between your boat and the dock to stop forward-and-back movement. Use one line to prevent the boat from surging forward and an opposing line to prevent it from drifting backward. For most dock setups, double-braid nylon lines with enough length to create a shallow angle are easier to handle and safer for cleats than short, steep lines.
Fast spring-line setup match
| Docking problem | Best setup move | Better Boat path |
|---|---|---|
| Boat surges forward or backward in the slip | Rig opposing spring lines at a shallow angle to hold the boat along the dock. | 1/2-inch Dock Lines |
| Hull rubs while the spring lines hold tension | Set fenders first, then adjust the line tension so the boat rests against protection, not bare dock. | Fender Lines |
| Unsure what diameter line to buy | Match line diameter to boat length and docking conditions before buying extras. | Use the sizing table below, then step up for heavy boats or exposed slips. |
The Unsung Heroes of Secure Docking
Most boaters know their bow and stern lines—the ones that keep the boat from drifting away from the pier. But those lines, often called "breast lines," mainly control side-to-side motion. They do very little to stop a boat from lurching forward or backward in its slip. That kind of movement is what causes nasty damage to transoms, swim platforms, and bow pulpits.
This is exactly where boat spring lines come into play. They are the critical, and often overlooked, piece of a truly secure tie-up. By running lines from the boat at an angle to the dock, you create opposing forces that effectively lock your vessel in place.
Why Standard Lines Fall Short
Picture your boat tied up with only bow and stern lines. A strong gust from behind or a big wake from a passing boat can easily make it surge forward, straining your lines and potentially slamming your bow into the dock. In tidal areas, things get even worse as changing water levels can make those lines dangerously tight or way too slack.
Spring lines solve this with simple physics.
By running a line from your bow cleat aft to a dock cleat, you prevent forward motion. By running a line from your stern cleat forward, you prevent backward motion. Together, they create a stable "V" of tension that holds the boat steady.
The Foundation of Docking Confidence
Learning how to properly use spring lines is a fundamental skill that separates novice boaters from seasoned skippers. It's not just about preventing damage—it’s about control and safety. A boat that's properly snugged up with spring lines is far safer to board and disembark from, and it puts a whole lot less strain on your boat's cleats and the dock hardware.
This isn't some new trick. Using spring lines has been a cornerstone of safe docking since the early 20th century. In the United States, which holds a 35.8% share of the global boat market, good spring line technique can reduce wear on cleats and hulls by up to 70% during tidal changes. With the recreational boat market valued at USD 29.19 billion, it’s no surprise that U.S. Coast Guard data shows properly tensioned spring lines can cut docking accidents by a whopping 45%.
Whether you're running your own boat or hopping on private Kona boat charters, knowing how to tie up right ensures a smooth experience for everyone. Of course, boat lines are only half the battle. You also need to protect your hull, and you can learn more in our guide on all about dock bumpers and fenders. Using quality boat fenders and dock lines is essential for a truly secure setup.
Choosing the Right Gear for Your Spring Lines
Picking the right gear for your spring lines isn't about grabbing the most expensive rope you can find. It's about matching the material, diameter, and length to your specific boat and the places you dock. Get these fundamentals right, and you’ll have a setup that gives you real peace of mind, whether you're tied up for an afternoon lunch or for the whole season.
Your spring lines are just too important for guesswork. The wrong choice can lead to snapped lines, damaged cleats, or worse. Let's break down what you actually need.
The Gold Standard Material: Double-Braided Nylon
When you're talking mooring and docking, double-braided nylon is the undisputed champion. There's a reason for it—it has the perfect blend of strength, stretch, and durability that other materials just can't touch.
Sure, polypropylene is cheap and it floats, but it gets eaten alive by the sun and has almost no elasticity. Other fancy ropes might be stronger on paper, but they don't have the "give" you need to absorb shock loads.
Here’s why double-braided nylon wins out for spring lines:
- Strength: It has incredible tensile strength, more than enough to handle the massive loads from wind and current.
- Stretch (Elasticity): This is the magic ingredient. Nylon can stretch up to 40% of its length before it even thinks about breaking. That elasticity is what soaks up the shock from a passing wake or a big gust of wind, protecting your boat's cleats and hardware from damaging jolts.
- Durability: The double-braid construction acts like armor, protecting the inner core from abrasion and UV rays. This gives it a much longer life than a basic three-strand rope.
With the recreational boating market hitting USD 39.7 billion and growing, especially in mid-sized powerboats (26-35 feet), quality gear is more important than ever. Products like Better Boat's Double Braided Nylon Dock Lines are built for this reality. They have breaking strengths over 12,000 pounds and enough elasticity to handle 30-knot winds without snapping. The need for this kind of reliable equipment is a big reason the mooring dock market continues to grow.
Determining the Right Diameter and Length
Once you've settled on double-braided nylon, you need to pick the right diameter and length for your boat. These aren't random numbers; they're directly tied to your boat's size and weight.
A line that's too thin simply won't have the strength you need. On the other hand, one that's too thick is a pain to handle and might not even fit on your cleats properly.
A solid rule of thumb is to use 1/8 inch of line diameter for every 9 feet of boat length.
For example, if you have a 36-foot boat, you'd want 1/2-inch lines (36 feet / 9 = 4, so 4/8 inch, which is 1/2 inch). A 45-foot boat? You'd be looking at 5/8-inch lines.
Here's a quick reference to make it even easier:
Recommended Spring Line Diameter by Boat Length
This table serves as a quick reference guide to help boaters select the appropriate line thickness based on their vessel's size, ensuring maximum safety and performance.
| Boat Length (Feet) | Recommended Line Diameter (Inches) | Minimum Breaking Strength (Approx. Lbs) |
|---|---|---|
| Up to 27' | 3/8" | 4,000 lbs |
| 28' - 35' | 1/2" | 6,000 lbs |
| 36' - 45' | 5/8" | 10,000 lbs |
| 46' - 55' | 3/4" | 14,000 lbs |
| 56' - 65' | 7/8" | 20,000 lbs |
Choosing the right diameter is crucial for safety, so don't be tempted to downsize to save a few dollars.
When it comes to length, your spring lines need to be versatile. A great formula is to make your spring lines roughly equal to your boat's length. This gives you plenty of scope for all sorts of docking situations, whether you're alongside a long pier or trying to secure your boat in a tight slip with cleats in all the wrong places. For a deeper dive, check out our complete guide to choosing the right dock lines for your boat.
Why Pre-Spliced Eyes Are a Game-Changer
You can absolutely tie a bowline to make a loop in your line, but a professionally spliced eye is in a different league for both strength and convenience.
Here’s the deal: a knot, even a good one, can weaken a rope by as much as 50%. A proper splice, however, retains 90-95% of the rope's original strength. That's a massive difference when your boat is on the line.
Better Boat’s lines come with a pre-spliced, 12-inch eye, which makes docking so much faster and more secure. You just loop the eye over a cleat on your boat or the dock, and you're done in seconds. It completely removes the guesswork and fumbling with knots, especially when you're docking single-handed or the weather is kicking up. This ready-to-use feature is a huge plus.
Practical Setups for Rigging Your Spring Lines
Alright, let's move from the theory to the dock. Rigging your spring lines isn't just tying a few ropes; it's about using simple physics to keep thousands of pounds of boat exactly where you want it. When you get this right, you look like a seasoned pro, even when the wind and current are trying to make you look foolish.
We're going to walk through the four essential setups every boater needs to know. They aren't complex, but each one has a very specific job. Once you master them, you'll be able to handle just about any docking situation with confidence.
Understanding the Four Key Configurations
Your boat has four main attachment points—cleats at the bow and stern. You'll use these in different combinations with the dock cleats to stop your boat from moving around. The names might sound a bit technical at first, but they're actually pretty straightforward. They just describe where the line starts on the boat and which way it runs.
- After Bow Spring: Runs from a bow cleat aft (backwards) to a dock cleat. Its job is to stop your boat from surging forward.
- Forward Bow Spring: Runs from a bow cleat forward to a dock cleat. This one keeps the boat from sliding backward.
- Forward Quarter Spring: Runs from a stern (or "quarter") cleat forward to a dock cleat. This also stops the boat from moving backward.
- After Quarter Spring: Runs from a stern cleat aft to a dock cleat. This line prevents the boat from moving forward.
You probably noticed a pattern: two lines stop forward motion, and two stop backward motion. The trick is using one of each in combination to create a balanced, locked-in setup.
The After Bow Spring: Your Forward Motion Stopper
Let's start with the workhorse of the group: the after bow spring. Picture yourself pulling into a slip. The last thing you want is a gust from behind pushing your bow into the pier. This line is your first line of defense.
To set it up, you run a line from a bow cleat back to a dock cleat that's roughly amidships. When your boat tries to lurch forward, this line instantly goes taut and stops it cold. Think of it as the parking brake for your boat.
The Forward Quarter Spring: Your Stern's Guardian
On the other end of the boat, you need a line doing the exact opposite. The forward quarter spring runs from one of your stern cleats forward to a dock cleat, again, usually somewhere amidships.
Its whole purpose is to keep your boat from sliding backward out of the slip or banging into a piling behind you. When you rig this one correctly, it works in perfect opposition to the after bow spring. Together, they create a powerful "X" of forces that holds your boat steady against both surge and sway.
A classic and incredibly effective setup is using an after bow spring on one side of the boat and a forward quarter spring on the other. This diagonal tension doesn't just control fore-and-aft movement; it also helps pull the boat snugly against your fenders and the dock.
The Other Two Springs and When to Use Them
What about the forward bow spring and the after quarter spring? You'll use them less often, but they're lifesavers in certain situations. Say you're docking somewhere with awkwardly placed cleats. A forward bow spring might give you a much better angle to prevent backward drift than a line run all the way from the stern.
Likewise, an after quarter spring can be the perfect solution if the only available dock cleat is way behind your boat. The key is to look at the dock, look at your boat, and pick the spring line that gives you the best angle to counteract any potential movement.
This simple diagram breaks down the main decisions you'll be making.

As you can see, it all starts with picking the right material, then sizing the diameter and length for your specific boat.

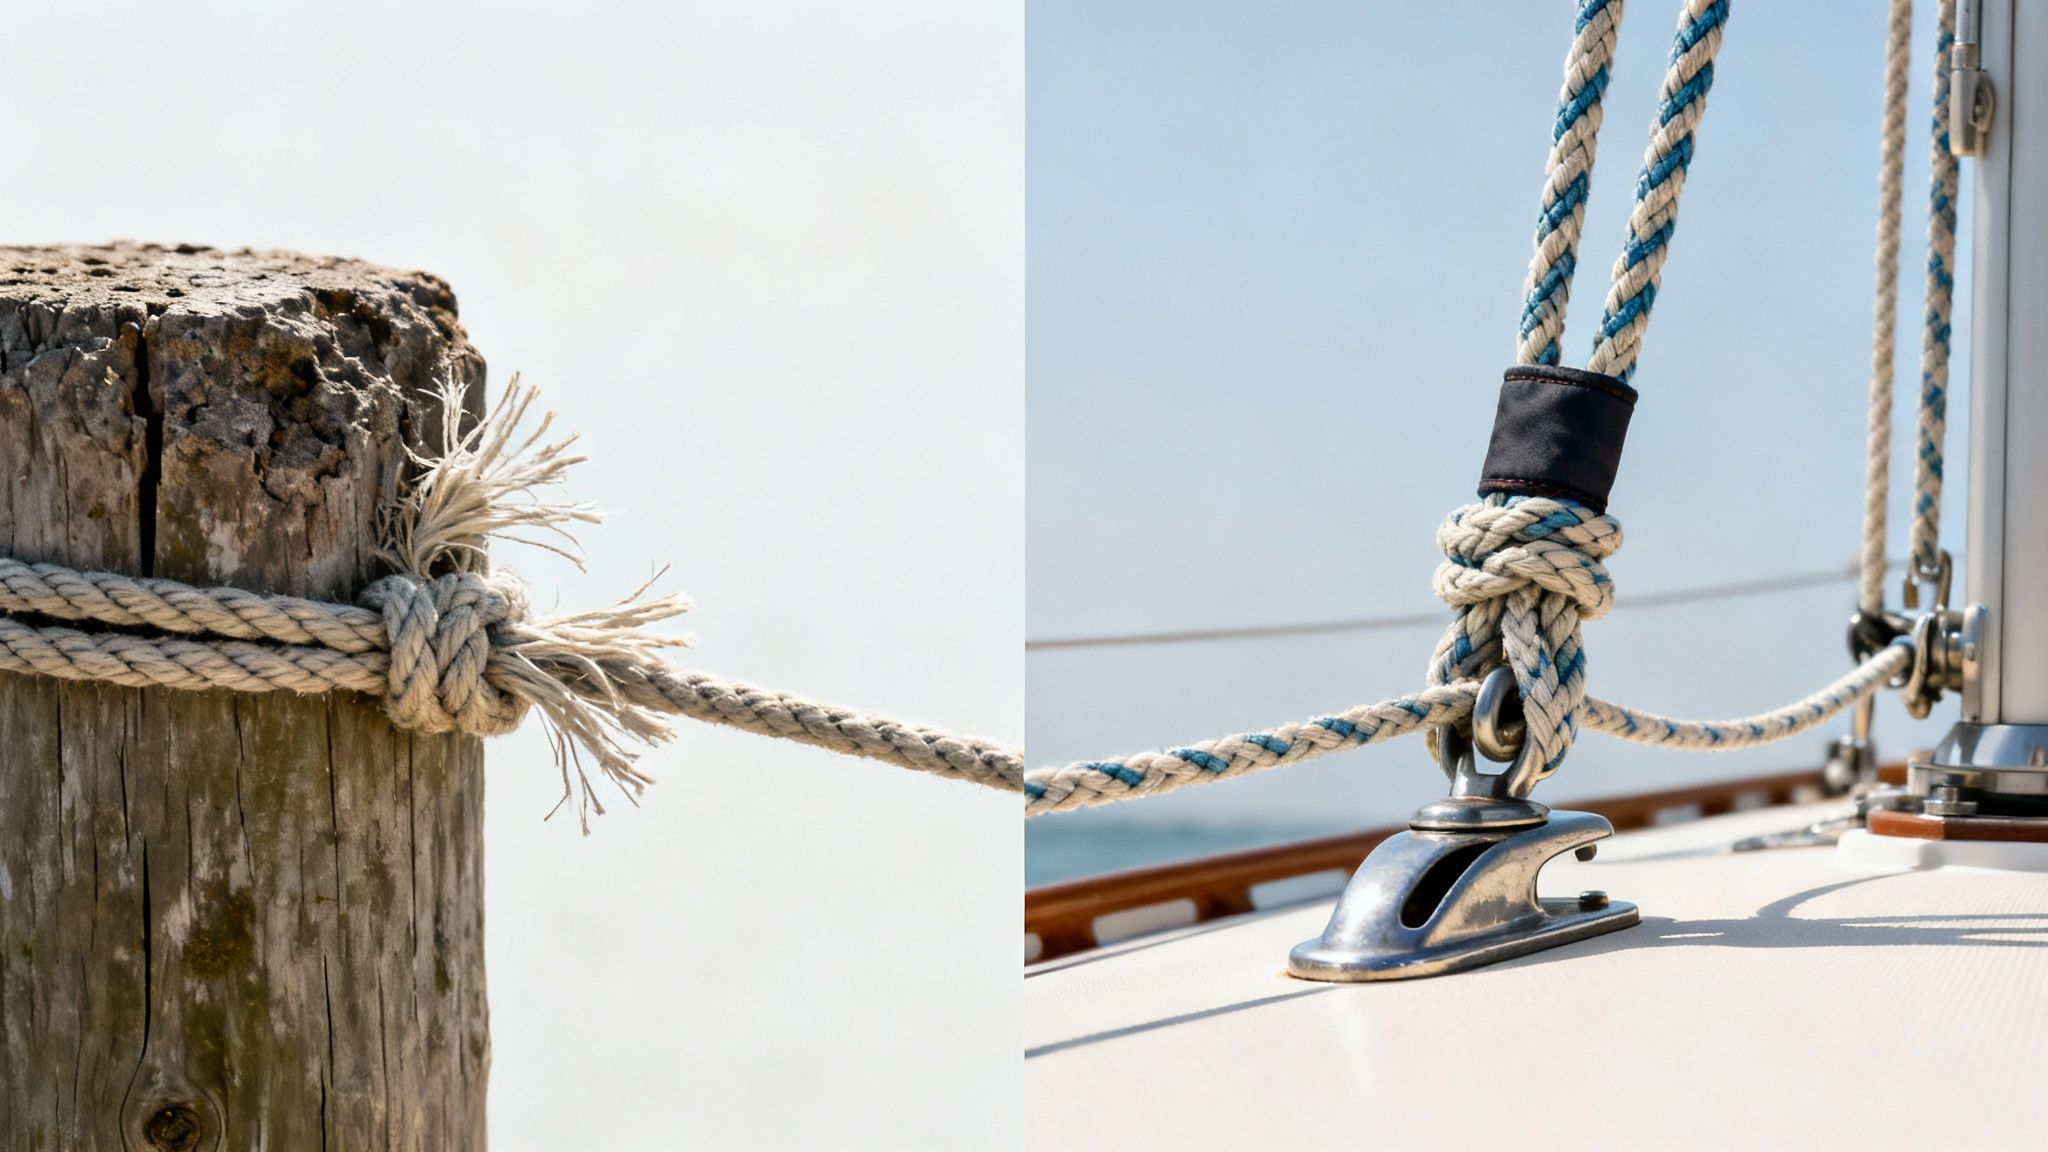
Mastering the Essential Knot: The Cleat Hitch
You can have the best lines money can buy, but they're totally useless if you can't secure them properly. You don't need a whole repertoire of fancy knots, but you absolutely must master one: the cleat hitch. It is, without a doubt, the most important knot in docking.
Why is it so great?
- It’s Strong: Tied correctly, it will not slip, period.
- It’s Fast: You can tie one in seconds, which is crucial when you're wrestling the boat in a stiff breeze.
- It’s Easy to Release: Even after taking a massive strain, a proper cleat hitch won't jam, so you can undo it quickly.
Here's the drill: Take one full wrap around the base of the cleat, then start making a figure-eight over the horns. After one or two of those, you finish it with a half hitch on one horn so the loose end of the line points away from the cleat's base. That final locking turn is what makes it secure. Practice this until you can do it with your eyes closed.
For a deep dive into line sizes, our dock line size chart has clear recommendations based on your boat's length.
Advanced Techniques for Tricky Docking Situations
Once you get the basics down, you'll start encountering the situations that can rattle even seasoned boaters. Wind, current, tight quarters, and tidal swings all throw variables into the mix that a standard tie-up just can't handle. Mastering these advanced moves is where you really start to build confidence at the helm.
These aren't just fancy maneuvers; they are practical, problem-solving skills for the real world. When the conditions get tough, having the right strategy—and gear you can count on—is the difference between a smooth landing and a stressful, potentially expensive one.
Pivoting into a Tight Slip with a Crosswind
One of the most common headaches is docking in a stiff crosswind that’s determined to push your bow or stern right off the dock. If you try to fight it with the engine, you’ll likely overcorrect and make a mess of your approach. There’s a better way: use a single spring line to elegantly pivot your boat right into place.
Here’s the game plan:
- Approach Upwind: Come up alongside the end of the pier, just upwind of your slip.
- Set One Spring Line: Get a crew member (or do it yourself if you’re single-handing) to drop an after bow spring line onto a dock cleat near the slip’s entrance.
- Let the Wind Do the Work: Pop the engine in neutral or just barely in forward gear. The wind will catch your stern and start pushing it away from the dock. Because that spring line is fixed, it acts like a hinge, and your bow will swing beautifully right into the slip.
- Finish the Job: Once your stern is lined up, you can ease the boat forward into the slip and get your other lines secured.
This technique turns the wind from an enemy into an ally, giving you incredible control when you need it most. It's a total game-changer that shows you truly understand how your boat handles.
Handling Significant Tidal Changes
If you boat in coastal areas, you know that tidal swings of several feet can wreak havoc on a standard docking setup. The lines you perfectly tensioned at high tide can become banjo-string tight at low tide, putting a terrifying amount of strain on your cleats and dock hardware. On the flip side, lines set at low tide will go dangerously slack at high tide, letting your boat slam around.
The key is to use longer spring lines set at much shallower angles.
By running your spring lines to cleats farther away on the dock, you create a longer, shallower scope. This drastically minimizes the change in tension as the boat rises and falls, allowing it to move vertically without putting all that stress on your gear.
It's the same principle as an anchor rode—more scope equals less dramatic angle changes. This is a non-negotiable adjustment for anyone leaving a boat unattended in a tidal area.
The Doubled-Up Slip Line for Easy Departures
Docking single-handed is one thing, but getting away from the dock by yourself can be even trickier. The doubled-up slip line is a brilliant method that lets you have a stress-free departure without ever leaving the helm to untie a line from the dock.
Here's how you set it up:
- Take the bitter end of your spring line from your boat's cleat, run it around a piling or cleat on the dock, and then bring it right back to that same cleat on your boat.
- Secure both the eye of the line and the bitter end to your boat's cleat. You've just created a "slip" line that you can release entirely from onboard.
- When you’re ready to cast off, just uncleat the bitter end from your boat and pull. The whole line will slide through the dock cleat and come right back to you.
This move keeps you in complete control until the last possible second. It's especially handy for casting off a stern line when the wind is trying to blow your bow into the pier.
Getting a firm grasp of these more nuanced techniques is part of a broader skill set, and you can explore more in our complete guide on how to dock a boat properly. Having reliable gear like Better Boat's fender lines and dock bumpers is also crucial, ensuring your fenders stay exactly where they need to be while you focus on handling the lines.
Common Spring Line Mistakes and How to Avoid Them
Getting your spring lines right is just half the battle. Honestly, some of the biggest lessons in boating come from learning what not to do, and docking is no exception. A handful of simple, repeated errors are behind most docking mishaps and gear failures I see at the marina.
Learning from others' mistakes is a lot cheaper and less stressful than making them all yourself. Let's walk through the most common blunders so you can sidestep them completely.
Ignoring the Silent Killer: Chafe
Chafe is that constant, sneaky friction that slowly saws its way through a perfectly good rope. It's the line rubbing against a rough piling, a sharp spot on a cleat, or even another line. Ignoring it is one of the most dangerous—and expensive—mistakes you can make.
A chafed line can snap without warning right when it's under the heaviest load, like in the middle of a nasty squall. That's a scenario no one wants to face.
The fix is easy: be vigilant. Every single time you dock, do a quick walk-around. Run your hands along your lines and feel for any fuzzy, worn sections. Look at every point where the line touches the dock or your boat. If you spot a potential chafe point, deal with it right then and there.
Sometimes, just repositioning the line gives it a cleaner, smoother run. For those stubborn spots that can't be avoided, specialized gear is your best friend. A dedicated chafe guard is the smartest preventative measure. These tough sleeves wrap around your dock line, creating a sacrificial barrier that takes the abuse so your rope doesn't have to.
The Banjo-Tight Tension Trap
There's a persistent myth, especially among newer boaters, that tighter lines equal a more secure boat. In reality, cranking your spring lines down until they're as taut as a banjo string is asking for trouble. A "banjo-tight" line has zero give, leaving no room for your boat to move with wakes, surges, or tidal shifts.
All that force has to go somewhere. Instead of the line's natural stretch absorbing the shock, it gets transferred directly to your boat's cleats and the dock's hardware. This massive, constant strain can cause gelcoat cracks around your cleats, bend stanchions, or even rip a cleat clean out of the fiberglass.
A good rule of thumb is to aim for "snug, not stretched." A properly set spring line should have just a little bit of give when you push on it. This lets the line do its job of absorbing shock loads, which protects your boat from damaging stress.
Using Lines That Are Too Short
I see this one all the time—using a line that's barely long enough to make it from the boat to the dock cleat. Short lines create steep, inefficient angles that seriously reduce their holding power. Worse, they put a ton of strain on your hardware, especially in places with significant tides. As the water level rises or falls, a short line tightens and slackens dramatically.
As we covered earlier, a great starting point for spring line length is roughly your boat's overall length. This gives you plenty of slack to work with, allowing you to run lines at shallow, effective angles and reach cleats that aren't perfectly positioned. Having extra length is never a problem; not having enough can make a secure tie-up impossible.
Choosing the Wrong Rope Material
Not all rope is created equal, and grabbing the wrong type for a spring line is a serious gamble. Some folks get tempted by high-tech, low-stretch lines like Dyneema or Spectra, thinking that higher tensile strength must be better. For docking, that's a critical error.
Lines like these have almost no elasticity. Every little shock from a passing boat's wake or a gust of wind is transferred directly and jarringly to your cleats. The perfect spring line needs some stretch to act as a shock absorber.
This is exactly why double-braided nylon remains the gold standard for docking. Its inherent stretch is a key feature, not a flaw. Sticking with the right material is a simple choice that prevents a world of expensive, stress-inducing problems.
Your Spring Line Questions, Answered
Even with the basics down, you’ll inevitably have questions when you’re standing on the dock, line in hand. Let's tackle some of the most common ones I hear from fellow boaters. Think of this as your quick-reference guide for those practical, on-the-water moments.
How Many Spring Lines Do I Really Need?
For most boats in calm, everyday conditions, two spring lines are your go-to setup. It's the standard for a reason: it works incredibly well. You'll run one line from a bow cleat back to the dock (an after bow spring) and another from a stern cleat forward on the dock (a forward quarter spring). This creates a solid "X" pattern that locks your boat in place, stopping it from surging forward or backward.
Now, if you're dealing with a nasty current, big tidal swings, or you're tying up for a longer stay, adding two more lines is cheap insurance. Using two springs from the bow and two from the stern—a total of four—gives you rock-solid stability and spreads the load across your boat's hardware. It’s a smart move in challenging conditions.
Can I Just Use My Regular Dock Lines?
Yes, you absolutely can—and you should. A "spring line" isn't some special, exotic type of rope. The name just describes what the line is doing. Your standard, high-quality dock lines are precisely what you need for the job.
What really matters is that the line has the right stuff: serious strength and just enough stretch to absorb shocks from wind and wakes. This is why double-braided nylon dock lines are the gold standard for all mooring, including spring lines. They have that crucial bit of give that protects your cleats and deck hardware from jarring forces.
Here's the key takeaway: The rope's name changes with its job. The same line can be a bow line one minute and a spring line the next. It’s all about how you rig it to control the boat.
How Should I Take Care of My Lines?
Good lines aren't cheap, but if you treat them right, they'll last for years. The biggest culprits that destroy ropes are salt, grit, and the sun's UV rays. A little routine maintenance goes a long way.
- Rinse Them Off: After every use in saltwater, give your lines a good rinse with fresh water. This gets rid of the abrasive salt crystals and grime that wear down the fibers.
- Let Them Dry: Never stow a wet line. Let them air-dry completely to stop mold and mildew from setting in and weakening the rope from the inside out.
- Store Them Smart: Coil your lines and keep them in a dry locker or dock box, out of direct sunlight. UV radiation is a silent killer for nylon.
- Give Them a Quick Check: Before you use a line, run your hand along its length. Feel for any chafe, frayed spots, or stiff sections. Stiffness is often a sign of internal wear, meaning it's time for a replacement.
A few minutes of care will ensure your lines are ready to perform when you need them most.
What's the Difference Between a "Forward" and an "After" Spring?
This is just boater-speak to quickly describe which way the line is running. It makes it easy to tell a crew member exactly which line you're talking about without any confusion.
A "forward spring" is any spring line that runs forward from your boat to the dock. The most common example is the forward quarter spring, which goes from a stern cleat forward to a dock cleat. Its job is to keep the boat from moving backward.
An "after spring" (often called an aft spring) is any line that runs aft (or backward) from your boat to the dock. The classic after bow spring runs from a bow cleat backward to a dock cleat, preventing the boat from moving forward.
When you use one of each, you create that perfect, balanced setup that keeps your boat snug and secure.
At Better Boat, we know that confidence on the water starts with reliable equipment. Our premium double-braided nylon dock lines are designed with the ideal balance of strength and elasticity to keep your vessel secure in any condition. Equip your boat with the gear trusted by over a million boaters by exploring our full range of docking and anchoring solutions at https://www.betterboat.com.


