


How to Winterize a Boat Motor Like a Pro
When it comes time to put your boat away for the season, a proper motor winterization isn't just another item on the to-do list—it's the single most important job you'll do all year. You're essentially tucking your engine in for a long winter's nap, and you want to make sure it wakes up healthy in the spring.
To get it right, you need to focus on protecting three critical systems from the ravages of cold and corrosion: the cooling system, the fuel system, and the engine's internal components. This means getting all the water out and circulating antifreeze, treating the fuel with a stabilizer, and coating the inside of the engine with fogging oil to stop rust in its tracks.
Why You Absolutely Cannot Skip Winterizing Your Motor
Before you even pick up a wrench, let's get one thing straight. Skipping this process isn't a minor shortcut. It's a high-stakes gamble with the heart of your boat, and the odds are not in your favor. It can, and often does, lead to catastrophic failure.
The most immediate and brutal threat is trapped water. It’s simple physics: water expands by about 9% when it freezes. That expansion exerts an incredible, unstoppable force—more than enough to crack a heavy cast iron engine block, split manifolds, or rupture heat exchangers. A single unexpected cold snap can turn a perfectly good motor into a very expensive paperweight.
It's More Than Just Freeze Protection
Cracked blocks are just the beginning of the horror stories. Modern fuels, especially any blend containing ethanol, can go bad over just a few months in storage. As the fuel breaks down, it leaves behind gummy, varnish-like deposits that will clog up your fuel lines, injectors, and carburetor jets. Come spring, you'll be dealing with an engine that runs rough, sputters, or flat-out refuses to start.
Then there's the silent killer: corrosion. Humidity and condensation love to form inside engine cylinders over the winter. This moisture causes rust to pit the cylinder walls and can even seize the piston rings to the cylinder itself.
Think of winterization as the smartest investment you can make for next season's peace of mind. You're not just preventing damage; you're guaranteeing a quick, trouble-free launch day when the warm weather finally returns.
Taking the time to prep your motor for winterizing properly does more than just sidestep disaster—it has a direct impact on its longevity and even your boat's resale value. In fact, industry data suggests that failing to winterize correctly increases the risk of serious engine damage by up to 25%.
Given that a huge number of boat owners do this every single year, it’s a standard of care that protects your investment. You can find more insights on the inboard engine market and maintenance trends here.
Ultimately, putting in a few hours of work now ensures your first day back on the water is filled with the sound of a smooth-running engine, not the sound of you writing a huge check to your mechanic.
Assembling Your Winterization Toolkit
Before you even think about starting the winterization process, you need to get your gear in order. Trust me, having everything you need within arm’s reach is the secret to turning a frustrating, day-long chore into a smooth, efficient afternoon project.
Think of it this way: this isn't just a shopping list; it's your game plan to avoid that dreaded mid-project run to the marine supply store when you're covered in grease.
The absolute superstar of this toolkit is your marine antifreeze. But not just any antifreeze will do. It is critical that you use a non-toxic, propylene glycol-based product specifically for boats and RVs. Never, ever use standard automotive antifreeze. That stuff contains ethylene glycol, which is incredibly toxic to aquatic life and illegal to discharge into waterways.

Fuel, Oil, and Internal Protection
With freeze protection covered, your next mission is to safeguard the fuel system and all those internal engine components. The ethanol-blended fuels we use today can go bad surprisingly fast, leaving behind gummy deposits that will clog up your entire fuel system. A high-quality fuel stabilizer is non-negotiable.
You'll also need a few other key items to get the job done right:
- Engine Oil & Filter: Grab a marine-grade oil that meets your manufacturer's specs. You're changing it now to get rid of all the corrosive gunk and contaminants that would otherwise sit in your engine all winter long.
- Fogging Oil: This stuff is magic in a can. It's an aerosol spray that coats internal parts like cylinder walls and pistons with a protective, anti-corrosive film. This simple step prevents rust from forming inside the engine due to condensation over the winter.
- Gear Lube: If you have an outboard or sterndrive, fresh lower-unit gear lube is absolutely essential. Old lube can have water mixed in, and if that water freezes, it can easily crack the gear case—a very expensive repair. Fresh lube pushes any water out.
A rookie mistake is thinking all fluids are created equal. Using the correct marine-specific products for antifreeze, oil, and fuel stabilization is the difference between a simple spring startup and a costly, gut-wrenching call to your mechanic.
The Essential Tools of the Trade
Now that your fluids and protectants are sorted, let’s talk tools. Most of these are standard items you probably have in your garage, but a couple are specific to winterizing a boat motor.
Your basic kit should include a good socket set, wrenches, screwdrivers, and an oil filter wrench. More importantly, you'll need a way to run the engine safely out of the water.
For an outboard or sterndrive, that means a motor flusher—often called "ear muffs"—that clamps over the water intakes and connects to a garden hose. If you have an inboard engine, you'll likely need a "fake-a-lake" system or a simple large bucket and hose setup to circulate the antifreeze through the block.
And of course, don't forget the simple stuff: plenty of funnels, shop rags, and a proper container to catch all that used oil.
To make things easier, here's a quick checklist of the supplies we've covered.
Winterization Supply Checklist
This table breaks down the must-have supplies, what they do, and which type of engine they're typically for.
| Supply Item | Primary Function | Engine Type (Inboard/Outboard/Both) |
|---|---|---|
| Marine Antifreeze | Prevents water in the engine block from freezing and cracking components. | Both |
| Fuel Stabilizer | Prevents fuel degradation and keeps the fuel system clean over winter. | Both |
| Engine Oil & Filter | Replaces old, contaminated oil to prevent internal corrosion during storage. | Both |
| Fogging Oil | Coats internal engine parts to protect against rust from condensation. | Both |
| Gear Lube | Protects lower unit gears from water intrusion and freeze damage. | Outboard/Sterndrive |
| Motor Flusher ("Muffs") | Allows running the engine out of water for flushing and winterizing. | Outboard/Sterndrive |
| "Fake-a-Lake" Kit | Allows running an inboard engine out of water for flushing and winterizing. | Inboard |
| Basic Hand Tools | For removing drain plugs, changing filters, and general tasks. | Both |
Having these items ready to go will ensure your winterization process is as painless as possible.
A Practical Guide to Winterizing Outboard Motors
Outboards might seem simpler than their inboard cousins, but they have their own specific needs when it's time for winter layup. Getting it right means protecting the fuel system from going bad, flushing out corrosive salt and grime, keeping the lower unit safe from freeze damage, and stopping rust from forming inside the engine.
Let's walk through exactly how to tackle each of these key areas.
First things first: the fuel. The ethanol-blended gasoline we use today can start breaking down in as little as a month. When it does, it leaves behind a sticky varnish and gum that's notorious for clogging up carburetors and injectors. To head this off, add a quality fuel stabilizer to your tank—make sure it's nearly full—and follow the ratio on the bottle.
Once the stabilizer is in, you have to get that treated fuel running through the entire system. This is a critical step. It ensures every last fuel line, filter, and injector gets a protective coating for the long winter ahead.
Flushing, Fogging, and Fluid Changes
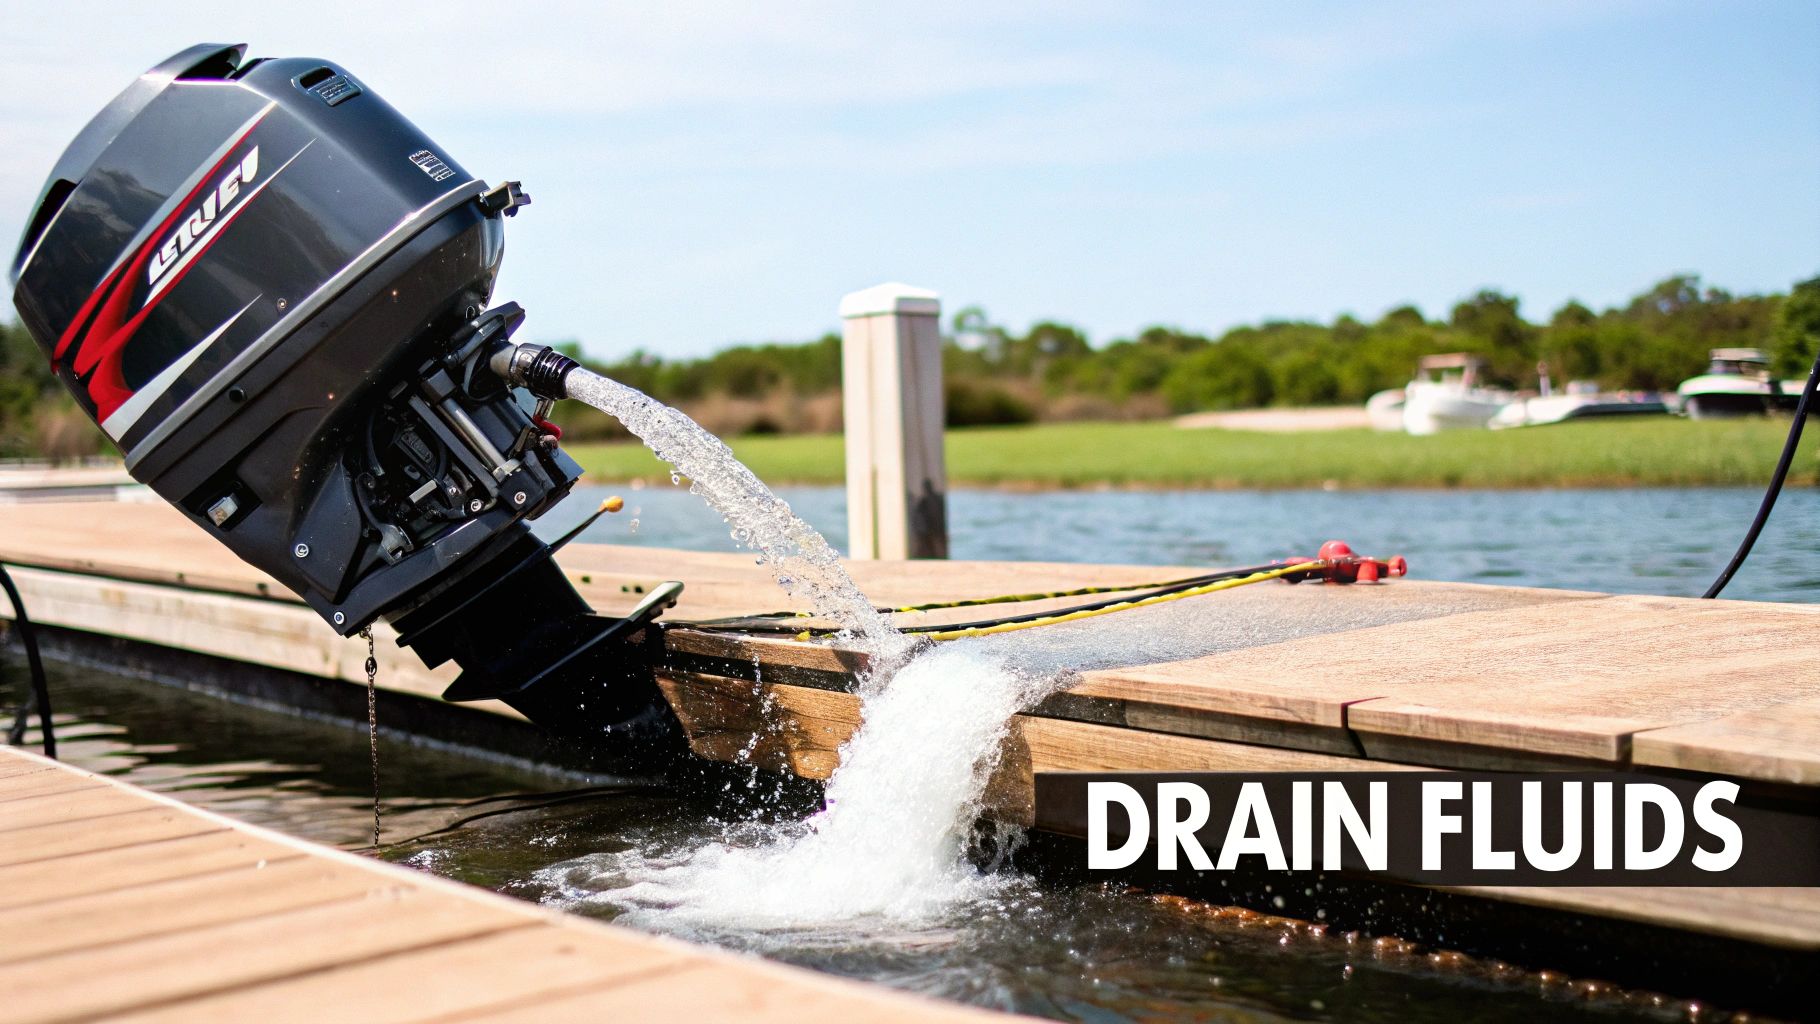
With the fuel treated, it's time to give the cooling system a thorough flush. This isn't optional, especially if you spend any time in saltwater or even brackish water. Salt residue is incredibly corrosive and will eat away at your engine from the inside out.
Grab a motor flusher—most people call them "ear muffs"—and attach it to the water intakes on the lower unit. Hook up a garden hose, turn the water on full blast, and then start the engine. Let it run at a low, easy idle for about five to ten minutes. This not only flushes out all the salt, sand, and muck but also circulates the stabilized fuel you just added.
For a deeper dive, we have a complete guide on how to flush a boat engine that covers all the details.
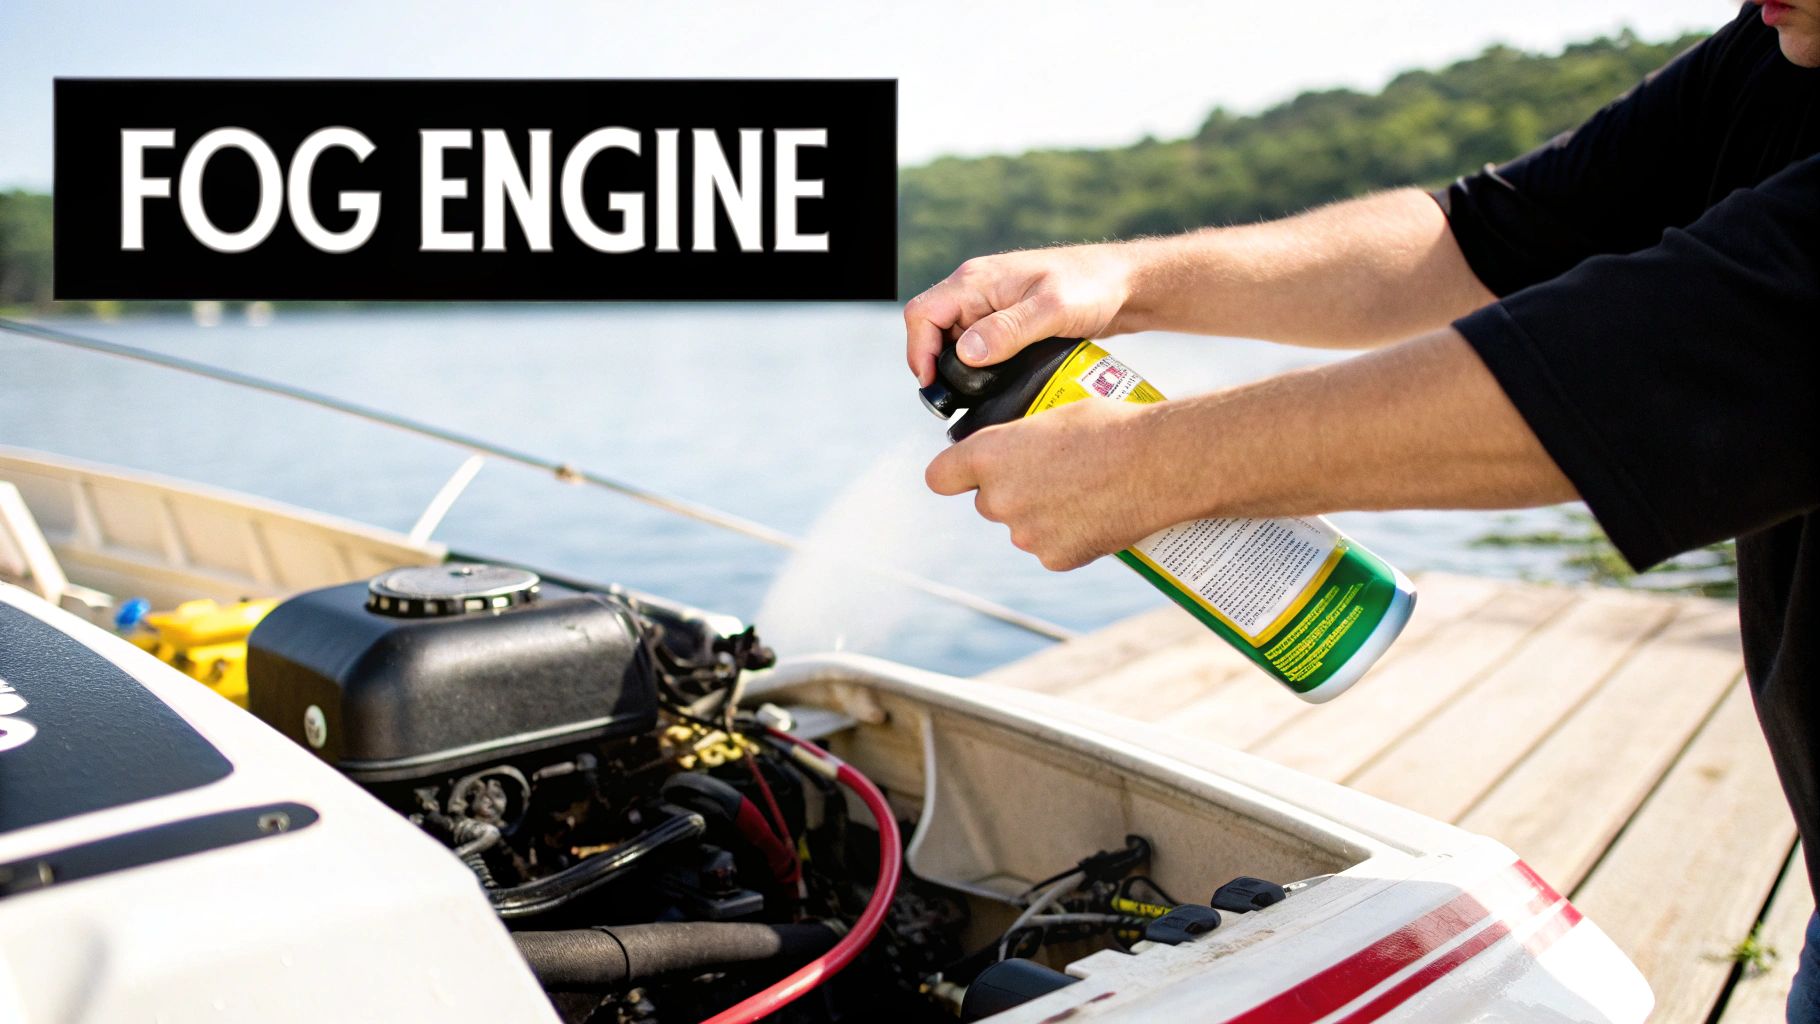
Next up, while the engine is still running on the flusher, it's time to "fog" it. This process coats all the internal engine parts with a protective layer of oil, which is your best defense against rust and corrosion caused by winter humidity.
Take the engine cover off. You'll spray fogging oil directly into the air intake of each carburetor. Keep spraying until the engine starts putting out heavy white smoke and begins to sputter. Just before it dies, give it one final, healthy spray and then turn the key off.
That fogging process is your engine's best friend against internal corrosion. When you see that thick white smoke, that's a good thing! It means the protective oil has made its way through the cylinders and crankcase.
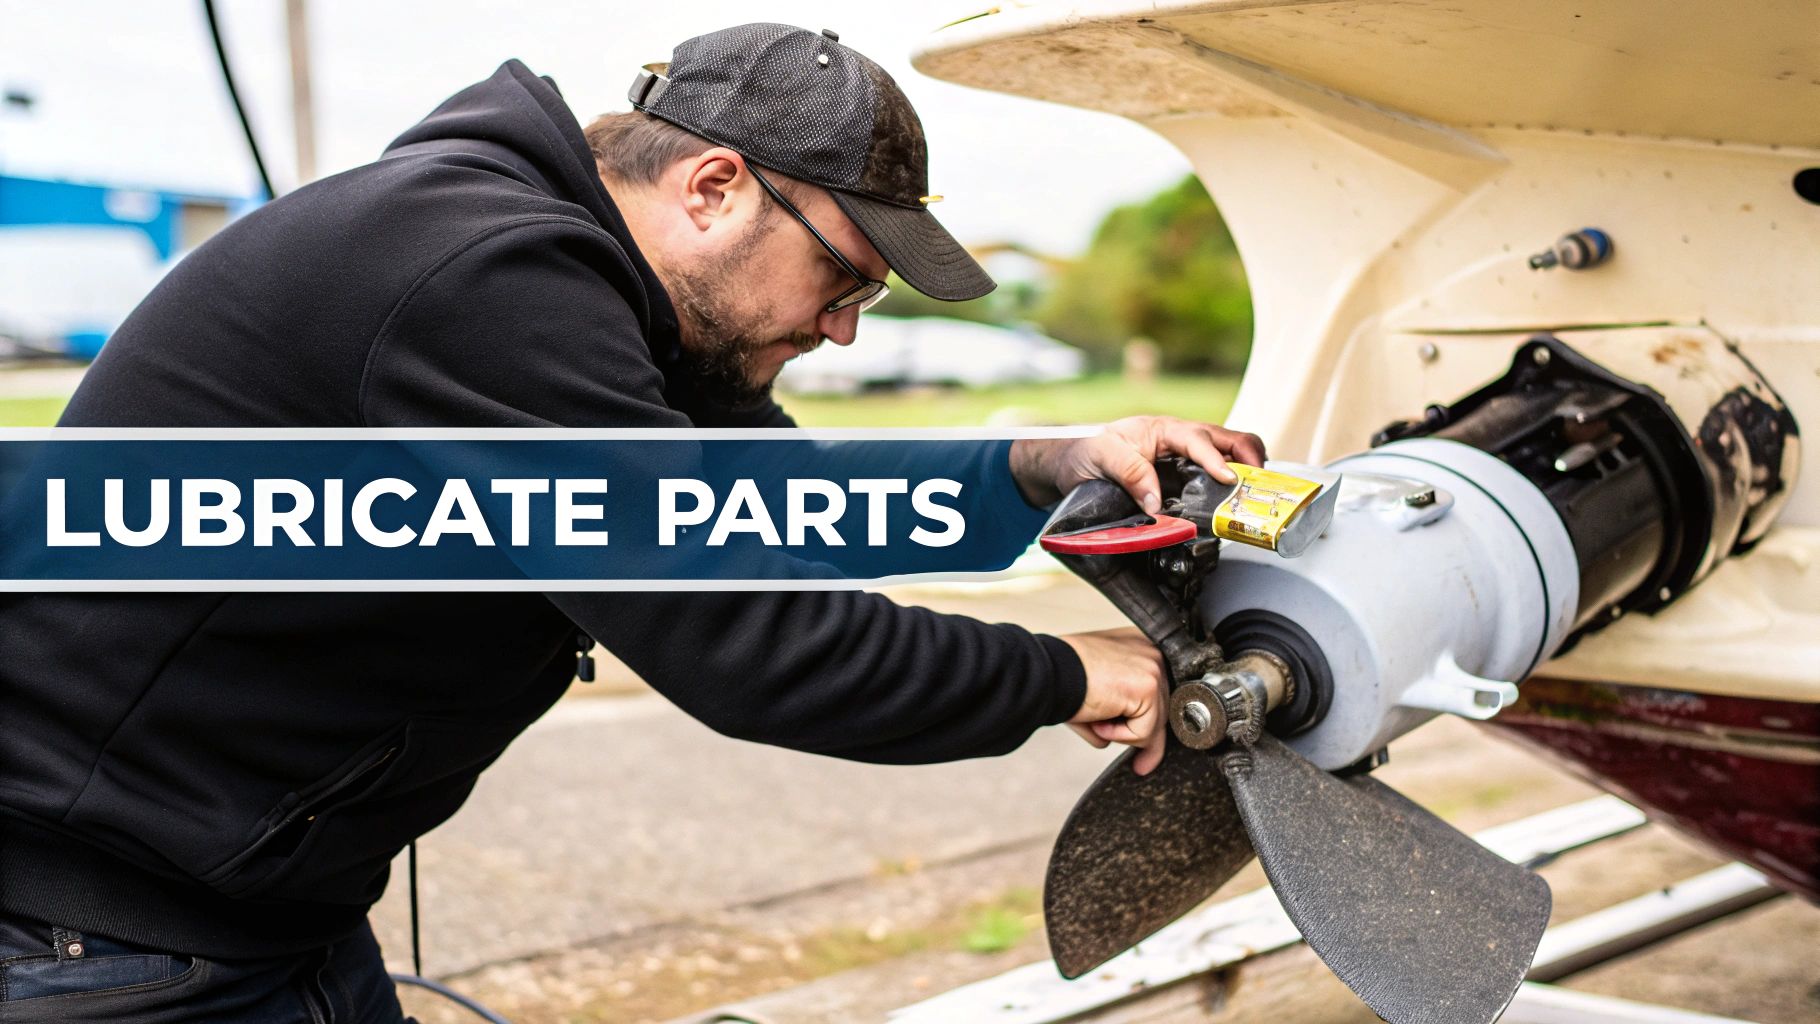
One last task that often gets overlooked is changing the lower unit gear lube. This is a big one. Start by loosening the bottom drain screw, then the top vent screw. Have a drain pan ready and let all the old lube drain out completely. If it looks milky, that means water got in. Any water left in there can freeze, expand, and crack the gearcase—a catastrophic and wallet-crushing failure.
Once it's empty, pump fresh marine-grade gear lube into the bottom hole until you see it start to seep out of the top vent hole. That's your cue that it's full. Quickly put the screws back in, and you're done.
The boating industry is clear that proper winterization has a massive impact on an engine's lifespan and reliability. In fact, following these specific procedures can reduce engine repair costs by up to 40%. It’s easily one of the best returns on investment you can make as a boat owner.
This image breaks down the key ratios and timing for your fuel and oil tasks.
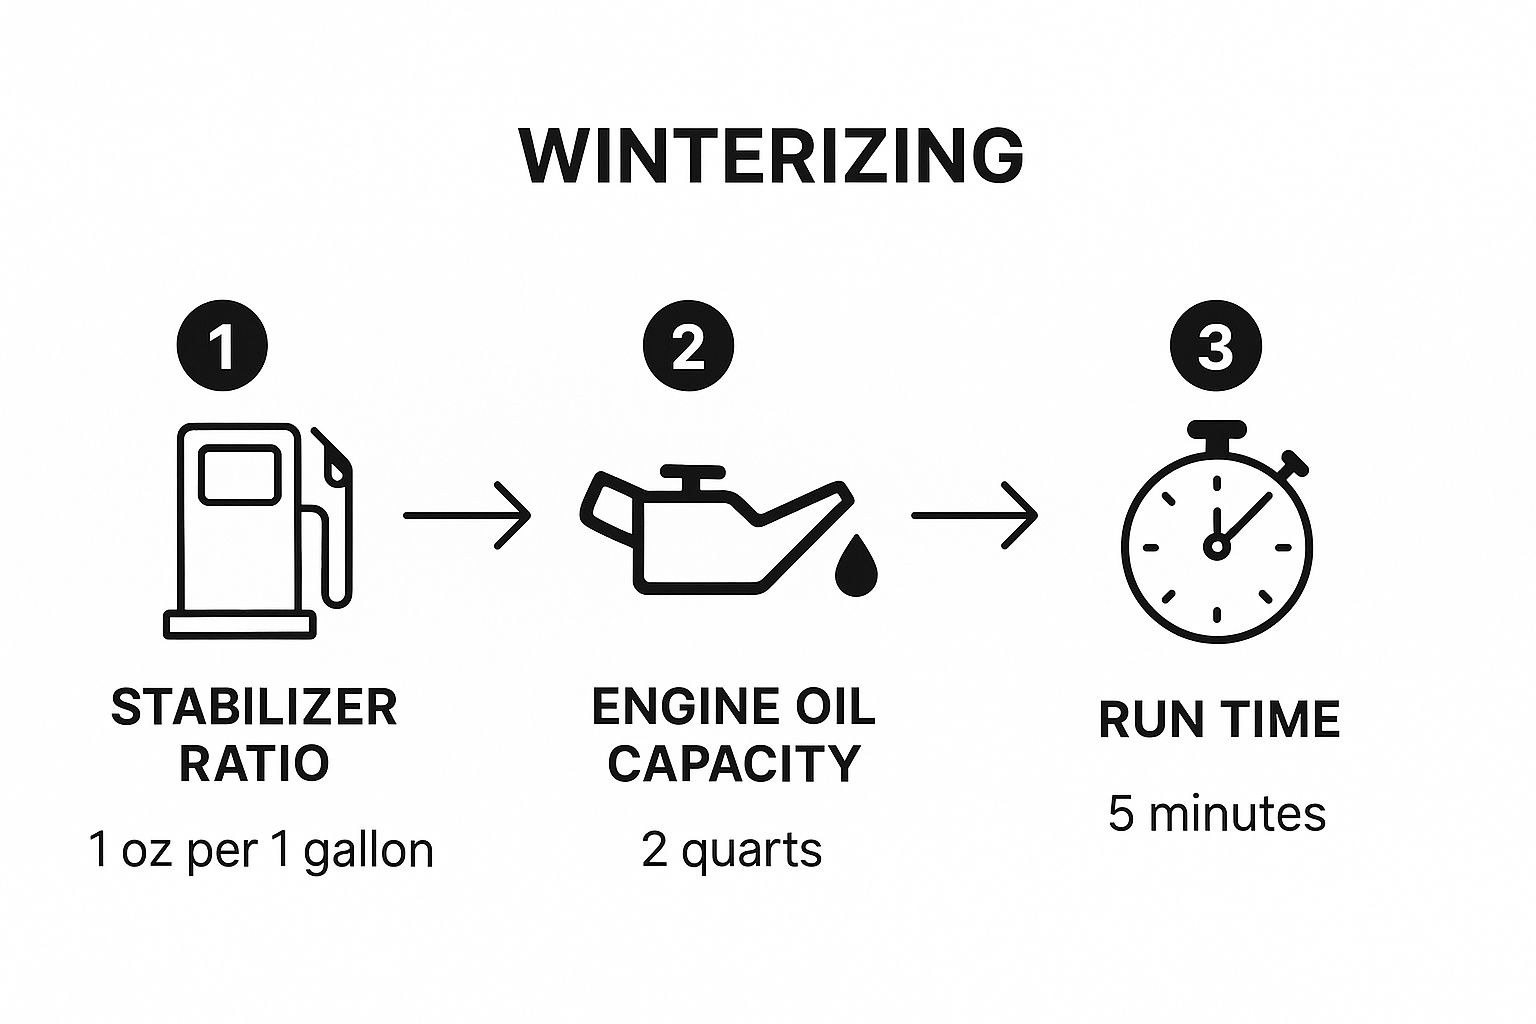
As you can see, it doesn't take much. A small amount of stabilizer and a short engine run is all you need to protect your fuel system for months on end.
Mastering Inboard and Sterndrive Winterization
Unlike their outboard cousins, inboard and sterndrive engines require a much more thorough winterization. Their complex raw-water cooling systems are full of low spots where water can pool and hide. If you miss a single spot, you're looking at a cracked engine block—a catastrophic and wallet-crushing failure.
This guide will walk you through the essential steps to get this job done right. We'll cover draining, flushing, and protecting every part of your engine so it weathers the winter perfectly and is ready to roar next season.
The Draining Ritual
The single most critical step is getting every last drop of water out. That means draining the engine block, manifolds, and all the hoses connected to them. Your owner's manual is your absolute best friend here, as the number and location of drain plugs vary wildly between manufacturers like Mercruiser, Volvo Penta, and Crusader.
Generally, you'll be looking for plugs on:
- The sides of the engine block (they're often blue, brass, or black plastic).
- The bottom of the exhaust manifolds.
- The main water circulation pump housing.
Once you find them, open them all up and let the water pour out. I always keep a thin piece of wire handy to poke into the drain holes. It's amazing how often a small bit of rust or sediment can create a blockage, trapping just enough water to cause serious damage. Don't skip this.
The Antifreeze Flush
Once you're sure the system is empty, it’s time to add freeze protection. Inboards and sterndrives need to be filled with non-toxic propylene glycol antifreeze. This is where a "fake-a-lake" or even a simple five-gallon bucket setup comes into play.
Hook up your system to the engine's raw water intake hose. Fire up the engine and immediately start feeding it a 50/50 mix of antifreeze and water from your bucket. Keep your eyes on the exhaust outlets. When you see that distinct pink or blue color of the antifreeze spitting out, you know it has circulated all the way through the system.
Let it run for about 30 seconds more just to be safe, then shut it down. This ensures every internal passage is coated and protected from freezing temperatures.
A common mistake I see is boaters just draining the water and calling it a day. That leaves the engine vulnerable to condensation, which can pool, freeze, and crack the block just as easily. The antifreeze flush not only prevents freezing but also adds a layer of corrosion protection for all those internal components.
Protecting Fuel and Internals
With the cooling system buttoned up, the next steps are just as crucial. While the engine is still warm from the flush, change the oil and filter. Warm oil flows better, carrying more of the nasty contaminants and corrosive byproducts out with it.
Next up is the fuel. Top off your tank to about 90-95% full to minimize air space where condensation can form. Add the correct amount of a quality fuel stabilizer, then run the engine long enough for the treated fuel to work its way through the entire system before you start the antifreeze flush. For a deeper dive, our guide on winterizing your inboard boat motor covers this in more detail.
Finally, give the engine a good fogging. Spray fogging oil directly into the carburetor or throttle body while the engine is running. When you see thick smoke coming from the exhaust, you're done—shut it down. This simple step coats your pistons and cylinder walls, stopping rust in its tracks.
This whole process became standard practice back in the 1970s as boating took off, and for good reason. Studies showed that proper winterization could extend engine life by 25%-30% by preventing off-season moisture damage. It's a small investment of time that pays off big.
Final Steps for Secure Winter Storage
You’ve handled the internals, which is a huge part of the battle. Now it’s time to shift your focus to the motor’s exterior and all the supporting pieces. These final touches are what really separate a decent winterization job from a great one, making sure your boat is truly buttoned up and ready for a smooth launch come spring.
First up, that battery. Leaving it hooked up all winter is just asking for a dead battery in a few months. Even when everything is off, a boat's electrical system has a tiny parasitic draw that will slowly but surely drain the life out of it. Go ahead and disconnect the battery terminals—always negative first, then positive—and pull it out of the boat.
Find a cool, dry place to store it, but never on a bare concrete floor. A simple wooden block or a shelf will do just fine. The absolute best practice? Hook it up to a smart trickle charger or a battery tender. These devices are brilliant; they keep the battery at a perfect charge without overcooking it, which can dramatically extend its life and guarantee you have full juice for that first turn of the key.
Exterior Protection and Final Positioning
With the battery squared away, this is the perfect time to give the motor's exterior a good cleaning. Grab some quality marine soap and wash off all the salt, grime, and any algae that’s made a home there. Once it's clean and totally dry, hit the powerhead with a light coat of corrosion-guard spray. It's an excellent shield against moisture and rust over the long winter.
While you're working around the prop, give it a really close inspection. Look for any dings, cracks, or even slightly bent blades. It might not look like much, but even minor damage can create vibrations that lead to much bigger, more expensive problems down the line. Winter is the perfect time to get a prop repaired so you're not stuck waiting when the warm weather hits.
Don't underestimate the power of a simple inspection. Catching a damaged prop or a frayed wire now saves you from a frustrating, last-minute repair that could delay your first day back on the water.
Finally, let's talk about how the motor itself will sit for the next several months. If you have an outboard or a sterndrive, you need to trim the motor all the way down into its vertical position. This is critical because it allows any and all water trapped in the cooling passages or gearcase to drain out completely. It's your last line of defense against freeze damage.
Your last piece of the puzzle is the boat cover. And I can't stress this enough: use a breathable cover, not a generic plastic tarp from the hardware store. A non-breathable tarp is a recipe for disaster. It traps moisture underneath, creating a humid greenhouse perfect for mold, mildew, and corrosion. A proper boat cover lets air circulate, keeping everything dry and protected.
To make sure you've covered all your bases, a good winterization checklist for your boat can be a lifesaver. It’s an invaluable tool for double-checking your work and ensuring you haven’t missed a single, crucial detail.
Common Questions About Winterizing Your Motor
Even after you've done it a few times, a few questions about winterizing your motor always seem to pop up. Getting straight answers is the key to doing the job right and avoiding a headache—and a huge repair bill—come spring. Let's tackle some of the most common questions we hear from boat owners.
Do I Really Need to Winterize in a Milder Climate?
Yes, you absolutely do. It's a common misconception that "winterizing" is only about preventing freeze damage. While the risk of a cracked block is lower in a place like Florida or Southern California, one unexpected cold snap is all it takes to cause thousands in damage. Temperatures just dipping into the low 30s can be enough to start the process.
But here's what many boaters miss: proper winterization is a complete storage prep process, not just freeze protection.
- Fuel Goes Bad: Today's ethanol-blended fuel can start to degrade in just a few months. When it does, it leaves behind nasty, gummy deposits that will clog up your fuel lines and injectors. A good stabilizer is your only defense against this.
- Corrosion is a Killer: Humidity is your engine's worst enemy during the off-season. Fogging the engine's internals and changing the oil coats all those critical metal surfaces, protecting them from rust.
- Old Oil is Acidic: Leaving used, contaminated oil sitting in your engine all winter is a bad idea. Those contaminants are acidic and will slowly eat away at bearings and other sensitive components.
Think of it less as a cold-weather chore and more as essential long-term storage maintenance for your investment.
Can I Use Regular Car Antifreeze in My Boat?
This one is a hard no. You should never use automotive antifreeze (the green or orange stuff) in your boat's engine. That type of antifreeze contains ethylene glycol, which is incredibly toxic to fish, pets, and any other form of aquatic life.
When you de-winterize and start your boat in the spring, any of that antifreeze left in the system gets discharged into the water. That's not just environmentally harmful, it's illegal. Always, always use a non-toxic, propylene glycol-based antifreeze that is specifically sold for marine and RV use. It's usually pink and is designed to be safe for our waterways.
What Is the Single Biggest Winterization Mistake?
The most common—and by far the most catastrophic—mistake is failing to completely drain all the water out of an inboard or sterndrive engine before adding antifreeze. It's shockingly easy to miss a single drain plug or just assume the system is empty when there's still water trapped in a low spot.
When that small amount of trapped water freezes, it expands with enough force to crack a cast iron engine block or exhaust manifold. This isn't a small repair; it's one of the most expensive and gut-wrenching failures you can face as a boat owner. Take the extra five minutes to double-check your owner's manual and physically touch every single drain point to make sure it's open and empty.
Should I Store My Boat with a Full or Empty Fuel Tank?
The consensus among just about every marine mechanic is to store your boat with a nearly full tank of fuel—around 90% to 95% full.
A full tank leaves very little room for air. This is important because it drastically reduces the space where condensation (water) can form as temperatures rise and fall over the winter. Water in your fuel is a recipe for rough starts, sputtering, and poor performance next season.
Of course, filling the tank is only step one. The crucial second step is adding the correct amount of a quality fuel stabilizer to that full tank. Then, run the engine for about 10 minutes to make sure that treated fuel gets circulated all the way through the fuel lines, filters, and injectors. This gives you complete protection from the tank all the way to the engine.
For all the premium supplies you need to protect your investment this winter, from marine antifreeze to fuel stabilizer, trust Better Boat. We make maintenance easy so you can enjoy more time on the water. Shop our full line of boating essentials today.


