


Mastering Spring Lines on a Boat A Practical Guide
Spring lines are a specific type of docking line, rigged diagonally to keep your boat from surging forward or backward along the dock. While your bow and stern lines handle the side-to-side movement, spring lines are what stop that front-to-back motion caused by wind, currents, or passing boat wakes.
Quick answer: what spring lines do
Spring lines stop a boat from moving forward or backward along the dock. A forward spring keeps the boat from drifting astern; an aft spring keeps the boat from surging ahead. Once those two diagonal lines oppose each other, bow and stern lines can control distance from the dock instead of carrying the whole load.
Fast spring-line gear match
| Need | What to choose | Better Boat path |
|---|---|---|
| Everyday spring lines for a recreational boat | Double-braid nylon dock lines with a spliced eye and enough length for a shallow angle. | Better Boat Dock Lines |
| Better control in a tight slip | Use one forward spring and one aft spring before tightening bow and stern lines. | Follow the rigging steps below. |
| Less rub while the boat is held against the dock | Set fenders before final line tension so the hull does not carry the load directly. | Pair the spring-line setup with correctly placed fenders. |
Understanding Why Spring Lines Are Essential
Ever come back to your slip and find your boat has nudged the piling in front of it? Or maybe it’s straining hard against the stern line, pulled back by an offshore breeze? That’s exactly the kind of movement spring lines are meant to prevent. They’re a non-negotiable part of securing your boat properly, adding a layer of stability that bow and stern lines just can't provide on their own.
Here's the simple way to think about it: your standard lines keep the boat from drifting away from the dock. Spring lines keep it from moving along the dock. This control is absolutely critical in just about every mooring situation you can imagine, from a quiet afternoon tied up at the fuel dock to riding out a squall overnight.
The Two Types of Spring Lines
To really lock your boat in place, you’ll want to use two opposing spring lines. Each has a specific job, and they work together perfectly, almost like a set of brakes.
-
Forward Spring Line: This line usually runs from a cleat on your boat that’s aft of the midpoint (midship) and goes forward to a cleat on the dock. Its main purpose is to stop the boat from moving backward. It holds the boat steady against a current or wind hitting the bow.
-
Aft Spring Line: You might also hear this called a "reverse spring line." It runs from a cleat on your boat that's forward of the midpoint and goes back to a cleat on the dock. This one’s job is to stop the boat from surging forward and bumping into the pier or another boat ahead of you.
When you rig both, you essentially create a secure cradle that holds your boat perfectly in its slip. The two lines pull against each other, canceling out the forces from wind and water that are always trying to push your boat around.
A well-secured boat relies on a system of lines working in harmony. Spring lines are the critical component that transforms a basic tie-up into a genuinely secure mooring, protecting your boat from damage and giving you peace of mind.
Getting this technique down is a foundational skill for any boater. To see how it all fits together, check out our complete guide on how to dock a boat properly. Understanding how spring lines integrate into the bigger picture will make you a much more confident and capable captain.
Choosing the Right Gear for Secure Docking
Having the perfect technique for rigging spring lines is only half the battle. Your setup is only as good as the gear you're using, and skimping here is a mistake I've seen too many boaters make. Selecting high-quality lines and accessories isn't just about looking professional at the dock—it's about protecting your investment from some pretty nasty (and expensive) damage.
The Best Ropes for the Job
When it comes to the lines themselves, the first big decision is the material. For just about any docking situation, double-braid nylon is the undisputed king. There's a good reason it's the industry standard. It provides a fantastic one-two punch of incredible strength and just the right amount of shock absorption.
That little bit of "give" is absolutely critical. It allows the line to stretch slightly when a big wake rolls through or the wind picks up, preventing those violent, jarring movements that put a ton of strain on your boat's cleats and deck hardware.
Nailing Down Your Dock Line Specs
Once you've settled on double-braid nylon, you need to get two key specs right: diameter and length.
-
Line Diameter: The thickness of your line needs to be matched to your boat's size and weight. A line that's too thin simply won't have the strength to hold your boat in a blow, creating a dangerous situation. On the other hand, a line that's way too thick is a pain to handle and might not even fit on your cleats properly. When in doubt, it never hurts to go one size up for an extra margin of safety.
-
Line Length: For spring lines specifically, a great rule of thumb is to use lines that are about two-thirds the length of your boat. This gives you plenty of working room for proper rigging in most slips without leaving a messy coil of trip-hazard spaghetti on the dock.
Of course, if you're looking for a reliable, no-fuss solution, our Better Boat Dock Lines are a perfect choice. We designed them with marine-grade double-braid nylon and a professionally spliced 12-inch eye, which makes them a breeze to handle. Plus, they have built-in UV resistance, so they won't get crunchy and weak after a few seasons in the sun.
For a deeper dive into picking the right thickness for your vessel, be sure to check out our detailed guide to dock line sizes. It's got all the specifics you'll need.
As a quick reference, here's a simple table to get you started.

Recommended Spring Line Diameter by Boat Length
Use this table as a general guide to select the right diameter for your spring lines based on your boat's overall length. Always consider your boat's displacement and typical mooring conditions.
| Boat Length | Recommended Line Diameter | Better Boat Product Link |
|---|---|---|
| Up to 27' | 3/8" | Better Boat 3/8" Lines |
| 28' to 35' | 1/2" | Better Boat 1/2" Lines |
| 36' to 45' | 5/8" | Better Boat 5/8" Lines |
| 46' to 59' | 3/4" | Better Boat 3/4" Lines |
| 60' and Up | 7/8" to 1" | Consult a professional rigger |
Remember, this is a starting point. If you're in a high-wind area or have a particularly heavy boat for its length, sizing up is a smart move.
Don't Forget the Supporting Cast
Your lines are the stars of the show, but a couple of key accessories will complete your docking setup and prevent a lot of headaches.
First, fenders are non-negotiable. They work hand-in-hand with your spring lines to cushion your hull and absorb any impact, saving your gelcoat from ugly scrapes and gouges against the dock.
Also, take a serious look at chafe guards. These simple sleeves protect your lines at any point where they might rub against the rough edge of a dock or pass through a chock. This one small addition can dramatically extend the life of your expensive dock lines.
Mastering your gear is a universal principle in water sports. It's just as crucial for docking as it is in other activities, like choosing the right leash for surfing. Getting the details right is what separates a smooth, safe experience from a potential disaster.
How to Rig Your Spring Lines for Perfect Control
Okay, let's move from theory to the real world. Knowing how to rig your spring lines is a core skill that translates directly to keeping your boat safe and sound at the dock. We’ll walk through exactly how to set up both forward and aft spring lines for the situations you'll actually encounter out there.
The whole point is to create opposing forces that lock your boat in place. It’s like a perfectly balanced tug-of-war where your boat is the prize, and it goes absolutely nowhere.
This flowchart breaks down the basic decision-making process for choosing the right gear before you even toss a line.
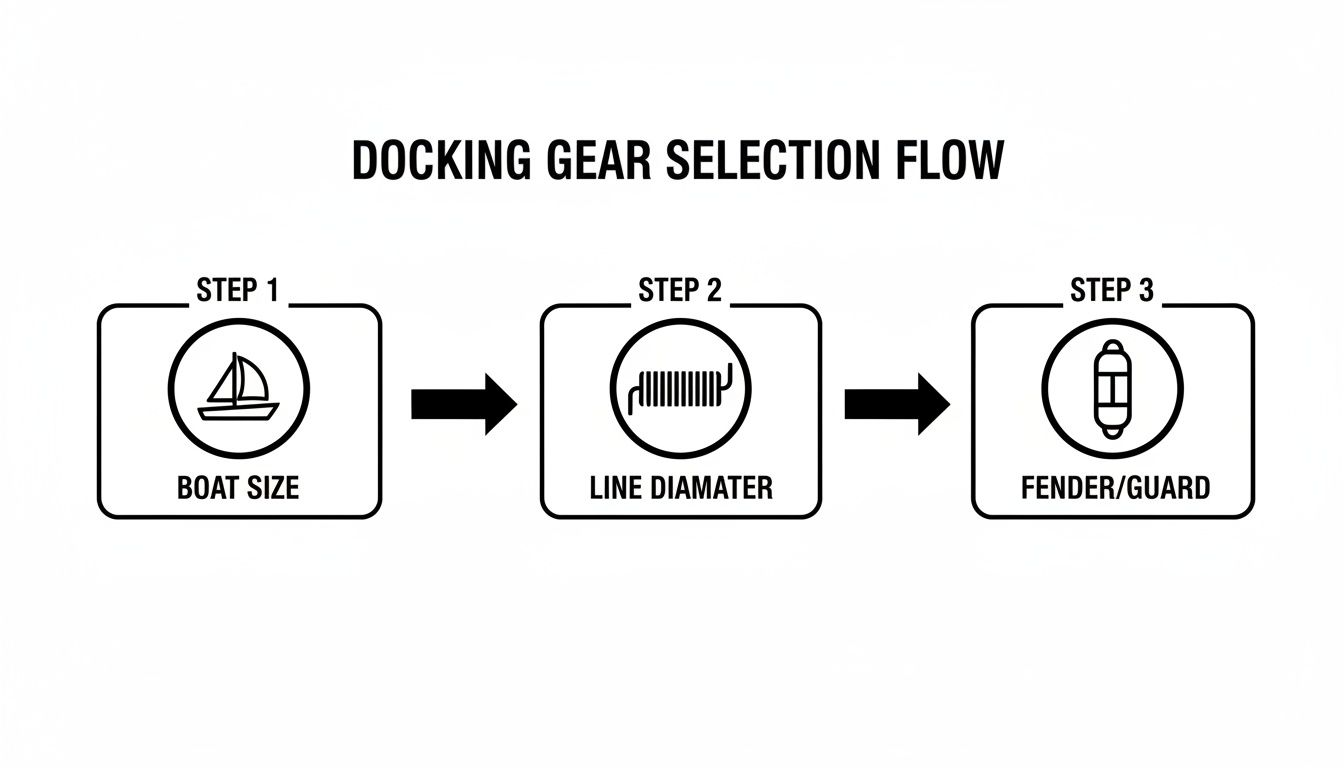
As you can see, getting the fundamentals right—from line diameter to fender placement—is the foundation you build on.
Mastering the Forward Spring Line
Think of the forward spring line as your primary defense against moving backward. This is the line that stops your boat from drifting astern when wind hits the bow or a current is trying to pull you out of your slip.
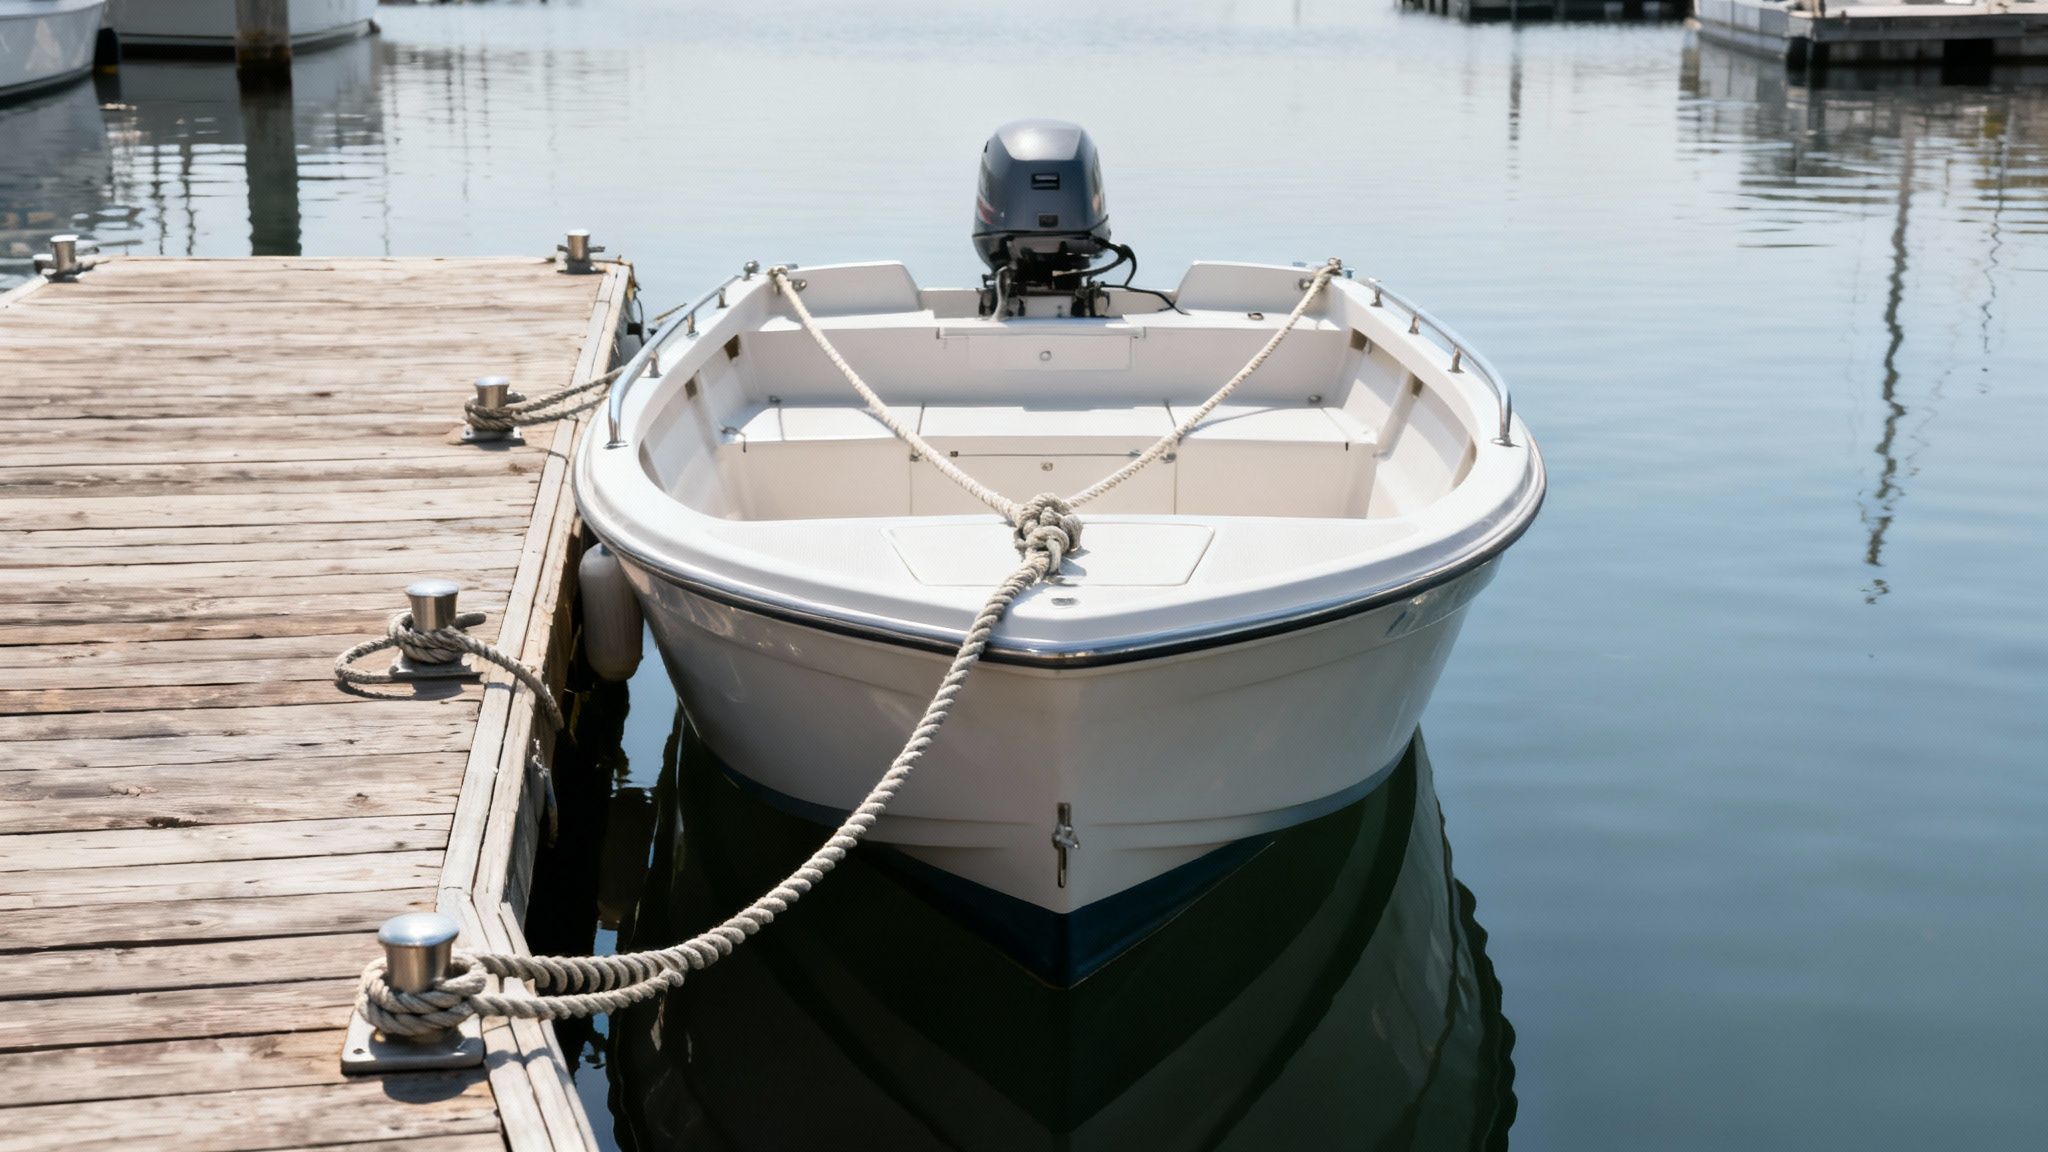
To rig it properly, start from a cleat on your boat located aft of its midpoint—a stern or midship cleat usually works perfectly. From there, run the line forward to a cleat on the dock that's ahead of your boat's position. This creates a diagonal brake that instantly stops any rearward motion.
Picture this: you're in a slip with a strong outbound current. By running a forward spring from your stern cleat to a dock cleat up near your bow, you create tension that holds the boat firm against that current. It's not going anywhere.
Securing the Aft Spring Line
On the flip side, the aft spring line is what keeps your boat from surging forward. It’s absolutely critical for preventing your bow from bumping the dock, a piling, or another boat moored ahead. You might also hear this called a "reverse" spring line.
The setup is just the mirror image of the forward spring. You'll start from a cleat on your boat that is forward of its midpoint, like a bow cleat. Then, run this line back to a cleat on the dock that’s behind your boat. This setup puts an immediate stop to any forward momentum.
Imagine you’re docked alongside a long pier with a breeze pushing from behind. Rigging an aft spring from your bow cleat to a piling well behind you will keep your boat from creeping forward and making unwanted contact with whatever is in front of you.
Achieving the Perfect Angle
Here’s a tip from experience: the effectiveness of your spring lines is all about the angle. A great setup has the lines running at a shallow angle, as close to parallel with the boat and dock as you can get. If the line is too steep (running almost straight out from the boat to the dock), it loses its ability to control that crucial forward-and-aft movement.
The optimal spring line angle maximizes leverage against surging forces. A longer, shallower angle provides far more stability than a short, steep one, giving you better control with less strain on your lines and hardware.
When you're tying up, try to use dock cleats that are as far forward and aft as is practical. This little adjustment extends the length of your lines, which improves their angle and gives you maximum security. For a complete rundown on securing your vessel, check out our detailed advice on tying a boat to a dock, which pairs perfectly with these spring line techniques.
By getting the placement of both forward and aft spring lines right, you gain precise control in any situation. You can walk away confident that your boat will remain exactly where you left it, safe and secure.
Essential Knots Every Boater Should Master
Your spring lines are only as reliable as the knots holding them fast. I've seen it happen: a perfectly placed line tied with a granny knot becomes a liability in a gust of wind. To keep your boat secure, you need to master a few essential knots.
The goal isn't to become a master marlinespike sailor overnight. It's about making a few key knots feel like second nature. These are the ones you'll turn to again and again for their strength, reliability, and the simple fact that you can untie them when you need to—even after they've been under serious strain.
The Undisputed King of Cleats: The Cleat Hitch
When you're tying off to a cleat—whether it's on your boat or on the dock—the cleat hitch is the only knot you should be using. It’s engineered specifically for this job, distributing the load evenly across the cleat to maximize holding power and reduce wear on your expensive lines.
Tying it is muscle memory for any experienced boater:
- Start with a full wrap around the base of the cleat.
- Next, make a figure-eight across the horns.
- Finish with a final under-tuck on one horn to lock it down.
A properly tied cleat hitch will hold firm under immense strain but can be released in a snap, even when the line is taut. Don't make the rookie mistake of adding extra loops. It doesn't add security; it just makes the knot a nightmare to untie.
The Go-To Knot for a Fixed Loop: The Bowline
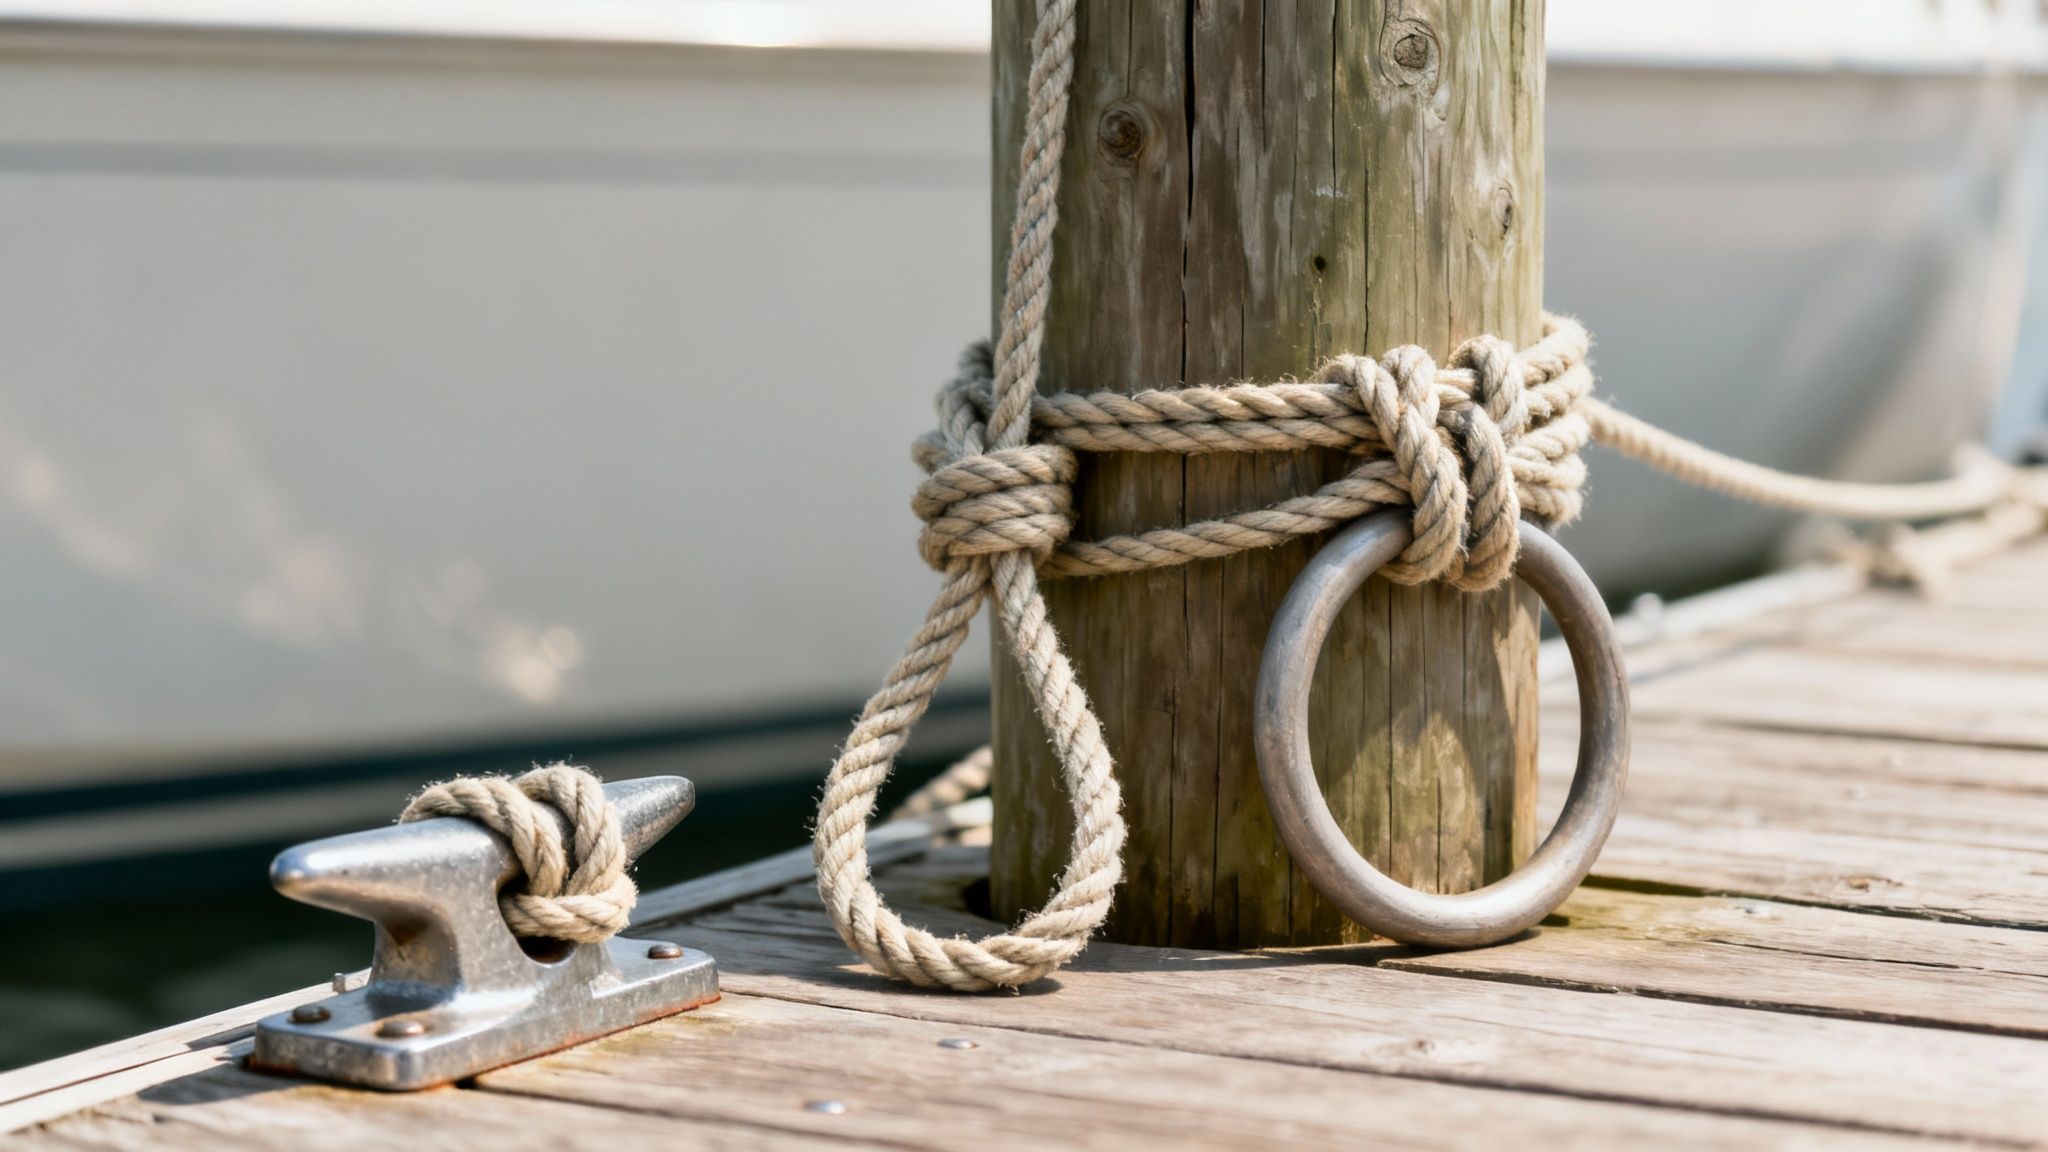
The bowline (pronounced "boh-lin") is quite possibly the most useful knot in a boater's arsenal. It creates a strong, fixed loop at the end of a line that will not slip or jam, period. This makes it the perfect choice for dropping a line over a piling, post, or bollard.
Picture this: you need to get your aft spring line onto a big piling. A quick bowline gives you the perfect-sized loop to drop right over the top. You can walk away knowing it'll hold fast without cinching down and getting stuck. There's a reason sailors have sworn by it for centuries.
The Best Bet for a Piling: A Round Turn and Two Half Hitches
Sometimes, you can't just drop a loop over a piling. Maybe the top is cluttered, or you're tying up to a ring on the dock. This is where the round turn and two half hitches shines. Just like the name says, you start with a full round turn around the object, which brilliantly takes the initial strain and protects your line from chafe.
From there, you simply tie two half hitches around the standing part of the line to secure the end. This knot is incredibly secure, yet it's another one that's easy to untie after being heavily loaded. Many new boaters build a solid foundation in these skills with a hands-on course like the RYA Competent Crew course.
For a closer look at these knots with diagrams and step-by-step instructions, check out our complete guide on how to tie boat knots.
Advanced Spring Line Techniques for Tricky Situations
Once you've got the basics down, you can start using spring lines to get yourself out of some really tricky situations. These advanced moves turn your lines into powerful tools, giving you precise control even when the weather isn't cooperating. From slipping out of a crowded dock to riding out a nasty storm, knowing the right way to rig your lines makes all the difference.
One of the most valuable skills you can learn is how to "spring off" the dock. This is your secret weapon for those days when the wind has you pinned against the pier, making a normal departure feel next to impossible.
How to Spring Off the Dock
Picture this: a strong onshore wind is shoving your boat sideways, holding it tight against the pilings. If you try to just push off or power away, you’re asking for a scraped hull or, worse, sending your stern crashing into the dock. There’s a better way. You can use a forward spring line to pivot your stern out into open water, slick as can be.
Here’s the game plan:
- Rig a forward spring line. First, run a line from a stern cleat on your boat up to a dock cleat or piling somewhere around your boat's midship. This should be the only line holding you to the dock (aside from your fenders, of course).
- Turn your wheel away from the dock. If you're docked with your starboard side to the pier, crank your wheel hard over to starboard.
- Give it a little forward gear. Gently engage your engine in forward. You only need enough throttle to make the boat want to creep forward. The spring line will hold it in place, but the prop wash will start pushing your stern away from the dock.
- Pivot on out. You'll see your stern swing gracefully out into clear water. Once you've got enough of an angle, pop the engine in neutral, have someone quickly release the spring line, and you can back away from the dock without a single scratch.
This method turns a high-stress situation into a controlled, predictable maneuver. It uses the boat’s own power and a single line to overcome the force of the wind, showcasing the true versatility of spring lines.
Managing Chafe and Tides
If you plan on leaving your boat docked for a while, especially in spots with a lot of surge or big tidal swings, protecting your lines from chafe is non-negotiable. Chafe is the enemy—it’s the friction from a line rubbing against a rough surface, and it can chew through a brand-new rope with shocking speed.
The best defense is a good offense. Use high-quality chafe guards wherever your spring lines pass through a chock or wrap around a piling. Our Anti-Chafe Woven Polyester Fender Covers are actually fantastic for this. They create a tough, smooth barrier that can drastically extend the life of your expensive dock lines.
When you're tied to a fixed dock in a tidal area, you also have to think about the water level going up and down. If you tie your spring lines too tight at low tide, they can come under incredible strain when the tide rolls in, potentially even ripping a cleat right off your deck. The fix here is to use longer spring lines and cross them.
Crossed Spring Lines for Maximum Stability
For rock-solid stability during storms or in marinas with heavy boat traffic, crossed spring lines are the gold standard.
Here’s the setup:
- Run a forward spring from your bow cleat back to an aft dock cleat.
- Run an aft spring from your stern cleat forward to a dock cleat up ahead.
This creates an "X" pattern with your lines. This configuration gives you the longest possible lines, which maximizes their ability to stretch and absorb shock. It also allows for plenty of vertical movement from tides or waves without the lines going dangerously tight or hopelessly slack. It’s a simple adjustment that provides a huge boost in security right when you need it most.
Common Questions About Spring Lines
Even seasoned boaters run into questions at the dock. Knowing the right answers can be the difference between a relaxing evening and a stressful, potentially damaging tie-up. Let's tackle some of the most common questions I hear about rigging spring lines.
How Tight Should Spring Lines Be?
You're looking for the sweet spot: snug, but never guitar-string tight. My rule of thumb is to leave just enough slack so you can press down on the middle of the line and feel a little give.
That bit of flex is your shock absorber. It lets the boat handle the push and pull from passing wakes or a sudden gust of wind without yanking hard on your cleats.
If you're in a place with big tides, you absolutely need to leave more slack. This is non-negotiable. The extra line allows your boat to rise and fall with the water, preventing dangerous strain that can rip out cleats or snap lines.
Can I Get Away With Just One Spring Line?
For a super quick, temporary stop—we're talking minutes—in dead calm conditions, you might be able to get by with a single spring line. But honestly, it's a risky shortcut I wouldn't recommend.
For any docking that lasts more than a few minutes, especially overnight or in any kind of wind or current, you need both a forward and an aft spring line. It's just standard, safe seamanship. Using two opposing lines gives you balanced control and stops the boat from swinging or pivoting into the dock or another boat.
You might hear the term "breast line" used, too. The key difference is the angle. Spring lines run mostly parallel to your boat to control its forward and backward movement. Breast lines run straight out from the boat to the dock, pulling it in tight. A really secure tie-up often uses both.
At the end of the day, rigging two spring lines is about peace of mind. It ensures your boat is held securely from both directions, so you can walk away confident it will be right where you left it.
For a complete range of marine-grade docking equipment, from durable lines to protective fenders, trust Better Boat to keep your vessel safe and secure. Check out our full selection of boating accessories to complete your docking setup.


