


Your Guide to Choosing the Best Aluminum Corrosion Cleaner for Your Boat
An effective aluminum corrosion cleaner isn't just a general-purpose soap; it's a specialized formula built to chemically break down the oxidation, pitting, and stains that plague aluminum surfaces, all without harming the metal itself. For any of us with a boat, using a dedicated cleaner is the only real way to get rid of that chalky white film and bring back the shine on pontoons, railings, and towers.
Quick answer: best way to clean aluminum corrosion on a boat
Use a dedicated aluminum cleaner when the surface has chalky white oxidation, dark waterline staining, or salt corrosion. Wash loose grit off first, apply the cleaner in small sections, let it dwell only as directed, agitate gently, and rinse completely before the cleaner dries. Avoid household acids, abrasive pads, and polishing before the corrosion has been chemically loosened.
Fast aluminum corrosion cleaner match
| Aluminum condition | Best next step | Better Boat path |
|---|---|---|
| White oxidation on pontoons, rails, or towers | Use a cleaner made for oxidized aluminum, then rinse thoroughly. | Aluminum Cleaner |
| Salt film and light grime before corrosion sets in | Wash early so salt does not keep attacking the surface. | Boat-safe wash, then inspect for remaining oxidation. |
| Pitted or heavily etched aluminum | Clean first, then decide whether polishing or professional refinishing is needed. | Do not hide deep pitting with polish alone. |
Why Your Boat's Aluminum Needs Special Attention

That chalky white film, pitting, and those ugly stains aren't just an eyesore—they're active signs of corrosion eating away at your boat. In a marine environment, aluminum parts are constantly under attack. Saltwater, harsh UV rays, and everyday pollutants all team up to break down the metal's natural protective layer.
The Two Types of Marine Corrosion
It really helps to know what you're up against. When it comes to marine aluminum, you're fighting two main types of corrosion:
- Oxidation: This is the one you'll see most often. It looks like a dull, powdery white or gray film. It’s a natural reaction when aluminum meets air and moisture, but in the marine world, it builds up fast and looks terrible.
- Galvanic Corrosion: This is the more sinister villain. It happens when two different metals—like an aluminum pontoon and a stainless steel bolt—touch while wet with saltwater. The saltwater acts as a conductor, and the less "noble" metal (your aluminum) corrodes at a dangerously fast rate. This leads to deep pits and can genuinely weaken the structure. You can get the full rundown by checking out our guide on fighting salt corrosion on boats.
Because of this constant assault, a generic household soap or an all-purpose cleaner just won't cut it. They don't have the chemical muscle to break down metallic oxides. In fact, using the wrong product can make things worse by leaving behind residues that just attract more gunk.
A specialized aluminum corrosion cleaner is a non-negotiable part of any boater's maintenance kit. Protecting these critical components isn't just about looks; it’s about preserving your boat's value and structural integrity for years of safe boating.
The need for good solutions is skyrocketing. The global market for aluminum cleaners hit $1,900 million in 2024 and is expected to climb to $3,500 million by 2035. With over 12 million registered boats in North America alone, keeping up with maintenance is more important than ever.
Studies even show that proper, regular cleaning can extend the life of an aluminum boat by up to 50%, saving owners thousands in repair or replacement costs down the line. You can find plenty more details about these trends and the aluminum cleaner market's growth online.
How to Select the Right Aluminum Cleaner
Picking the right aluminum cleaner for your boat isn't as simple as grabbing the first bottle you see on the shelf. The options you'll find range from seriously aggressive, acid-based formulas made for heavy-duty restoration to gentle, pH-neutral solutions that are perfect for just keeping things looking sharp. The choice you make will absolutely define the results you get—and the safety of your boat's surfaces.
First, ask yourself what you're trying to accomplish. Are you trying to bring a heavily pitted, chalky pontoon back from the dead? Or are you just trying to maintain the brilliant shine on a new T-top? Your answer is the key. A harsh cleaner would be total overkill for light oxidation, while a gentle one won’t even make a dent in severe corrosion.
Acid-Based vs. pH-Neutral Cleaners
Getting a handle on the basic difference between cleaner types is the first step. Acid-based cleaners are the heavy hitters. They’re formulated with acids like hydrofluoric or phosphoric acid that chemically dissolve thick layers of oxidation and stubborn mineral deposits. They work fast and save you a lot of elbow grease, but they come with risks.
On the other side, you have pH-neutral or balanced cleaners. These are your go-to for regular maintenance and for use on more delicate surfaces. They work by breaking the bond between the grime and the aluminum without relying on harsh chemicals. Sure, they might require a bit more scrubbing on tougher spots, but they are significantly safer for anodized, painted, or clear-coated aluminum finishes.
Pro Tip: Always, always spot-test any new cleaner on a small, hidden area first. This simple step can save you from accidentally etching, dulling, or discoloring a huge, visible surface. Just apply a little, wait a few minutes, and check for any bad reactions before you go all in.
For most boaters dealing with light to moderate corrosion, a balanced formula offers the perfect blend of cleaning power and surface safety. An expertly formulated product, like our Better Boat Aluminum Cleaner, is designed to effectively zap those white streaks, oxidation, and stains without the risk of damaging sensitive finishes. It really strikes that ideal balance, making it a reliable choice for everything from pontoon logs to window frames.
Aluminum Cleaner Types At a Glance
To make the decision a little clearer, here’s a quick breakdown to help you match the right cleaner to your specific job.
| Cleaner Type | Ideal For | Key Benefits | Potential Downsides |
|---|---|---|---|
| Acid-Based | Heavy corrosion, severe pitting, and restoring neglected bare aluminum. | Extremely fast-acting with minimal scrubbing needed to cut through thick oxidation. | Can easily etch or damage anodized, painted, or clear-coated finishes. Requires strict safety precautions (gloves, goggles). |
| pH-Neutral/Balanced | Routine cleaning, light oxidation, and maintaining anodized or painted aluminum. | Safe for a wide variety of finishes, environmentally friendlier, and gentler on skin. | May require more manual effort or multiple applications for stubborn corrosion. |
| Polishing Compounds | Removing fine scratches and restoring a high-gloss shine after cleaning. | Creates a mirror-like finish and smooths the surface. | Is not a cleaner; it's a finishing step and won't remove heavy corrosion on its own. |
This table should give you a pretty good idea of where to start. Think about the condition of your aluminum right now, and choose the tool that fits the task.
What to Look For on the Label
When you’re comparing products, the label is your best friend. Certain key phrases can tell you a whole lot about how the product works and what it’s safe to use on.
- "Safe for Anodized Aluminum": This is a huge one. It's a critical indicator that the product is pH-balanced and won't strip the protective anodized layer that's there to prevent corrosion in the first place.
- "Biodegradable": An important feature for any boater who cares about our waterways. This means the formula will break down naturally without harming marine life.
- "Restores and Brightens": This usually suggests a stronger formula, most likely acid-based. It's intended for bringing dull, heavily oxidized aluminum back to life.
At the end of the day, the best aluminum corrosion cleaner is the one that’s right for the job. For the vast majority of boat maintenance tasks—from seasonal cleanups to tackling stubborn water spots—a high-quality, balanced cleaner gives you the muscle you need without putting your boat's valuable finishes on the line.
Let's Get That Aluminum Looking New Again
Alright, this is where the fun starts. Taking your boat's aluminum from dull and chalky back to bright and clean is a seriously satisfying job, but you’ve got to do it right. We're not just going through a generic checklist here; we're talking about the proven methods that actually work and leave you with a finish you can be proud of.
This flowchart lays out the entire game plan, from start to finish.
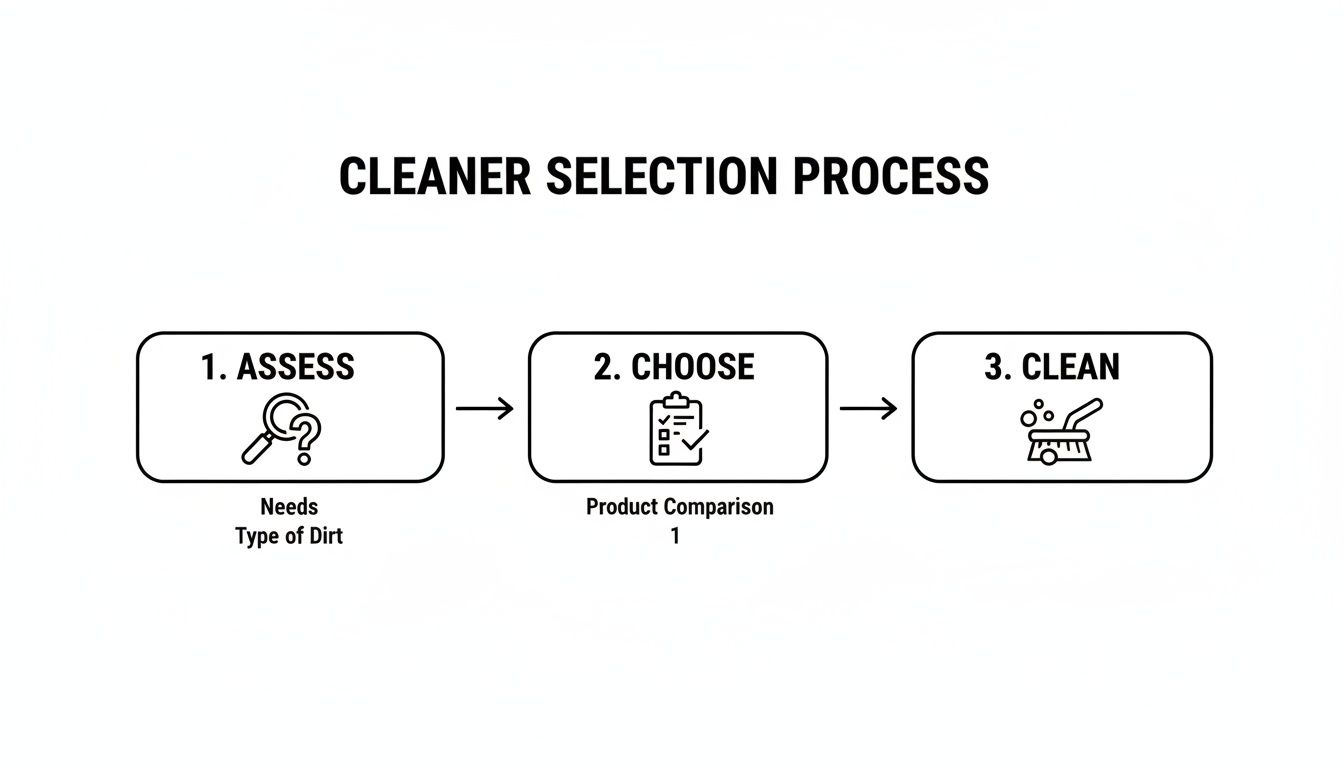
The biggest thing to remember is that success comes from a methodical approach. You need to size up the damage, pick the right cleaner for that specific job, and then follow the cleaning process correctly.
First Things First: Surface Prep
Before you even crack open a bottle of aluminum corrosion cleaner, you have to prep the surface. This part is absolutely non-negotiable. Skipping it is like trying to paint a dirty wall—the results will look terrible and won't last. The goal here is simple: get rid of any loose dirt, grime, salt, or grease that will get in the way of the cleaner doing its job.
Start by giving the entire aluminum surface a solid rinse with fresh water. A regular garden hose with a good spray nozzle is all you need. This first pass knocks off the easy stuff like surface-level grit and salt crystals that could scratch the aluminum when you start scrubbing.
If you're dealing with caked-on grime or oily spots, you'll need a gentle wash with a mild, pH-neutral boat soap. Grab a soft sponge or a microfiber cloth for this—never use an abrasive pad at this stage. After you've lathered it up and given it a light scrub, rinse everything off completely. You don't want any soap residue left behind. Let it air dry, or wipe it down with a clean, dry cloth.
Applying Your Cleaner the Right Way
Now that you have a clean, dry surface, you're ready for the main event. For this guide, we'll walk through the process using a balanced, effective product like Better Boat's Aluminum Cleaner, which is formulated to cut through tough corrosion without being overly aggressive.
Safety has to be your top priority. Even with a balanced formula, you need to wear the right gear.
- Gloves: Chemical-resistant gloves are a must to protect your skin from irritation.
- Safety Glasses: A pair of goggles or safety glasses is essential. You don't want an accidental splash in your eye.
- Ventilation: Always work in an open, well-ventilated space to avoid breathing in any fumes.
When you start applying the cleaner, work in small, manageable sections—think three to four feet at a time. This is key because it stops the product from drying on the surface before you can work it in, which is a fast track to streaks and a blotchy finish. Spray the cleaner evenly over your first section, making sure you get complete coverage.
The Magic of Dwell Time and Agitation
Once it's on, the cleaner needs a moment to do its thing. We call this dwell time. It’s the period where the active ingredients are breaking down all those layers of oxidation. For most cleaners, a dwell time of two to five minutes is about right, but always double-check the instructions on the product label.
Expert Tip: Whatever you do, don't let the cleaner dry on the aluminum. If you're working on a hot, sunny day, you might need to work in even smaller sections or lightly mist the area with water to keep it damp while it dwells.
While the cleaner is working, a little elbow grease is needed to lift the loosened corrosion. The tool you use here is critical. A soft-bristle brush is your best friend for this job. It’s got enough muscle to scrub away the chalky residue and stains but is gentle enough that it won't scratch or mar the soft aluminum.
Think about real-world spots, like a heavily stained waterline on your pontoon logs. Use your brush in a steady back-and-forth motion. For those annoying spots where corrosion creeps in under railing bases or around hardware, a smaller detail brush will let you work the cleaner right into those tight corners.
Rinsing and Checking Your Work
After the dwell time is up and you’ve scrubbed the area thoroughly, it's rinse time. A powerful, complete rinse is just as important as the cleaning itself. Use your hose to wash away every last trace of the cleaner and the gunk it lifted. Always start rinsing from the top and work your way down so you don't let dirty runoff streak the areas you've already cleaned.
Step back and take a look. Is the white, chalky film gone? Are the stains noticeably lighter? If it looks clean and bright, you’re good to move on to the next section and repeat the process.
If you’re dealing with some really stubborn, deep corrosion, don’t be surprised if it needs a second round. Years of oxidation can be tough. Just repeat the apply-dwell-agitate-rinse cycle on that specific spot. For a deeper dive into tackling a full-boat project, check out our guide on how to deep clean an aluminum boat for more video tips and tricks.
Following this methodical, section-by-section approach is the secret to getting a consistently great result. By prepping right, applying safely, and rinsing thoroughly, you're setting yourself up for a brilliant finish. The next step? Locking in that shine and protecting your hard work.
Polishing and Protecting for a Lasting Shine
Successfully knocking out that chalky film and stubborn corrosion is a huge win, but the job isn't quite finished. Cleaning strips away the problem, but it also leaves the aluminum bare and vulnerable to the elements. To get that brilliant, factory-fresh gleam—and more importantly, to keep it—you need to follow up with polishing and protection.
This two-step finale is what separates a decent cleaning job from a professional-grade restoration. Polishing buffs away any minor imperfections or lingering haze left by the cleaner, creating a smooth, mirror-like surface. After that, a quality marine wax creates a durable barrier that locks in your hard work and shields the aluminum from future attack.
The Critical Role of Polishing
Think of polishing as the fine-tuning stage of the process. Even the most effective aluminum corrosion cleaner can leave behind a slightly dull or uneven finish, especially after you've battled heavy oxidation. An aluminum polish contains very fine abrasives that gently smooth out the metal's surface on a microscopic level.
This process really does two key things:
- Restores Luster: It buffs away faint scratches and haze, creating a uniform surface that reflects light evenly for that coveted brilliant shine.
- Preps for Protection: A super-smooth, polished surface allows your protective wax or sealant to bond more effectively. This means a longer-lasting and more complete seal against the elements.
For a deeper dive into the specific techniques and tools that'll get you the best possible results, check out our complete guide on polishing an aluminum boat.
Sealing the Deal with a Protective Coating
After polishing, your aluminum looks fantastic, but it’s essentially exposed. Without a protective layer, saltwater, UV rays, and pollutants will immediately start the corrosion process all over again. This is where a high-quality marine wax becomes your MVP.
Applying a robust wax creates an invisible shield that repels water and contaminants. In the marine world, where 40% of recreational boats in the U.S. have aluminum hulls, this protection is absolutely non-negotiable. Aluminum faces corrosion rates 2-3 times faster in saltwater, a problem that can cost owners hundreds, if not thousands, annually if neglected. The good news? Targeted care makes a massive difference. Professional-grade products can reduce your cleaning time by 40% and increase the surface's lifespan by 60%.
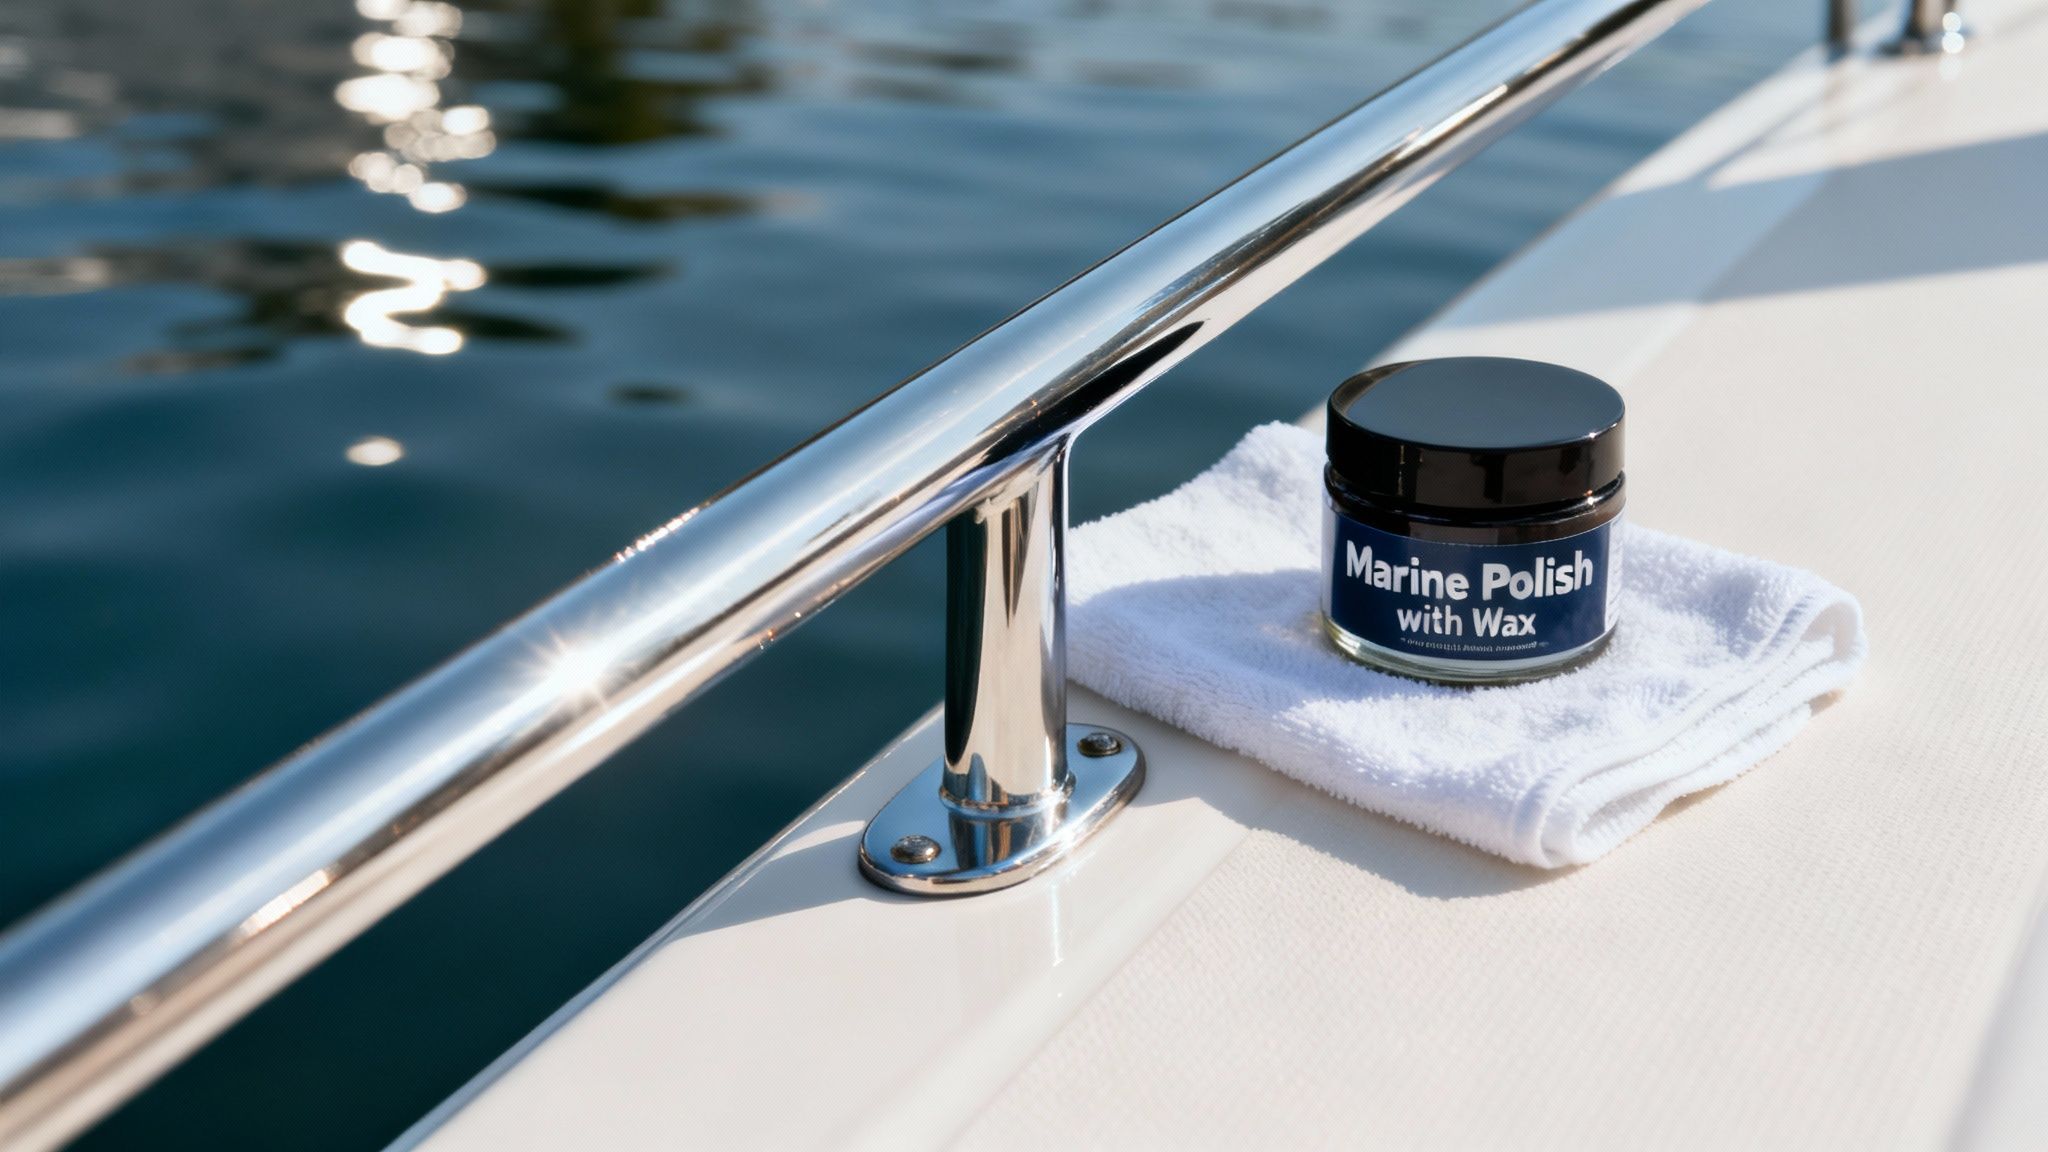
For a truly efficient solution, grab a product that combines both steps. A high-quality marine polish with wax not only amps up the shine but also lays down that crucial layer of UV and saltwater protection in a single application, saving you time and effort.
Application Techniques for a Flawless Finish
Applying polish and wax correctly is just as important as choosing the right product. You're aiming for a thin, even coat that provides maximum protection without leaving behind streaks or a tacky residue.
Start with a clean, soft applicator pad or microfiber cloth. Dab a small amount of the polish and wax combo onto the pad—not directly onto the aluminum.
Work in small, overlapping circular motions with light to moderate pressure. Just like when you were cleaning, tackling manageable sections is key. This ensures the product doesn't dry out before you can properly buff it off.
Let the product haze over, which usually takes a few minutes depending on the temperature and humidity. Once it's hazed, grab a separate, clean microfiber cloth and buff it off to reveal that brilliant, protected shine.
Remember to flip your cloth frequently to a clean side to avoid just rubbing the residue back onto the surface. This final step locks in all your hard work, ensuring your boat's aluminum stays gleaming and corrosion-free for months to come.
Building a Simple Aluminum Maintenance Routine
The secret to keeping your boat’s aluminum looking great isn’t about one massive, back-breaking restoration job each year. Not at all. It's about building a simple, proactive maintenance routine that stops corrosion before it ever gets a foothold. A sustainable schedule is always easier than a reactive repair, and it saves you a ton of time and effort down the line.
The trick is to match your routine to your environment. A boat that lives in a saltwater marina is fighting a much tougher battle against corrosion than one docked on a freshwater lake. Your maintenance frequency has to reflect that reality.
Saltwater vs Freshwater Schedules
For boaters in saltwater, you've got to be more vigilant. Salt crystals left on aluminum are like tiny corrosion magnets, literally pulling moisture from the air and kicking oxidation into high gear.
- After Every Single Trip: Give all aluminum surfaces a thorough rinse with fresh water. This is the single most important step you can take. Don't skip it.
- Monthly: Do a quick wash with a pH-neutral boat soap. This gets rid of any grime or salt residue that a simple rinse might have missed.
- Quarterly: Now it's time for a deeper clean. Grab a dedicated aluminum corrosion cleaner to knock out any light oxidation that’s started to creep in.
- Bi-Annually: At the beginning and end of your season, follow that deep clean with a good application of marine wax. This seals the surface and gives you a protective barrier.
If you're on freshwater, you can relax that schedule a bit. The corrosive elements just aren't as intense. A good rinse after you pull the boat is still a great habit, but you can often stretch out the deep cleaning and waxing cycles.
The goal isn't to create more work for yourself. It's to make the work you do more effective. A consistent, simple routine with the right products makes everything faster and easier, keeping your aluminum looking its best.
Costly Mistakes to Avoid
A good routine is also about knowing what not to do. I’ve seen plenty of well-intentioned boat owners cause irreversible damage by grabbing the wrong tools or products from the garage.
One of the worst offenders is steel wool or any other harsh metallic abrasive. These tools shred, leaving microscopic steel particles embedded in the soft aluminum. This triggers aggressive galvanic corrosion, leading to those ugly, rust-colored stains that are nearly impossible to get out. Stick to soft-bristle brushes or non-woven abrasive pads.
Just as bad are overly aggressive, all-purpose chemicals. Cleaners with bleach, ammonia, or high concentrations of acid will etch, dull, or permanently discolor your aluminum finish. Always, always grab a product that’s specifically formulated for marine aluminum.
Integrating Better Boat Products for an Effortless Routine
Building an efficient maintenance routine is a whole lot simpler when you have a go-to toolkit. Using Better Boat’s cleaning and protection products gives you a compatible system that works together for professional results with less elbow grease.
Start with our Aluminum Cleaner for your quarterly deep cleans to safely lift away oxidation. Follow up with our Marine Polish with Wax for your bi-annual protection to lock in that shine and create a durable shield against the elements.
This proactive approach is especially critical when you consider that over a million pontoon and recreational boats are sold in the U.S. each year. A solid routine helps fend off the black streak corrosion that plagues 60% of saltwater-exposed hulls within just two years.
Using efficient, quality products not only saves a DIYer from a potential $1,000+ repaint job but also helps boat charter professionals slash their labor costs by around 35%. You can explore more on how effective products impact the marine maintenance market to see the full picture.
By committing to a simple schedule, you're protecting your investment and keeping your boat looking brand new, season after season.

Common Questions About Cleaning Boat Aluminum
Even with a solid game plan, you're bound to have a few questions when staring down a patch of aluminum corrosion. Getting the right answers can be the difference between a Saturday spent swearing at your boat and one spent admiring a perfect, gleaming finish. Let's tackle some of the most common things boat owners ask so you can get the job done right.
Can I Use This on My Boat's Anodized or Painted Aluminum?
This is a big one, and the short answer is: be extremely careful. Anodized and painted surfaces are there to protect the aluminum, but they can be surprisingly sensitive. Hit them with a harsh, highly acidic cleaner, and you can easily strip, etch, or discolor that protective layer for good.
This is exactly why a pH-balanced product is your best friend. A properly formulated aluminum corrosion cleaner is designed to be tough on the chalky white oxidation but gentle on these delicate finishes. Even so, it's always a smart move to test any new cleaner on a small, out-of-the-way spot first—think the inside of a pontoon log or underneath a railing. A quick test patch gives you peace of mind before you go all-in.
What Is the Difference Between a Cleaner and a Polish?
It's easy to mix these two up, but they have totally different jobs. The best way to think about it is a one-two punch for bringing your aluminum back from the dead.
- Cleaner: The cleaner does the heavy lifting. Its job is to chemically dissolve the oxidation, cut through the grime, and lift all that nasty corrosion off the surface.
- Polish: A polish is a fine abrasive that you use after cleaning. It buffs out microscopic scratches and any leftover haze, smoothing the surface to create that brilliant, mirror-like shine.
You always clean first to get rid of the problem, then you polish to make it perfect.
How Often Should I Really Be Cleaning My Boat's Aluminum?
How often you need to clean really comes down to where you do your boating. Saltwater is way more aggressive on aluminum than freshwater, which means you need to be more vigilant.
If you’re a saltwater boater, the single best habit you can develop is giving all your aluminum a quick freshwater rinse after every single trip. This tiny step prevents salt crystals from drying on the surface and kicking off the whole corrosion process.
Beyond that daily rinse, a proper cleaning with a dedicated product is a good idea every one to two months for boats in the salt. For everyone, a deep clean followed by a good protective wax twice a year—once at the start of the season and once at the end—is the perfect schedule to keep that corrosion from ever getting a foothold.
What Safety Gear Should I Wear When Cleaning Aluminum?
Don't skip the safety prep—it should always be your first step. Even when you're working with a gentler, pH-balanced formula, you still need to protect yourself.
At a minimum, you’ll want chemical-resistant gloves and a good pair of safety glasses or goggles. This protects your skin and eyes from any accidental splashes. It's also a good idea to work in a well-ventilated area, especially with spray-on products, so you aren't breathing in the fumes. Most importantly, just take a minute to read and follow the safety directions on the product label before you start.
At Better Boat, we know that keeping your boat’s aluminum looking sharp is all about protecting your investment. Our full lineup of cleaning and detailing products is made to give you professional results without all the elbow grease, so you can spend less time scrubbing and more time on the water. Find everything you need to keep your vessel in pristine condition at https://www.betterboat.com.


