


A Complete Guide to Polishing an Aluminum Boat
Polishing an aluminum boat is about way more than just making it look good; it's a critical step in protecting your investment. You're essentially using a specialized abrasive compound to strip away that dull, chalky layer of oxidation and bring back a smooth, mirror-like finish. This doesn't just restore the boat's original shine—it creates a tough barrier against corrosion, especially if you spend time in harsh saltwater.
Why Polishing Your Aluminum Boat Matters
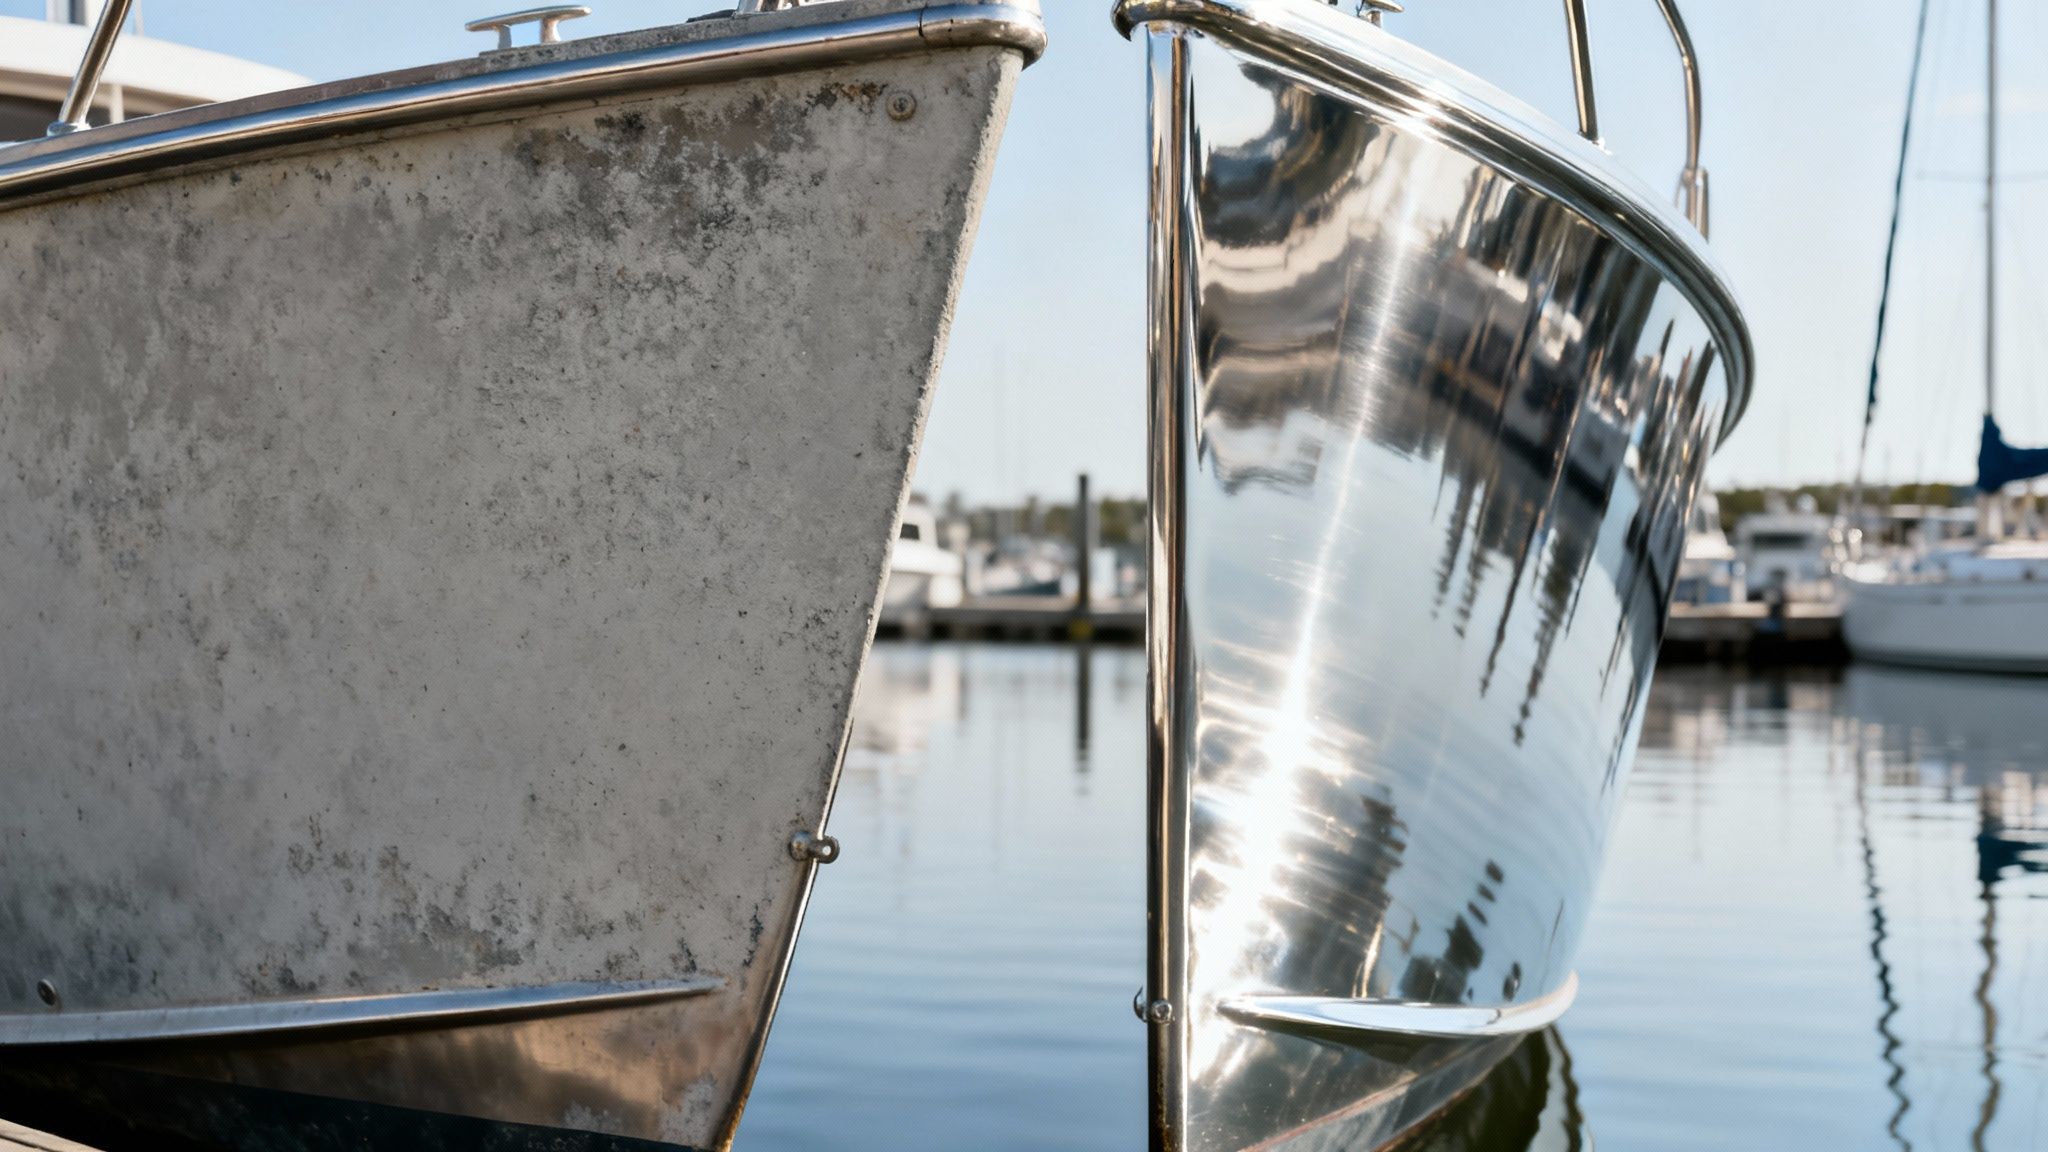
It's easy to think of polishing as just a cosmetic chore, but its real value is in preservation. When you leave bare aluminum to the elements, it reacts with oxygen and forms a dull layer of aluminum oxide. While this is the metal's natural way of protecting itself, it looks terrible and can eventually lead to serious pitting and damage.
Polishing is how we physically grind off that oxidized layer to reveal the fresh, vibrant metal hiding underneath.
Think of it as an investment in your boat's long-term health. Every time you polish your aluminum boat, you're not just getting it ready for a weekend on the lake. You're actively fighting off decay, extending its life, and protecting its resale value down the road.
The Science of Shine and Protection
The marine environment is brutal. Between the salt, constant moisture, and beating sun, your boat's hull takes a relentless pounding. When you polish that aluminum, you're creating an incredibly smooth, non-porous surface that makes it much harder for corrosive gunk to get a foothold.
This simple act of preventative maintenance pays off in several ways:
- Corrosion Prevention: A slick, polished surface sheds water and salt, which dramatically slows down the oxidation process. If you want to dive deeper into this, check out our guide on fighting salt corrosion on boats.
- Easier Cleaning: You'll be amazed at how easily grime, algae, and salt deposits wash off a polished hull compared to a rough, oxidized one.
- Increased Value: Let's be honest, a gleaming, well-cared-for boat will always fetch a better price and attract more serious buyers than one that looks tired and neglected.
Being proactive with your polishing schedule isn't just about appearances. It's a strategic defense that saves you from expensive and frustrating repairs later on—things like heavy sanding, repainting, or even fixing structural damage.
A Schedule for Success
When it comes to protecting your boat, consistency is everything. Take an 18–22 foot aluminum fishing boat, for example. If it lives in saltwater, it'll need a full hull polish every 12–18 months. In freshwater, you can stretch that to 18–36 months.
We've seen that owners who stick to a regular schedule report spending up to 60% less time on heavy-duty corrective work over a five-year period. This simple routine prevents that nasty, heavy oxidation from building up, making each future polishing job quicker and easier than the last.
Choosing Your Polishing Tools and Compounds

Having the right equipment is what separates a frustrating, weekend-long chore from a genuinely satisfying project. When you're staring down a dull aluminum hull, the tools and compounds you pick will make all the difference in the final shine and the effort it takes to get there.
The first big decision is an easy one: are you going to tackle this job by hand, or with a machine?
Hand Polishing Versus Machine Polishing
Honestly, this choice often comes down to the boat's condition and how much time you've got. Polishing with aluminum polish by hand is great for small jon boats, hitting tight spots around cleats and railings, or just doing a quick touch-up. It gives you incredible control but requires a serious amount of elbow grease for an entire hull.
For most folks, especially if you're dealing with a larger boat or any significant oxidation, a machine is the only way to go. It’s faster, more effective, and delivers that professional-grade gleam you're after.
- Hand Polishing: Your best bet for light oxidation and detail work. It’s less aggressive, which lowers the risk of marring the aluminum, but it's a slow and steady process.
- Machine Polishing: The undisputed champion for moderate to heavy oxidation. A good variable-speed orbital buffer makes quick work of large areas and has the muscle to cut through that chalky buildup for a true mirror finish.
The key takeaway here is to match the method to the mission. Don't even think about hand-polishing a heavily oxidized 22-foot pontoon unless you're looking for a multi-day workout. A quality orbital buffer is a fantastic investment for any serious boat owner.
Assembling Your Polishing Arsenal
Alright, once you’ve picked your path—hand or machine—it's time to gather the gear. Using the right supplies doesn't just make the work easier; it's essential for getting that coveted mirror finish without accidentally damaging your boat.
To help you get organized, here’s a quick-reference table of the essentials for both polishing methods.
Essential Toolkit for Aluminum Boat Polishing
| Item | Purpose | Hand Polishing | Machine Polishing | Better Boat Recommendation |
|---|---|---|---|---|
| Variable-Speed Orbital Buffer | Powers through oxidation and buffs large surfaces quickly. | Not Needed | Essential | Look for a reputable brand with ergonomic design. |
| Wool Compounding Pads | Aggressive cutting for heavy oxidation removal. | Not Needed | Essential | Use with your cutting compound for the first pass. |
| Foam Polishing/Finishing Pads | Removes swirl marks and creates a high-gloss shine. | Not Needed | Essential | A softer pad for the final polishing step. |
| Applicator Pads | Applying compound and polish by hand. | Essential | Good for tight spots | Soft foam or our Microfiber Applicator Pads work best. |
| Cutting Compound | Abrasive polish to remove the top layer of oxidation. | Essential | Essential | Our Marine Polish with Wax is an all-in-one solution that cleans, shines, and protects. |
| Finishing Polish | Fine abrasive polish to refine the surface to a mirror shine. | Essential | Essential | For a two-step process, follow the cutting compound to remove hazing. |
| High-Quality Microfiber Towels | Wiping away residue without scratching the surface. | Essential | Essential | Better Boat Microfiber Towel Set |
This list covers the non-negotiables. You'll thank yourself later for not skimping, especially on good microfiber towels—cheap ones will just leave lint and fine scratches behind.
Demystifying Polishing Compounds
The polish itself is the real magic in a bottle. Not all polishes are created equal, and using the wrong one will leave you with a hazy, swirled mess that's worse than when you started.
Think of it this way: different surfaces require different levels of abrasion. You wouldn't use the same approach on every material, and understanding concepts from other fields, like professional glass polishing techniques, shows how specific abrasive properties are key to success.
For aluminum boat hulls, you'll almost always need a two-step combo:
- Cutting Compound: This is the heavy lifter. It's a more aggressive polish with larger abrasives designed to slice through that tough, chalky layer of oxidation and level the surface.
- Finishing Polish: Once the grunt work is done, you follow up with a fine finishing polish. This removes the microscopic scratches and swirls left by the cutting compound, bringing out that brilliant, deep shine.
Choosing the right product can feel overwhelming, but we've got you covered. For a deeper dive into specific recommendations, check out our guide on the best boat polishing compound. Just make sure whatever you choose is a marine-specific aluminum polish; they're formulated to handle the harsh saltwater environment.

Preparing Your Boat for a Perfect Polish
Let’s be honest: you can't get a mirror finish on a dirty surface. This prep stage is the absolute, non-negotiable foundation for the whole project. Rushing it is the single biggest mistake I see, and it's what separates an amateur job from a truly showroom-quality result.
Think of it like painting a house. You’d never just slap a fresh coat over dirty, peeling walls, right? Same logic applies here.
First things first: a serious, thorough wash. Over a season, your boat collects a stubborn film of salt, algae, grime, and water spots that have to go. Before you even think about polishing, you have to get the surface perfectly clean. That includes learning how to safely remove stubborn water spots that can etch into the aluminum.
A powerful wash does more than just get the hull clean. It lifts away all the tiny abrasive particles that, if left behind, would get ground into the aluminum during polishing. That's how you end up with deep, frustrating scratches that are a nightmare to remove later.
A Deep Clean is Non-Negotiable
Start by giving the entire hull a deep scrub using a high-quality soap designed for marine environments. Our Better Boat Boat Soap is formulated to cut right through that tough grime and salt without stripping any protective coatings you might have.
Grab a soft-bristled brush and gently scrub the whole surface. Pay extra attention to the waterline, since that's where the worst buildup usually happens. Once you're done scrubbing, give the boat a complete rinse with fresh water and let it dry completely.
After the boat is clean, it's time to degrease—a critical step that far too many people skip. Engine exhaust, oils, and other gunk create a greasy film on the aluminum over time. Polish can't bond to or cut through that film, which leads to a splotchy, uneven mess.
A quick wipe-down with a good degreaser or even some isopropyl alcohol on a clean microfiber towel does the trick. This ensures your polishing compound makes direct contact with the aluminum oxide layer it's meant to work on. For a full walkthrough, check out our complete video guide on how to deep clean an aluminum boat.
Masking for Professional Results
With the surface sparkling clean and totally degreased, your last prep task is masking off everything you don't want the polisher to touch. Trust me, a careless slip with a buffer can permanently scuff or damage non-metal surfaces in a split second.
Take your time with this. Use high-quality painter's tape to create a clean, protective border around these areas:
- Vinyl decals and graphics: A spinning buffer pad will grab the edge of a decal and tear it right off before you can blink.
- Painted trim and registration numbers: You want to protect these from accidental scuffs and abrasion.
- Plastic or rubber components: Any non-aluminum trim pieces, like rub rails or cleats, should be carefully taped off.
This meticulous prep work guarantees clean, crisp lines and protects the rest of your boat. It might feel a bit tedious, but this attention to detail is precisely what elevates the final outcome, ensuring all your hard work pays off with a flawless, professional shine.
Executing The Polishing Process Like a Pro
With your boat perfectly prepped, this is where the real fun starts. The techniques you use from here on out will make the difference between a decent shine and a true, deep mirror finish. Think of it as a process of refinement, starting with the heavy lifting to remove years of neglect and finishing with a delicate touch to really make it pop.
Before you even think about grabbing a polisher, that foundational prep work is non-negotiable.
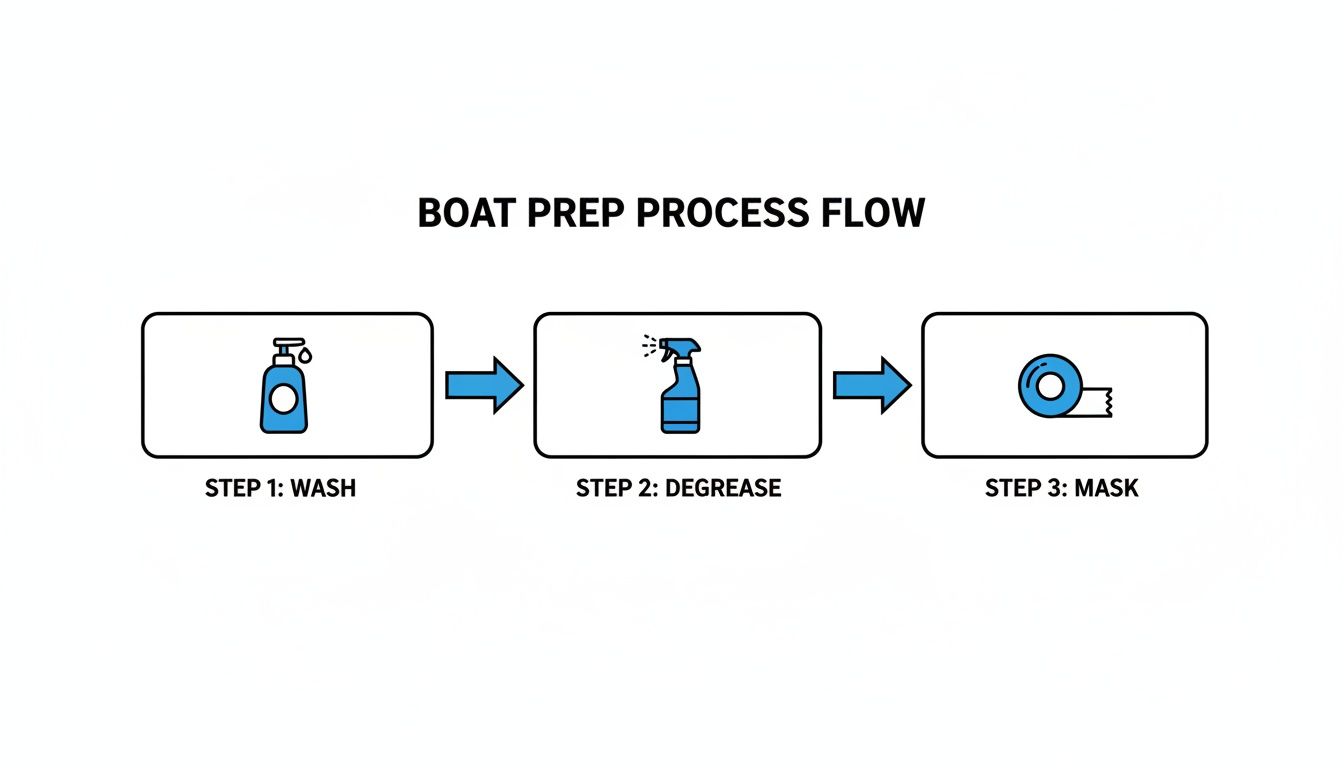
This simple flow—wash, degrease, and mask—is everything. It gives you a clean canvas so the abrasive compounds can do their job properly. If you cut corners here, you're just fighting an uphill battle for the rest of the project.
Starting With Heavy Oxidation Removal
If your hull looks chalky, dull, and forgotten, a standard polish isn't going to cut it. You need to get more aggressive to level out that damaged surface before you can even think about bringing out a shine. This is where wet-sanding comes into play.
Wet-sanding is really only for heavily oxidized or lightly pitted aluminum. It sounds intense, but it's just using very fine-grit waterproof sandpaper with plenty of water to knock down the worst of the damage.
I usually start with 800-grit and work my way up to 2000-grit. The key is to keep the surface soaking wet to stop the paper from clogging up and to help wash away the aluminum oxide you're removing.
Your goal here isn't a shine. You're aiming for a uniform, hazy finish. That haze is just a pattern of super-fine, consistent scratches that the next step—compounding—will easily buff out.
Wet-sanding is your reset button. It erases deep-seated oxidation that a buffer alone can't touch, creating a smooth, workable foundation. It’s extra work upfront, but trust me, it saves you hours of frustration with the polisher.
The First Cut: The Compounding Stage
Now we get to fire up the buffer. For this first pass, you'll want your most aggressive combination: a wool compounding pad and a good quality cutting compound. Wool pads just have more bite than foam, which is exactly what you need to erase those sanding marks or cut through stubborn oxidation.
Squeeze a few small dabs of compound onto the pad. Pick a small, manageable 2x2 foot section to work on—any bigger and the compound will dry out before you can work it in. Set your variable-speed polisher to a low speed, maybe 1200-1500 RPM, just to spread the product evenly.
Once it's spread, bump the speed up to 1800-2000 RPM and start working the buffer across the section in slow, overlapping passes. Apply firm, steady pressure and keep that pad as flat as you can against the hull. This is how you avoid leaving buffer trails or "holograms" in the finish.
- Move Systematically: Work from top to bottom and overlap each pass by about 50%. This guarantees you don't miss any spots.
- Keep it Moving: Don't ever let the buffer rest in one spot. It can generate enough heat to burn the aluminum, creating a permanent blemish.
- Work Until It’s Clear: Keep buffing until the compound breaks down. You'll see it go from a hazy mess to almost clear. That's your cue to stop.
As soon as you finish a section, grab a clean microfiber towel and wipe off the black residue immediately. If you let that stuff dry, it's a real pain to get off later.
Refining The Finish With a Final Polish
After you've compounded the entire boat, it's going to look a thousand times better. But it's not a mirror finish—not yet. The wool pad and heavy compound have left their own tiny swirl marks behind. The final step is all about refining those away.
Switch to a much gentler setup: a soft foam finishing pad and a fine finishing polish. This combo has almost no cutting power. Its only job is to smooth out the microscopic scratches from the last stage and coax out that deep, liquid shine.
The technique is pretty much the same as compounding, but you'll use a much lighter touch.
- Apply a few pea-sized drops of finishing polish to your clean foam pad.
- Work in the same 2x2 foot sections, spreading the polish on a low speed.
- Bump the speed up a bit, but this time use only light to moderate pressure. You're letting the polish do the work, not forcing it.
- Overlap your passes and keep going until the polish turns almost transparent.
- Wipe the residue right away with a fresh, clean microfiber towel to reveal the shine underneath.
This two-step process—a heavy cut followed by a fine finish—is the secret sauce. It makes sure you properly remove all the damage first, then carefully polish the surface to a brilliant shine.
Locking in the Shine with a Protective Sealant
You’ve put in some serious time and elbow grease to get that incredible mirror shine. The last thing you want is for it to vanish in a few weeks.
Without a protective barrier, freshly polished aluminum will start looking dull and chalky all over again as oxidation inevitably sets in. This final step isn't just a good idea—it's absolutely essential for preserving all your hard work.
Applying a high-quality sealant creates an invisible shield between the raw aluminum and the harsh marine environment. It blocks moisture, salt, and damaging UV rays from attacking the surface, effectively locking in the gloss and making your polish job last so much longer. It's the one thing that will keep your boat looking its best all season.
Choosing the Right Shield for Your Hull
When it comes to protectants, you’ve got options, from traditional carnauba waxes to modern synthetic formulas. Carnauba offers a beautiful, warm glow, but frankly, it just doesn't hold up in a demanding marine setting.
Synthetic sealants and ceramic-infused products offer far superior durability and protection. They're built for the abuse that comes with being on the water. To get a better sense of what's out there, you can explore our guide on what a ceramic sealant is and see the benefits for yourself.
For an aluminum boat, a marine-specific wax is your best defense. Our Better Boat Marine Wax is formulated to create a durable, hydrophobic layer that actively beads up and repels water and contaminants. It provides robust UV protection to stop the sun from dulling the finish and, as a bonus, makes future clean-ups a whole lot easier.
Applying a sealant is not a one-and-done task for the life of your boat. It's the beginning of a simple but crucial maintenance routine. Think of it as sunscreen for your hull; it needs to be reapplied to remain effective.
Application and Maintenance Schedule
Putting on our Marine Wax is about as straightforward as it gets. Using a clean applicator pad, work in a thin, even coat over a small section of the hull at a time. Gentle, circular motions are all you need.
Let it dry to a haze for a few minutes, then grab a clean, dry microfiber towel and buff it off. What you're left with is a slick, protected finish.
This protective layer is the key to long-term preservation. Many pros limit heavy abrasion to once every few years, instead relying on less aggressive polishing and frequent waxing to avoid thinning the alloy and preserve the boat's structural integrity.
For boats in high-UV or saltwater environments, a quick reapplication every 3-4 months will maintain that protective shield and keep your boat's brilliant shine locked in.
Common Questions About Polishing Aluminum Boats
Even with the best guide in hand, questions always come up when you’re knee-deep in a project. Polishing an aluminum boat has a few quirks, and getting a quick answer can be a lifesaver. Let's tackle some of the most common things people ask.
Can I Use Automotive Polish on My Boat?
This is probably the number one question I hear, and the short answer is: please don’t. It’s a bad idea.
Automotive polishes are designed for clear-coated paint, which is a completely different animal from the raw aluminum on your hull. They just don't have the aggressive abrasives needed to cut through that tough, chalky layer of aluminum oxide. You’ll end up with a hazy, disappointing finish and a lot of wasted effort.
Even more importantly, car products don’t contain the specialized corrosion inhibitors necessary to survive in a marine environment—especially saltwater.
How Do I Handle the Black Residue?
That messy, black gunk you see building up as you buff? It's totally normal. It's just a mix of used-up polish, the aluminum oxide you've removed, and microscopic bits of metal. The trick isn't to avoid it, but to manage it.
The best way to stay on top of it is to work in small, manageable sections, about 2x2 feet at a time. The moment you finish buffing an area, stop what you're doing and immediately wipe the residue away with a clean microfiber towel.
Pro Tip: Keep folding your microfiber towel to a clean side for every wipe. This simple habit stops you from smearing that grime right back onto your freshly polished surface—a classic rookie mistake that leads to hazing.
What Is the Best Way to Polish Tight Spots?
Your big orbital buffer is a beast on the large, flat sections of the hull, but it’s completely useless for the detailed areas. When you get to the tricky spots around rivets, cleats, seams, and tight corners, you'll need to change your approach.
For these spots, you have two great options.
- By Hand: This is the most straightforward method. Dab a small amount of a good metal polish onto a microfiber applicator pad and work it into the area using firm, consistent pressure.
- With a Drill: For a more professional result, grab a cone-shaped or ball-shaped polishing attachment for a standard power drill. This little tool lets you apply even speed and pressure in those small, awkward spaces, giving you a much more uniform shine across the whole boat.
Taking the time to do this detail work is what really separates a decent job from a fantastic one. It ensures every last inch of your boat has that brilliant, protected gleam you've been working so hard for.
At Better Boat, we know that having the right tools makes all the difference. Our premium marine-grade products are designed to give you professional results with less effort. Explore our full collection of cleaning and maintenance supplies to keep your vessel in top condition. Visit us at https://www.betterboat.com to find everything you need.


