


Best Way To Clean Boat Seats With Pro Tips For Every Material
After every trip, I give my seats a quick rinse with warm water and a drop of marine-safe soap. It’s a habit that stops grime in its tracks before it settles into the fabric or vinyl. When I run into stubborn spots—or worse, mildew—I reach for Better Boat Mildew Stain Remover. And for a thorough reset, that hot-water extraction every few months works wonders.
Choosing The Right Cleaning Method
Picking the perfect approach starts with two questions: how dirty are your seats, and what are they made of? Light salt spray and sunscreen smudges call for a gentle touch. But if you see oil rings or mildew blooms, it’s time to switch gears. And when years of dirt have built up in seams, deep cleaning with hot water gets you back to square one.
-
Mild Cleaning
- Rinse away salt, sunscreen and surface dust
- Foam up with Better Boat Marine Vinyl Cleaner to lift away light grime
- Dry off with a microfiber towel to keep mold at bay
-
Stain Removal
- Spray Better Boat Mildew Stain Remover on organic stains
- Work in thin layers under natural daylight for best results
- Finish with a vinyl conditioner to lock out future spots
-
Deep Cleaning
- Hot-water extraction flushes out embedded particles
- Keep pressure below 1800 PSI to protect stitches and hems
- Aim for a deep scrub every three months on busy boats
“Regular quick cleans prevent 90% of deep-cleaning headaches,” says veteran detailer Mike Ruiz.
Comparison Of Cleaning Methods
Below is a snapshot of how each cleaning style measures up, so you can choose quickly when you’re dockside.
| Method | Effectiveness | Frequency | Best For |
|---|---|---|---|
| Mild Cleaning | Good for surface dirt | After every outing | Vinyl, Fabric, Leather |
| Stain Removal | Removes 90% of stains | As needed | Mildew, Oil, Sunscreen |
| Deep Cleaning | Excellent for embedded grime | Quarterly | Long-neglected seats |
Keep this chart handy so you’re never guessing the right next step. For all your cleaning essentials, explore Better Boat’s complete lineup at Better Boat Cleaning Supplies.
Real-World Cleaning Scenario
Picture this: you’re on a foggy morning dock and your guest’s coffee tumbles onto the seat. Instead of panicking, you grab a hose and marine soap. A few circular strokes with Better Boat Marine Vinyl Cleaner and most of the stain lifts away.
If a thin ring remains, spritz on Better Boat Mildew Stain Remover, let it sit for two minutes, then gently scrub in circles. Finish with a cold rinse.
- Rinse the coffee spill with fresh water
- Work in Marine Cleaner foam using a soft-bristle brush
- Blot dry with an absorbent microfiber cloth
- Apply a vinyl conditioner to bring back the shine
Last weekend, this routine saved me an hour of elbow grease before guests boarded. It’s a small step that keeps upholstery looking its best. For a full kit of seat-care heroes, check out Better Boat’s complete boat cleaning kit—always worth stashing on board.
Identify Seat Materials And Prepare Safely
Dockside setup always starts the same way: figure out exactly what you’re dealing with. Vinyl, marine-grade fabric, mesh, leather and teak/wood each demand their own approach. Use the wrong cleaner and you’ll risk faded color, stiff seams—or worse.
I learned this the hard way when I grabbed a wood-specific solution for vinyl seats and ended up with tiny cracks. A quick feel and eyeball check can spare you that headache.
Test Material Type
Get hands-on. Run your fingertips over the seat surface and peek at any exposed edges. Vinyl feels cool and smooth, while fabric has that soft, textured give. Mesh? You’ll sense the holes under your touch. Leather feels warm with a natural grain, and teak’s unmistakable wood pattern stands out.
Use this table to nail down your dockside inspections:
| Material | Touch Test | Visual Clue | Cleaning Caution |
|---|---|---|---|
| Vinyl | Smooth, cool | Flat finish | No acids or solvents |
| Fabric | Textured weave | Backing layer | Avoid bleaching agents |
| Mesh | Perforated feel | Tiny holes | Prevent snags |
| Leather | Warm, grainy | Natural creases | No harsh soaps or bleach |
| Teak/Wood | Hard grain | Visible wood grain | Use wood-safe products |
A few extra checks to confirm your hunch:
- Press a fingernail into a hidden seam to sense foam or fiber backing
- Hold the material up to sunlight to reveal any waterproof coatings
- Wipe with a damp microfiber cloth to catch dye transfer
“Investing a few brush strokes in material ID can save hours of redo,” dockmaster Kevin Li reminds us.
Gather Cleaning Essentials
Once you’ve matched cleaner to material, lay everything out on a non-slip mat. Keep towels within arm’s reach and group your tools by task—rinse, scrub, repeat. I often set up beside the cockpit, where airflow is better for chemical sprays.
Make sure you’ve got proper ventilation before you spray or foam. A small fan aimed away from you or an open hatch can make all the difference.
Here are the five items I never launch without:
- Better Boat Marine Vinyl Cleaner for everyday soap-and-water scrubbing
- Microfiber towels and absorbent pads to trap drips
- Soft-bristle brushes and foam applicators for controlled scrubbing
- Nitrile gloves and safety glasses to shield skin and eyes
- A bucket of filtered water for mixing and rinsing tools
For a step-by-step on assembling a professional-grade setup, check out our full boat cleaning kit guide.

Better Boat Boat Interior Cleaning Kit
If you want the core interior-seat products in one buy, this kit bundles the Better Boat vinyl-care essentials instead of piecing them together one bottle at a time.
Check availabilitySet Up Safe Workstation
Pick stable, level ground for your cleaning zone. Spread a tarp or drip tray beneath the seats so runoff collects neatly in a bucket—no messy deck stains and zero slip risks.
Always perform a spot test before you begin. Drop a dab of cleaner on an inconspicuous seam, wait sixty seconds, then blot it dry. No surprises mid-scrub.
- Work in the shade to prevent cleaners from flash-drying
- Position a fan or open hatch downwind to steer fumes away
- Don safety glasses and wear old clothes when using foaming sprays
View Cleaning Workflow
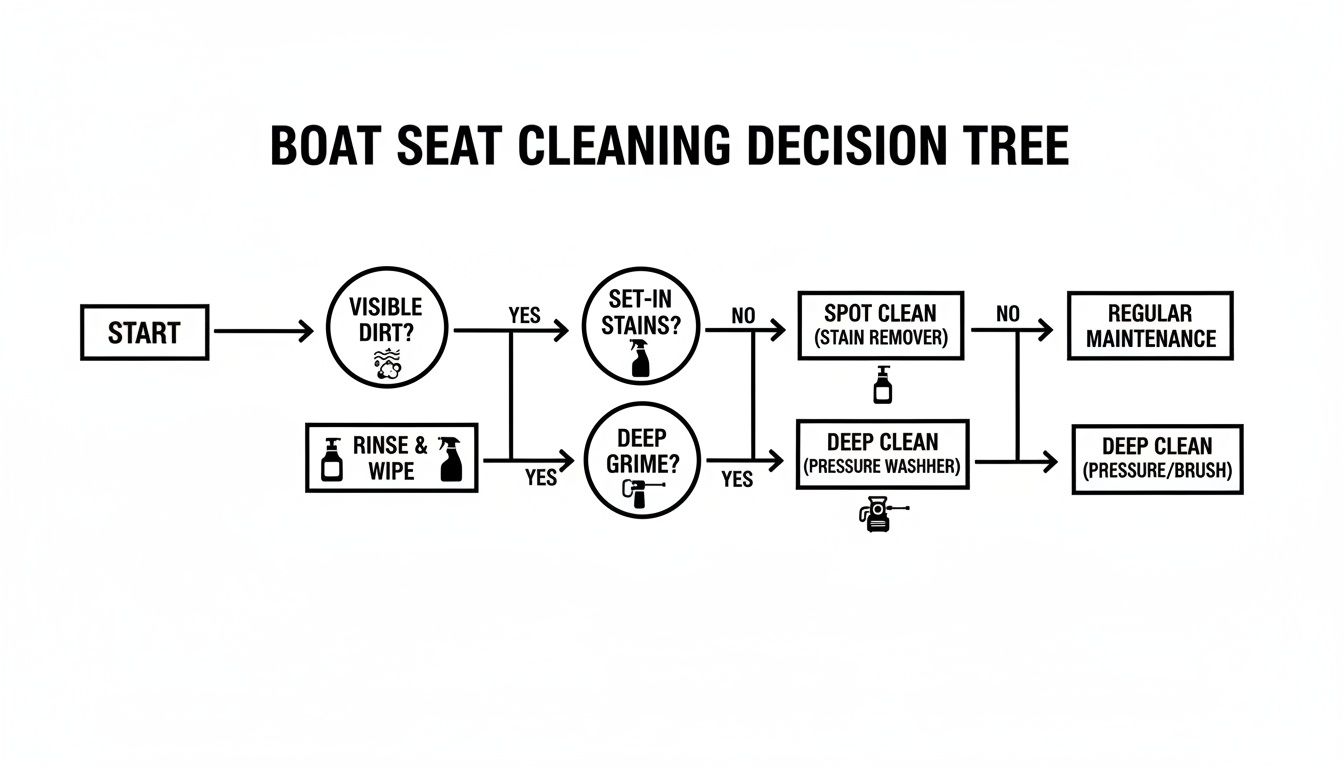
This chart lays out a clear progression: start with a quick rinse for fresh salt spray, switch to targeted stain removal for oil or organic spots, and save deep cleaning for stubborn grime. Each branch tells you when a simple rinse will do and when it’s time for tougher tools.
With materials identified and a safe station in place, you’re all set. Next up: dive into precise cleaning methods for every upholstery type—efficient, safe and spot-on.
Clean Vinyl Boat Seats With Soap And Water
Vinyl seats soak up sun, salt spray and sunscreen more than any other surface on your boat. That means they need a gentle but thorough wash after every weekend run.
A quick rinse with warm water right off the dock sweeps away gritty salt crystals and oily residue. Most marine manufacturers even call this the best way to clean boat seats and ward off premature aging.
In fact, a practical, data-backed routine using mild soap and water stops the bulk of long-term damage. It keeps salt, oils and mildew from breaking down the polymer and accelerates UV resistance. For the full deep dive, check out the PRP Seats maintenance guide.
Rinse Away Salt And Sunscreen
Grab your hose or a bucket of warm water and give the vinyl a gentle flood. Keep the nozzle around twelve inches from the seats to avoid driving dirt into creases.
Soft, circular sweeps lift away salt grains and sunscreen streaks without nicking the finish.
“A quick rinse stops 90% of stubborn spots from forming,” says boating enthusiast Jenna Martin.
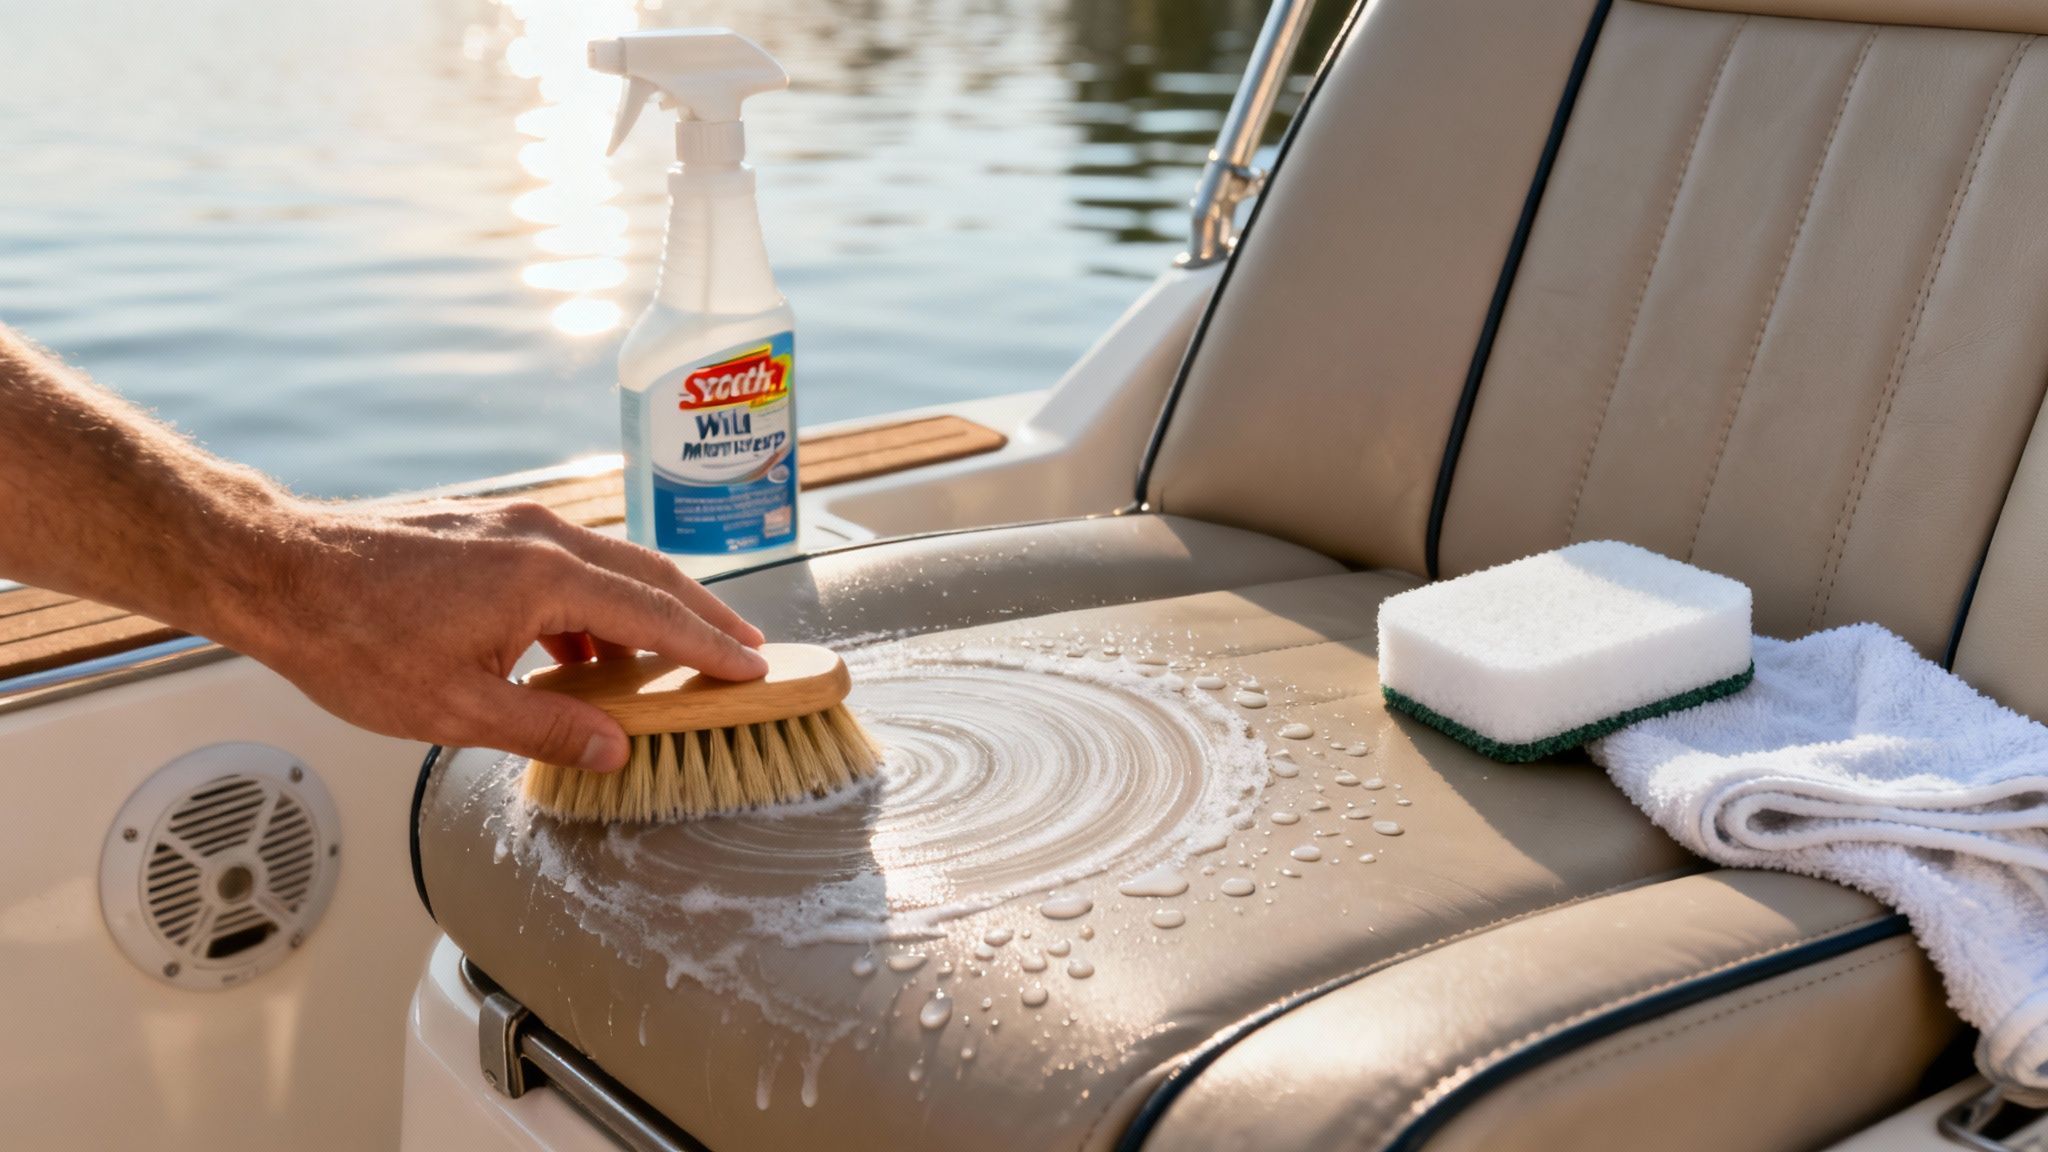
Gentle Scrub With Marine Cleaner
Mist a section of the damp seat with Better Boat Marine Vinyl Cleaner. Its pH-balanced formula loosens grime while leaving UV inhibitors intact.
Work in tight, circular strokes using either:
- A soft-bristle brush for everyday dirt
- A non-abrasive scrub pad on more embedded spots
You’ll want these basics on hand before you start:
| Tool Type | Abrasion Level | Purpose |
|---|---|---|
| Soft-bristle brush | Medium | Everyday grime removal |
| Non-abrasive scrub pad | Fine | Scuffs and small stains |
| Microfiber cloth | Smooth | Final wipe and moisture blotting |
Always spot-test on a hidden seam before tackling the whole seat. And for product specs, see our guide on Better Boat Marine Vinyl Cleaner.
Prevent Streaking And Dry Marks
Once the scrubbing’s done, rinse under a low-pressure spray to wash away every trace of cleaner. Then blot the vinyl in overlapping, circular motions—never drag the towel straight across.
Do’s and Don’ts for a flawless finish:
- Do pat seats dry instead of wiping in long strokes
- Do work in the shade to slow down drying
- Don’t let any cleaner residue air-dry in direct sun
- Don’t over-saturate the vinyl with water
Spot Check Ingredients
Before you buy a cleaner, flip it over and confirm it’s pH-neutral with no harsh acids or solvents. Dab a little in an inconspicuous spot and wait about thirty seconds to make sure there’s no discoloration.
Steer clear of bleach, ammonia or other aggressive compounds—they can stiffen vinyl and fade your colors.
Apply Vinyl Conditioner
After the seats are fully dry, spread a layer of Better Boat Vinyl Conditioner to seal in protection. This step brings back flexibility, renews UV blockers and keeps vinyl looking vibrant.
- Use a clean applicator pad to spread conditioner evenly
- Let it soak in for five minutes out of direct sunlight
- Buff off any excess with a dry microfiber cloth
That little ritual repels water, shields against sun damage and can extend seat life by up to 30%.
Weekly Routine And Storage Tips
Make this soap-and-water wash plus conditioner your weekly ritual. Last spring I skipped mine and ended up with fuzzy mildew along the seams—something a quick wipe would’ve stopped in its tracks.
Keep your cleaning kit stashed near the swim platform for easy access. Before you stow the cushions, give them a final wipe with a dry towel.
- Stand cushions upright in a shaded, well-ventilated spot to air out hidden crevices
- Tuck silica gel packs into lockers to manage humidity and prevent mildew
- Inspect seats every two months for tiny cracks and tackle repairs early
- Lubricate hinge hardware with a silicone spray to keep moving parts quiet
If any streaks show up after drying, blend them out with a gentle circular buff using a fresh microfiber cloth.
“Consistency is key to preserving vinyl seats season after season,” advises upholstery expert Luis Vega.
Remove Mildew And Stains Safely
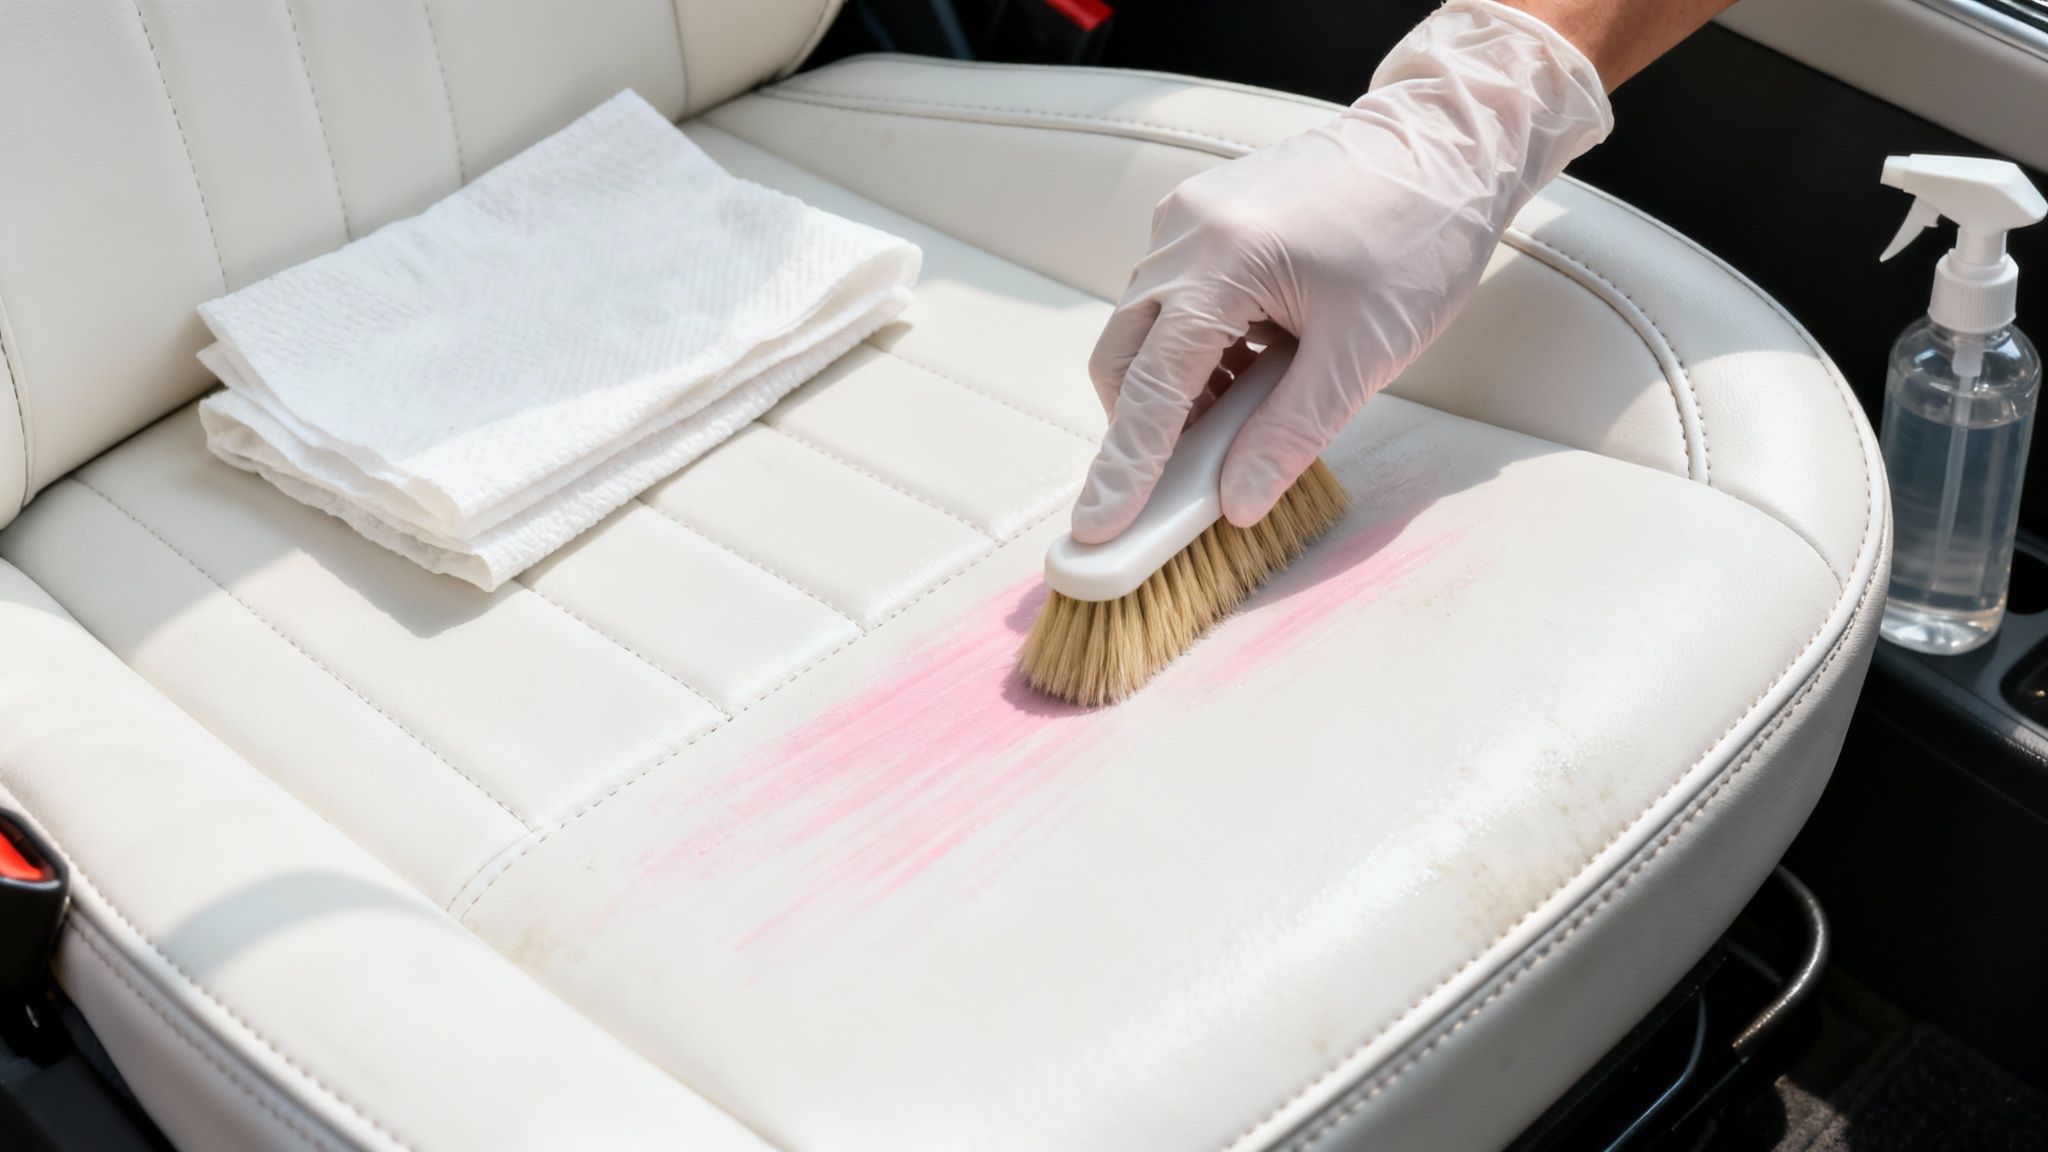
Mildew and those telltale pink streaks aren’t just unsightly—they slowly eat away at stitching and weaken vinyl if you let them linger. Last summer, on my 18-foot center console, I noticed tiny pink bubbles forming along the seams. That’s when I learned that an early, targeted attack makes all the difference.
I always keep a bottle of Better Boat Mildew Stain Remover on deck. Its gentle formula lifts stains without fading color. Once the mildew is gone, a quick swipe with vinyl conditioner locks out moisture and UV damage.
Applying Better Boat Mildew Stain Remover
Begin on a shady deck—direct sun dries cleaners too fast and cuts short their stain-fighting power.
Use a soft foam applicator or microfiber pad to coat a 12×12 inch patch in a single direction. This way you can watch the stain lift under even light.
- Shake the bottle, then spray onto your pad for precise control.
- Spread an even, thin layer of Better Boat Mildew Stain Remover across seams and flat sections.
- Let it dwell for two minutes, keeping the surface moist.
- Rinse thoroughly with low-pressure fresh water until the suds vanish.
Independent tests and boating reports confirm marine-grade mildew removers and vinyl cleaners clear over 90% of visible mildew and pink staining, while generic household products often fall short and can dull or damage materials. Read more about these findings in our full boating report: Pink Stains on Boat Seats: How to Fix Them.
| Method | Removal Rate |
|---|---|
| Better Boat Remover | >90% |
| Generic Household Cleaners | ~50% |
Consistent stain removal with marine-grade products prevents material breakdown and keeps seats looking like new.
DIY Vinegar And Water Solution
When pinking is still faint, a simple vinegar mix can do the trick without special products. I blend equal parts white vinegar and water in a spray bottle, then:
- Mist the affected area lightly.
- Allow it to sit for five minutes.
- Gently scrub with a soft brush to lift residue.
- Rinse thoroughly, then blot dry with a clean microfiber.
This approach handles about 60% of early-stage stains and is completely safe on vinyl and leather.
Avoid Harsh Chemicals
Some cleaners look tempting but spell trouble for your seats. Avoid:
- Bleach and chlorine solutions
- Ammonia or acid-based soaps
- Strong degreasers not labeled for marine use
- Abrasive pads like Magic Erasers
After any stain removal, always follow up with a vinyl conditioner to restore UV inhibitors and moisture barriers.
Post Treatment Tips
Once cleaning is done, let seats air dry in the shade or a breezy, well-ventilated spot. Trapped humidity around cushions can stall drying, so stand seats upright for at least an hour.
- Keep cushions separated for full airflow
- Wipe hinges and seams with a dry cloth
- Scan corners with a flashlight for hidden spots
- Fluff fabric seats gently with a soft brush
- After 24 hours, apply a UV protectant for extra defense
On a recent weekend cruise, I tackled deep mildew on a leather bow seat just before evening. Watching the surface under soft light helped me spot tiny residual marks I’d missed earlier. A quick second pass wiped them out completely—proof that careful inspection pays off.
A final wipe with a dry towel finishes the job perfectly.
Check out our detailed guide on Mildew Removal for Boat Seats in our blog for more in-depth tips: Mildew Removal for Boat Seats
Use Pressure Extraction For Deep Cleaning
When everyday scrubbing and spot treatments still leave grime tucked deep in seams and foam, pressure extraction steps in. By blasting hot water through your seats, it flushes out dirt, mold spores and hidden microbes that simple soap can’t reach.
Pressure extraction shines on vinyl, marine fabrics—even leather that tolerates moisture. You can rent a hot-water extractor or call in a pro detailer to handle the heavy work and dodge rookie mistakes.
- DIY Extraction
Renting a unit from a hardware store costs around $80–$120 per day. You set the pace, take breaks, and save on labor. - Professional Service
A mobile detailer will charge $200–$350, complete with commercial-grade gear and expert know-how.
“Hot-water extraction gets into spots that scrubbing alone misses,” says Emma Cole, a veteran detailer.
DIY Pressure Extraction Guidance
Before powering up, set your machine to about 1500–1800 PSI. That sweet spot lifts stubborn debris without risking seam damage.
Keep the water temperature near 140°F—hot enough to break down oils and biological growth, but not so hot it harms adhesives.
Hold the nozzle 12–18 inches from the surface at a shallow angle. This technique guides water into the material rather than piercing through it.
| Parameter | Value | Purpose |
|---|---|---|
| Pressure | 1500–1800 PSI | Deep debris extraction |
| Water Temperature | ~140°F | Oil and microbial breakdown |
| Nozzle Distance | 12–18 inches | Prevent seam or material damage |
Break the treatment area into 2–3-foot segments. Every five minutes, pause and inspect the foam backing for signs of over-saturation.
This method isn’t just chatter—high-pressure, heated-water decontamination (originally developed for invasive-species control) removed 91% of seeds and small organisms at 1800 PSI, compared to 74% with low-pressure rinsing and 65% through hand cleaning. Read the full research on invasive-species decontamination and seat cleaning efficiency
Hiring Professional Services
Detailing experts arrive with truck-mounted extractors that maintain steady heat and pressure. They’ll deep-steam your upholstery while you relax.
Most boat owners schedule a deep extraction every 12–24 months and often pair it with an annual hull wash to save on call-out fees.
- Mobile Detailer Visit — $200–$350
- Rental Machine for Weekend — $80–$120 per day
- Annual Service Plan — $500–$700 (bundle discounts available)
Deciding On The Best Option
If you run charters or host frequent guests, a professional extraction delivers consistent, high-quality results. For weekend warriors, DIY extraction tackles most buildup and stretches your budget.
On my 22-foot center console, a weekend DIY session washed out years of sunblock gunk—saving me $300 in pro fees. But high-traffic boats still benefit from commercial steamers.
Post-Extraction Care
- Stand cushions upright for at least one hour to air dry.
- Wipe seams and stitching with a dry microfiber to catch lingering moisture.
- Apply Best Marine Vinyl Protectant on vinyl to guard against water and UV rays.
- Gently brush fabric naps back into place before stowing.
- Use a wet-dry vacuum on cushion layers to pull out any hidden dampness.
This post-extraction routine keeps mold at bay and blocks moisture from crevices. Always store cushions in a well-ventilated spot to prevent humidity buildup.
Finally, neutralize any residue with Better Boat Marine Vinyl Cleaner. Once dry, seal in UV protection and restore suppleness with Better Boat Vinyl Conditioner.
Explore Better Boat for all your cleaning solutions.
Protect Condition And Store Your Seats
Once you’ve got that spotless finish, a few simple routines keep minor issues from turning into headaches. Drying, treating, and stashing seats the right way stops moisture and sun damage in their tracks.
Dry Cushions Completely
Even after a thorough cleaning, hidden damp spots are mildew magnets. Stand cushions upright in the shade so air can circulate around seams and foam.
- Use non-abrasive racks to prevent deck stains or scuffs.
- Air-dry for at least 2 hours, checking folds and hinges.
- Pat stubborn dampness with a soft towel, focusing on crevices.
If the cushions still feel cool after 2 hours, flip them and let fresh air finish the job. Thorough dryness protects foam cores and stitching from mold.
Apply Hydrophobic Protectant
With cushions bone-dry, mist on Best Marine Vinyl Protectant to build an invisible shield. It repels water, blocks UV rays, and makes future cleanups a breeze.
- Mist evenly and work in with a microfiber cloth.
- Let it cure for 10 minutes, then buff off any excess.
- Regular treatments can extend seat life by up to 30%.
On marine-grade fabric seats, mist lightly and wipe with a pad to avoid saturating the backing material.
Establish Weekly Maintenance
A handful of minutes each week staves off major scrubbing sessions. After every outing, a quick wipe cuts salt and sunscreen residue right at the source.
I keep a spray bottle of diluted cleaner in my deck box for rapid touch-ups.
- Wipe seats with a damp microfiber cloth and mild soap.
- Rinse with fresh water and dry with absorbent towels.
- Reapply protectant on high-wear spots every 7 days.
While you’re at it, inspect seams and hardware for early signs of wear or corrosion. Spraying metal fittings with silicone lubricant once a month keeps pivot points moving smoothly.
Store Seats Off Season
Before you stash seats for the season, leather and teak deserve extra care. A pH-balanced leather balm restores suppleness, while a thin layer of teak oil maintains natural moisture.
Use this Off-Season Checklist:
- Clean and dry cushions fully in a covered area.
- Bag vinyl cushions in breathable cotton covers.
- Place silica gel packs in storage containers to control humidity.
- Store leather seats in a temperature-controlled environment.
- Stack teak seats upright, off concrete or damp floors.
Choosing a cool, dry location prevents temperature spikes and dampness. Label all covers with date and seat position for an easy spring setup. Top off or replace protectants and oils annually to keep everything in peak shape.
“Consistent conditioning and smart storage keep upholstery fresh for years,” remarks upholstery pro Mia Hernandez.
Making these practices a habit transforms seasonal maintenance into an effortless routine. Your seats will look and feel fresh every voyage, and you’ll save on repairs in the long run.
Happy boating starts with well-cared-for seats. Enjoy the ride.
FAQ
When you’re in the middle of scrubbing vinyl or fabric seats, you need practical advice on the spot. These quick answers keep you moving without interrupting your cleaning flow.
Quick mid-clean solutions drawn from real on-water scrubs
Marine-Safe Household Cleaners
It’s tempting to grab that all-purpose spray under the sink, but bleach and harsh acids can strip UV inhibitors and weaken seams. Instead, stock up on marine-friendly soaps or Better Boat Marine Vinyl Cleaner. They lift dirt gently while preserving your seat’s protective finish.
Tackling Offshore Grease Spots
Oil rings from the galley or engine bay can be stubborn. My favorite trick is a simple marine cleaner-and-warm-water spray right onto the stain. Let it sit for a minute, then agitate with a soft brush. Rinse lightly—this targets grease without flooding the foam beneath.
Common Freshen-Up Hacks
If deep cleaning feels far off, a pressure-extraction every 12–24 months usually does the trick. High-traffic charter boats? Aim for an annual cycle.
For a last-minute spruce before guests arrive, keep these at hand:
- A spray bottle of diluted Better Boat Marine Vinyl Cleaner
- A stiff-bristle brush
- A clean microfiber towel
Mist the seat, give it a quick scrub, then blot—seats will be dry in under five minutes.
- Rinse tools between tasks to prevent streaks from soap build-up
- Always spot-test cleaners in a shaded corner to check for color shifts
- Air-dry seams in a breeze or under a fan to avoid hidden moisture
Spot-checks can slash deep clean frequency by 50%, extending your seats’ life.
If stubborn pink mildew appears, skip the guesswork and follow our Mildew Remover guide. No more mid-clean surprises—this FAQ is your dockside cheat sheet.
Ready to streamline seat care? Explore Better Boat for in-depth solutions.


