


Choosing the Best Boat Stain Remover for Your Boat
When you're trying to get rid of a stubborn boat stain - like mildew, grease, grime, or algae - grabbing the first cleaner you see is a recipe for disaster. I've seen it happen too many times—using the wrong formula can permanently damage your boat's surfaces. The right product really comes down to two things: the type of stain you're dealing with and the surface you're cleaning, whether it's fiberglass, vinyl, or canvas.
Matching the Stain Remover to the Surface
Staring at an ugly stain on your boat is frustrating, but jumping the gun with the wrong cleaner can make a bad situation a whole lot worse. The pristine gelcoat on your hull, the soft vinyl of your seats, and the tough canvas on your cover all have their own chemistry. Each one needs a specific approach to avoid causing permanent damage.
This is more than just cleaning; it’s about protecting your investment. A poorly chosen chemical can easily strip away protective coatings, cause ugly discoloration, or even weaken the material over time. It's like trying to clean a nice silk shirt with a heavy-duty kitchen degreaser—you just know it’s not going to end well.
Organic vs. Inorganic Stains
First things first, you need to identify your enemy. Stains on a boat typically fall into two main camps:
- Organic Stains: These come from anything that is or was once alive. The usual suspects on a boat are mildew, algae, bird droppings, annoying tannin stains from wet leaves, and, of course, food and drink spills. Your best bet here are alkaline or pH-neutral cleaners designed to break down that biological gunk.
- Inorganic Stains: These are mineral-based stains. Think of rust drips from your hardware, that yellowish scum at the waterline, and hard water spots. These tough marks usually call for an acid-based boat stain remover to dissolve the mineral deposits.
Getting this part right is the secret to picking a product that actually works without creating a new, bigger problem. For instance, using a strong acid on your canvas cover to zap a rust spot could weaken the fabric, setting you up for a nasty tear down the road.
To give you a clearer picture, here’s a quick rundown of what cleaner works best for what job.
Quick Guide to Boat Stain Remover Types
| Remover Type | Best For Stains Like... | Ideal Surfaces | Use with Caution On |
|---|---|---|---|
| Alkaline Cleaners | Mildew, algae, bird droppings, food spills | Fiberglass, gelcoat, vinyl | Painted surfaces, sensitive fabrics |
| Acid-Based Cleaners | Rust, waterline scum, mineral deposits | Fiberglass, gelcoat, metal hardware | Vinyl, canvas, aluminum, painted areas |
| pH-Neutral Cleaners | Light dirt, dust, fresh spills, general cleaning | All surfaces, including vinyl, canvas, leather | Not effective on heavy or set-in stains |
| Enzyme Cleaners | Blood, fish guts, organic waste | Upholstery, carpet, canvas | Not ideal for hard, non-porous surfaces |
| Solvent-Based Cleaners | Grease, oil, tar, adhesive residue | Metal, fiberglass (spot treatment only) | Vinyl, rubber, plastics, painted surfaces |
This table should help you quickly narrow down your options and avoid grabbing the wrong bottle for the job.
Deciding Your Action Plan
So, should you tackle that stain yourself or is it time to call in a pro? It really boils down to how bad the stain is and how much time you have on your hands. This simple chart can help you make the right call.
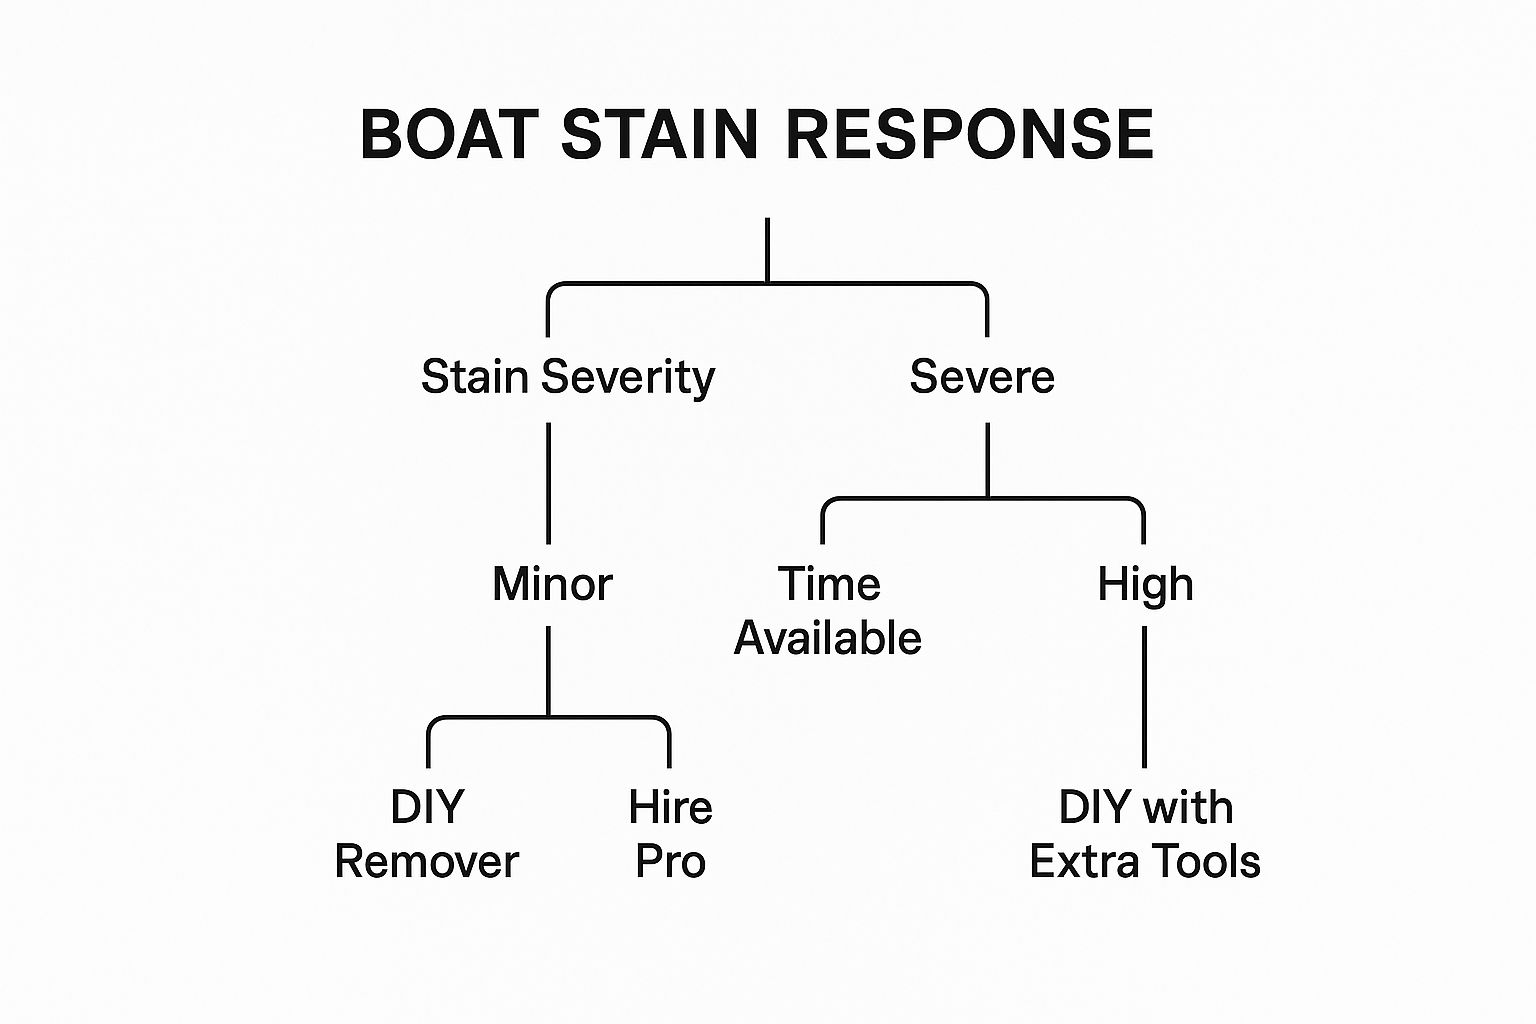
The takeaway here is pretty simple: for really tough stains, you need the right gear and enough time for a DIY fix to be worth it. If you're short on either, calling a professional detailer might be the smarter, faster move.
Pro Tip: Always, and I mean always, test a new boat stain remover on a small, hidden spot first. This one simple step can save you from a world of hurt, like widespread discoloration or damage, especially on older vinyl or colored canvas.
The market for cleaning products is huge, and it's only getting bigger. The global stain remover market was valued at $23.33 billion and is expected to hit $37.84 billion by 2034. While marine-specific products are a small slice of that pie, all the research and innovation in the broader industry means we get safer and more effective formulas for our boats. You can explore the full research on stain remover market trends to see how these developments are changing the game for marine care.
Removing Tough Stains from Fiberglass and Gelcoat

Your boat’s fiberglass and gelcoat hull is its armor, but it's also a magnet for ugly stains. From that grimy "boat beard" at the waterline to rust streaks that make a great boat look neglected, these marks are tough. They don't just wipe away; you need the right approach and a powerful boat stain remover to get the job done.
The reason these stains are so stubborn comes down to the gelcoat itself. It’s non-porous, which is great for keeping water out, but it also means mineral and organic deposits can latch on with a surprising grip. That’s why your standard boat soap often just isn’t enough to lift these deep-set blemishes.
It's a common problem, and the market for effective cleaners is growing right along with the number of boaters. The boat hull cleaner market is already valued at an estimated $500 million, and it's expected to keep expanding as more people look for products that work without damaging their investment.
Preparing for the Hull Cleaning Process
Before you pop the top on a hull stain remover, a little prep work makes a huge difference. Give the hull a good wash with a quality boat soap first. This gets rid of all the loose salt, grime, and surface dirt, letting your stain remover focus its power directly on the tough stuff.
Next, get your safety gear ready. Let's be honest, the cleaners that really work on tough hull stains contain acids like oxalic or phosphoric acid. They’re fantastic for dissolving stains, but you have to handle them with respect.
Essential Safety Gear Checklist:
- Chemical-Resistant Gloves: Don't skip these. Nitrile or neoprene gloves are essential to protect your skin.
- Safety Goggles or Glasses: Splashes happen, especially if there’s a breeze. Protect your eyes.
- Long-Sleeved Shirt and Pants: Minimize skin exposure by covering up.
Always work in a well-ventilated area. If the boat's on a trailer, stay outdoors. If you're on the water, try to find a spot with a decent cross-breeze.

Applying the Stain Remover for Best Results
Here’s the biggest mistake I see boaters make: they try to clean the hull in direct, hot sunlight. The heat makes the cleaner evaporate almost instantly, well before it can break down the stain. All you’re left with are streaks and residue.
Pro Tip: Always work on a cool, overcast day or in the shade. If you can't, do it in the early morning or late evening when the hull is cool to the touch. This gives the cleaner proper "dwell time" to do its job.
Work in small, manageable sections—about three to four feet at a time. This keeps you in control and prevents the product from drying out. Apply the boat stain remover with a sponge or spray bottle and let it sit for the time recommended on the label, which is usually just a few minutes. Then, rinse thoroughly with fresh water before moving to the next section. For a more detailed guide, check out our post on how to clean a fiberglass boat.
If you have a really stubborn spot, like a deep rust stain, don't be afraid to do a second application. You can also gently agitate the area with a soft-bristled brush to help lift the stain from the gelcoat before you rinse. Remember, let the chemicals do the work, not aggressive scrubbing that can scratch the finish.
Once you’ve got it clean, finish the job by applying a quality marine wax. It adds a protective barrier that makes your next cleanup a whole lot easier.
How to Clean Your Boat's Vinyl Upholstery
Dingy, stained vinyl seats can make an otherwise beautiful boat look tired and old. It’s a common story: your boat’s interior is constantly exposed to punishing elements like UV rays and moisture. Throw in some greasy sunscreen and color bleeding from wet towels, and you've got stains that seem impossible to beat.
The secret to winning this battle is using the right gear and techniques. So many boat owners make the mistake of grabbing a generic household cleaner or, even worse, a bottle of bleach. It might look like it’s working at first, but those harsh chemicals are doing a number on your vinyl. Bleach, for instance, will strip the vinyl's protective top layer, leaving it brittle, cracked, and a magnet for future stains.
The Initial Cleanup and Prep Work
Before you go after the tough stains, you need to prep the area. This first pass clears away all the loose dirt and grime, letting your boat stain remover get straight to work on the real problems.
Start by vacuuming the seats thoroughly. Get a brush attachment and work it into the seams and around the hardware to pull out sand, salt, and any other gritty bits that could scratch up the vinyl when you start scrubbing.
After vacuuming, give everything a general wipe-down with a little mild soap and water. This will handle the surface-level gunk and give you a clear look at the deep, set-in stains you’ll be targeting next.
Deep Cleaning Those Stubborn Vinyl Stains
With the surface clean, it's time for the deep work. This is where a dedicated marine vinyl cleaner is non-negotiable. These formulas are built to break down classic boat stains—mold, mildew, sunscreen—without stripping the vinyl of the plasticizers that keep it soft and prevent cracking.
For light mildew or general dinginess, spray your cleaner directly onto a small section. Let it sit for a minute or two to work its magic (always check the manufacturer's directions).
Now, grab a soft-bristle brush and gently work the cleaner into the stain using small, circular motions. You're not trying to scrub the life out of it; the goal is to lift the stain out of the vinyl's texture. You’ll see the grime start to dissolve pretty quickly. When you're done, just wipe the area clean with a damp microfiber towel.
Real-World Example: You spot some of those ugly black mildew spots in the corner of a seat cushion that never sees the sun. After spraying a quality marine mildew stain remover and letting it dwell, a few gentle swirls with a soft brush should lift them right out. A quick wipe-down, and the vinyl underneath will look fresh and bright again.
Applying a Protective UV Coating
Getting your vinyl clean is only half the job. To keep it looking pristine, you have to protect it from the sun and salt that caused the stains in the first place. The final, crucial step is applying a quality UV protectant spray.
Think of this coating as sunscreen for your seats. It creates a barrier that shields the material from the sun's fading and cracking power. It also helps repel water and makes it much harder for new stains to take hold. Just spray the protectant onto a clean microfiber cloth and wipe it evenly over all your vinyl surfaces.
The fact that the global market for boat vinyl cleaners is projected to hit $500 million with 6% annual growth shows just how vital this step is. Boaters are realizing that preventative care is the best way to protect their investment. You can discover more insights about the boat vinyl cleaner market to see where the industry is heading. For even more detailed advice, check out our complete guide to choosing a marine vinyl cleaner. This last layer of defense is what makes the difference between a temporary fix and a long-term restoration.
Cleaning Canvas Covers and Bimini Tops
Your boat’s canvas and bimini top are constantly under assault. They’re the first line of defense against the sun, rain, and—let's be honest—the inevitable bird droppings, mold, mildew, and sticky tree sap. Cleaning these fabric surfaces isn't like scrubbing the hull; you need a gentler touch. Using the wrong stuff can wreck the fabric and destroy its water resistance.
The best way to tackle this job? Get the canvas off the boat if you can. Laying it out on a clean driveway makes the whole process worlds easier. You won't have to worry about cleaners and grime running down onto your gelcoat or vinyl, and you can give it a proper scrub and rinse.
Choosing the Right Canvas Cleaner
When you're looking for a cleaner, stay far away from anything with harsh chemicals like bleach or ammonia. I know it's tempting to blast a stain with the strong stuff, but they will absolutely weaken the fabric fibers and stitching over time. You'll end up with premature rips and tears. Stick to products specifically labeled as safe for marine canvas.
For just a general clean-up or some light stains, a bit of mild soap and water can do the trick. But for the nasty organic stuff, you'll need to bring in some specialized help.
- Mildew Stains: You need a dedicated mildew stain remover made for fabrics. These are formulated to kill the mildew spores without eating away at the canvas itself.
- Tree Sap and Bird Droppings: Get to these while they're fresh if you can. If they've already hardened, gently scrape off the excess with a plastic putty knife before hitting the spot with a targeted cleaner.
- General Grime: For that layer of dirt that builds up over the season, a quality marine canvas cleaner is your best friend. It will lift the gunk without stripping the fabric's protective coatings.
Expert Insight: I can't stress this enough: rinsing is just as critical as cleaning. If you leave any soap or cleaner residue on the canvas, it gets sticky and actually attracts more dirt. The stains will come back faster than ever. You have to rinse until the water runs completely clear.
The Cleaning and Re-Waterproofing Process
Once you've got your cleaner, give the entire canvas a good soak with fresh water. Apply your chosen boat stain remover or cleaning solution and just let it sit for a few minutes. This gives it time to work its way into the stains. Next, grab a soft-bristle brush and gently scrub in a circular motion.
After you're done scrubbing, it's time for that meticulous rinse I mentioned. You need to get every single trace of the cleaner off.
Once the canvas is perfectly clean and has had time to air dry completely, you're not quite done. This next part is non-negotiable if you want your canvas to last.
The deep cleaning process strips away the original water-repellent finish from the factory. You have to re-apply it.
A new coat of a marine-grade fabric guard or waterproofing spray is essential. This step restores the canvas's ability to shed water, which is your single best defense against future mold and mildew. It also adds a layer of protection against damaging UV rays, seriously extending the life of your expensive cover or bimini. For a more detailed walkthrough, you can check out our complete guide on proper boat canvas cleaning. It’s a crucial final step that keeps your canvas protecting your boat season after season.
Safe Cleaning and Environmental Responsibility
There’s nothing more satisfying than watching a powerful boat stain remover melt away months of grime. But with that power comes real responsibility. The same chemicals that obliterate waterline scum and rust stains demand respect—both for your own safety and for the water your boat calls home.
Before you even crack open a bottle, let's talk about staying safe. This isn't your average boat soap. Many of the most effective formulas contain strong acids or alkaline agents that can cause nasty skin burns or serious eye damage. A simple splashback can turn a quick cleaning job into a very painful lesson.
Your Personal Protective Equipment Checklist
Think of your safety gear as part of your core cleaning kit. It's just as vital as the cleaner itself, so never skimp on it. What you'll need depends on the product, but a few items are non-negotiable.
- Chemical-Resistant Gloves: Your everyday dish gloves aren’t going to cut it here. You absolutely need nitrile or neoprene gloves to form a proper barrier, especially when you're working with the tougher acid-based rust removers.
- Safety Goggles or Glasses: Your eyes are incredibly vulnerable. A good pair of wraparound safety goggles is your best bet for protection, particularly if there's any wind or you’re trying to clean a surface above your head.
- Proper Ventilation: The fumes from these cleaners can get overwhelming in a hurry. Always work outside in the fresh air. If you find yourself stuck cleaning a tight, enclosed space, it’s smart to use a respirator rated for chemical vapors.
Following these simple rules will dramatically lower your risk and let you focus on getting the boat clean without any drama.
Protecting the Waterways
Your responsibility doesn't stop at your own skin. The chemicals you use can do a number on aquatic life if they run straight into the water. This is where you can bring the "Clean Marina" mindset to your own dock or driveway.
The golden rule is to prevent runoff. The best-case scenario is always to clean your boat when it's hauled out of the water. If you have to clean it while it’s afloat, be smart about it. Use products sparingly and find ways to contain any runoff, like placing absorbent pads or a boom around your work area to catch drips before they hit the water.
Key Takeaway: You'll see "biodegradable" on a lot of labels, but don't mistake that for "harmless." Biodegradable simply means the product will break down eventually. It can still be toxic to fish and plants on contact. Always read the fine print.
When you can, look for products that are specifically labeled as "biodegradable" or "phosphate-free." These formulas are designed to have a much lower environmental footprint. Top brands like BoatLIFE are great examples, offering effective, eco-friendlier options like their phosphate-free and biodegradable Boat Cleaner for general washing. It’s all about getting the job done without wrecking the environment we all enjoy.
Responsible Disposal of Cleaning Products
When the work is finished, how you handle the leftovers and used materials is just as important. Never, ever pour unused boat stain remover down a storm drain or into the water. That’s not just poor form—it’s often illegal and can come with some eye-watering fines.
Getting rid of this stuff properly is pretty straightforward:
- Read the Label: The container itself will have specific disposal instructions. Follow them to the letter.
- Contact Local Authorities: Your marina office or local waste authority can tell you exactly how to dispose of chemical cleaners. Many have special hazardous waste collection days or sites.
- Contain Soaked Materials: Any used rags, sponges, or absorbent pads should go into a sealed plastic bag before you toss them in the trash. This keeps any leftover chemicals from leaking out.
By making these safety and environmental habits part of your regular cleaning routine, you can keep your boat looking sharp without compromising your health or the health of our waterways. It's what being a responsible boater is all about.
Common Questions About Boat Stain Removers
Even with the best products in hand, you’re bound to have some questions. When you're dealing with a powerful boat stain remover, knowing a few extra details can be the difference between a perfect finish and a costly mistake.
Let's clear up some of the most common questions I hear from fellow boaters. Getting these right will help you work confidently and get the job done right the first time.
Can I Use Household Cleaners Like Bleach on My Boat?
I get asked this all the time, and my answer is always a firm no. It’s so tempting to grab that bottle of bleach from under the sink, thinking it'll blast away any stain. But trust me, it's one of the worst things you can do to your boat.
Household cleaners simply aren't built for marine materials or the harsh sun, salt, and water they live in. Bleach is especially destructive.
- On canvas, it’ll eat away at the stitching and weaken the fabric, setting you up for rips and tears down the road.
- On vinyl, it strips out the essential plasticizers and the protective topcoat. This leaves your seats brittle, ready to crack, and even more prone to future stains.
- On your gelcoat, it will dull the finish, and over time, can create tiny pits in the surface that actually attract more dirt.
Stick with a dedicated marine-grade cleaner. It’s the only way to know for sure you’re just removing the stain and not damaging the surface underneath.
How Do I Prevent Stains from Coming Back So Quickly?
It’s incredibly frustrating to spend a weekend scrubbing, only to see those same stains creep back a few weeks later. The secret to a long-lasting clean isn't just about the cleaning itself—it's all about protection.
Once you’ve deep-cleaned a surface, you have to apply a protective treatment. This creates a barrier against the elements and is the key step that turns a temporary fix into a lasting one. It’s just like waxing your car; you wouldn't wash it and then leave the paint exposed, right? The same logic applies to every part of your boat.
Surface-Specific Protective Treatments
| Surface | Protective Treatment | Why It Works |
|---|---|---|
| Fiberglass/Gelcoat | A quality marine wax or polymer sealant | Creates a slick, non-porous barrier that repels water, dirt, and grime, making future cleaning much easier and protecting against UV damage. |
| Vinyl Upholstery | A marine UV protectant spray | Shields against the sun's harsh rays that cause fading and cracking. It also forms a barrier against oils, spills, and moisture. |
| Canvas & Bimini Tops | A water-repellent fabric guard | Restores the canvas's ability to shed water, which is the number one defense against the growth of new mold and mildew. |
Make this protective step a mandatory part of your routine. You'll spend way less time scrubbing and more time actually enjoying a boat that looks fantastic.
Do Eco-Friendly Boat Stain Removers Actually Work?
Yes, they absolutely do. There's an old misconception that "biodegradable" or "eco-friendly" is just code for "weak." That might have been the case years ago, but modern chemistry has come a very long way.
Today, many of the best eco-friendly stain removers are incredibly effective. They're engineered to break down tough stains without resorting to the harsh acids or solvents found in some old-school cleaners.
Expert Insight: While they work great, some eco-friendly formulas require a bit more patience. You might need to let the product sit a little longer (dwell time) or use a bit more elbow grease, but the trade-off is worth it. They are a much safer choice for the environment and for the more sensitive surfaces on your boat.
Using these products also helps you stay in line with Clean Marina guidelines, ensuring the waterways we all love stay healthy for future generations.
How Long Should I Leave a Stain Remover on the Surface?
This is a critical one. Leaving a cleaner on for too long—or not long enough—can completely tank your results. The golden rule is to always follow the manufacturer's instructions on the bottle. Dwell times can vary wildly from one boat stain remover to another.
A good rule of thumb is to never, ever let a chemical cleaner dry on the surface. This is especially true when working in direct sunlight or on a hot day. A cleaner that has dried on is a nightmare to rinse off and almost always leaves behind streaks, residue, or can even damage the finish.
The pro-tip here is to work in small, manageable sections. This gives you total control and ensures you can rinse the area completely before the cleaner has any chance to dry out.
Ready to tackle those tough stains with products you can trust? Better Boat offers a full line of premium, easy-to-use cleaning solutions designed to keep your boat in pristine condition. From our powerful mildew stain removers to our protective UV sprays, we have everything you need to get professional results. Protect your investment and simplify your maintenance routine. Explore our complete collection of boat cleaning and care products today!


