


DIY Boat Steering Cable Replacement Guide
Replacing your boat's steering cable is a project that speaks directly to your safety and control on the water. A worn-out or corroded cable can make steering feel stiff, sloppy, or in a worst-case scenario, fail completely. Nobody wants to be left adrift.
Catching the early warning signs transforms this task from an emergency, on-the-water repair into simple, proactive maintenance.
Why This Is a Critical DIY Project
Before you even think about reaching for a wrench, let's be clear about what's at stake. Your boat's steering cable is the direct physical link between your hands on the wheel and the direction your engine is pointing. It’s not some secondary component; it’s a primary safety system.
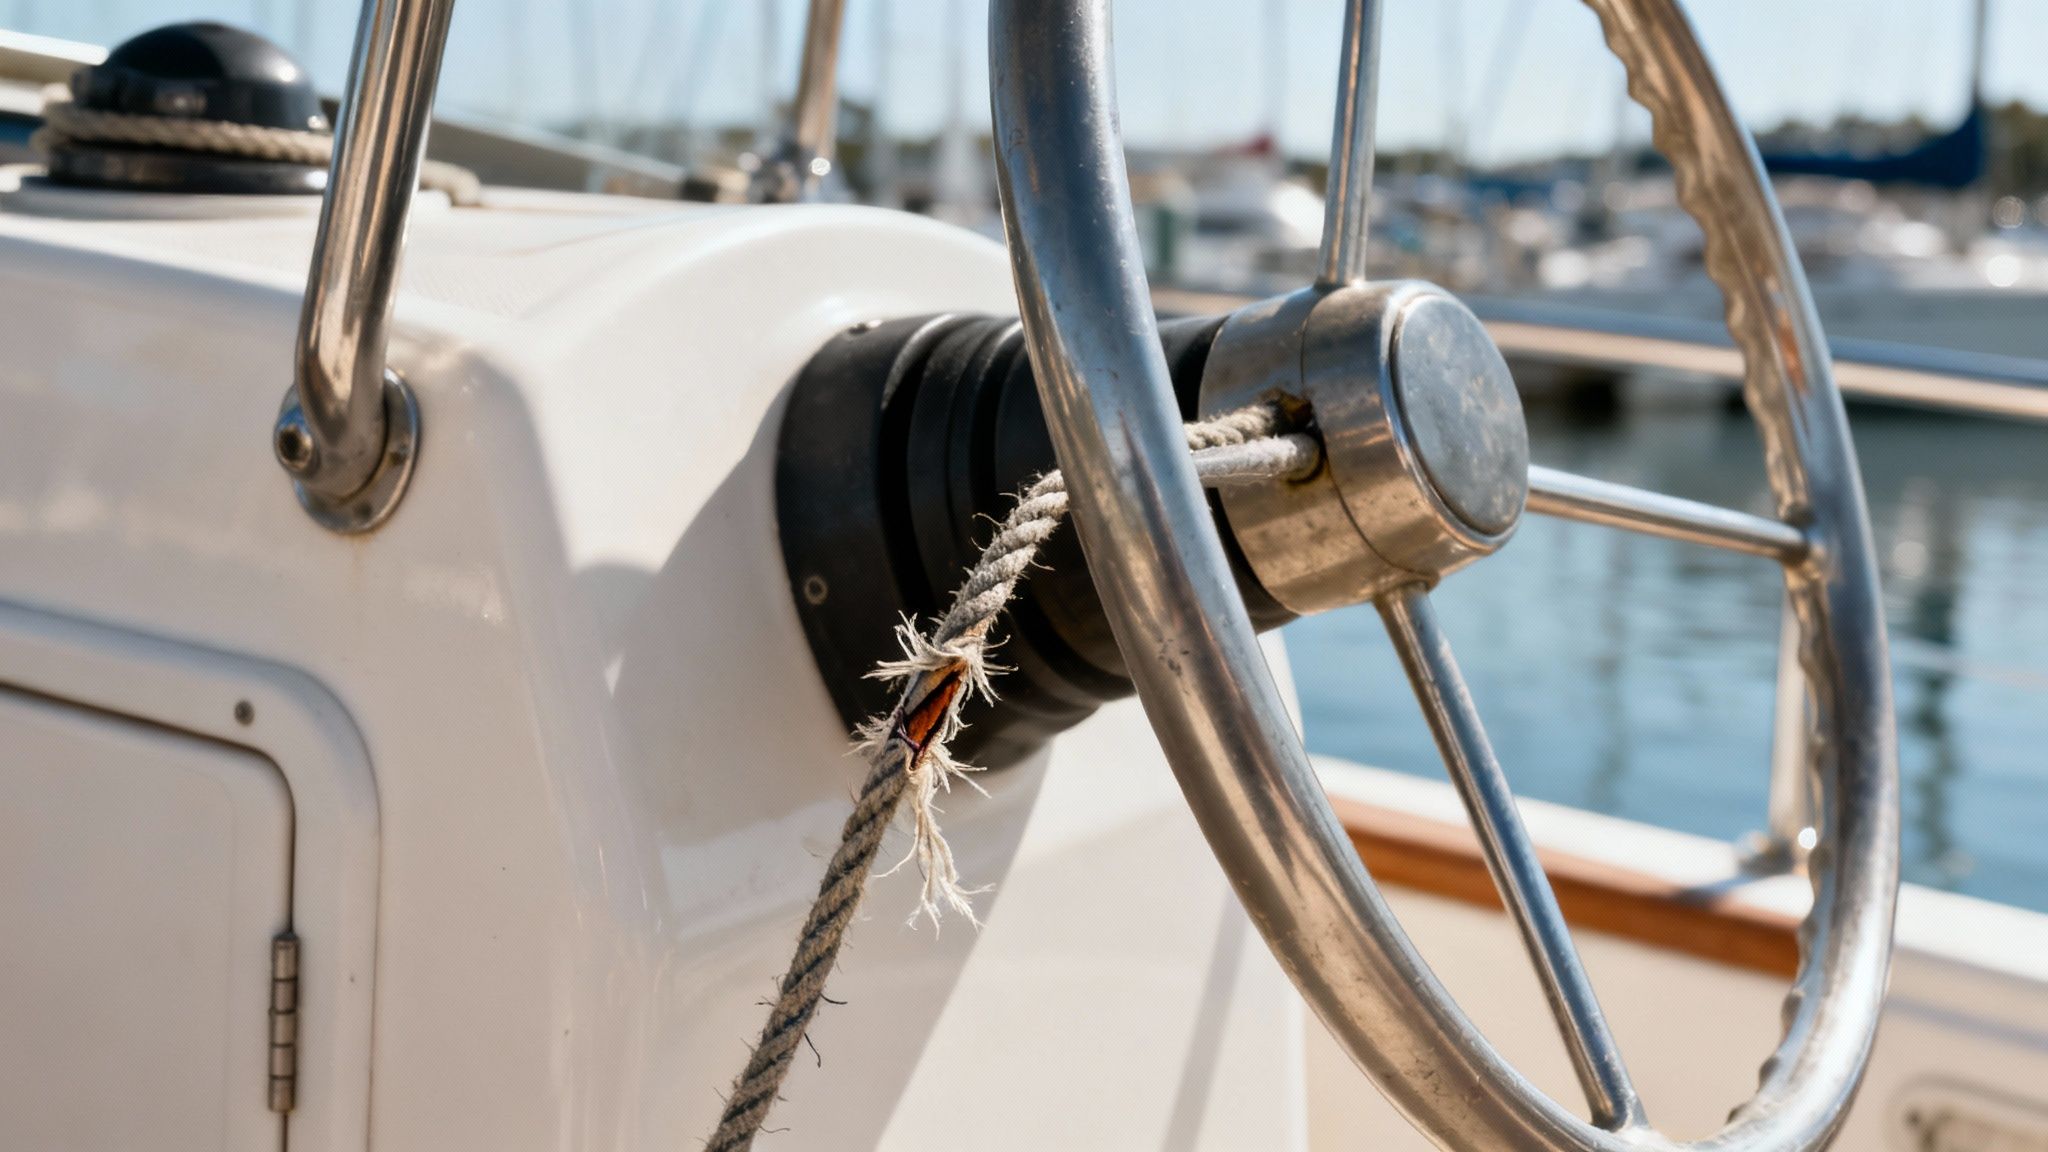
Ignoring the subtle warnings of a failing cable is a gamble. A stiff wheel, excess "play," or strange grinding noises aren't just minor annoyances. They're clear signals that the cable is corroding, binding up, or otherwise starting to fail.
Recognizing the Warning Signs
Think of it like the brakes on your car. You wouldn't ignore a soft brake pedal or a grinding sound, and the same caution applies here. The most common symptoms that signal it's time for a steering cable replacement include:
- Increased Steering Effort: The wheel becomes progressively harder to turn, especially in one direction. This almost always points to internal corrosion or a lack of lubrication.
- Excessive Free Play: You find yourself moving the steering wheel several inches back and forth before the engine actually responds. This sloppiness indicates wear inside the cable or helm assembly.
- Grinding or Popping Noises: Any audible clicks, pops, or a gritty feeling when you turn the wheel are major red flags. This could mean damaged gear teeth in the helm or a kinked cable.
By tackling these signs early, you turn a potential crisis into a manageable weekend project. This proactive approach is a cornerstone of responsible boating. A well-maintained vessel is a safer vessel, and steering integrity is non-negotiable.
Checking your steering system should be a routine part of your pre-departure process, right alongside everything else on a comprehensive boat safety checklist.
The Scope of the Issue
This isn't some rare problem affecting only a few unlucky boaters. It’s a widespread maintenance task that millions of boat owners will face.
The global market for boat steering systems was valued at around USD 1.2 billion back in 2020 and is only expected to grow. On average, a recreational boat's steering cable needs replacement every 5 to 7 years, depending on how much you use it and its exposure to harsh marine environments.
Given the millions of registered boats out there, that adds up to a massive number of replacements every year, highlighting just how essential this skill is for any hands-on boat owner.
Ultimately, taking on this project yourself is a direct investment in your safety and peace of mind on the water. Knowing your steering is responsive and reliable allows you to focus on what matters most: enjoying your time with family and friends.
Gathering the Right Tools and Parts
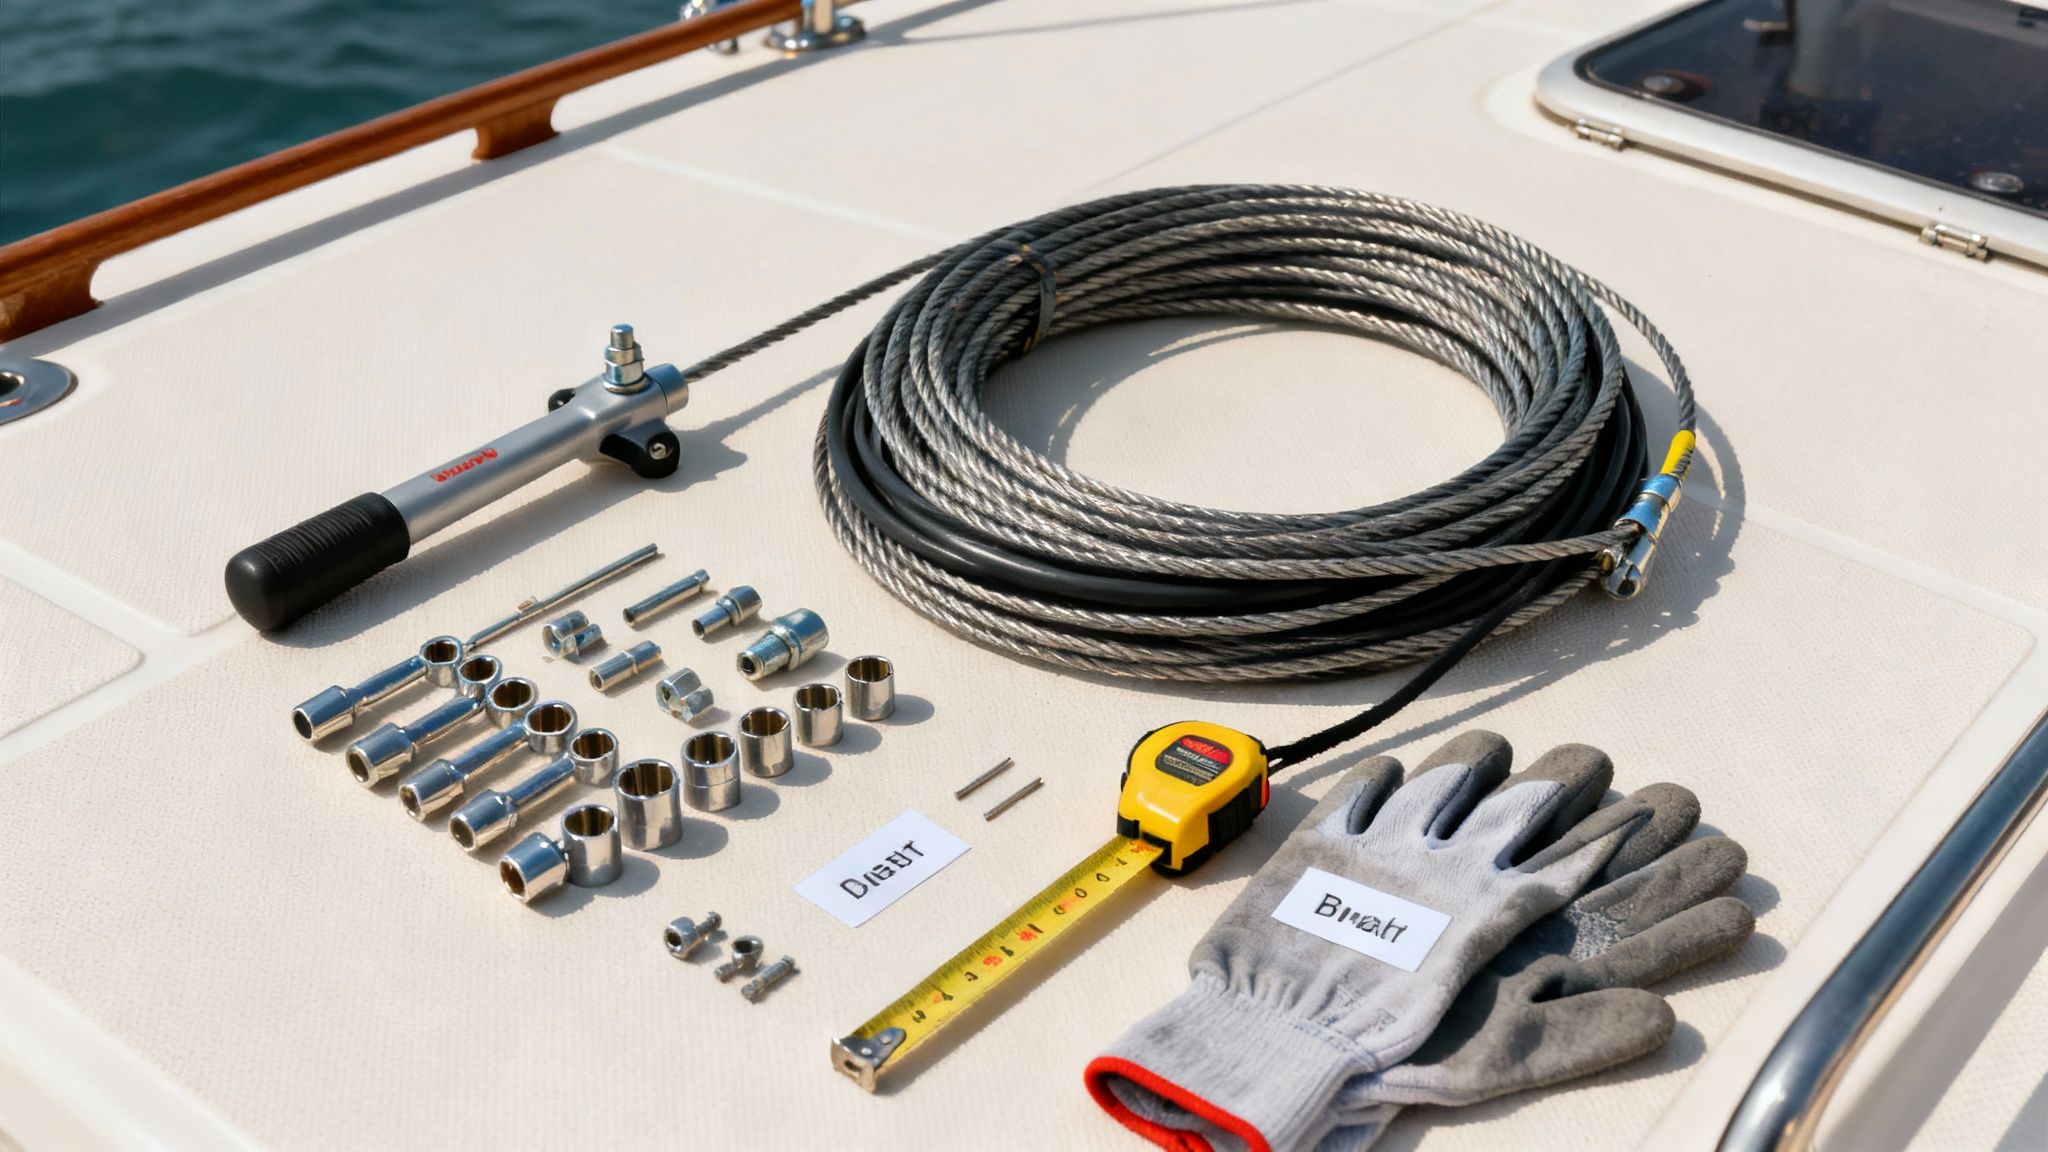
A successful boat steering cable replacement starts long before you ever pick up a wrench. I've learned over the years that good preparation is what separates a frustrating, all-day affair from a smooth, satisfying project. Rushing this stage is a surefire recipe for multiple trips back to the marine supply store.
First things first, let's get your toolkit in order. You probably have most of what you need in your garage, but a couple of key items can make a world of difference. Proper prep doesn't just save time; it prevents you from accidentally damaging your boat or the new parts during the install.
Your Essential Tool Checklist
There's nothing worse than being wedged into a tight bilge and realizing the one wrench you need is back in the workshop. Get everything you need together and within arm's reach before you start.
Here's what I always have on hand for this job:
- Socket and Wrench Set: You'll want both standard and metric sizes. Marine hardware is notorious for being a mix of both, so it's best to have a full set ready.
- Adjustable Wrenches: A pair of large adjustable wrenches is a lifesaver for gripping those big nuts on the steering tube and cable assembly.
- Penetrating Oil: This is non-negotiable. Corroded nuts and bolts are a given, and letting some penetrating oil soak in for a bit will save you a ton of sweat and frustration.
- Wire Cutters or Snips: You'll need these for clipping off all the old zip ties holding the cable in place.
- Duct Tape: This is my secret weapon for routing the new cable. Just tape the end of the new cable securely to the old one before you pull it out. The old cable becomes the perfect guide, pulling the new one right into place.
- Marine-Grade Grease: Absolutely essential. For a job this critical, use a high-quality grease like our Marine Grease, which is specifically formulated to resist water and prevent corrosion in harsh saltwater environments. A grease gun makes the job quick and easy.
For a deeper dive into what every boater should have on board, check out our complete guide to essential boat tools. It'll get you ready for this project and just about any other repair that comes your way.
Choosing the Correct Replacement Cable
Getting this part right is the most critical step of the whole process. Installing the wrong cable isn't just a hassle—it's a genuine safety risk. Your first job is to figure out what kind of system you have. Most boats under 50 feet use one of two main types of mechanical systems.
A common mistake is buying a cable based on your boat's length alone. The actual cable length depends on its specific routing path, including all the bends and turns from the helm to the engine.
The two systems you'll run into are rotary and rack-and-pinion. A rotary helm uses a round gear mechanism behind the dash, while a rack-and-pinion system uses a straight, flat gear bar. You have to replace your system with the same type. To make things simple, you can get a complete kit that includes the helm, cable, and bezel, guaranteeing a perfect fit.
To nail the length, the best way is to check the existing cable. Look for a part number printed right on the plastic jacket, usually within a few feet of the helm. The last two digits almost always tell you the length in feet. If that number is worn off or unreadable, you'll have to pull the old cable out and measure it manually from tip to tip. That measurement is your golden ticket to a perfect replacement.
Choosing Your Replacement Steering System
Picking the right system can feel overwhelming, but it really comes down to what kind of boat you have and how you use it. Here’s a quick breakdown of the most common options to help you decide.
| System Type | Best For | Key Feature | Consideration |
|---|---|---|---|
| Rotary Steering | Smaller boats, outboards under 150 HP | Simple, compact design fits tight spaces | Can have more noticeable steering effort |
| Rack-and-Pinion | Ski boats, performance hulls | Provides a more direct, responsive feel | Requires more space behind the dashboard |
| No-Feedback (NFB) | Higher horsepower outboards | Reduces engine torque felt at the wheel | More complex helm mechanism, higher cost |
| Hydraulic Steering | Large boats, high-HP engines | Effortless, smooth steering | Most expensive, requires bleeding lines |
Ultimately, replacing your cable with the same type and length is the safest bet for a straightforward job. If you're considering an upgrade to a No-Feedback or hydraulic system, it's a bigger project but can dramatically improve your time on the water.
Navigating the Replacement Process
Alright, with your tools laid out and the right replacement cable ready to go, it’s time to get down to business. This is where a little patience goes a long way. We'll tackle this by breaking the job into a few key phases, starting at the engine and making our way up to the helm.
The process itself isn't rocket science, but you'll be working in some tight spots. Just remember, every boat layout is a bit unique, so you might need to get creative to solve a problem or two. Take your time and think through each step before you start wrenching on anything.
Disconnecting at the Engine
First up, we need to free the old cable from the engine's tiller arm or steering tube. Honestly, this is often the trickiest part of the whole job, mainly due to corrosion and cramped quarters. If you've got a swim platform or a tight engine cowling, you know exactly what I mean.
Grab your penetrating oil and give that big nut holding the cable to the engine's tilt tube a good soak. Let it sit and do its thing for at least 15-20 minutes. While you're waiting, you can pop off the steering link rod from the cable's output ram. It's usually just one nut, sometimes secured with a cotter pin.
Now, let's get back to that big retaining nut. You'll need two wrenches here—one to get a grip on the flat spots of the steering tube to hold it steady, and the other to turn the nut.
If it's being stubborn, don't be afraid to add more oil and give it a few gentle taps with a hammer to break that corrosion bond. Whatever you do, don't just go full gorilla on it; you could damage the tilt tube, and that's a much bigger problem. Finesse is your friend here.
Pulling the Old Cable and Routing the New One
Once the engine end is free, it’s time to head to the helm. How you disconnect it here will depend on whether you have a rotary or a rack-and-pinion system. Usually, this involves taking off the steering wheel and a bezel to get to the helm mechanism, then unbolting the helm to release the cable. For a better look at how these different setups work, check out our guide on the anatomy of a boat steering wheel.
With both ends disconnected, you're ready for what I think is the most satisfying part. Before you yank the old cable out, grab some quality duct tape. Securely tape the helm-end of your new cable to the engine-end of the old one. Overlap them by about a foot and wrap it tight to make sure it's a smooth, snag-free connection.
Pro Tip: This is a two-person job if you can swing it. Have a helper gently feed the new cable from the helm side while you carefully pull the old cable out from the engine side. This simple trick keeps the cable from kinking and makes navigating through rigging tubes a breeze.
Using the old cable as a "guide wire" is a total game-changer. It guarantees the new cable follows the exact same path, so there’s no guesswork involved in the routing.
Final Connections and Adjustments
With the new cable pulled through, you're on the home stretch. The rest is pretty much the reverse of what you just did. I like to start by loosely attaching the new cable at the helm, then heading back to the engine.
- At the Engine: Take a wire brush and clean up the threads on the tilt tube really well. Slather a good amount of fresh Marine Grease on the tube and inside the new cable's retaining nut. Always thread it on by hand first to avoid cross-threading, then tighten it down securely.
- At the Helm: Reconnect the cable to the helm mechanism, following the manufacturer's directions. Bolt the helm back into place and make sure everything is good and tight.
Before you put the steering wheel back on, do a quick function check. Turn the helm and watch the engine. Does turning the wheel to starboard make the engine turn right? If it’s backward, you've probably wrapped the cable the wrong way around the helm gear. It’s an easy fix now, but a real pain once it's all buttoned up.
Once you’ve confirmed the steering direction is correct, make your final tweaks to ensure there’s no binding or sloppy play in the system. While boat steering cables have their own quirks, the basic principles of replacing a cable are pretty universal. If you want to get a better handle on the fundamentals, this general DIY cable repair guide has some great insights.
Troubleshooting Common Installation Issues
Even when you do everything by the book, replacing a steering cable can throw a few curveballs your way. Years of corrosion, tight corners in the rigging tube, and other little surprises can turn a simple job into a real battle. But don't reach for the bigger hammer just yet.
Most of these hang-ups are pretty common, and there are straightforward ways to work through them without damaging your boat or your new parts. Let's walk through the most frequent frustrations you might run into.
The Old Cable Is Seized Solid
This is the big one. You’ve got your wrenches locked onto that big retaining nut on the engine's tilt tube, and it just won't break free. Saltwater and time have a nasty habit of practically welding these parts together.
The secret here is patience, not brute force. Douse the nut and threads with a good penetrating oil and let it sit for at least 30 minutes. Give it time to creep in and do its job. Then, grab two wrenches—use one to hold the tilt tube steady by its flat spots while you turn the nut with the other. If it’s still giving you grief, a few sharp taps on the wrench with a hammer can often shock the corrosion enough to break its grip.
Never, ever use a torch or extreme heat around the engine. The risk of fire is huge, and you could easily damage seals, wiring, or other critical parts. Slow, steady pressure and a quality lubricant are your best friends here.
My Steering Is Unusually Stiff Now
You got the new cable in, but cranking the wheel feels like an arm workout. It's a frustrating setback, but it almost always points to one of two culprits: a bad cable route or not enough grease.
First, trace the cable’s path from the helm all the way to the engine. If it's being forced into a bend that’s too sharp or got kinked during the install, it’s going to bind up. You want the widest, most sweeping bends possible. Think gentle curves, not sharp angles.
Second, think back to the lubrication step. Did you really slather it on? The inside of the tilt tube and the entire length of the cable’s output ram need a thick coat of quality marine grease. If the steering is still tight, you might have to disconnect the cable at the engine and grease everything up again. For the best protection against the elements, our Marine Grease is specifically designed to hold up in harsh saltwater conditions.
This infographic breaks down the core phases of the job, which is where you're most likely to hit a snag.
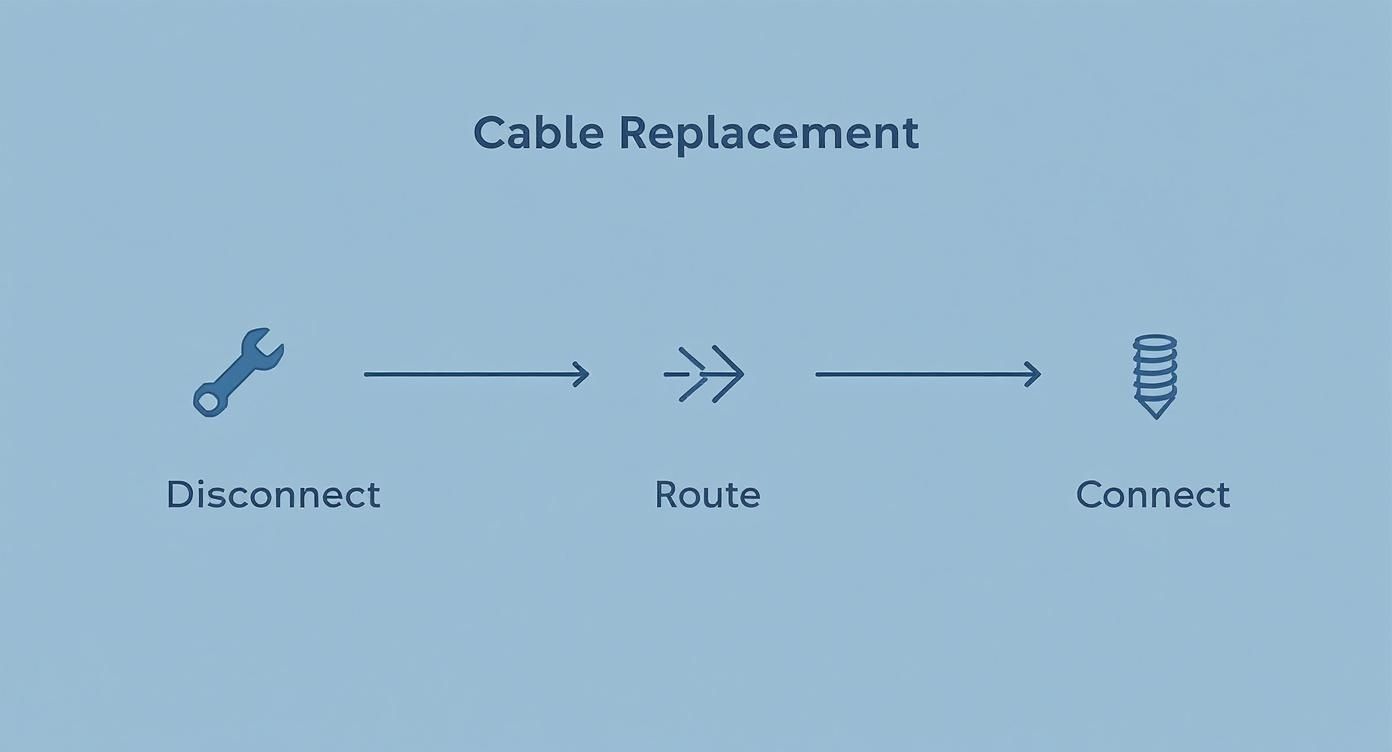
It boils the project down to three main actions: getting the old hardware off, running the new cable, and making the final connections.
The Steering Wheel Turns the Wrong Way
It happens to the best of us. You’ve put it all back together, you spin the wheel right, and the engine swings left. It feels like a major mistake, but the fix is surprisingly quick and happens right at the helm.
This mix-up occurs when the steering cable is wrapped the wrong way around the helm's internal gear. You’ll just need to pop the steering wheel and bezel off again, unhook the cable from the helm unit, and simply feed it back in from the opposite direction. It’s a good lesson: always do a quick direction check before you put all the trim pieces back on.
Maintaining Your New Steering System

Getting that new cable installed is a huge win, but your work isn’t quite finished. Smart, consistent maintenance is what ensures your efforts pay off for years to come, not just for a single season. A simple care routine protects your investment and keeps your steering feeling as smooth and responsive as the day you installed it.
Think of it as protecting your time and money. Proper upkeep helps you avoid repeating the entire boat steering cable replacement process prematurely. It’s all about turning a major repair into a one-time project followed by minor, preventative checks.
Proactive Lubrication and Inspection
The two pillars of long-term steering health are proper lubrication and regular inspection. They work hand-in-hand to fight off the sworn enemies of your steering system: corrosion and water intrusion.
A key habit to develop is regularly applying fresh marine-grade grease to the engine's tilt tube and the cable’s output ram. This creates a waterproof barrier that keeps saltwater out and ensures everything moves without friction.
A simple but effective trick is to turn the steering wheel all the way from lock-to-lock a few times every month. This simple motion redistributes the grease along the full length of the cable ram, preventing it from hardening and ensuring the entire assembly stays lubricated.
Your Routine Maintenance Checklist
Integrating these checks into your regular boating schedule will extend the life of your new system significantly. It doesn't take much time, and it's far easier than another full replacement. To get a better handle on the longevity of your boat's steering system, understanding broader general maintenance practices can be really beneficial.
Here’s what to keep an eye on:
- Grease the Tilt Tube: At least twice a season, clean the old grease off the tilt tube and steering ram and apply a fresh, liberal coat of Marine Grease.
- Inspect the Cable Jacket: Take a moment to look over the visible parts of the cable jacket. You're looking for any cracks, chafing, or signs of damage that could let water in.
- Check for Water Intrusion: Look for any milky or rusty residue around the steering ram's seals. This is a telltale sign that water has breached the barrier and corrosion is starting.
This proactive approach is financially smart. In Europe, where the boat steering system market was valued at USD 1.47 billion in 2024, boaters allocate around 30% of maintenance budgets to steering upkeep. Given that a single replacement can cost up to EUR 400, preventative care offers a clear return on investment.
For a more complete overview of vessel upkeep, consider incorporating these steps into a larger schedule, like the one outlined in our comprehensive boat maintenance checklist. It helps you stay on top of all the little tasks that keep your boat safe and reliable.

Still Have Questions About Steering Cable Replacement?
Even with a step-by-step guide in hand, it's smart to have a few questions. We're talking about your boat's steering system, after all—a critical piece of safety gear. Let's tackle some of the most common questions we hear from boaters just like you.
How Often Should I Replace My Boat Steering Cable?
The go-to advice is to replace the cable every 5 to 7 years for a recreational boat, but that's not set in stone. If you're out on the saltwater every weekend, that timeline shrinks. How you maintain it and how often you use it play a huge role.
Honestly, the best way to know is to pay attention to how your steering feels. Is it getting stiff? Do you hear grinding noises or feel a bunch of extra play in the wheel? Those are clear signals that it's time for an inspection, regardless of how old the cable is. Don't let a small annoyance turn into a major problem out on the water.
Your boat talks to you through feel and sound. If you listen, it'll tell you when maintenance is needed long before a part actually breaks. Getting ahead of these things is just part of being a safe, responsible skipper.
Should I Replace Just the Cable or the Entire Kit?
I get this question a lot. It’s tempting to save a few bucks and just swap out the cable, especially if the helm seems okay. But here's my take: always replace the entire kit. That means the helm, cable, and the bezel assembly. These parts are engineered to wear down together.
Putting a shiny new cable on an old, worn-out helm is a recipe for sloppy steering. It can even cause that new cable to fail way sooner than it should. If your current steering system has been on the boat for more than 10 years, do yourself a favor and invest in a complete kit. You'll get the peace of mind that everything is working together perfectly.
What's a Boat Steering Cable Replacement Going to Cost Me?
The cost really depends on whether you're doing it yourself or calling in a pro.
If you're ready to get your hands dirty and follow a guide like this one, you're looking at about $150 to $300 for a good-quality steering kit. The price tag will shift based on your cable length and whether you have a rotary or a rack-and-pinion system.
Opting for a professional marine mechanic? You'll need to add labor costs to the parts. That can push the total into the $400 to $700 range, and sometimes even more depending on how complex your boat's rigging is and what the going labor rates are in your area. This is one of those projects where a little DIY effort can save you a significant chunk of change.
For every job on your boat, from the helm to the hull, Better Boat is here with the premium products and expert advice you need to get it done right. Our full lineup of cleaning supplies, marine-grade hardware, and essential tools is designed to make boat care straightforward and effective. Keep your vessel in top shape by exploring all our solutions at https://www.betterboat.com.


