


How to Detail a Boat for a Showroom Shine
Getting that showroom shine on your boat isn't about some secret trick. It's about showing up with the right gear for the job. Your success really starts with building a solid arsenal of supplies, from the right marine-grade soaps that won't strip your finish to the perfect polisher for knocking out oxidation. Putting this kit together from the get-go means you'll work smarter, not harder.
Your Essential Boat Detailing Toolkit
Before you even think about getting the hull wet, a well-stocked detailing kit is your best friend. I know it's tempting to just grab whatever soap and sponges you have lying around, but boats and marine environments are a different beast. Using household detergents is a huge mistake—they'll strip off wax and protective coatings, leaving your gelcoat wide open to UV damage and oxidation.
If you want a quick refresher on the initial wash-down, check out our complete guide on how to properly clean a boat before you begin detailing.
The absolute foundation of a good detailing kit is a pH-neutral marine boat soap. This stuff is engineered to lift away salt, grime, and dirt without being harsh on your gelcoat or any wax you've already applied. Think of it as your first line of defense in protecting your boat's finish and value.
Must-Have Cleaning and Polishing Gear
To really do this right, you need more than just soap. Having the proper tools for application and removal is what separates a decent job from a professional one, preventing scratches and giving you that even, glossy finish. My personal, can't-work-without-it checklist always includes these items:
- Microfiber Towels and Mitts: Don't skimp here; you need a few different types. A plush wash mitt is great because it holds tons of suds, which helps lift grit away instead of dragging it across the paint. You'll also want separate, high-quality microfiber towels for drying, for buffing off polish, and for applying wax. You absolutely cannot mix these up.
- A Dual-Action Polisher: For anyone new to this, a dual-action (or DA) polisher is a total game-changer. It oscillates in a random pattern, which makes it far more forgiving than a pro-grade rotary buffer. This drastically lowers your chances of burning right through the gelcoat or leaving those ugly swirl marks.
- Pads for Polishing and Compounding: A polisher is only as good as the pad on the end of it. You'll need a collection of foam or microfiber pads with different levels of abrasiveness, or "cut." This ranges from aggressive compounding pads for tackling heavy oxidation to ultra-soft finishing pads for bringing out that final, deep gloss.
Pro Tip: Grab a permanent marker and label your microfiber towels for their specific jobs—'Wash,' 'Dry,' 'Compound,' 'Wax.' This simple step prevents cross-contamination. Accidentally using a towel with dried compound residue to apply wax will completely undo all your hard work and ruin that perfect finish.
Essential Safety Equipment
Let's be real: boat detailing involves some chemicals that can be pretty tough on your skin and eyes. Don't ever skip the personal protective equipment (PPE). It’s a simple but critical step that makes the whole process safer and way more comfortable.
Your safety kit should be simple but effective:
- Chemical-Resistant Gloves: A good pair of nitrile or latex gloves will save your hands from getting dried out or having a reaction to cleaners, compounds, and sealants.
- Vented Goggles or Safety Glasses: You need to protect your eyes from splashes, especially when you fire up the polisher—it can definitely sling product around.
- Knee Pads: Trust me on this one. You're going to spend a lot of time on your knees working on the hull. A good pair of knee pads will be the best friend your body has all day.
By taking the time to assemble this toolkit before you start, you're setting yourself up for a pro-level result. It turns what could be a chore into a genuinely rewarding process, all while protecting your investment and keeping it looking incredible.
The Foundation: A Deep Wash and Decontamination
Every brilliant, long-lasting shine you see on a boat starts with a perfectly clean surface. Honestly, this is the single most important part of the entire detailing process. It's the foundation for everything that comes next.
If you rush this step, you’ll end up grinding grit and salt into the finish with your polisher, creating more scratches than you started with. The goal here isn't just to make the boat look clean—it's to create a pure, uncontaminated surface for the polishing and waxing stages to bond to.
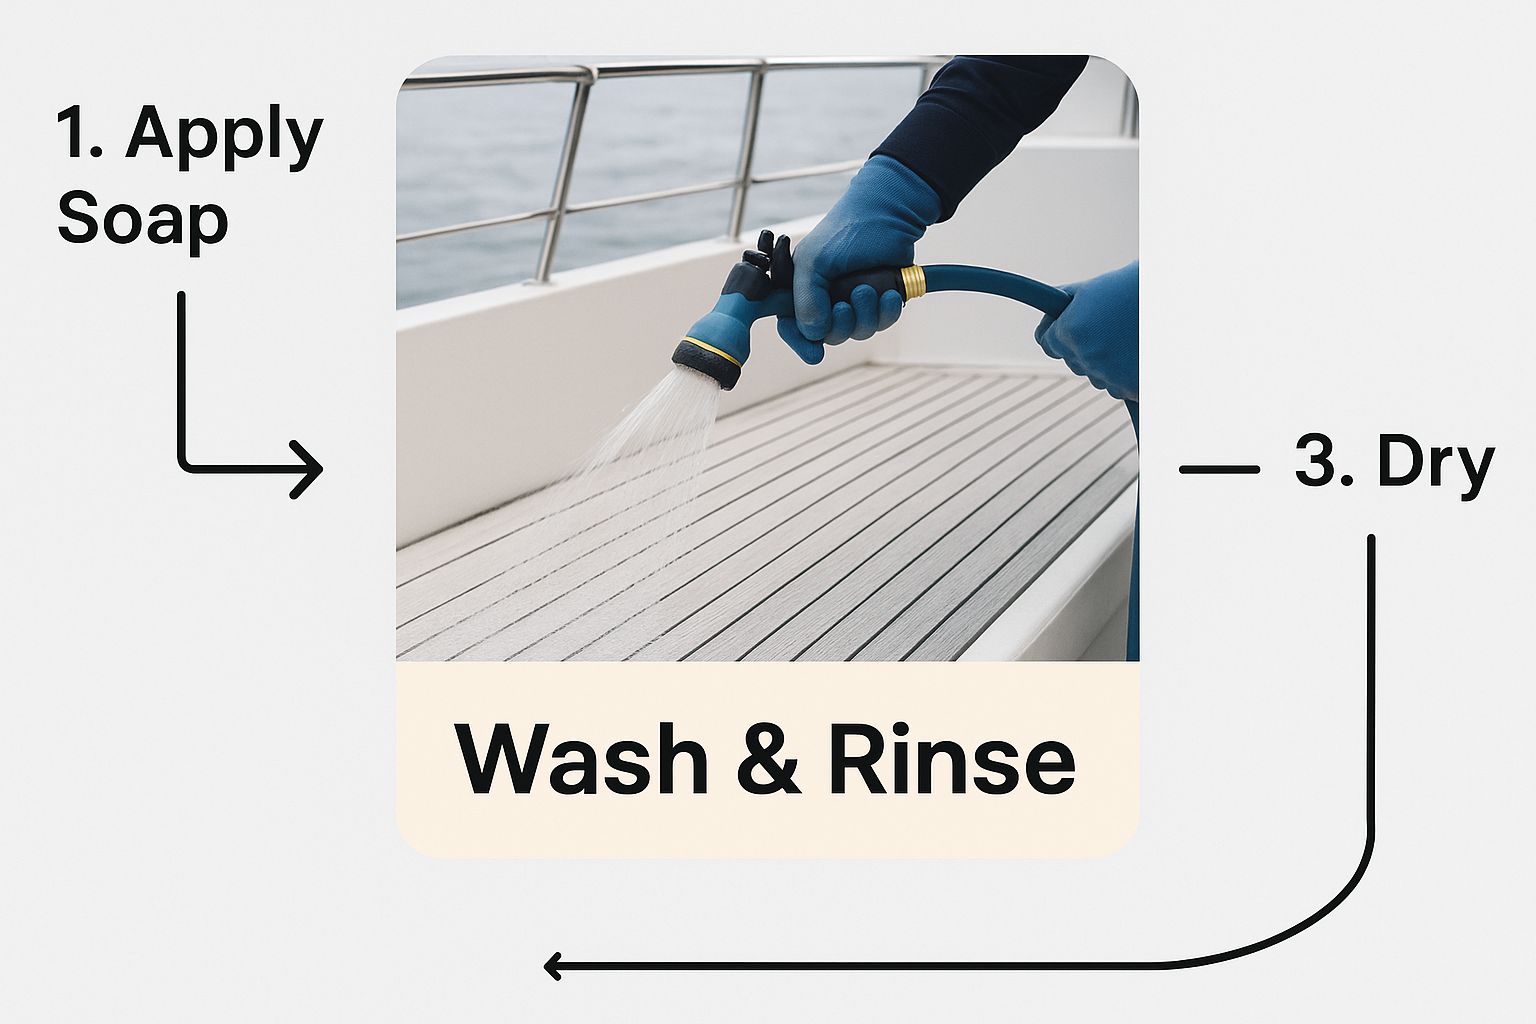
Starting with a gentle but thorough rinse is key. It gets the loose, heavy stuff off so you aren't dragging it across the sensitive gelcoat during the hand-washing phase.
The Two-Bucket Wash Method
The real secret to a scratch-free wash is the two-bucket method. It might sound a little extra, but it's a non-negotiable technique that every professional detailer I know swears by. It’s simple: one bucket holds your soapy water, and the second is filled with plain, clean water with a Grit Guard at the bottom.
Here's how it plays out in practice:
- Dunk your clean wash mitt into the soap bucket.
- Wash a small section of the boat, always working from the top down.
- Before getting more suds, rinse the dirty mitt in the plain water bucket, rubbing it against the Grit Guard. This knocks all the dirt and salt particles loose, trapping them at the bottom.
- Wring out the mitt, and then go back to the soap bucket for a fresh, clean load.
This simple habit prevents you from picking up the grit you just removed and dragging it all over your boat's finish. It’s a small change that makes a massive difference in the final look.
Decontaminating the Hull
After a good wash, your boat might look clean, but it's likely still covered in bonded contaminants that soap alone won't touch. These are those stubborn spots that make the surface feel rough to the touch and will absolutely sabotage your wax job.
Expert Insight: I like to think of a boat's gelcoat like skin. A basic wash removes the surface dirt, but decontamination is like a deep exfoliation that cleans out the pores. Without this, your wax or sealant can't properly bond to the surface, which drastically cuts down its lifespan and effectiveness.
There’s a reason the market for specialized boat cleaners is so massive. It was valued at USD 3.16 billion in 2023 and is only expected to grow as more owners recognize the importance of proper maintenance. You can dig into the specifics by checking out the latest boat cleaner market research.
To get that surface truly pure, you need to target different types of grime with the right products.
Boat Cleaning Stages and Recommended Products
Here’s a quick breakdown of the essential cleaning and decontamination steps, along with the right type of product for each job.
| Stage | Objective | Recommended Product Type |
|---|---|---|
| Initial Wash | Remove loose dirt, salt, and grime. | pH-Neutral Marine Soap |
| Waterline Stains | Dissolve the stubborn brown or green "boat beard." | Acid-Based Hull Cleaner |
| Mineral Deposits | Remove hard water spots from sprinklers or spray. | Mineral Deposit Remover |
| Organic Stains | Eliminate bird droppings, spider droppings, and leaf tannins. | All-Purpose Marine Cleaner |
A few pro tips for this stage: always apply these cleaners to a cool, dry surface and stay out of direct sunlight to prevent them from drying too quickly.
For those ugly waterline stains, you'll need a dedicated hull cleaner. These are often acid-based, so be sure to follow the safety instructions—gloves and eye protection are a must. Just spray it on, let it sit for a few minutes (don't let it dry!), and you’ll often see the stains literally melt away right before your eyes. It’s pretty satisfying.
Once you’ve tackled all the specific stains and deposits, give the entire boat one final, thorough rinse. Now your boat is truly clean and prepped, providing the perfect canvas for restoring that deep, reflective shine.
Restoring a Mirror Shine with Compounding and Polishing
With your hull perfectly clean and prepped, you've set the stage for the most rewarding part of the whole process. This is where the magic happens—where you literally erase years of sun damage, oxidation, and annoying little scratches to bring back that deep, showroom shine. We’re not just talking about a quick buff; this is a meticulous correction that reveals the vibrant, healthy gelcoat hiding underneath.
First things first, you need to "read" your boat's finish. Get up close and personal. Run your hand across the hull. Does it feel chalky or dry? Is the color looking dull and washed out compared to a spot that's been covered up? That's oxidation, and how bad it is will dictate where you start. Heavy, chalky oxidation needs an aggressive game plan, while a bit of light dullness can be fixed with a much gentler approach.
Choosing Your Cut Compound or Polish
Think of compounds and polishes like liquid sandpaper, each with a different grit level designed for a specific job. Nailing this choice is everything. Going too aggressive is a rookie mistake that strips away healthy gelcoat you can't get back. On the flip side, using something too fine on heavy oxidation is just a waste of time, energy, and product.
-
Heavy-Cut Compound: This is your heavy hitter for gelcoat that's seriously oxidized, chalky, and faded. It packs the most aggressive punch to power through the damaged top layer. It will almost always leave its own fine scratches or a slight haze, but don't panic—that's a totally normal part of the process.
-
Medium-Cut Polish: If your boat has moderate oxidation, or if you've just finished the heavy-cut step, this is what you'll grab next. It's designed to refine the surface, clearing up the haze from the compound and starting to build that gloss.
-
Fine-Cut or Finishing Polish: For boats with just light swirls or as the final machine step, a finishing polish is the ticket. It uses super-fine abrasives to buff out the last tiny imperfections and pop a deep, wet-looking shine.
You’ll be applying these with a machine polisher. Sure, you can do it by hand, but the power and consistency of a machine deliver a night-and-day better result in a fraction of the time. For most boat owners, a dual-action (DA) polisher is the perfect tool. Its random orbital motion is far more forgiving than a pro's rotary buffer, making it much safer on your gelcoat and drastically reducing the risk of burns.
Mastering Your Polisher Technique
The real art is in the technique—combining the right product, pad, and motion. Don’t get overwhelmed and try to tackle the whole boat at once. Break the hull down into manageable 2x2 foot sections. Working in a small, focused area like this is the only way to ensure you work the product properly and get a beautiful, consistent finish from bow to stern.
For each section, stick to this simple method:
- Squeeze 4-5 pea-sized drops of your compound or polish onto the pad.
- Before you hit the power button, dab the pad on your 2x2 section a few times. This simple move prevents product from slinging all over you and the boat.
- Set the machine to a low speed just to spread the polish evenly.
- Crank it up to a medium speed and move the polisher in a slow, overlapping cross-hatch pattern—a few passes side-to-side, then a few passes up-and-down.
- Use firm, steady pressure, keeping the pad flat against the surface. Let the machine do the heavy lifting.
Keep at it until the product starts to look thin and almost transparent. That's your sign that the abrasives have fully broken down and done their job. Grab a clean microfiber towel, wipe away the residue, and hit the area with a flashlight to check your work before moving on.
Crucial Takeaway: The number one mistake people make is globbing on way too much product. More is not better here. Excess polish just gums up the pad, kills its cutting power, and leaves you with a sticky mess that's a nightmare to wipe off. Trust me, a little goes a long way.
This methodical process is a cornerstone of the maritime service world. In fact, professional detailing is just one part of a massive industry that supports over 19.4 million workers globally across more than 198,000 companies. The entire marine vessels market is on track to grow from USD 111.10 billion to USD 133.63 billion by 2030, fueled by an ever-expanding fleet. You can dive deeper into the scale of this industry and find more details in the full maritime industry outlook from Startus Insights.
Matching Pads to the Job
The pad you choose is just as critical as the polish. Pads are made from different materials and come in various levels of firmness, each designed to work best with a specific type of liquid.
| Pad Type | Primary Use | Best Paired With |
|---|---|---|
| Wool Pad | Aggressive cutting for heavy oxidation | Heavy-Cut Compounds |
| Foam Cutting Pad | Moderate to heavy defect removal | Medium to Heavy Compounds |
| Foam Polishing Pad | Light defect removal and gloss enhancement | Medium to Fine Polishes |
| Foam Finishing Pad | Final gloss refinement and wax/sealant application | Finishing Polishes & Waxes |
Always start with the least aggressive pad and polish combo you think might work. Find an inconspicuous spot to do a small test patch. If it doesn't quite cut it, then you can step up to a more aggressive pad or product. This approach ensures you only remove the bare minimum of gelcoat necessary to get the job done.
Once you’re finished with this stage, your hull will be incredibly smooth and reflective, creating the perfect canvas for the final, and most critical, step: protection.
Locking In the Shine with Waxes and Sealants
After all that hard work compounding and polishing, your boat's gelcoat is looking pristine and glossy, but it's also completely exposed. This is the final, most critical stage: locking in that shine and giving your hull a tough shield against the harsh marine environment. If you skip this, all that gloss you just worked so hard for will fade in a matter of weeks.
This step is about more than just looks. It's your boat's primary defense against UV rays, saltwater corrosion, bird droppings, and those stubborn waterline stains. A properly sealed surface is also hydrophobic, which just means water beads up and rolls right off, taking dirt along with it and making your future cleanups so much easier.
Choosing Your Boat's Armor
The world of marine protectants can seem a little overwhelming, but it really just boils down to three main categories. Each one offers a different balance of looks, durability, and how much effort it takes to apply.
Here’s a look at the different products you’ll find on the shelf and what they’re best for.
Comparison of Marine Protection Products
| Protection Type | Durability | Gloss Level | UV Protection |
|---|---|---|---|
| Marine Wax | 2-3 months | Deep, warm | Good |
| Polymer Sealant | 4-6 months | Slick, hard | Excellent |
| Ceramic Coating | 1-2+ years | Extremely glossy | Superior |
Let's break down what this means for your boat.
- Marine Wax: This is the classic choice, usually containing carnauba for that deep, wet-looking gloss. It’s absolutely fantastic for bringing out the richness in darker colored hulls. The trade-off is durability; a carnauba wax typically only lasts about 2-3 months in a tough marine environment.
- Polymer Sealant: These are synthetic products engineered for one thing: toughness. A sealant won't give you the same warm glow as carnauba, but it creates a slick, hard, almost glass-like finish that offers superior protection for 4-6 months.
- Ceramic Coatings: This is the top-tier option. A true ceramic coating creates a semi-permanent, microscopic layer of SiO2 (silicon dioxide) that actually bonds to your gelcoat. The protection is unmatched, often lasting for 1-2 years or even more. It offers incredible UV resistance and makes the surface so slick that cleaning becomes a breeze.
Expert Insight: For most recreational boaters, a high-quality polymer sealant is the sweet spot. It delivers excellent protection that can last most of a boating season and is far more durable than a traditional wax—all without the intensive prep work and high cost of a full ceramic coating.
Knowing how often you should wax a boat is crucial for keeping it in top condition.
Application Techniques for a Flawless Finish
Whether you’re working by hand or with a machine, the secret is applying a very thin, even layer. Piling on thick coats of wax or sealant doesn't add more protection. It just makes it a beast to buff off and often leaves a streaky, hazy mess.
Applying by Hand
For the traditionalist, applying wax by hand can be a pretty relaxing process. Just grab a soft foam applicator pad and work in small, manageable sections.
Apply the product using gentle, overlapping circular motions to make sure you get complete coverage. Let it dry to a haze, which usually takes 10-20 minutes (but always check the product directions!). Once it's hazed over, use a clean, plush microfiber towel to buff it off, flipping the towel frequently to a clean side.
Applying with a Polisher
For speed and a perfectly even coat, nothing beats a dual-action polisher with a soft foam finishing pad.
- Dab a few small, pea-sized dots of sealant or liquid wax onto your finishing pad.
- Set the polisher to its lowest speed.
- Working in a 3x3 foot section, quickly spread the product over the surface without any pressure.
- You don't need to "work" it in like a polish. The only goal here is to lay down a thin, uniform coat.
- Let it haze up, then simply wipe away the residue with a fresh microfiber towel.
The massive growth of the marine industry directly fuels the development of these protective products. The global marine coatings market is a great example of this, projected to grow from USD 4.28 billion in 2025 to USD 6.58 billion by 2032. This boom is driven by the constant need to protect vessels from the very elements you’re fighting.
With that final protective layer applied, your boat is finally ready to face the elements with a brilliant, long-lasting shine.
The Professional Difference: Interior and Hardware Detailing
A truly great boat detail is more than just a shiny hull. What really separates the pros from the amateurs is the painstaking care given to the interior and hardware—all the bits you see and touch every single time you step on board. This is what takes a boat from just "clean" to a show-quality restoration.
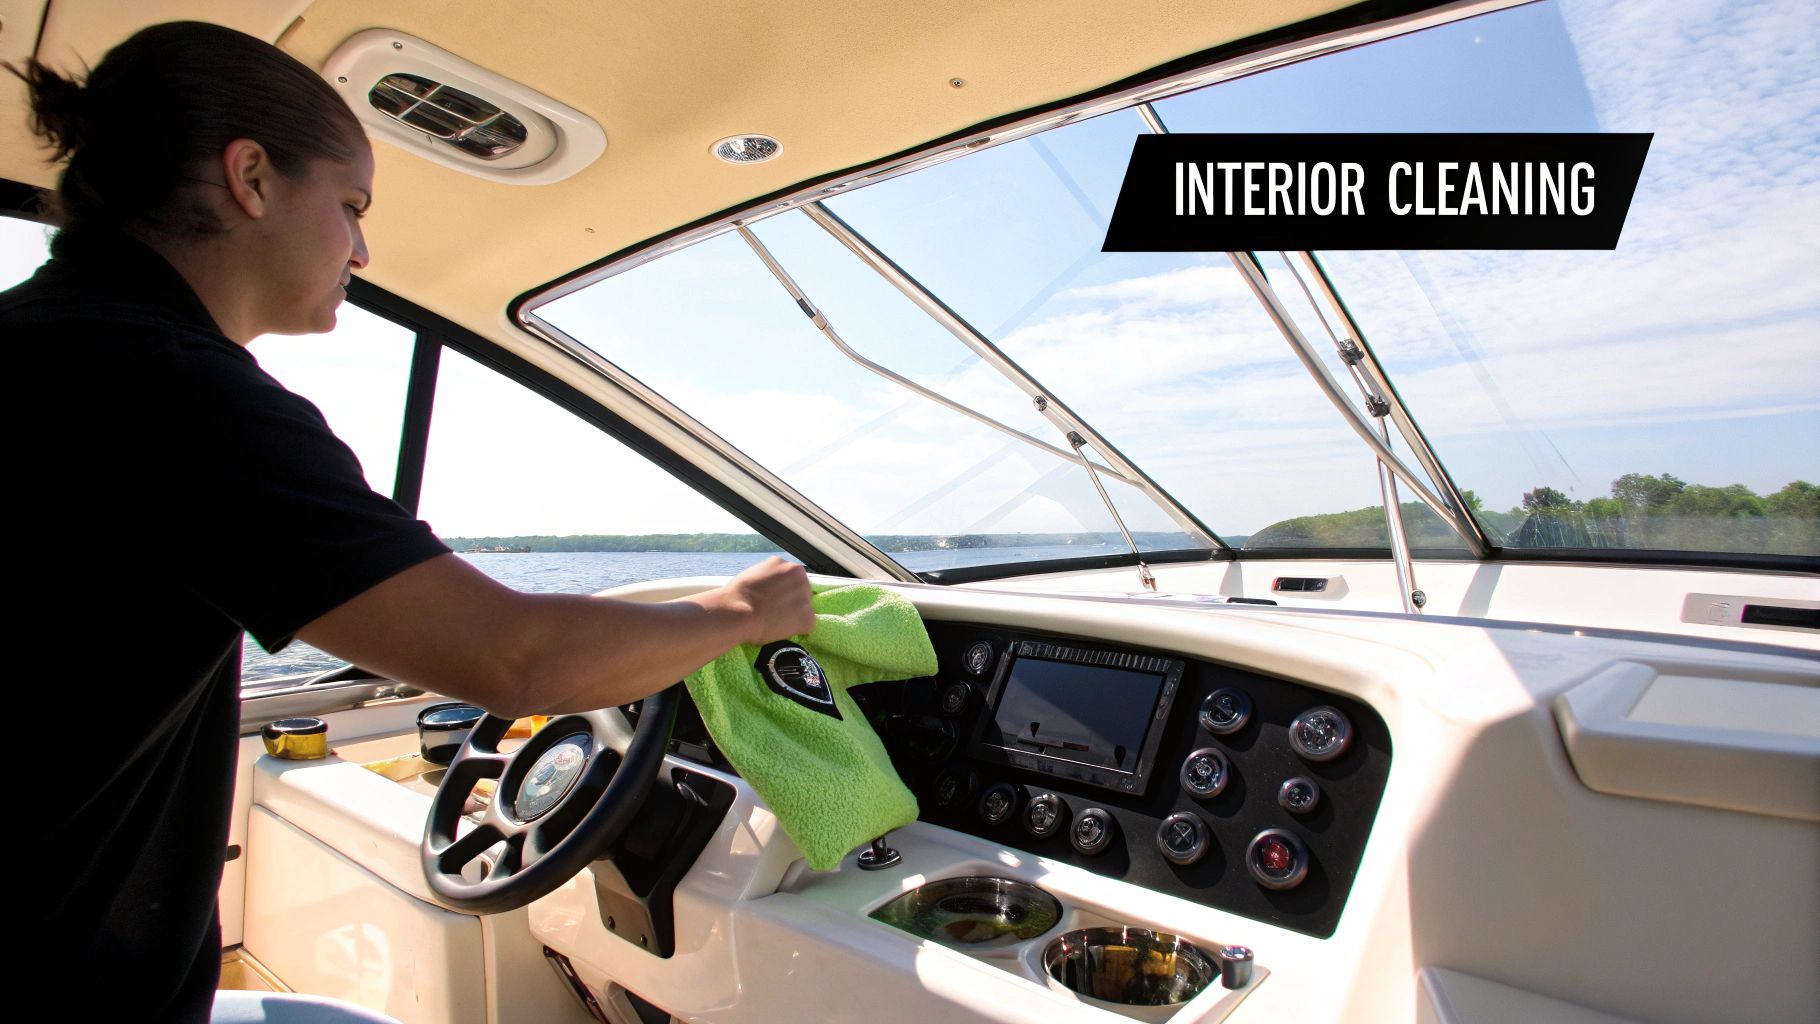
I'm talking about getting a mirror finish on the stainless steel, deep cleaning the vinyl seats until they look factory-fresh, and making sure every surface, from the non-skid deck to the Bimini top, is spotless and protected. These are the final touches that pull the whole job together.
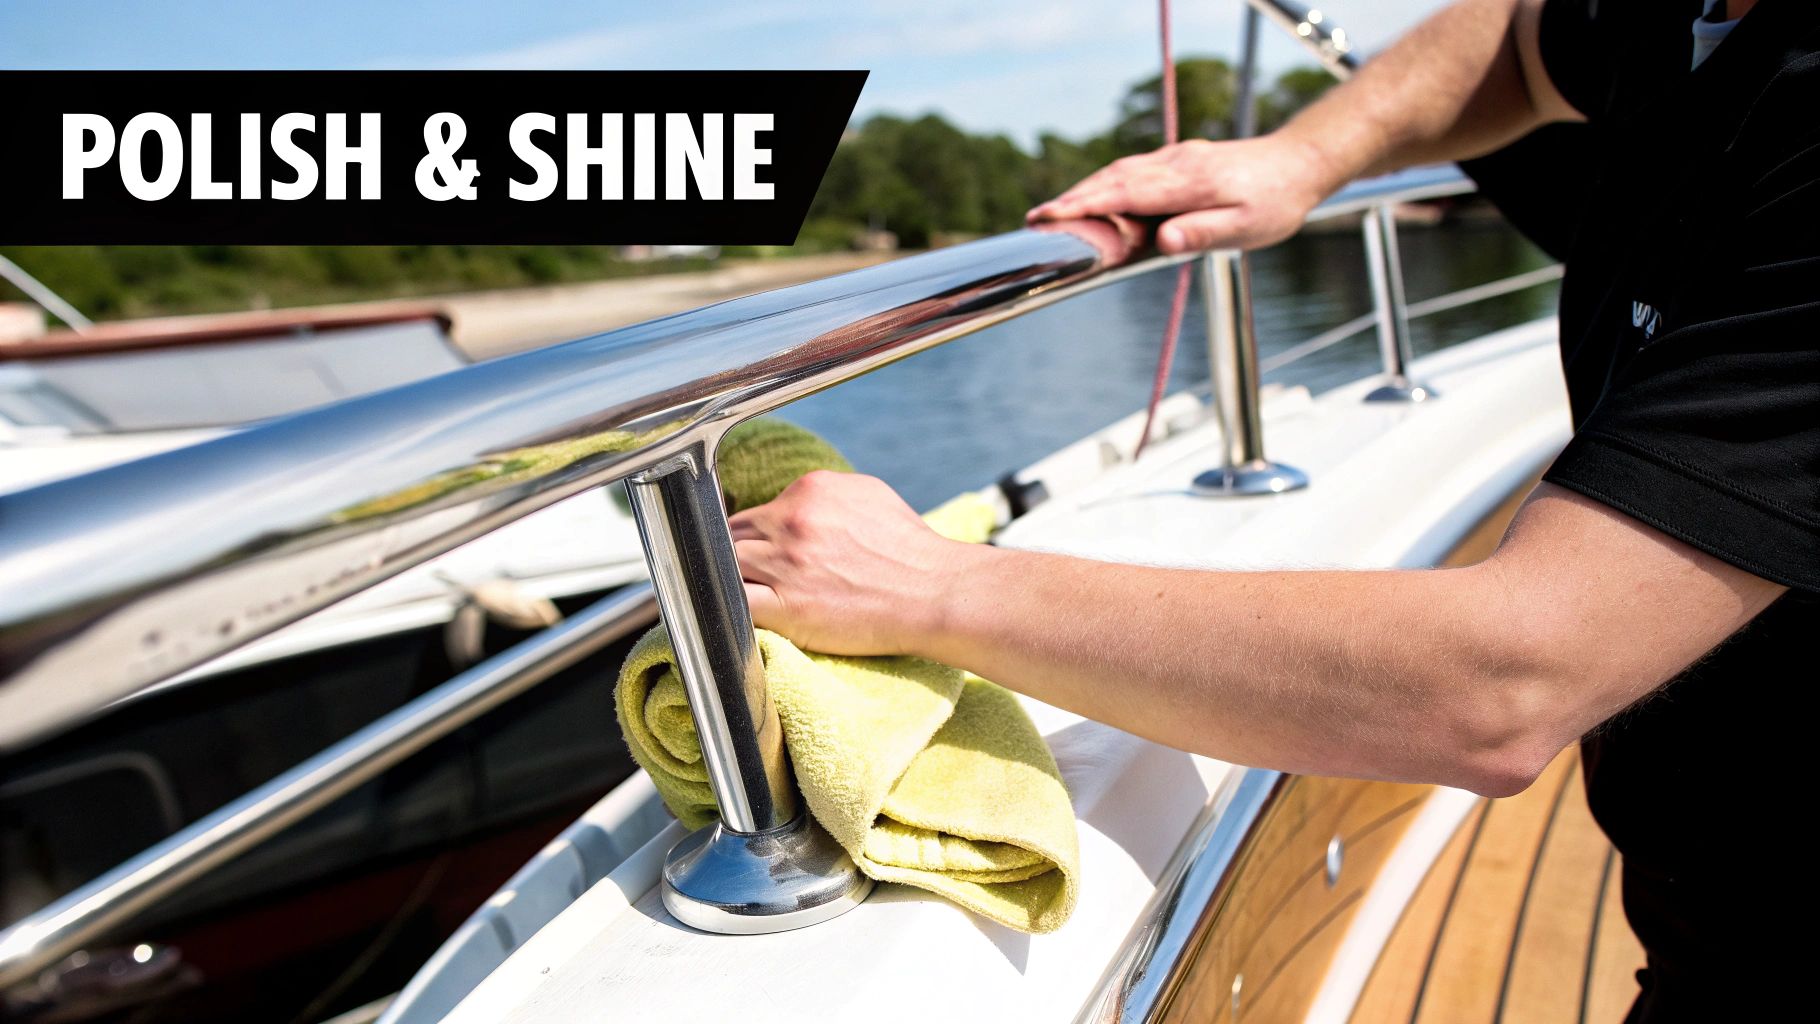
Polishing Metal Hardware to Perfection
Stainless steel cleats, railings, and fixtures take a beating from salt and sun, leaving them dull and spotted. Bringing back their shine is one of the most satisfying parts of the job and makes a huge difference visually.
The secret is using a dedicated marine metal polish, not some generic all-purpose cleaner from the auto parts store. Marine formulas are designed to cut through salt corrosion without being too harsh. Put a small dab on a microfiber applicator and work it into the metal with some solid pressure. If there's a grain to the metal, follow it. You'll know it's working when your cloth turns black from the oxidation you're lifting off.
For those tricky spots around screws and mounts, an old toothbrush or a small detailing brush is your best friend. Once you're done polishing, grab a clean microfiber towel and buff the metal to a brilliant, swirl-free shine. This little step not only looks great but also protects the metal, making it easier to clean next time around.

Revitalizing Vinyl Seats and Surfaces
Boat seats suffer from UV rays, salt water, and their number one enemy: sunscreen. Those greasy white stains can feel permanent, but with the right game plan, you can get your vinyl looking brand new again.
Think of it as a one-two punch: clean, then protect.
First, you need to deep clean. Mix a specialized marine vinyl cleaner with water as directed on the bottle. Let the solution sit for a minute to really break down the oils and grime. Then, get in there with a soft-bristled brush and gently scrub the surface, giving extra attention to the seams and stitching where mildew loves to set up camp.
After a thorough rinse and letting the seats dry completely, it's time for the most important step. Apply a high-quality marine vinyl protectant that has powerful UV inhibitors. This isn't just about shine; it's a shield that nourishes the vinyl, stops it from drying out and cracking, and makes future sunscreen messes much easier to wipe away.
A Pro’s Insight: The biggest mistake I see people make is attacking their seats with "magic" eraser-type sponges or abrasive household cleaners. Sure, they might lift the stain, but they also strip the factory protective coating right off the vinyl. This leaves it exposed and far more likely to get damaged, fade, and crack down the road. Stick with products made for marine vinyl.
Tackling Decks and Other Details
With the hull, metal, and vinyl looking sharp, it's time for the final details that tie the whole project together. This is where a good detail becomes a great one.
- Non-Skid Decks: These textured surfaces are great for grip but are magnets for dirt. The best way to clean them is with a stiff deck brush and a good boat soap. Make sure to scrub in different directions to get the dirt out of every little crevice.
- Plexiglass & Isinglass: Whatever you do, don't use a regular glass cleaner with ammonia on these. It will make them cloudy and brittle over time. Grab a dedicated plastic cleaner and polish, and use a fresh microfiber towel to restore clarity and buff out tiny scratches.
- Canvas Care: For your Bimini top and boat covers, a gentle cleaner and a soft brush will do the trick. After it’s dry, hit it with a marine-grade fabric waterproofing spray to bring back its water repellency and UV protection.
A thorough detail also means knowing how to handle specialty materials like modern deck flooring. For more on that, check out our guide on how to keep your SeaDek and leather clean. Nailing these final steps is what will make your boat the envy of the dock.
Common Boat Detailing Questions Answered
Even with the best plan, questions pop up. It happens to everyone when they're first learning how to detail a boat, so don't sweat it. This section is all about tackling those common questions with direct, hands-on advice.
Think of this as the expert knowledge that bridges the gap between a decent job and a truly professional finish. Let's clear up the confusion so you can get to work with confidence.
How Often Should I Detail My Boat?
This is probably the question I hear most often, and the real answer comes in two parts.
A full detail—we’re talking the heavy-duty work of compounding and polishing—is really just a once-a-year job. Most boaters like to knock this out right before the season starts. It's the perfect way to get a fresh start and a brilliant shine.
But the secret to keeping that shine isn't just one big effort. It's all about consistent maintenance. That protective layer you work so hard to apply isn't going to last forever on its own.
You’ll want to lay down a fresh coat of wax or sealant every 3-4 months. If your boat is constantly battling saltwater or baking in the hot sun, you might need to do it even more often. A quick rinse with fresh water after every trip also makes a massive difference in protecting your finish and making the next wash that much easier.
Can I Use Car Products on My Boat?
It's tempting, I get it. You've got a garage full of car care products, so why not use them on the boat? My answer is always a firm "no." Using automotive products on a boat is like bringing a knife to a gunfight—they're just not built for the environment.
Car waxes are made to handle road grime, rain, and some sun. Marine products are engineered for a much tougher battle.
Key Difference: Marine-grade protectants are loaded with powerful UV inhibitors and specialized polymers. They're designed to stand up to constant water exposure, corrosive salt spray, and the brutal, unrelenting sun. A car wax might look good for a week or two, but it will break down and wash away in no time, leaving your porous gelcoat completely defenseless.
Always invest in products specifically made for marine use. They're formulated to bond properly with gelcoat and deliver the serious protection your boat actually needs.
What Is the Difference Between Gelcoat and Marine Paint?
Knowing what surface you’re working on is absolutely critical. The vast majority of fiberglass boats have a gelcoat finish. This is a thick, durable layer of resin that's sprayed into the boat's mold during manufacturing, making it part of the hull itself. Gelcoat is tough, but it's also porous, which is why it's so prone to oxidizing and getting that chalky, faded look over time.
Marine paint, on the other hand, is a coating applied on top of the hull, much like the paint on your car. You’ll often find it on high-performance yachts or older boats that have been restored.
Paint is generally less porous and glossier from the start, but it can be more sensitive to scratches. You can detail both surfaces similarly, but you have to be certain your compounds and waxes are safe for the specific type you have.
How Do I Handle Heavy Oxidation on My Hull?
A chalky, dull hull can look pretty daunting, but it's almost always fixable with the right tools and a methodical approach. This isn't a job for a simple one-step polish; you need to bring out the big guns.
Your starting point is a heavy-cut liquid compound and a wool or aggressive foam cutting pad on your polisher. Don't try to tackle the whole hull at once. Work in small, manageable 2x2 foot sections. Apply firm pressure and use slow, overlapping passes—this gives the abrasives time to do their job and cut through that dead, oxidized layer of gelcoat.
This first step is all about correction, so don't be surprised if it leaves behind a haze or some swirl marks. That’s perfectly normal. The next step is to follow up with a medium polish, and then a fine polish, each with a progressively softer foam pad. This multi-stage process is what removes the compounding haze and refines the surface, bringing back that deep, wet-look gloss before you even think about laying down wax.
For every challenge you face while detailing your boat, Better Boat has a premium, easy-to-use solution designed to deliver professional results. From our specialized marine soaps to our durable sealants and polishing accessories, we have everything you need to protect your investment and keep it looking its best. Explore our full range of American-owned, satisfaction-guaranteed products at https://www.betterboat.com.


