


A Guide to Marine Wax and Polish for a Lasting Shine
Using marine wax and polish isn't just about making your boat look sharp at the dock; it’s one of the most important maintenance jobs you can do to protect its value and finish. Think of polish as the corrective step that erases oxidation and minor scratches, and wax as the protective shield that guards that restored surface from the elements.
Quick answer: marine wax vs polish
Use polish when the gelcoat is dull, chalky, or lightly scratched. Use wax or a sealant after the surface is clean and corrected, because wax protects the finish but does not remove oxidation by itself. If the boat has visible oxidation, wash first, compound or polish the surface, then apply protection in thin coats with clean applicators.
Fast marine wax and polish setup
| Surface condition | Best next step | Better Boat path |
|---|---|---|
| Light haze with decent shine left | Polish to restore gloss before adding protection. | Boat Marine Polish |
| Heavier oxidation or chalky gelcoat | Start with compound, then refine with polish before waxing. | Marine Boat Rubbing Compound |
| Ready for wax or final wipe-down | Apply thin coats and buff residue with clean microfiber. | Microfiber Wax Applicator Set |
| Dirty surface before detailing | Wash first so grit does not get dragged through the gelcoat. | Premium Boat Soap |
Why Marine Wax and Polish Are Your Boat's Best Defense
It helps to think of your boat’s gelcoat as its skin. It's a tough, durable layer designed to look great while protecting the crucial fiberglass structure underneath. But unlike our skin, it's under constant assault from a marine environment far harsher than anything a car faces on the road.
The combination of relentless sun, corrosive salt, and constant water exposure works around the clock to break down this protective layer. Neglect it, and you'll soon see a dull, chalky, and faded appearance known as oxidation. This isn't just a cosmetic problem—a compromised gelcoat is far more likely to stain, let water in, and suffer further structural damage.
The Two-Part System for Lasting Protection
This is where the powerhouse duo of marine polish and wax comes into play. They do two very different but equally vital jobs. To really get their value, you have to see them as a two-step system: restoration first, then protection.
- Marine Polish: The Restorer: This is your corrective product. Marine polish contains fine abrasives that are engineered to gently remove the damaged, oxidized top layer of your gelcoat. It buffs away fine scratches, hard water spots, and stains, bringing back the surface's original color and smoothness. It’s all about prepping the canvas.
- Marine Wax: The Protector: After polishing, the gelcoat is smooth but also raw and exposed. Wax steps in as the protective shield. It seals the now-porous surface, creating a sacrificial barrier that defends against UV rays, makes water bead up and roll off, and stops salt and grime from digging into the finish.
The core idea here is simple but critical: you can't effectively protect a damaged surface. Polishing first gives the wax a clean, stable foundation to bond with, which results in a much deeper shine and protection that lasts significantly longer.
Beyond Aesthetics: A Smart Investment
Regularly using a quality marine wax and polish does a lot more than just maintain a mirror-like shine. It's a fundamental part of boat ownership that directly affects your investment. A well-kept hull not only looks stunning tied up at the marina but also holds its resale value way better than one showing signs of environmental abuse.
By committing to a routine of polishing to correct and waxing to protect, you are actively extending the life of your boat's most visible—and vulnerable—asset. This guide will walk you through everything you need to know to master this process.

Understanding How Polish and Wax Actually Work
To really get what a good marine polish and wax can do, it helps to zoom in and see what’s happening at a microscopic level on your boat’s hull. The best way to think about your boat's gelcoat is like its skin—it's a tough, glossy, protective layer. But just like skin, it takes a beating from the sun, salt, and water, which eventually leads to that dull, chalky look we all hate.
A marine polish is your first line of attack. Think of it as a specialized exfoliant, packed with tiny micro-abrasives that are engineered to gently buff away the damaged, oxidized outer layer. These little workhorses physically smooth out light scratches and remove stubborn stains, essentially leveling the surface and bringing back its original shine and color.
This isn't just about looking good. This corrective step is what makes the next phase—protection—truly effective.
From Correcting Damage to Creating a Shield
After a good polish, your gelcoat looks fantastic, but it's also raw and exposed. That’s where marine wax comes in, acting like a high-performance, waterproof sunscreen for your hull. Wax isn’t for fixing problems; it's all about sealing and protecting that freshly restored surface.
When you lay down a coat of wax, you're filling in all the microscopic pores in the gelcoat. This creates a sacrificial barrier—a thin, tough, and transparent shield that takes the abuse so your hull doesn't have to.
This layer does a few critical jobs:
- UV Protection: It’s loaded with powerful UV inhibitors that block the sun's harsh rays, stopping them from degrading the gelcoat underneath.
- Contaminant Blocker: It forms a seal that prevents salt, bird droppings, acid rain, and general grime from getting a foothold, which makes cleanup a breeze.
- Hydrophobic Surface: It creates that amazing water-beading effect you see on a freshly waxed boat, forcing water to roll right off instead of drying and leaving ugly mineral spots.
The whole secret to a pro-level finish is understanding this "correct then protect" approach. You simply can't protect a damaged surface effectively. Polishing first gives the wax a clean, smooth base to grip onto, leading to a much deeper gloss and protection that actually lasts.
The Evolution of Protection Chemistries
The world of boat care has come a long way from just simple waxes. While the old-school products definitely still have their place, today's formulas give you a lot more specialized options.
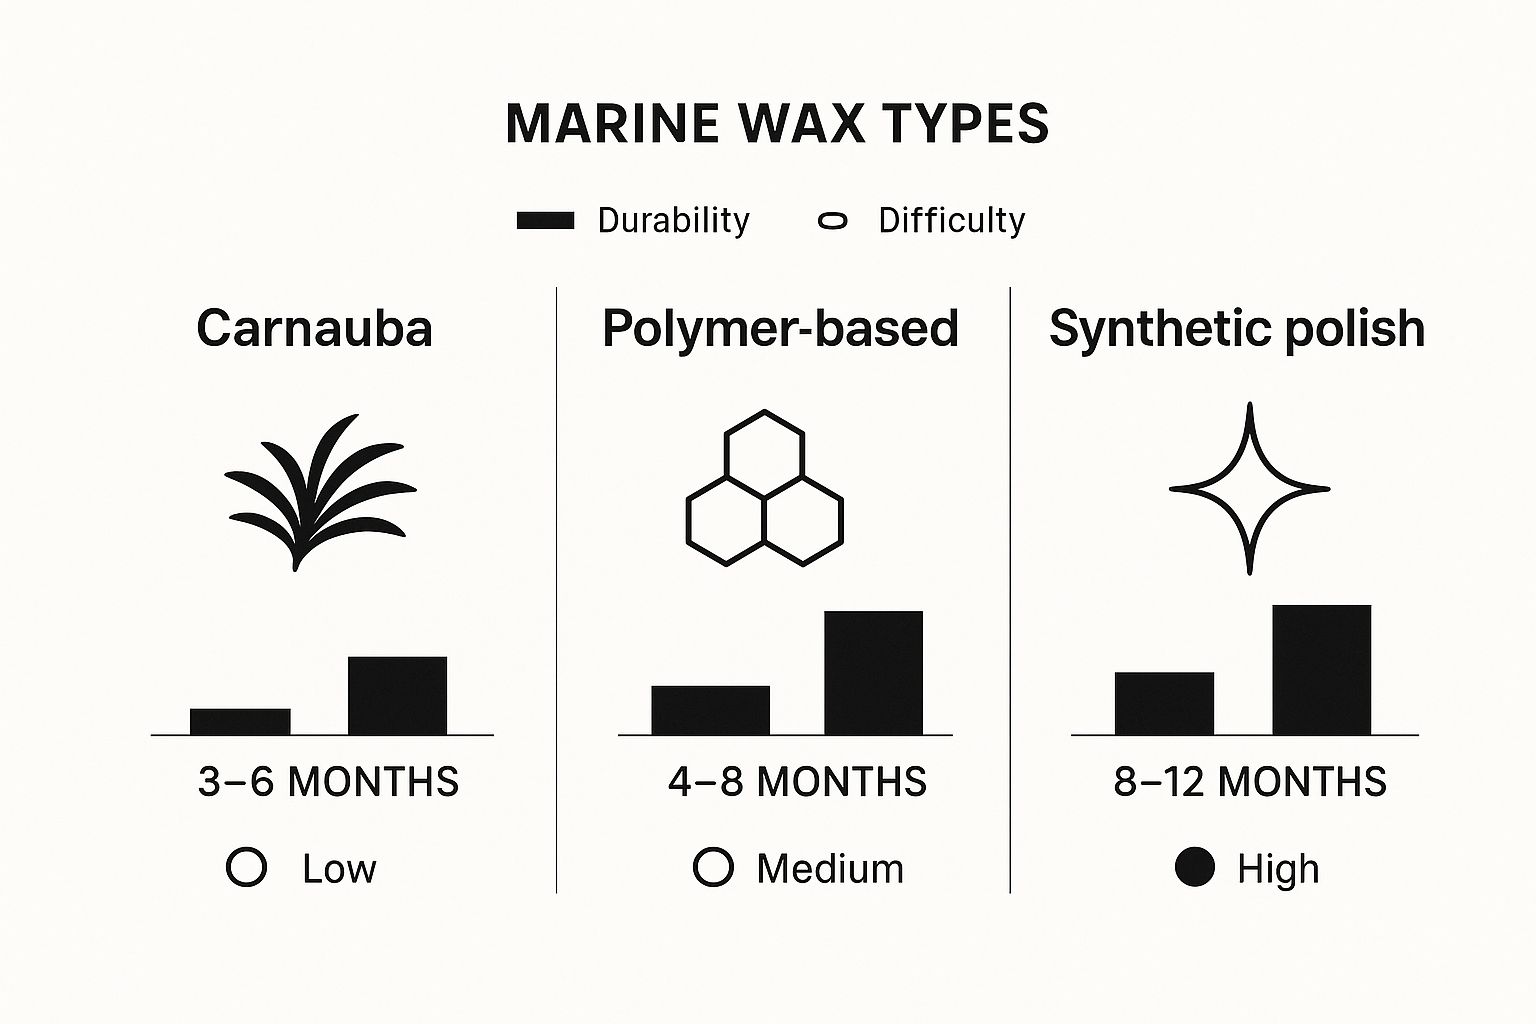
Carnauba Wax Often called the "queen of waxes," carnauba comes from a Brazilian palm tree and is famous for producing an incredibly deep, rich, wet-look gloss. It's the go-to for show boats or for owners who want that unmatched visual pop. The trade-off? Its natural formula means it doesn't last as long, usually just a few months in a tough marine environment.
Polymer Sealants These are the synthetic, lab-engineered protectors. Instead of just sitting on top of the surface like carnauba, polymers create a chemical bond with the gelcoat itself. This results in a much tougher, more resilient shell that can easily last for six months or more. The shine is often described as a sharper, more reflective gloss compared to the warm glow of carnauba, but you can't beat their durability.
Ceramic Coatings This is the cutting edge of surface protection. Ceramic coatings are liquid polymers that cure into a hard, glass-like layer on your hull. They offer the absolute best in durability, with some products lasting for years, not just months. These coatings are exceptionally resistant to chemicals, minor scratches, and UV damage.
The industry is always pushing forward. Thanks to things like nanotechnology and advanced polymer chemistry, we now have formulas that are more effective and last longer than ever before. There's also a big push for eco-friendly, biodegradable polishes that meet strict marine regulations. You can explore more about these market trends and their impact on boat care.
At the end of the day, whether you reach for a classic marine wax or a high-tech sealant, the goal is the same. You're putting a renewable, sacrificial shield on your boat to protect the much more valuable gelcoat underneath. It's one of the smartest and simplest investments you can make in your boat's long-term health and good looks.
How to Choose the Right Products for Your Boat
Stepping into the marine care aisle can be pretty overwhelming. You're faced with shelves packed with bottles, all promising a mirror-like shine. How in the world do you pick the right marine wax and polish for your boat? The secret isn't finding a single “best” product, but the best product for your boat's current condition and what you're trying to accomplish.
Choosing the right formula is a lot like picking the right tool for a job. You wouldn’t use a sledgehammer to hang a picture, and you definitely wouldn't use a fine-grit polish on a heavily oxidized, chalky hull. The key is to take a good, hard look at your boat's needs before you buy anything.
Assess Your Boat's Starting Point
Before you even think about adding a product to your cart, get up close and personal with your boat’s gelcoat. The condition of this surface is going to dictate your entire game plan.
- For New or Well-Maintained Boats: If your gelcoat is already looking sharp—still glossy with minimal fading or stains—your main job is protection. You can skip the aggressive compounds. A high-quality one-step cleaner wax or a dedicated marine wax or sealant is perfect for keeping up the finish and adding that crucial protective layer.
- For Mildly Oxidized or Dull Boats: Has the shine faded? Does the surface feel a bit rough or chalky to the touch? You'll need more than just a wax. A light-to-medium grade polish is what you need to gently remove that thin layer of oxidation and bring back the gloss. After polishing, you must follow up with a separate wax or sealant to lock in the shine and protect the surface.
- For Heavily Oxidized and Neglected Boats: If the gelcoat is chalky, faded, and rough, you're in restoration territory. This is a multi-step project. You'll start with a more aggressive rubbing compound to cut through the heavy oxidation, follow it with a finer polish to buff out any swirl marks, and finish with a durable wax or sealant to protect your hard work.
Here's a simple way to think about it: a cleaner wax is like a quick tune-up, a polish and wax combo is a deep detailing session, and a full compound, polish, and wax system is a complete restoration project.
Cleaner Waxes vs Multi-Step Systems
Your initial assessment will point you down one of two paths. Each one has its own trade-offs when it comes to time, effort, and the final results.
A one-step cleaner wax is an all-in-one product that mixes a light polish with a protective wax. It’s a fantastic time-saver for newer boats or for those mid-season touch-ups. The catch? It won’t have the corrective muscle of a dedicated polish or the staying power of a dedicated sealant.
On the other hand, a multi-step system means using separate products for each job: a compound or polish to correct the surface, then a wax or sealant to protect it. It's more work, no doubt. But the results are far superior and last much longer, especially on older or more weathered boats.
This simple visual breaks down the trade-off between how long a product lasts and how much work it takes to apply.
As you can see, products like synthetic polishes and sealants give you the longest-lasting protection but take more elbow grease. Traditional waxes are easier to put on but you'll be reapplying them more often.
Comparing Marine Wax and Polish Options
Once your boat is polished and ready for that final protective layer, you've got another choice to make. This is the crucial step that shields all your hard work from the sun, salt, and grime. To make sense of the options, we've put together a quick comparison table.
| Product Type | Primary Function | Best For | Durability | Application Effort |
|---|---|---|---|---|
| Carnauba Wax | Deep, "wet-look" gloss | Show-quality shine, enthusiasts who enjoy frequent waxing | 3-6 months | Medium |
| Polymer Sealant | Long-lasting, durable protection | Boaters seeking maximum longevity and UV defense | 6-12 months | High |
| Hybrid Ceramic Wax | Balanced gloss and durability | A great all-around option for most boaters | 4-8 months | Medium |
| Cleaner Wax | Light cleaning & protection | New boats or quick touch-ups on well-maintained finishes | 2-4 months | Low |
Carnauba waxes are legendary for that deep, unparalleled shine, but polymer sealants are the undisputed champions of long-term protection. Hybrid products, which blend natural waxes with synthetic polymers, really do offer a fantastic compromise between the two.
Your choice often comes down to how frequently you're willing to reapply the protection. To help plan your maintenance schedule, you might be interested in our guide on how often you should wax a boat.
Ultimately, picking the right products boils down to a simple formula. Match the strength of your polish to the level of oxidation on your hull. Then, choose your protective wax or sealant based on the balance you want between shine, durability, and how often you want to do the job. This thoughtful approach makes sure you invest your time and money wisely for a brilliant finish that truly lasts.
Your Step-by-Step Application Guide for a Flawless Finish
Alright, you've got the right products in hand, so it’s time to get down to business. Achieving that deep, mirror-like shine you see on show boats isn't about some secret formula—it's all about following a proven process. If you follow these steps carefully, all your effort will pay off with a brilliant, tough finish that truly protects your investment.
Think of this guide as a recipe for a perfect finish. Skipping a step or rushing the job can really mess up the final result. In this game, patience and a sharp eye for detail are your most valuable tools.
Stage 1: Meticulous Preparation
Before a single drop of marine wax and polish even thinks about touching your hull, proper prep is completely non-negotiable. If you try to polish a dirty boat, you’re just grinding salt, dust, and other grit directly into the gelcoat. You'll end up creating the exact swirl marks and fine scratches you were trying to get rid of in the first place.
- Thorough Washing: Start by giving the boat a top-to-bottom wash with a quality, pH-neutral boat soap. Steer clear of dish soap or other harsh household cleaners; they'll strip off any old wax and can dry out the gelcoat. A dedicated boat brush or a soft wash mitt is what you need to lift the grime away gently.
- Complete Rinsing and Drying: After washing, rinse the boat completely to get rid of every bit of soap residue. Then, use a clean, super-absorbent microfiber towel or a chamois to dry the entire surface. This crucial step prevents water spots, which can be a real pain to remove later on.
- Taping Off Sensitive Areas: Grab some high-quality painter's tape and mask off any areas that aren't gelcoat. This means things like vinyl decals, non-skid decks, rubber trim, and any metal fittings. This simple step seems tedious, but it saves a massive amount of cleanup time later.
A clean, dry, and perfectly prepped surface is the foundation for a flawless finish. Rushing this first stage is the single biggest mistake boat owners make, and it always leads to disappointing results and a lot more work down the road.
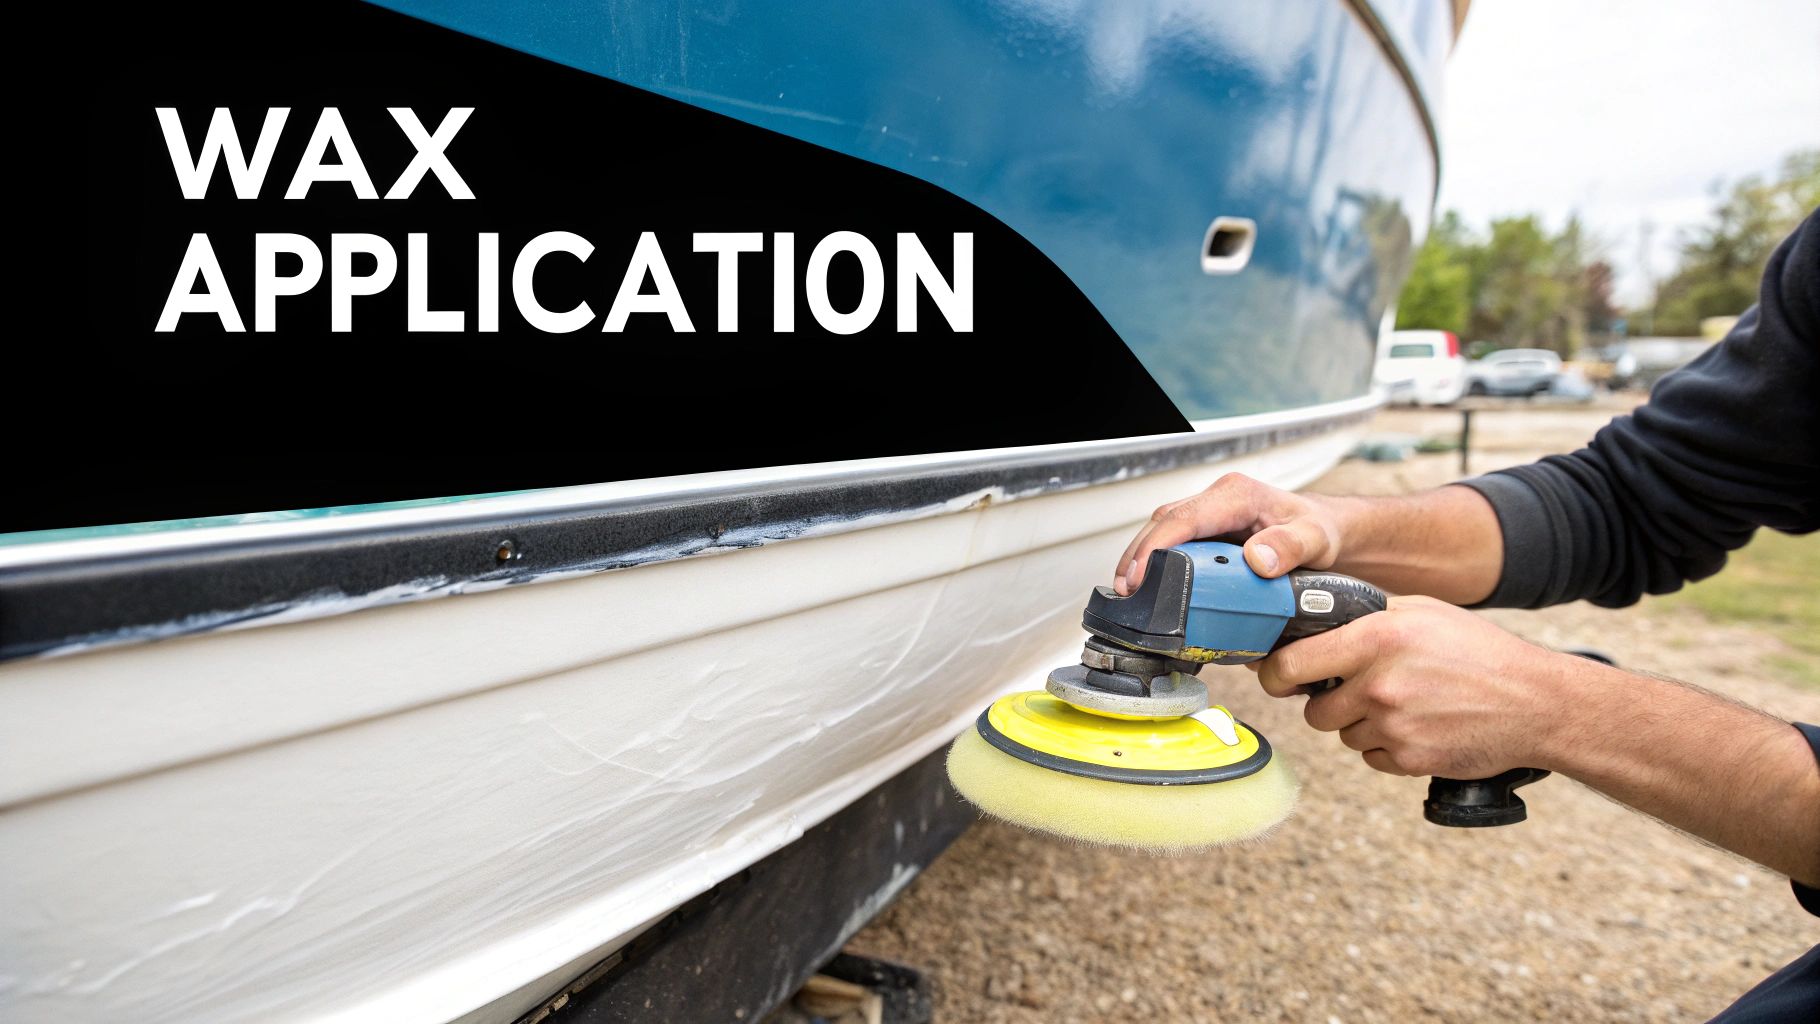
Stage 2: The Art of Polishing
With the boat prepped and ready, it's time to bring back that shine. Polishing with a polishing compound is the step where you correct the finish by removing oxidation and small imperfections. This creates that ultra-smooth canvas you need for the wax to bond to. You can tackle this by hand or with an electric polisher.
Polish for this step
Boat Marine Polish
Boat Marine Polish uses fine abrasives to lift light oxidation and restore a deep, glossy surface, giving the wax a smooth, clean foundation to bond to.
For a tiny spot or a very light touch-up, polishing by hand can get the job done. But for any boat bigger than a dinghy, a machine polisher is an absolute game-changer. It doesn't just save your arms and shoulders, it delivers a far more consistent and professional-looking result. A dual-action (DA) or random orbital polisher is the perfect choice for most boat owners, as it's much more forgiving and safer on gelcoat than a high-speed rotary buffer.
Using a Polisher Like a Pro
- Pad Selection: Match your foam or wool pad to your polish. Use a more aggressive cutting pad for heavy-duty compounds and a softer finishing pad for fine polishes.
- Apply Product to the Pad: Squeeze a few small, pea-sized dots of polish directly onto the pad itself. Never glob polish right onto the hull—it can dry out way too fast.
- Work in Small Sections: Break up your hull into manageable 2x2 foot sections. Working in small, controlled areas is key to making sure you fully work the polish in before it starts to dry.
- Spread the Product: With the machine still off, just dab the pad around the section to spread the polish out a bit.
- Begin Polishing: Fire up the polisher on a low speed (like 1 or 2) to spread the product evenly. Then, bump the speed up (usually to 4 or 5) and work the area using overlapping passes in a cross-hatch pattern—first side-to-side, then up-and-down.
- Monitor Your Progress: As you work the area, you'll see the polish turn into a thin, hazy film. That’s your signal that the abrasives have broken down and done their job.
- Wipe and Inspect: Shut the polisher off and use a clean microfiber towel to wipe away the residue. Get a good look at the surface, preferably under bright light. If you still see some oxidation, you might need to do a second pass.
Stage 3: Sealing the Deal with Wax
Once the whole hull is polished to a beautiful, uniform gloss, you're on the home stretch. Now it's time for the final, protective layer. Applying a quality marine wax or sealant is what shields that restored finish from sun, salt, and everything else the marine environment throws at it.
If you remember one thing about waxing, make it this: thin is in. Slathering on a thick coat of wax doesn't give you more protection. It just makes it a nightmare to buff off and often leads to ugly streaks and hazing.
Application and Buffing Technique
- Apply a Thin, Even Coat: Grab a clean foam applicator pad and apply a very thin, even layer of wax. Stick to the same small, 2x2 foot sections you used when polishing.
- Let It Haze: Check the manufacturer's instructions for the proper drying time. The wax is ready for removal when it hazes over. A quick way to check is the finger-swipe test: if your finger leaves a smear, it needs more time. If it wipes clean, you're good to go.
- Buff to a Brilliant Shine: Using a separate, clean, high-pile microfiber towel, start buffing off the wax residue. Keep flipping the towel to a fresh side so you're actually removing the haze, not just pushing it around. A final, gentle wipe-down with one more fresh microfiber will reveal that deep, brilliant, and totally streak-free shine you've been working for.
By following this guide, you’re not just making your boat look fantastic—you're performing essential maintenance that protects its condition and value for years to come.
Maintaining Your Shine for Long-Term Protection
Getting that deep, brilliant shine from a fresh polish and wax job is one of the most satisfying parts of boat ownership. But the real win? Keeping it that way all season long. That’s where a smart, consistent maintenance routine comes in.
This isn't about adding more work to your plate. It's about saving yourself a ton of time and effort down the road. A little upkeep now means you're just maintaining a beautiful finish, not starting a massive restoration project from scratch every year. And it all begins with how you wash your boat.
Preserve Your Wax with Smart Washing
After all the time you spent buffing and waxing, the last thing you want to do is wash that protection right off. This is why using a pH-neutral, wax-safe boat soap is an absolute must for regular clean-ups. Harsh detergents, and especially household cleaners like dish soap, will chew through your wax layer in no time, leaving your gelcoat exposed to the elements again.
The right soap is designed to gently lift away salt and grime without stripping the protective barrier you worked so hard to apply. If you're not sure what to look for, check out our guide on the best boat cleaners to find the perfect match for your needs.
Amplify Your Shine with Booster Sprays
Between full waxing sessions, one of the best tricks in the book is to use a "booster" or "sacrificial" spray. Think of these as quick detailers made specifically for marine environments. You use them right after a wash and dry, and they lay down a fresh, thin layer of protection over your existing wax.
- They bring back that slick, "just-waxed" feel and gloss.
- They add another layer of crucial UV protection.
- They make your next wash even easier because dirt can't stick as well.
It’s like giving your boat a quick sunscreen top-up. A few minutes with a booster spray can easily add weeks, or even months, to the life of your base wax coat. It's a simple step that delivers huge results with very little effort.
A consistent maintenance schedule is your best defense against the elements. The growing focus on vessel aesthetics and performance has fueled the marine coatings industry, leading to better products for proactive owners. To see how these trends are shaping the market, you can learn more about the global marine coatings industry.
Creating Your Maintenance Schedule
So, what does the right schedule look like? It really depends on your boat and your environment. A boat that lives in a saltwater slip in sunny Florida will need more attention than a trailered boat that's kept under a cover in a cooler climate.
Here’s a basic maintenance plan you can tweak to fit your situation:
| Frequency | Task | Products Needed |
|---|---|---|
| After Every Use | Rinse with fresh water | Hose, nozzle |
| Every 2-4 Weeks | Wash and Boost | pH-neutral soap, booster spray |
| Every 4-6 Months | Full Re-Wax | Cleaner wax or marine wax/sealant |
| Once a Year | Polish and Re-Wax | Marine polish and wax/sealant |
Following a simple plan like this ensures your investment in marine wax and polish really pays off, keeping your boat protected and looking incredible, season after season.
Troubleshooting Common Polishing and Waxing Mistakes
Even when you're using the best marine wax and polish out there, things can sometimes go sideways. Don't get discouraged! Achieving that perfect, mirror-like finish is a skill you build over time, and a few hiccups are part of the learning curve. Let's walk through how to diagnose and fix the most common issues, turning a frustrating result into a flawless shine.
The number one problem boat owners run into? Swirl marks. You finish polishing, step back to admire your work, and see a web of fine, circular scratches. This is almost always caused by using the wrong technique with a polisher, pushing down too hard, or working with a dirty pad. To fix it, grab a finer polish and a soft finishing pad. Go over the area again with very light pressure, using slow, overlapping passes to erase the marks.
Another classic mistake is a wax job that looks cloudy or feels impossible to buff off. If this happens, you almost certainly applied the wax too thick or were working in direct sun or high humidity.
The golden rule of waxing is that thin is in. A thick coat doesn't add more protection; it just creates a sticky, streaky mess that’s a nightmare to remove. If you've laid it on too thick, let the area dry, then grab a clean microfiber towel and a bit of quick detailer spray to help break down and wipe away the excess.
Fixing Tougher Surface Issues
Sometimes, the issue isn't your technique but the surface you're working on. If you're polishing away and feel like you're not making a dent, you're probably up against severe oxidation that needs a more aggressive approach.
Problem 1: Stubborn Oxidation When a standard polish isn't cutting it, it's time to step up to a rubbing compound. Compounds are packed with more aggressive abrasives specifically designed to slice through that heavy, chalky layer of oxidation. Just remember, a compound is the first step, not the last. Always follow up with a fine polish to remove any micro-marring before you even think about applying wax.
Problem 2: Old Wax Buildup If your fresh coat of wax looks patchy and uneven, you're likely applying it over old, contaminated layers of previous wax jobs. You need a completely clean slate for new protection to bond properly.
A good wash with a dedicated wax-stripping soap or a diluted all-purpose cleaner will do the trick. For really stubborn grease and grime, you might need a dedicated degreaser. Many of the same principles apply to hull prep as to engine spaces, and you can pick up some great tips from this guide on boat bilge cleaning and degreasing.
Eliminating Streaks and High Spots
Finally, let's talk about those irritating streaks or dark, blotchy patches, often called "high spots."

Apply and buff with control
Microfiber Wax Applicator Set
A dedicated microfiber wax applicator lets you work fresh wax into a high spot with even pressure, making it far easier to buff to a clean, streak-free finish.
- Cause: This happens when you don't buff all the wax off completely and evenly before it has a chance to fully cure.
- Solution: Thankfully, the fix is easy. Just apply a tiny amount of fresh wax to the high spot with an applicator pad. This re-wets the dried wax underneath, allowing you to easily buff the entire area to a uniform, perfect finish with a clean microfiber towel.
Your Marine Wax and Polish Questions, Answered
Even when you've got the basics down, a few questions always pop up when it comes to keeping your boat's finish looking sharp. That's perfectly normal. Getting straight answers not only builds confidence but also makes sure you're protecting your investment the right way. Let's tackle some of the most common things boat owners ask.
We'll clear up any confusion, from picking the right products to figuring out a maintenance schedule, so you can get the best possible results and avoid those frustrating—and often expensive—mistakes.
Can I Use Car Wax on My Boat?
This is probably the number one question we hear, and the answer is a hard no. It’s easy to think wax is wax, but automotive products just aren't built for the harsh life a boat endures. Think about it: your car isn't sitting in corrosive saltwater 24/7 or getting blasted by intense UV rays bouncing off the water's surface.
Marine wax and polish are packed with much stronger UV inhibitors and specially formulated polymers that are engineered to fight off salt, constant moisture, and brutal sun exposure. Slapping car wax on your boat's gelcoat is a shortcut that will absolutely backfire. It will break down in a fraction of the time, leaving your hull with almost no real protection and forcing you to do the whole job over again way too soon.
How Often Should I Wax My Boat?
There’s no one-size-fits-all answer here. The right schedule really depends on how and where you use your boat.
- High-Exposure Boats: If your boat lives in a saltwater slip in a sunny spot like Florida or Southern California, you’ll need to put on a fresh coat of quality marine wax every 3-4 months. This keeps that protective barrier strong against the elements.
- Lower-Exposure Boats: For a trailered boat that’s kept under a cover and only sees occasional use, a high-quality polymer sealant can easily last anywhere from 6 months up to a full year.
The best way to get more life out of any wax or sealant? Wash your boat regularly with a pH-neutral, wax-safe soap.
What Is the Difference Between a Polish and a Rubbing Compound?
Both of these are your go-to products for bringing a dull gelcoat back to life, but they work very differently. It all comes down to how aggressive they are. A polish uses very fine abrasives to gently buff away light oxidation, small swirl marks, and minor stains, restoring that deep, wet-looking shine.
A rubbing compound, on the other hand, is the heavy hitter. It’s a much more aggressive formula designed to cut through and remove heavy, chalky oxidation and more noticeable scratches.
Here's a pro tip we live by: always start with the least abrasive product that can solve the problem. Try a polish first. Only move up to a rubbing compound if the polish isn't quite enough to correct the surface damage.
Do I Need an Electric Polisher to Get Good Results?
While it’s not strictly required, investing in a good dual-action (DA) orbital polisher is something we highly recommend for any boat owner. If your vessel is bigger than a small dinghy, it will save you an incredible amount of time and back-breaking effort.
Even more importantly, a machine gives you a far more consistent and uniform finish than you could ever hope to achieve by hand. It works the marine wax and polish into the gelcoat pores evenly, which is the secret to getting those professional-grade, head-turning results.
The boating world has certainly caught on, with the global boat polish market growing as more owners look for better ways to maintain their vessels. For a deeper dive into this trend, you can review market growth insights.
Ready to give your boat the head-turning shine and durable protection it deserves? At Better Boat, we make premium, easy-to-use marine care products that have been tested and trusted by over a million boaters. From our high-performance waxes to our professional-grade polishes, we’ve got everything you need to keep your investment looking brand new.
Explore our full range of boat cleaning and detailing supplies today!


