 Skip to content

A Practical Guide to Repair Boat Canvas Like a Pro
Before you can fix anything, you have to know exactly what you’re up against. Successfully repairing boat canvas isn't just about patching a hole; it's about understanding the scope of the problem, from a tiny snag to serious fabric fatigue.
A good, hard look at the damage is your first step, followed by gathering the right gear to make sure your fix actually lasts. This initial assessment is what separates a quick DIY job from a trip to the pros.
Understanding Your Canvas And Building A Repair Kit
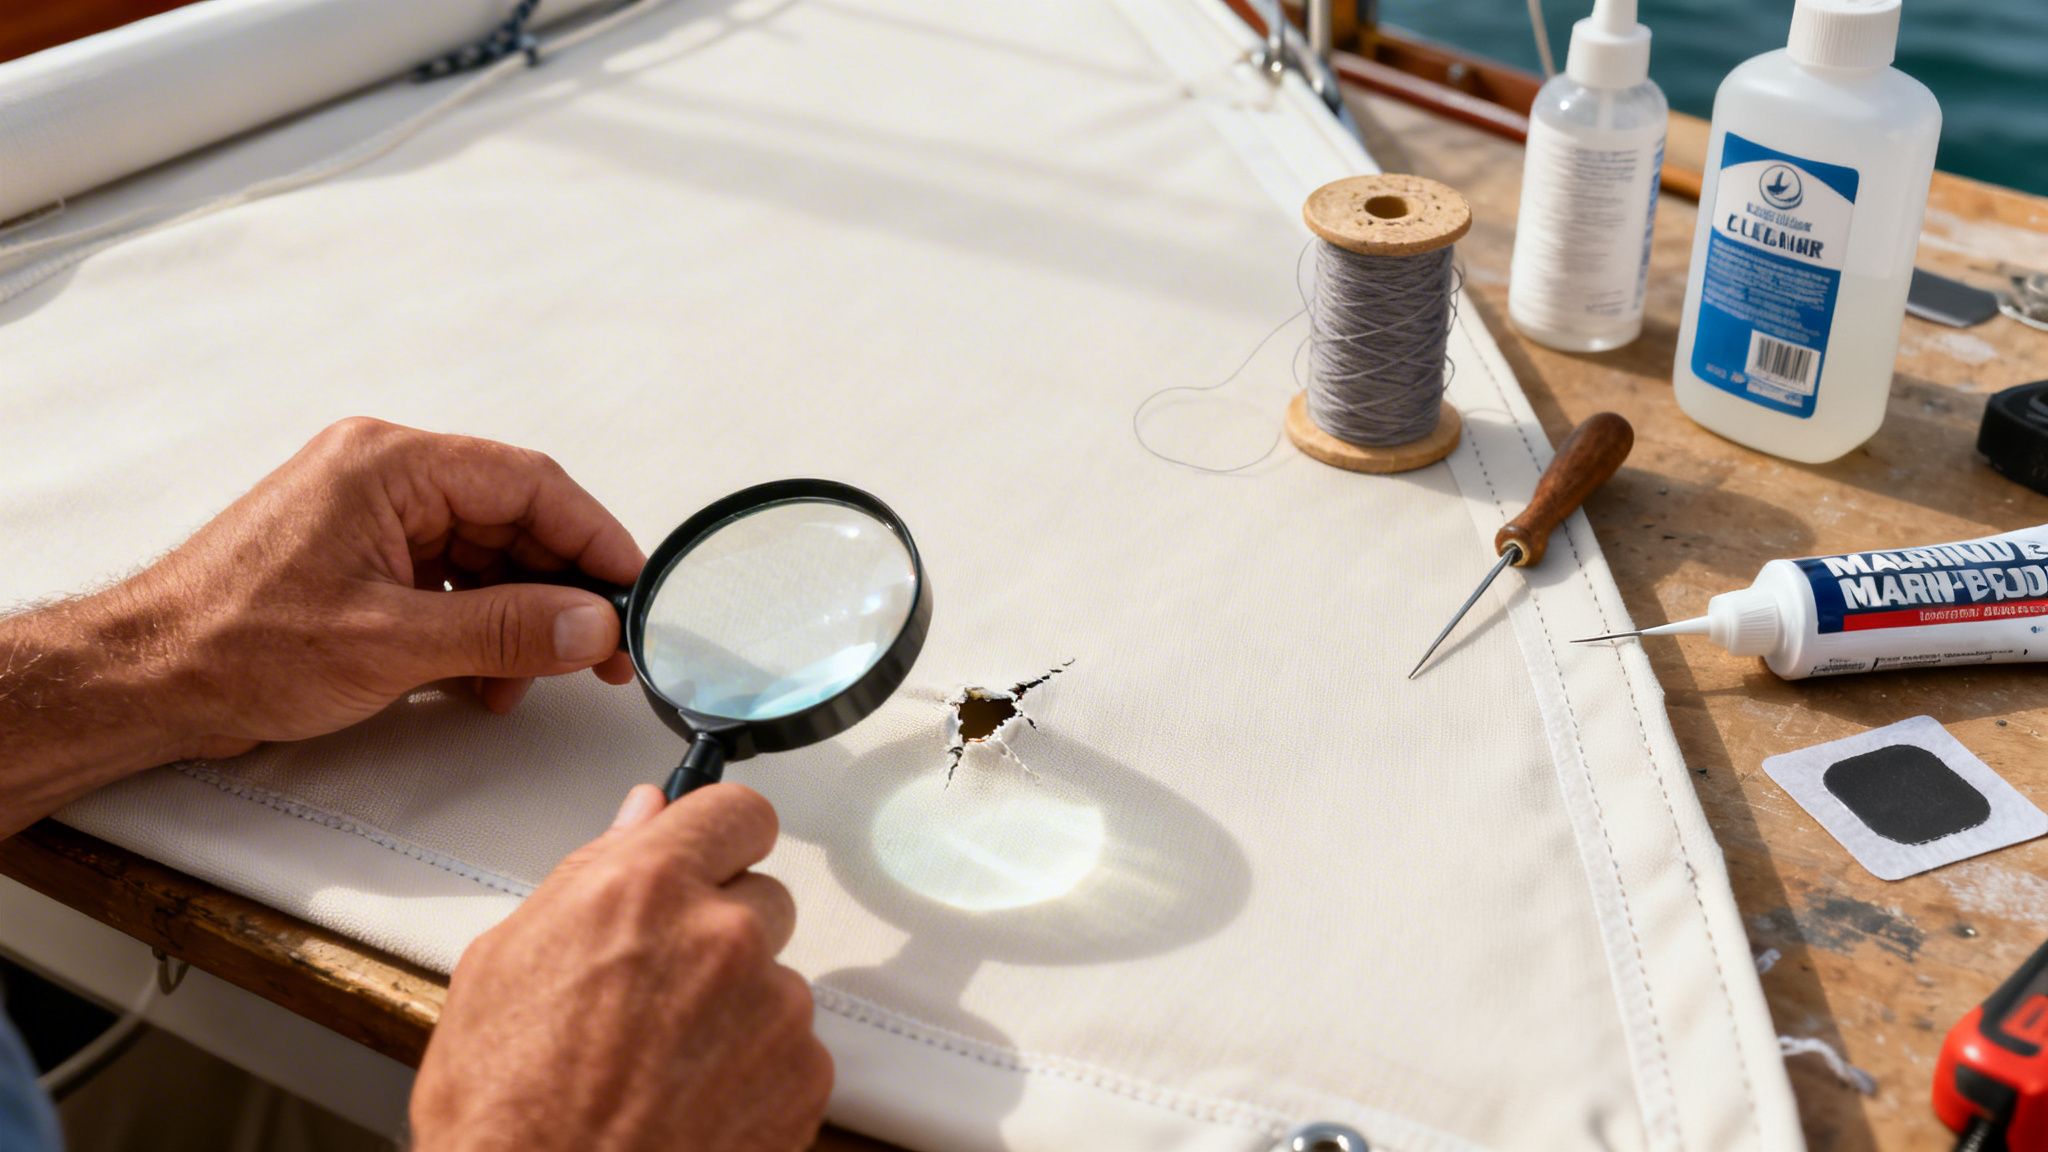
Before a single stitch is sewn or a drop of adhesive is applied, a detailed inspection of your boat's canvas is non-negotiable. Don't just glance at the obvious tear and call it a day—get up close and personal.
I've seen it a hundred times: small, seemingly innocent issues are often just red flags for bigger, underlying problems that can compromise the whole cover. Being proactive here doesn't just save you a few bucks; it can add years to the life of your canvas.
This isn't just a niche skill anymore. The global boat repairing market is booming, and a huge chunk of that is driven by fabric care. Your boat canvas is constantly battling harsh UV rays, saltwater, and wind, making it a prime candidate for wear and tear.
In fact, some figures suggest that up to 30% of annual boat maintenance budgets go toward fabric and upholstery repairs. It really highlights the value of learning to handle this stuff yourself.
Conducting A Thorough Canvas Inspection
Time to play detective. The first thing you need to do is spread the canvas out in a well-lit area, preferably on a clean, flat surface like your driveway or a garage floor. You're looking for more than just the big, obvious rips and holes. Pay really close attention to the seams, as stitching is almost always the first thing to fail under constant sun exposure and tension.
Next, give the fabric the "tug test." Gently pull the material on either side of a spot that looks a little weak. If the canvas tears without much effort or feels brittle and papery, you're dealing with UV degradation, what we call "sun rot." Slapping a small patch on sun-rotted fabric is a band-aid, at best. The material around it is already compromised and will likely fail before the season is out.
Here’s a quick checklist of what to look for:
- Seams and Stitching: Are there frayed, broken, or completely missing threads? A single split seam can unravel shockingly fast, turning a small problem into a massive headache.
- Stress Points: Check the areas around snaps, grommets, and corners where the canvas is pulled tightest. Look for signs of stretching, thinning fabric, or tiny tears just starting to form.
- Discoloration and Fading: Some fading is just part of life on the water. But if you see severe, blotchy discoloration, it’s a sign that the fabric's protective coatings have worn off, leaving it wide open to water and more UV damage.
- Mildew and Stains: Get your nose in there. Do you see dark spots or smell that tell-tale musty odor? Mildew isn't just ugly; it actively weakens the canvas fibers over time.
To help you sort through what you find, here's a quick guide to common issues and what to do about them.
Canvas Damage Assessment And Action Plan
Use this guide to identify common canvas issues and determine the most effective repair strategy.
| Type of Damage | Severity | Recommended DIY Action | When to Call a Pro |
|---|---|---|---|
| Small Punctures (<1 inch) | Minor | Apply a high-strength adhesive canvas patch. | If punctures are numerous or in high-stress areas. |
| Ripped Seams | Moderate | Re-sew with UV-resistant polyester thread. | If the seam is long and requires a heavy-duty sewing machine. |
| Torn Fasteners | Moderate | Replace snaps or grommets using a specialized tool kit. | If the fabric around the fastener is severely rotted. |
| UV Degradation ("Sun Rot") | Severe | Small, brittle areas can be reinforced, but it's a temp fix. | If large sections of the canvas feel brittle and weak. |
| Widespread Mildew | Moderate | Treat with our Mildew Stain Remover. | If mildew has caused fiber decay and structural weakness. |
This table should give you a solid starting point for deciding whether to tackle the job yourself or hand it off to an expert.
Assembling Your Essential Repair Toolkit
Okay, you've diagnosed the problem. Now it's time to gather your supplies. Having the right tools on hand is the difference between a frustrating afternoon and a successful, long-lasting repair that you can be proud of. Your tool kit should be stocked with marine-grade components specifically designed to survive the harsh environment your boat lives in.
I see this mistake all the time: people grab standard household thread or a tube of superglue from the junk drawer. These materials are not made for marine environments. They will disintegrate in the sun and salt, and you'll be making the exact same repair again next season. Always, always invest in marine-specific products.
Here's what your essential kit should have:
- Marine-Grade Thread: UV-resistant polyester thread is the only real choice for sewing repairs. It won’t rot, shrink, or get brittle in the sun like cotton or standard nylon will.
- Canvas Patch Material: Find a patch material that matches your existing canvas in both weight and color. A good match makes the repair nearly invisible.
- Cleaning Supplies: Before you even think about applying an adhesive or sealant, the area has to be spotless. Our heavy-duty boat canvas cleaning supplies are made to cut through salt, grime, and dirt to ensure you get a strong, permanent bond.
- Marine Epoxy or Sealant: For tears around hardware or to fully waterproof your new stitching, a quality marine sealant is your best friend. It creates a flexible, permanent seal that keeps water out.
Before diving into a big sewing project, make sure you have the right machine for the job. Marine canvas is thick and tough, and a standard home sewing machine will struggle. For bigger repairs, taking some time to learn about choosing the right sewing machine for thick material is a smart move. With a clear diagnosis and the right toolkit, you're ready to tackle almost any boat canvas repair that comes your way.
Mastering Essential Canvas Repair Techniques
Alright, you've surveyed the damage and gathered your tools. Now for the satisfying part: getting your hands dirty and making those repairs yourself. You'd be surprised how manageable the most common canvas issues are with the right approach. Let's walk through the core techniques that are the bread and butter of any DIY boat canvas repair.
These are the same methods the pros use, just broken down into simple, actionable steps. Getting these down will save you a bundle and give you the confidence to tackle future problems head-on, keeping your boat looking sharp and well-protected.
The Art of the Invisible Adhesive Patch
For those small punctures, snags, or tears under an inch, an adhesive patch is your quickest fix. But here’s the secret: a successful patch is 90% prep work. A dirty, damp surface will cause even the best marine adhesive to give up the ghost way too soon.
Your first job is to create a perfectly clean, dry, and debris-free area for that patch to grab onto. Any lingering salt, grime, or mildew is a deal-breaker for a strong bond.
Use a quality canvas cleaner and scrub an area several inches wider than the tear itself. Let it dry completely—and I mean completely. Don't rush this part.
Once the surface is pristine, you're ready to patch:
- Cut and Round the Patch: Always round the corners of your patch material. Sharp, square corners are practically begging to get snagged and start peeling up.
- Apply the Glue: Using our Marine Grade Fabric Adhesive, spread a thin, even layer on the patch and on the canvas around the tear.
- Press and Cure: Firmly press the patch into place. Work from the center outward to smooth out any air bubbles. Then, place something heavy and flat on top and let it cure for the full time recommended by the manufacturer—usually around 24 hours.
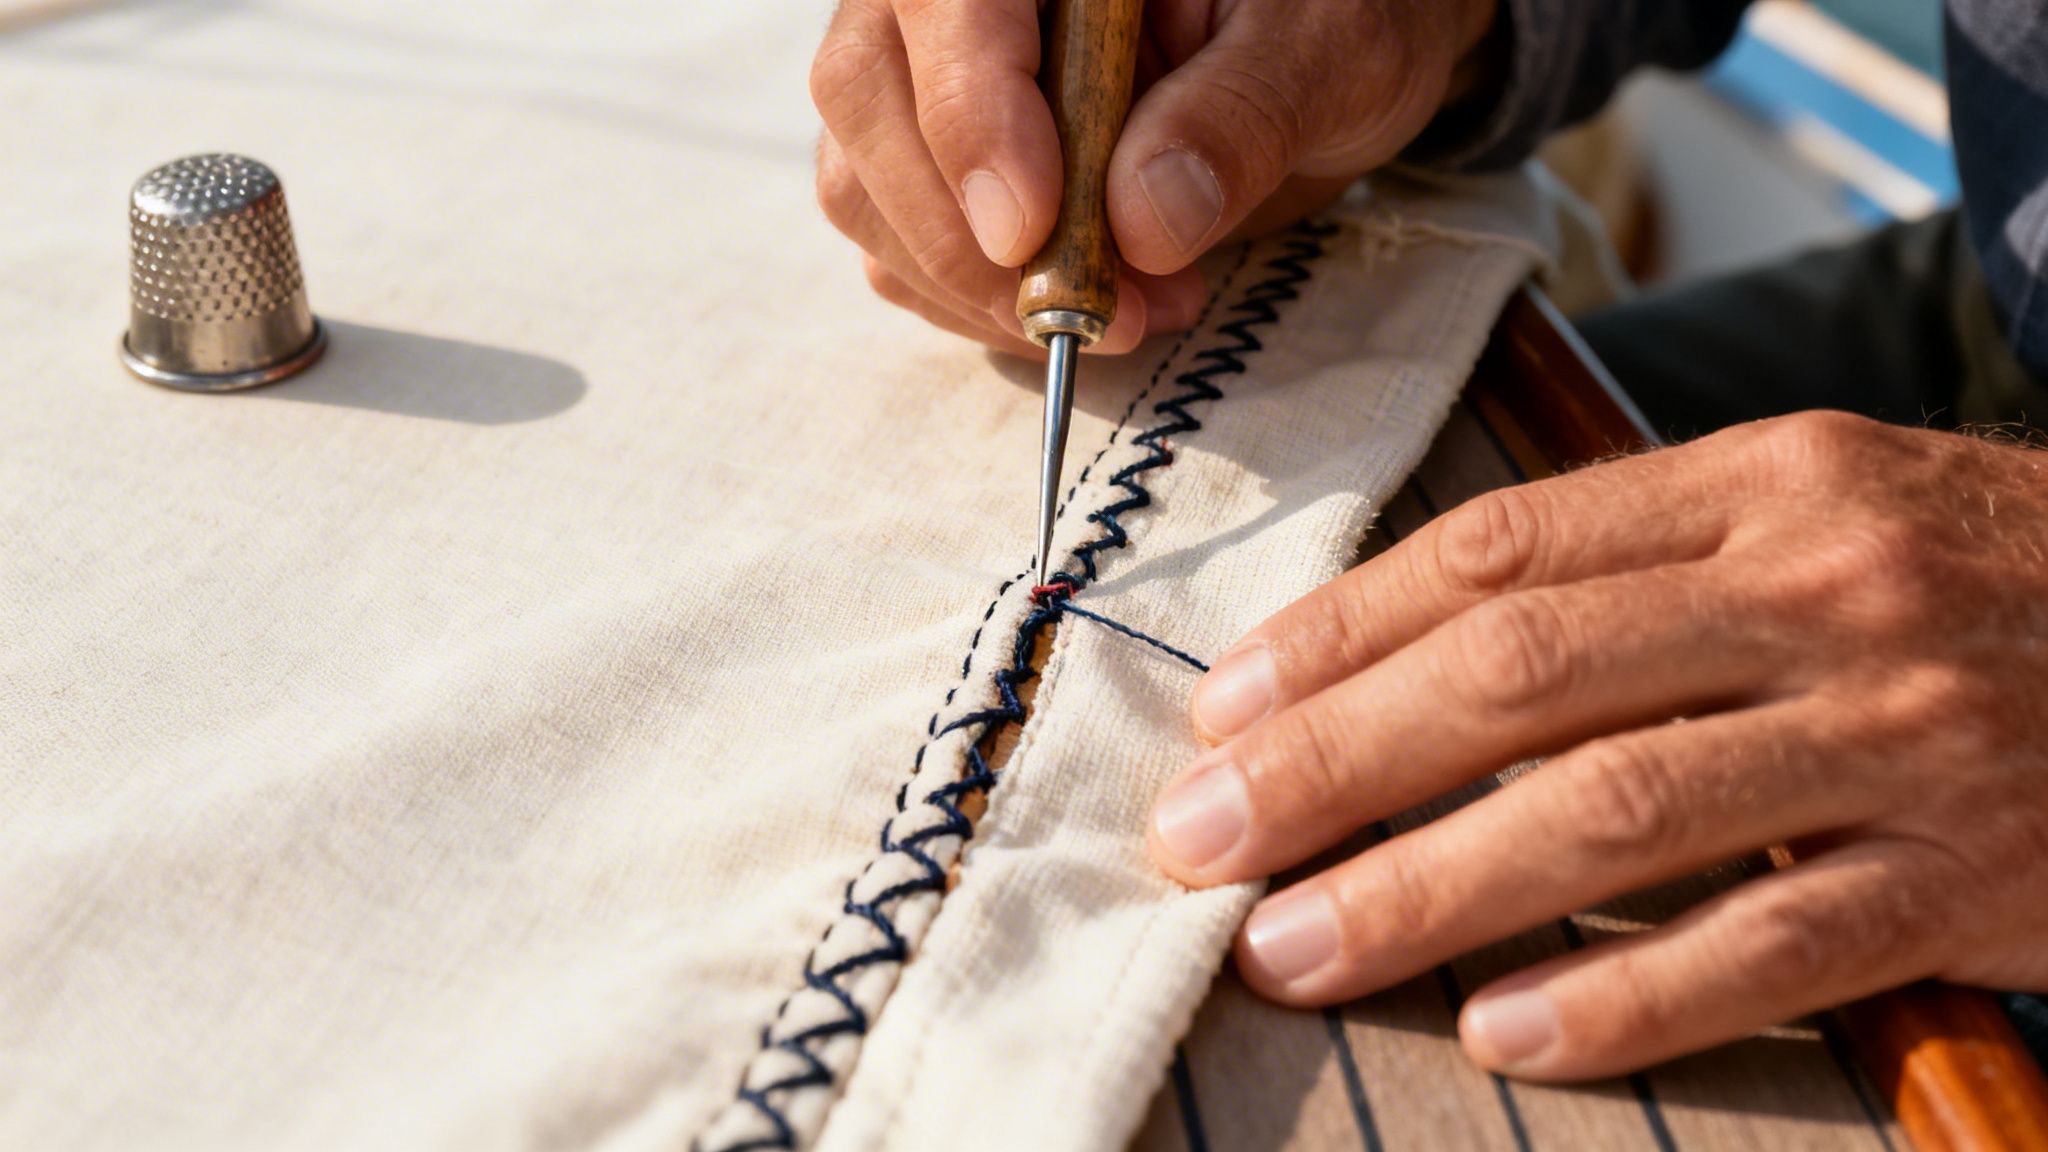
Hand-Sewing Split Seams Like a Pro
Split seams are probably the number one failure on boat canvas. The thread is constantly battling UV rays and tension, and eventually, it just gives out. While it might look intimidating, hand-sewing a seam with a proper sewing awl creates a lock stitch that’s just as tough as anything from a machine.
A sewing awl is a fantastic tool. It pushes a heavy-duty needle and thread through the canvas, creating a loop on the far side. You simply pass the rest of your thread through that loop to lock the stitch in place. It's strong and surprisingly quick once you get the rhythm down.
While you’re in repair mode, it’s a great time to give the rest of your canvas a once-over. You might fix one seam only to spot the early stages of mildew nearby. Knowing how to effectively remove mildew from canvas can stop a small problem before it degrades the fabric and causes another tear.
Start by threading your awl with a good UV-resistant polyester thread. Push the needle through the canvas at the beginning of the split, then pull it back just enough to form a loop. Pass the entire loose end of the thread through that loop and pull the awl out completely. This tightens your first stitch. Just repeat this process, making sure your stitches are tight and even, until the seam is fully closed.
Replacing Broken Snaps and Zippers
Nothing’s more frustrating than a snap that won't snap or a zipper that's frozen solid. Thankfully, replacing them is a pretty straightforward job. The key is to remember that these things often fail because of corrosion or stress on the fabric, so your repair should reinforce the area, not just replace the part.
For broken snaps, a simple snap-and-grommet tool kit is all you need. Once you pry the old snap off, take a close look at the canvas underneath. If it looks worn or stretched, add a small reinforcing patch to the backside before installing the new snap. That little bit of extra material will spread the tension out and keep the new snap from tearing through.
Zippers demand a bit more patience. If a zipper is just stuck, try rubbing a bar of soap or our Marine Zipper & Snap Lubricant on the teeth first. If that doesn't work, or if the slider or teeth are broken, it's time for a replacement. Carefully slice the old stitches with a seam ripper and use the old zipper as a template for the new one.
Here’s a pro tip: use double-sided seam tape to hold the new zipper perfectly in place while you sew. It prevents slipping and ensures your stitch lines are straight and clean, making the whole job ten times easier.
Waterproofing Your Canvas for Long-Term Protection
A good repair isn't finished when the last stitch is in place. The job's only truly done once you’ve re-armed the canvas against the elements. Waterproofing and UV protection are the critical final steps that turn a quick fix into a lasting solution.
This isn’t just about reacting to damage; it's about getting on a preventative maintenance schedule. It’s the single best thing you can do to extend the life of your boat’s canvas, saving you a whole lot of time and money in the long run.
Constant exposure to sun and saltwater chews away at the original factory coatings, leaving the fabric exposed. That’s how moisture gets in, how UV rays weaken the fibers, and ultimately, why you're making repairs in the first place.
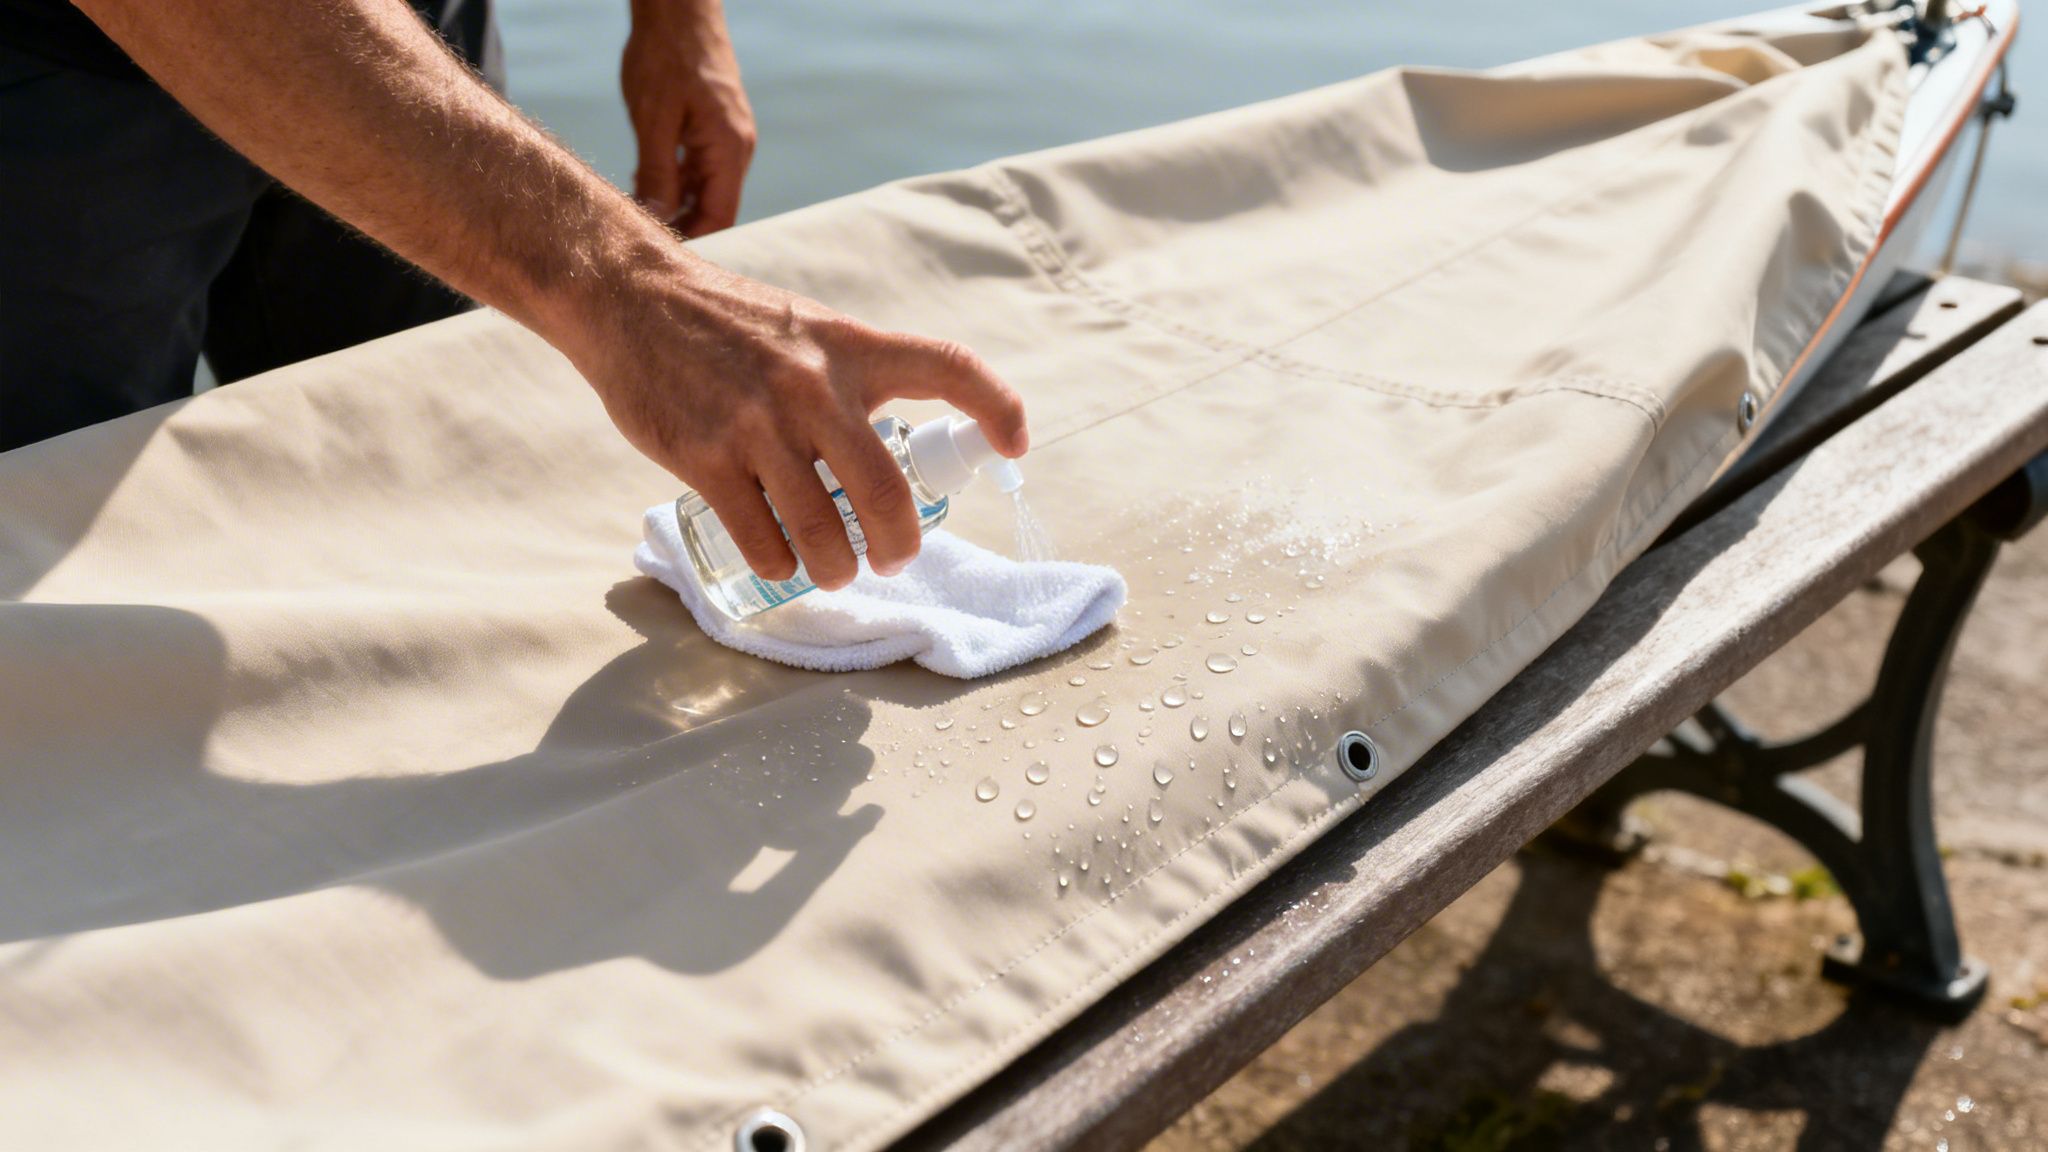
The Foundation: A Thorough Pre-Treatment Cleaning
Before you even think about applying a protectant, the canvas has to be spotless. Trying to waterproof a dirty surface is like waxing a muddy car—it just won't stick. Grime, salt crystals, and mildew create a barrier that prevents waterproofing agents from properly soaking into the fabric's weave.
This cleaning phase is non-negotiable. It's your best chance to stop the damage from getting worse. In fact, studies show a staggering 65% of boat owners see tears or fading within the first two years if they skip protective treatments. Salt buildup alone is responsible for about 40% of fabric degradation. Taking the time to clean properly and restore the waterproofing can slash future repair needs by up to 25%.
To get it done right, start with our Mildew Stain Remover to knock out any organic growth. Follow that up with our Boat Canvas Cleaner to lift away all the deep-seated dirt and salt. This one-two punch leaves you with a perfectly prepped surface for the protectant to grab onto.
Choosing and Applying Your Protective Coatings
With a clean and bone-dry canvas, it's time to bring back its defenses. You're looking for two key things: waterproofing and UV inhibition. Many modern sprays offer both, but always check the label to be sure you're getting full coverage. Stick with products made specifically for marine fabrics, as they’re built to handle the harsh life on the water.
The type of fabric matters, too. For instance, choosing the best outdoor fabric from the start makes a huge difference in durability, but even the toughest materials need their protective coatings replenished.
Applying the protectant is easy, but the details matter.
- Work in a Well-Ventilated Area: These sprays are potent, so always work outside or in a wide-open garage.
- Apply in Thin, Even Coats: Hold the sprayer about 8-12 inches from the canvas. Use a sweeping motion and slightly overlap each pass to avoid streaks.
- Pay Extra Attention to Seams: Stitched areas are weak points for water. Give all your repaired seams an extra pass with the spray to seal them up tight.
After the first coat, let it dry completely based on the product’s instructions. Then, hit it with a second coat. Two thin coats will always beat one thick, globby one. It allows for deeper penetration into the fibers and gives you a much more durable finish.
Once it's cured, you'll see water bead up and roll right off, just like it did when the canvas was new. To make this easy, our Boat Fabric Waterproofing Spray is designed to restore that critical barrier against both water and UV rays. A fresh application at least once a season is the best insurance you can get for your canvas.

Handling Advanced Repairs and Reinforcements
Once you've got the basics of patching and sewing down, it's time to tackle the more advanced projects that can really add years to the life of your boat canvas. This is where we get into the bigger stuff—the repairs and reinforcements that stop major problems before they start.
Think of it like this: instead of waiting for a grommet to rip clean out of the fabric, you're going to fortify that area before it fails. From swapping out cloudy windows to beefing up high-stress corners, these are the skills that take you from quick fixes to professional-grade canvas work.
Strategically Reinforcing High-Stress Areas
Let's be honest, some parts of your boat cover just work harder than others. Corners, the areas around snaps and grommets, and any spot where a support pole makes contact are under constant tension. That relentless stress will eventually stretch and weaken the fabric, leading to a tear. It's not a matter of if, but when.
The fix is to give these areas a little extra armor. By sewing a patch of tougher material over these vulnerable spots, you spread the load across a much wider, stronger surface. It’s a classic trick of the trade from professional canvas shops, and it's something you can absolutely do yourself.
A few go-to materials for this job include:
- Heavy-Duty Vinyl: My top choice for its sheer durability and water resistance. It's perfect for beefing up the areas around any hardware.
- Leather Scraps: A traditional and incredibly tough option. Great for adding chafe protection where lines or poles might rub.
- Extra Canvas: Sometimes the simplest solution is the best. Using a second layer of the same canvas material is an effective way to bolster a weak spot without changing the look.
To add a reinforcement patch, just cut your material so it extends at least two inches beyond the high-stress point in every direction. Use our Marine Grade Fabric Adhesive to tack it in place, then get out your sewing awl and some UV-resistant thread to stitch a permanent, rock-solid perimeter.
Replacing a Clear Vinyl Window
A cracked, yellowed, or foggy vinyl window (often called Isinglass) doesn't just look bad—it can be a real safety issue, seriously blocking your view. Replacing one seems like a huge job, but it's totally manageable if you're patient and methodical. The difference it makes is massive.
First things first, you need to carefully remove the old window. Grab a seam ripper and gently cut the stitches holding the old vinyl. And whatever you do, don't toss that old piece! It’s your golden ticket—the perfect template for the new one.
Lay the old, clouded vinyl over your new sheet of clear marine-grade vinyl. Trace its outline with a marker, and then cut out the new window. Using the old piece as a pattern guarantees a perfect fit back into the existing canvas opening.
Pro Tip: The trickiest part of this whole job is holding the new vinyl steady while you sew. Grab some double-sided seam tape and apply it around the inside edge of the canvas opening. Press the new window onto the tape—it'll hold it securely in place, acting like a much-needed third hand while you stitch.
With the new window taped in, you're ready to make it permanent. Use your sewing awl and follow the original stitch holes as a guide, creating a strong lock stitch all the way around. The result is a crystal-clear view and a huge upgrade to your boat's appearance.
For smaller nicks where a full replacement is overkill, you can use a quality fabric repair tape for boat covers and awnings to quickly seal up the damage.
Sealing Hardware for a Watertight Finish
Every single spot where a screw, snap, or cleat pokes through your canvas is a potential leak waiting to happen. Even the tightest stitch can wick moisture over time. The professional approach is to create a permanent, waterproof gasket around every piece of hardware.
This is where a good marine sealant is non-negotiable. After you've installed or reinstalled any hardware, run a small, clean bead of Better Boat’s Marine Sealant & Adhesive around the base where it meets the canvas. I like to use a gloved finger to smooth the bead, which forces the sealant into any microscopic gaps in the fabric's weave.
This simple last step creates an impermeable barrier that completely locks out water. It protects both your canvas and your boat's core from moisture intrusion, ensuring your repair isn't just strong, but completely watertight.
Deciding Between DIY and Professional Repair
So, you've spotted a tear in your boat canvas. The big question now is, do you tackle it yourself or call in a pro? Knowing how to fix it is one thing, but knowing when you should is the real key. This decision usually boils down to a classic balancing act: your time, your money, and your skill level.
Rolling up your sleeves for a DIY repair can be incredibly satisfying and easy on the wallet. There’s no denying that. But it's also crucial to be honest with yourself about where your abilities end. A simple patch job can quickly turn into a costly mess if you get in over your head.
On the flip side, a professional brings years of experience and specialized equipment to the table. They work efficiently and, more importantly, have a trained eye that can spot problems you might overlook—like widespread UV damage that makes a simple patch a total waste of time.
Weighing the Real Costs
At a glance, the cost difference looks like a no-brainer. You could grab a DIY patch kit with adhesive and some matching canvas for maybe $30. A professional canvas shop? They might quote you upwards of $150 for that same small repair once you factor in labor.
But the story gets more complicated with bigger jobs. We see it all the time: unprotected canvas needs attention within a single season, and those costs add up. While a full professional pontoon cover repair can be a significant expense, a bit of preventative care drastically cuts that cost down the line. The data backs this up; you can learn more about trends in the boat cover market and see how investing in quality care pays off. Many boaters are choosing to handle maintenance themselves precisely to avoid those high shop markups.
This flowchart gives you a simple way to think through the process, from a quick check-up to deciding whether to reinforce a spot or replace a whole section.
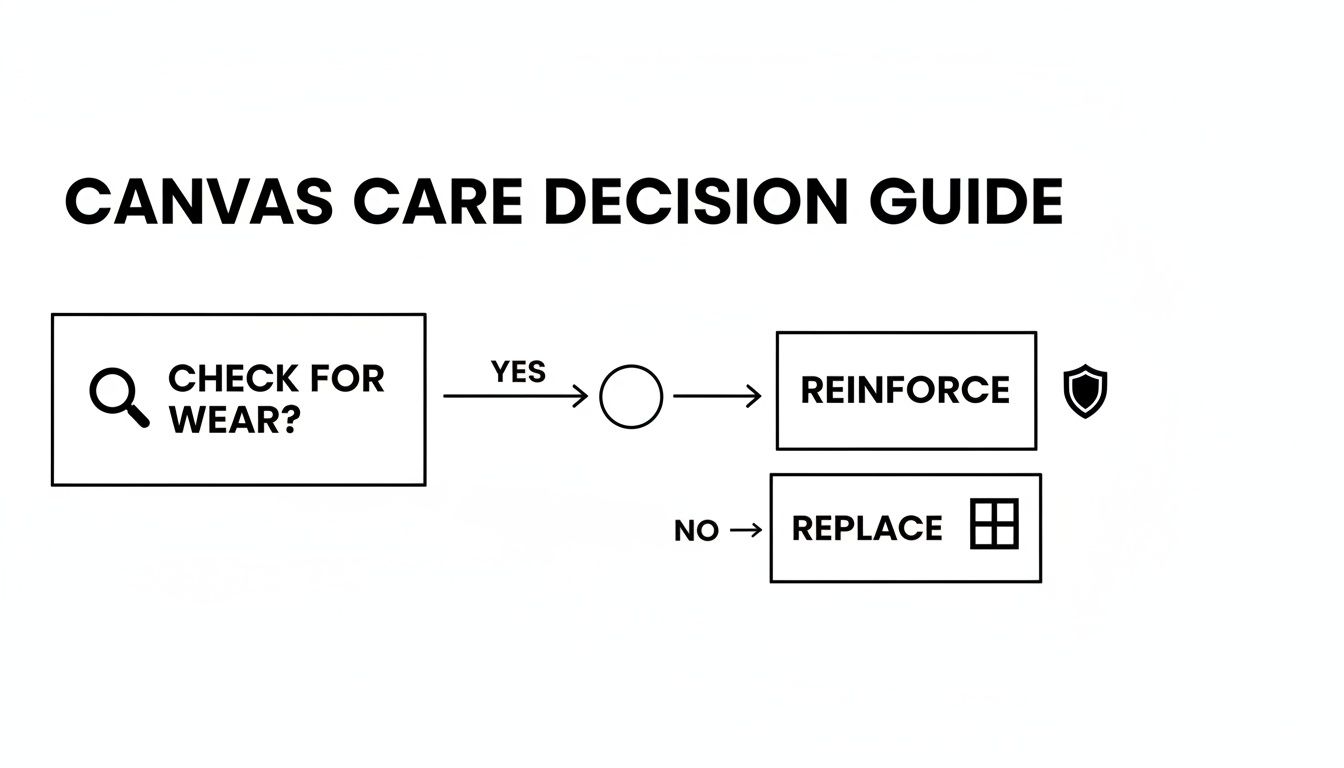
Think of it as a proactive cycle: inspect regularly, reinforce minor wear before it gets worse, and know when a section is too far gone.
Estimating Your Time Commitment
Time is the other resource you can't get back. A quick seam repair might just take an hour of your Saturday. But replacing a full vinyl window? That can easily devour your entire weekend.
Remember, professionals have the tools and muscle memory to knock out complex jobs in a fraction of the time it would take most of us.
Be realistic about your schedule. If your boat is stuck on the trailer for weeks while you try to find time for a big repair, the money you "saved" won't feel so great when you're missing perfect days out on the water.
To give you a better idea of what you're up against, let's break down the typical time and costs for some common jobs.
Cost and Time Comparison DIY vs Professional
This table breaks down the estimated costs and time for common canvas repairs to help you decide on the best approach for your boat.
| Repair Type | Estimated DIY Cost | Estimated Pro Cost | Estimated DIY Time |
|---|---|---|---|
| Small Adhesive Patch | $20 - $40 | $100 - $175 | 30 minutes (plus cure time) |
| Sewing a 3-Foot Seam | $15 - $30 (thread/awl) | $150 - $250 | 1-2 hours |
| Replacing a Snap | $10 - $25 (kit) | $75 - $125 | 15-30 minutes |
| Replacing a Small Vinyl Window | $50 - $100 | $300 - $500+ | 4-6 hours |
As you can see, the gap in both time and money widens significantly as the job gets more complex.
Knowing When to Call the Pros
Some jobs just scream for an expert. Don't let pride get in the way of making the smart call; a professional repair will almost always be stronger, last longer, and give you better peace of mind.
It's time to pick up the phone if you see any of these red flags:
- Extensive Dry Rot: If you can gently tug on the canvas and it feels brittle or tears easily, the fabric's integrity is shot. A pro can tell you if replacing a large panel makes sense or if you're better off investing in a whole new cover.
- Complex Structural Tears: Is the damage right on a corner, involving multiple seams and snaps? That’s tricky territory. Getting the tension and fit right requires experience to avoid making things worse.
- Lack of Proper Tools: Some jobs, like stitching through multiple thick layers of canvas and vinyl, are simply impossible without an industrial sewing machine. Your trusty hand awl won't cut it.
The ultimate goal here is a tough, waterproof repair that protects your boat. By taking an honest look at the damage, your budget, and your own skills, you can make the right call with confidence.
Got Questions About Your Boat Canvas Repair? We've Got Answers
Even when you have a solid plan, questions always pop up in the middle of a project. And when it comes to something as vital as your boat’s canvas, you want to be 100% sure you’re getting it right.
Let's walk through some of the most common questions boat owners run into when they're trying to repair their canvas. Getting these sorted will give you the confidence you need to get the job done right, so your repairs hold up season after season.
What Is the Best Thread for Repairing Boat Canvas
There's no room for debate here: you absolutely must use a UV-resistant polyester thread that's made for the marine world. This is not the place to try and save a few bucks with something from a regular craft store.
Your standard cotton or nylon thread will get absolutely destroyed by the constant barrage of sun and salt. It’ll rot, get brittle, and fall apart way faster than you’d think, meaning you'll be doing the same repair all over again in no time. A true marine-grade polyester thread, like a V-69 or V-92, is built for this abuse and will keep your stitches locked in for years.
Can I Use My Home Sewing Machine
You might be able to get away with using a heavy-duty home sewing machine for a very short, straight seam on thin, lightweight canvas. But let's be realistic—most marine canvas is way too thick and tough for a standard machine. Trying to force it is a great way to snap needles, burn out the motor, or worse.
For DIY repairs, a much smarter and more reliable tool is a simple sewing awl, often called a Speedy Stitcher. These things are cheap, tough as nails, and designed to punch through heavy-duty fabric. They create a lock stitch that's every bit as strong as what you'd get from a professional machine.
How Often Should I Re-Waterproof My Canvas
As a general rule, you should plan on re-applying a waterproofing treatment at least once a year. A good time to do this is at the start or end of your boating season. The easiest way to know for sure is to do a quick spray test.
Just hit the canvas with a garden hose. If you see the water bead up and roll right off, your protective layer is still doing its job. But if the fabric starts to darken or look like it's soaking up the water, it's time for a fresh coat. Keeping up with waterproofing is a cornerstone of any good boat canvas repair.
Quick tip: Before you spray on any new protectant, you have to give the canvas a thorough cleaning. If you don't, you're just spraying over a layer of salt and dirt, and the waterproofing treatment won't be able to bond properly with the fabric.
How Can I Prevent Mildew on Repaired Canvas
Stopping mildew really boils down to two things: moisture control and airflow. Mildew loves damp, dark, stagnant places, so your entire goal is to take those conditions away.
Here’s what works:
- Make sure it's completely dry: Never, ever cover or store your boat until you are positive the canvas is bone-dry, both on the surface and deep down.
- Get some air moving: If your cover doesn't already have vents, think about adding a few. Even just propping up the cover with a support pole can make a huge difference in circulation.
- Clean it regularly: A periodic cleaning washes away the grime and organic bits that mildew loves to feed on.
Using our Mildew Stain Remover on a regular basis is your best bet. It'll kill any stray spores before they can multiply and cause a real headache.
Keeping your boat's canvas in prime condition is a huge part of protecting your overall investment. With the right approach and quality gear, you can confidently handle most of these repairs yourself. For everything you need—from powerful cleaners to tough-as-nails sealants—trust Better Boat to deliver reliable, easy-to-use solutions. Check out our full line of marine care products at https://www.betterboat.com and keep your vessel in shipshape.