


DIY Guide to Repair Vinyl Boat Seats
Before you can even think about patching up your vinyl boat seats, you need to play detective. A thorough damage assessment is the first, and arguably most important, step. This initial once-over is about more than just spotting the obvious rip; it's about figuring out the right repair strategy, the best products, and the proper techniques to use.
Getting this part right is what prevents a simple weekend fix from spiraling into a full-blown—and expensive—replacement project.
Figuring Out How Bad the Damage Really Is
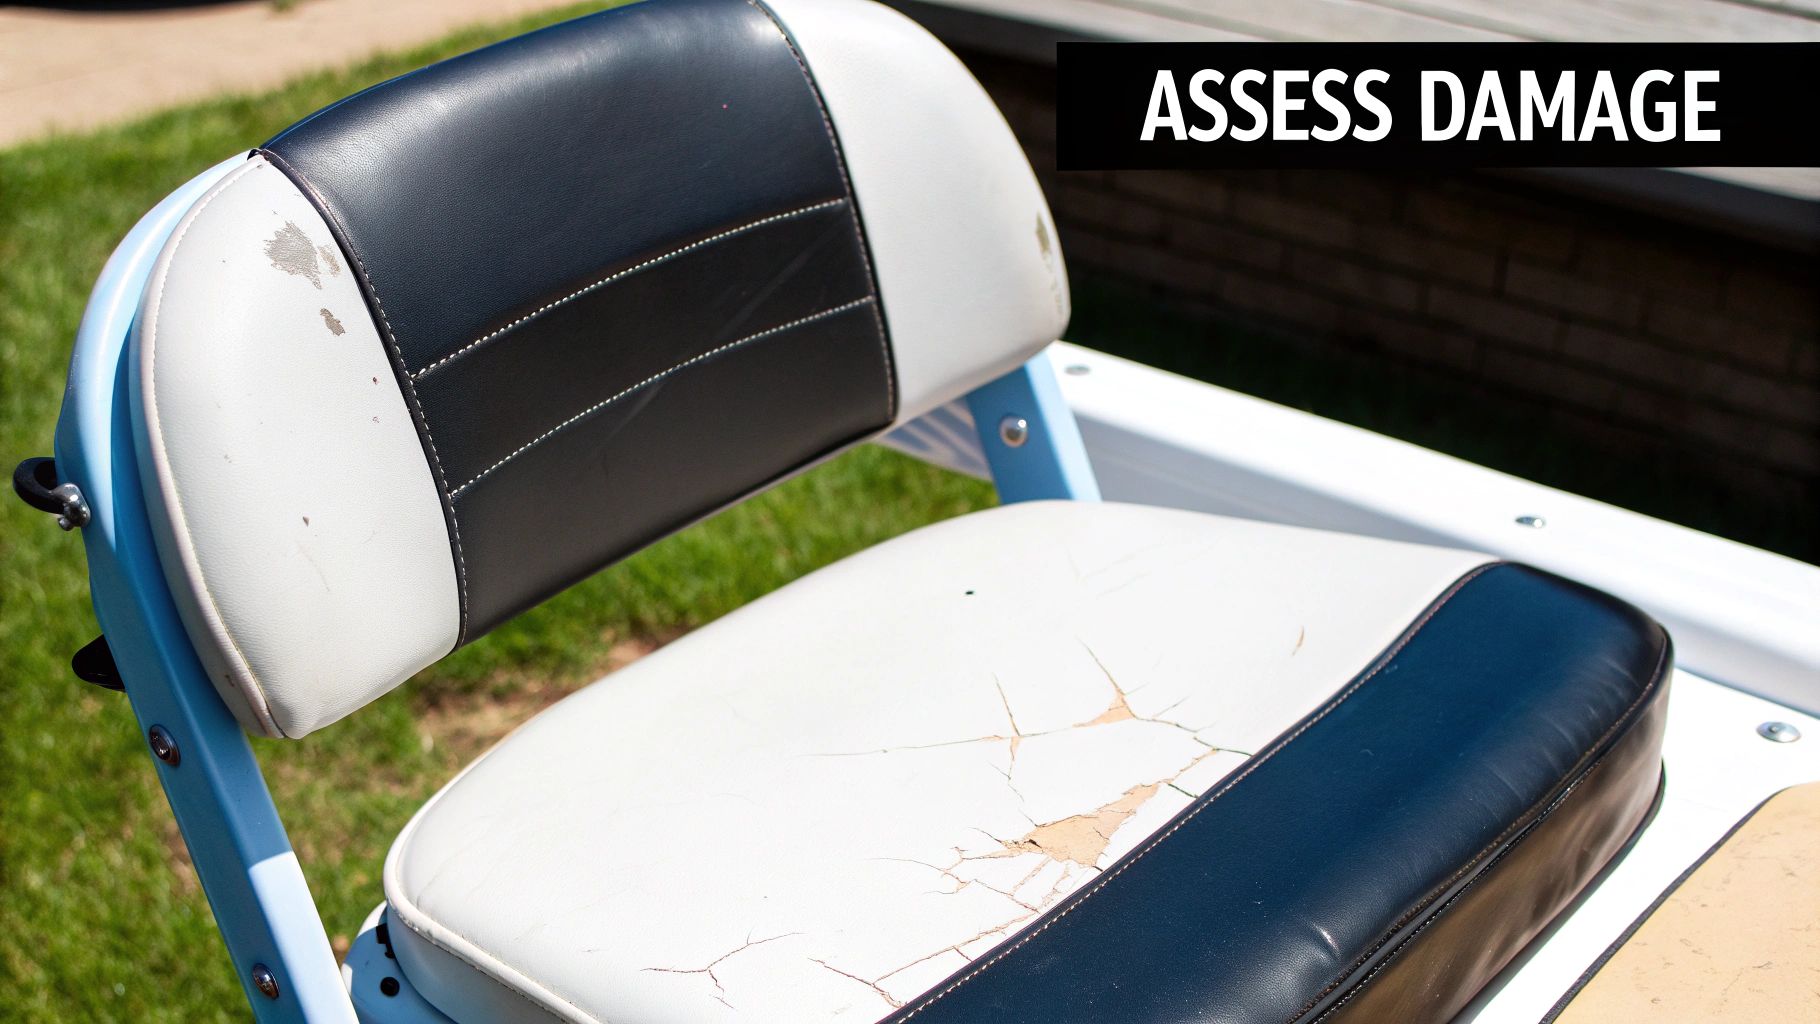
The success of any DIY project really comes down to understanding the true scope of the work ahead. When it comes to boat seats, what looks like a tiny surface crack might actually be a sign of widespread material fatigue. If you just slap a patch on that without addressing the underlying problem, you're setting yourself up for a failed repair that won't last a single season.
Think of a detailed inspection as your roadmap. Kick things off by giving the seats a good cleaning with a gentle vinyl cleaner. This gets rid of all the surface grime that can easily hide smaller imperfections. Once the seats are clean and completely dry, get in there with some bright, direct light and examine every single inch.
Know Your Enemy: Common Types of Vinyl Damage
Not all damage is created equal, and you can't treat it all the same. The way you’d fix a tiny puncture from a misplaced fishing hook is completely different from how you'd tackle a long, sun-rotted crack that’s been baking for years.
Keep an eye out for these common culprits:
- Scuffs and Abrasions: These are those surface-level scrapes, usually from gear, coolers, or shoes rubbing up against the vinyl. They’re mostly cosmetic and, thankfully, are the easiest to fix.
- Punctures and Small Tears: A sharp object is typically the cause here, leaving behind a clean hole or rip. These usually just need a bit of filler or a small, well-placed patch.
- Cracking and Fading: This is the tell-tale sign of prolonged UV exposure. It means the vinyl is getting brittle. If you see deep cracks, that’s a big red flag that the material's structural integrity is compromised.
- Seam Separation: This isn’t a surface issue; it’s a structural failure where the stitching has given up. This requires more than a simple patch—you're looking at a job that'll need a strong, marine-grade adhesive and maybe even some re-stitching.
Pro Tip: Gently press on the vinyl surrounding any damaged spot. If the material feels stiff, brittle, or makes a faint crackling sound, you're dealing with advanced sun damage. That decay likely extends far beyond the flaw you can see.
It's What's on the Inside That Counts
Now for the most critical part of your assessment: checking for hidden problems. A tear in the vinyl is an open invitation for water to seep into the foam cushion underneath. And waterlogged foam is bad news. It doesn't just lead to mold, mildew, and rot; it also makes the seat sag and lose its shape.
Press down firmly on the cushion. Does water squeeze out? Does it feel unusually heavy or kind of clumpy? These are major warning signs that the foam needs to be dried out completely—or even replaced—before you can effectively repair vinyl boat seats.
If you only fix the vinyl while ignoring the wet foam underneath, you’re just putting a band-aid on a bigger problem. Taking the time to do this careful, methodical assessment is what ensures you’ll have the right tools and materials on hand for a durable, professional-looking repair that actually lasts.
Choosing the Right Marine Vinyl Repair Kit
Once you've sized up the damage, your next task is to pick the right tools for the job. The success of your effort to repair vinyl boat seats hinges entirely on the quality and type of repair kit you choose. Not all kits are created equal, and grabbing the wrong one is a surefire way to end up with a weak, obvious patch that gives out before the season is even over.
Think of it this way: you wouldn't use wood glue to fix a ceramic vase. It’s the same principle here. An adhesive designed for a small puncture just won’t have the muscle to hold a high-stress seam tear together. Marine vinyl is a tough, specialized material built to survive sun, salt, and constant use, and it demands equally specialized repair products to match.
Decoding the Different Kit Types
Navigating the options can feel overwhelming, but it really just boils down to matching the product to the problem. Each type of kit is engineered for a specific kind of damage, from tiny cosmetic flaws to more serious structural tears.
- Liquid Vinyl Fillers: These are your go-to for small punctures, cracks, and annoying scuffs. They come in a thick, liquid form that you apply in thin layers. Once cured, it forms a flexible, durable patch that blends right in.
- Heat-Cured Patches: Got a larger tear or a full-blown hole? A heat-cured patch offers far superior strength. This process involves a patch material and a heat-activated adhesive, which together create a powerful bond that flexes with the seat.
- Heavy-Duty Adhesives: When you're dealing with a seam that's starting to separate, a dedicated adhesive is your best friend. These are formulated to bond vinyl back to itself or to the underlying frame, restoring the seam's integrity before you worry about the cosmetics.
A critical mistake I see boat owners make is reaching for household items like super glue or generic vinyl adhesives. These products just don't have the flexibility or UV resistance needed for a harsh marine environment. They almost always crack and peel, making the original damage even worse.
To make it easier to choose, here’s a quick breakdown of which kit works best for common issues:
Vinyl Repair Kit Comparison for Different Damage Types
This table compares common vinyl repair kits and their best applications for specific types of boat seat damage.
| Repair Kit Type | Best For | Key Features | Difficulty Level |
|---|---|---|---|
| Liquid Vinyl Filler | Small punctures, scuffs, minor cracks | Flexible, color-matchable, self-leveling | Easy |
| Heat-Cured Patch Kit | Large tears, holes, burns | Strongest bond, includes texture paper | Moderate |
| Adhesive & Patch Kit | Long rips, seam separation | High-strength adhesive, flexible patch | Moderate |
| All-in-One Kit | Multiple small repairs | Contains various colors and tools | Easy to Moderate |
Choosing the right kit from this list sets you up for a repair that not only looks good but also holds up against the elements.
Essential Tools and Why They Matter
A great kit is only half the battle; you also need the right tools to apply everything correctly. While most comprehensive kits include the basics, you should make sure you have quality versions of each. Key items are application spatulas for smoothing filler, graining paper to replicate the vinyl's texture, and a top-notch vinyl cleaner.
And speaking of cleaners, proper surface prep is completely non-negotiable.
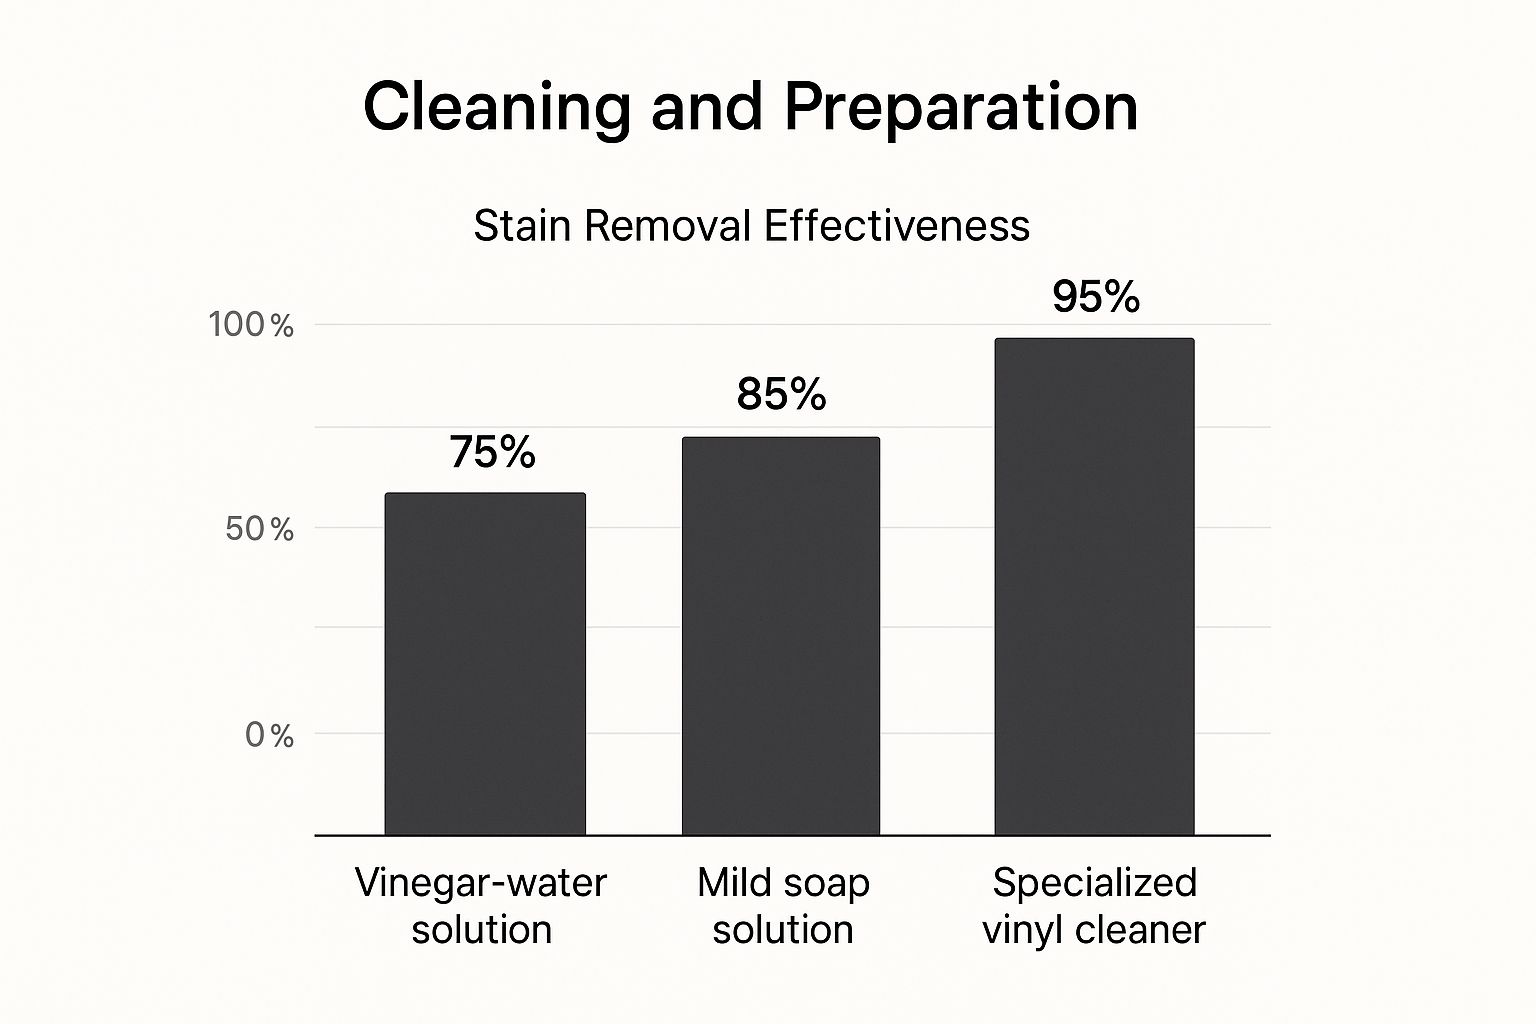
The data here makes it clear: a specialized cleaner is worlds more effective at removing contaminants that can ruin adhesion. To ensure your surface is perfectly prepped, check out our guide on choosing the best marine vinyl cleaner. Using the wrong cleaner can leave behind a residue that prevents a strong bond, sabotaging your repair from the very start.
There's a reason the marine vinyl industry was valued at USD 340.8 million in 2023—this material is engineered to resist tears, abrasion, and UV exposure. To honor that durability, your repair materials must be up to the same high standard. Selecting a purpose-built kit ensures your hard work pays off with a repair that lasts.
Preparing the Surface for a Flawless Repair
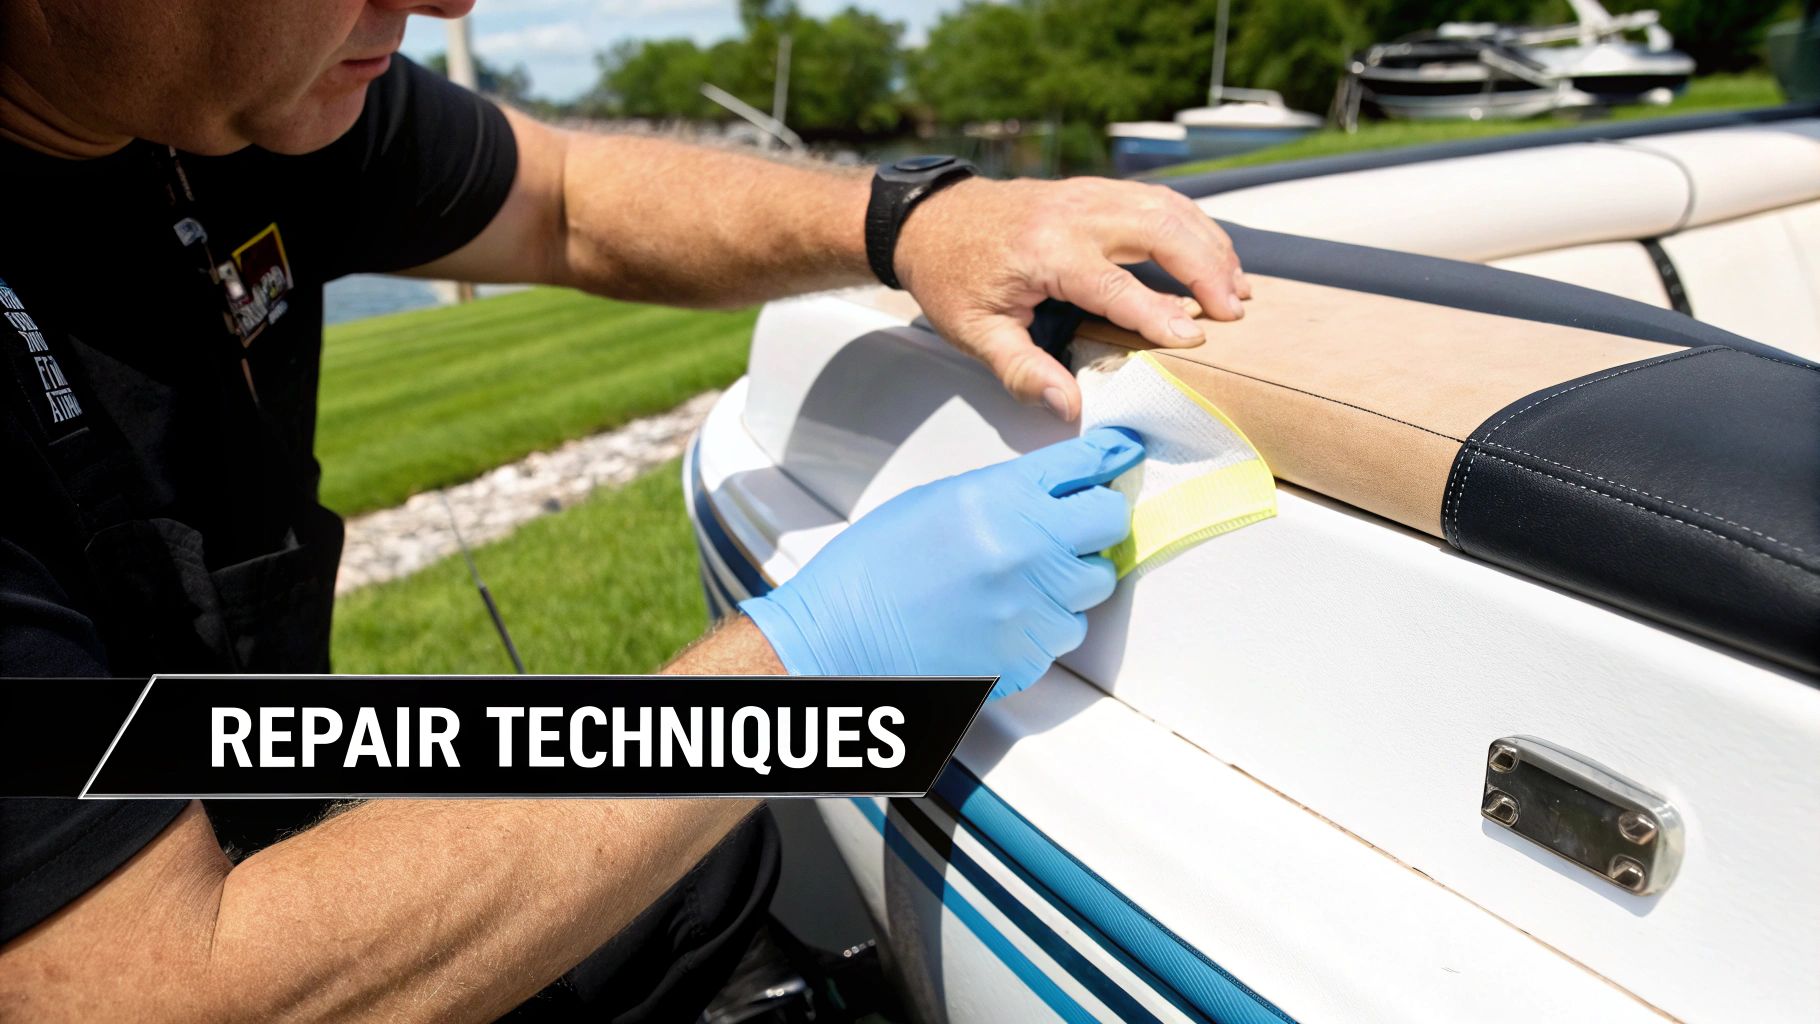
If you've ever painted a room, you know the secret to a perfect finish isn't just in the brushstroke—it's all in the prep work. The exact same principle applies when you repair vinyl boat seats. I've seen it time and time again: a poorly prepped surface is the number one reason repairs fail, causing patches to peel and fillers to lift off in a matter of weeks.
Don't fool yourself into thinking a quick wipe-down with a damp cloth will do the trick. Marine vinyl is under constant assault from a nasty cocktail of contaminants that actively prevent adhesion. Sunscreen, body oils, salt residue, and even those silicone-based protectants create an invisible barrier that you absolutely must remove for any repair to form a permanent bond.
A Deep Clean is Non-Negotiable
Your first move should be grabbing a high-quality marine vinyl cleaner and a medium-bristle brush. Get in there and scrub the area, making sure to clean a few inches beyond the actual damage. This isn't just about surface dirt; you're lifting out stubborn grime and mildew spores that have worked their way into the vinyl's texture.
Once you're done scrubbing, wipe the area down with a fresh cloth dampened with isopropyl alcohol. This is a crucial final step. It removes any lingering cleaner residue and completely degreases the surface, giving you the perfect canvas for your repair. For a more detailed guide on getting your seats spotless, check out our post on how to clean boat seats.
Crucial Takeaway: Skipping the alcohol wipe is a classic rookie mistake. That final degreasing is what allows the vinyl filler or adhesive to actually penetrate and bond with the vinyl itself, rather than just sticking to a film of leftover cleaner.
Prepping the Damaged Area Itself
With the surrounding surface pristine, it's time to focus on the tear or crack. How you handle this part creates a solid foundation for the repair material to grip, which is key to preventing it from failing along the edges down the road.
- Trim Away Frayed Edges: Take a sharp scalpel or a fresh razor blade and carefully trim any loose threads or frayed vinyl from the edges of the tear. You want a clean, solid border for the filler to grab onto.
- Bevel the Edges: For cracks, I like to angle the blade slightly to create a small "V" groove along the edge. It's a subtle trick, but it increases the surface area and gives the liquid vinyl a much better bite inside the crack.
The Final and Most Patient Step: Drying
Before you even think about applying any repair products, the area must be 100% dry. I'm not just talking about the surface of the vinyl—you have to be sure the foam cushion underneath is bone dry, too. If that foam is even slightly damp, moisture will eventually work its way up and push your beautiful repair right off from below.
If you think the foam is wet, press down on it with a dry towel to soak up as much as you can. A hairdryer on a low-heat setting can speed things up, or just let the seat bake in the sun for a while. Trust me, a little patience here pays off big time and ensures all your meticulous prep work leads to a durable, long-lasting fix.
Applying Patches and Fillers Like a Professional
With a clean and prepped surface, you're at the most satisfying part of the job—the actual repair. This is where your careful prep work pays off, turning an ugly flaw into something you'll barely notice. The right technique really depends on the type and size of damage you're up against.
A simple puncture is a world away from a long tear along a seam that's always under stress. We'll walk through the methods for the most common fixes, so you can confidently repair vinyl boat seats and get a pro-level finish.
Handling Large Tears with a Sub-Patch
When you've got a tear longer than an inch, just slathering filler on top won't cut it. The repair will just split open again the first time someone sits on it. You need to build in some strength from underneath, and that’s what a sub-patch is for.
- Cut Your Patch: Grab the canvas material from your kit and cut a piece that’s about half an inch larger than the tear on all sides. Go for a rounded or oval shape—no sharp corners that can snag and lift later.
- Slide it In: This part can be a little fiddly. Use tweezers or a small spatula to carefully slide the sub-patch through the tear. You want it to lie flat and centered directly underneath the vinyl.
- Glue it Down: Lift one side of the tear and brush a thin layer of marine-grade vinyl adhesive onto the underside of the vinyl and the top of the patch. Press it down firmly. Now, do the same for the other side, pulling the edges of the tear as close together as you can.
This gives you a strong, reinforced base. Once the adhesive has fully cured (check the manufacturer's instructions), you're ready to apply liquid vinyl filler over the top to hide the seam for good.
Applying Liquid Vinyl Filler for Cracks and Punctures
Liquid vinyl is a miracle worker for smaller cracks and punctures, but the secret is to work in thin, controlled layers. If you just glob it on, you’ll end up with a lumpy, obvious mess that's impossible to sand down smoothly.
Start with a very thin layer of the liquid vinyl filler, using a small applicator tool to work it directly into the crack. The goal is just to fill the damage, not to cover the vinyl around it. Let this first layer cure completely. Depending on the humidity, this could take an hour or more.
The real secret to a seamless finish is patience. Building the repair with two or three thin layers will always look better and be stronger than one thick, sloppy application. Each layer bonds to the one before it, creating a flexible repair that lasts.
Perfecting the Texture and Color
With your final layer of filler on but still a bit tacky, it's time to match the texture. Take the graining paper from your kit and gently press it onto the wet filler for a few seconds. Lift it straight off. This imprints the vinyl pattern onto the repair, making it blend in beautifully.
The last piece of the puzzle is color. Most kits provide several color tints you can mix. Play around with small batches on a piece of cardboard until you nail the perfect shade—just remember the color usually gets a bit darker as it dries. A perfect color match is what separates a decent patch from a truly invisible fix.
Putting in the effort to maintain your boat seats is a smart move. The market for marine seats, which includes these vinyl ones, hit USD 1.22 billion in 2023 and is expected to keep climbing. These seats are designed with water-resistant vinyl to fight off moisture damage, and your repairs help them do their job even longer. You can read more about the growth of the marine seats market at Marketdataforecast.com.
Finishing and Protecting Your Repaired Boat Seats
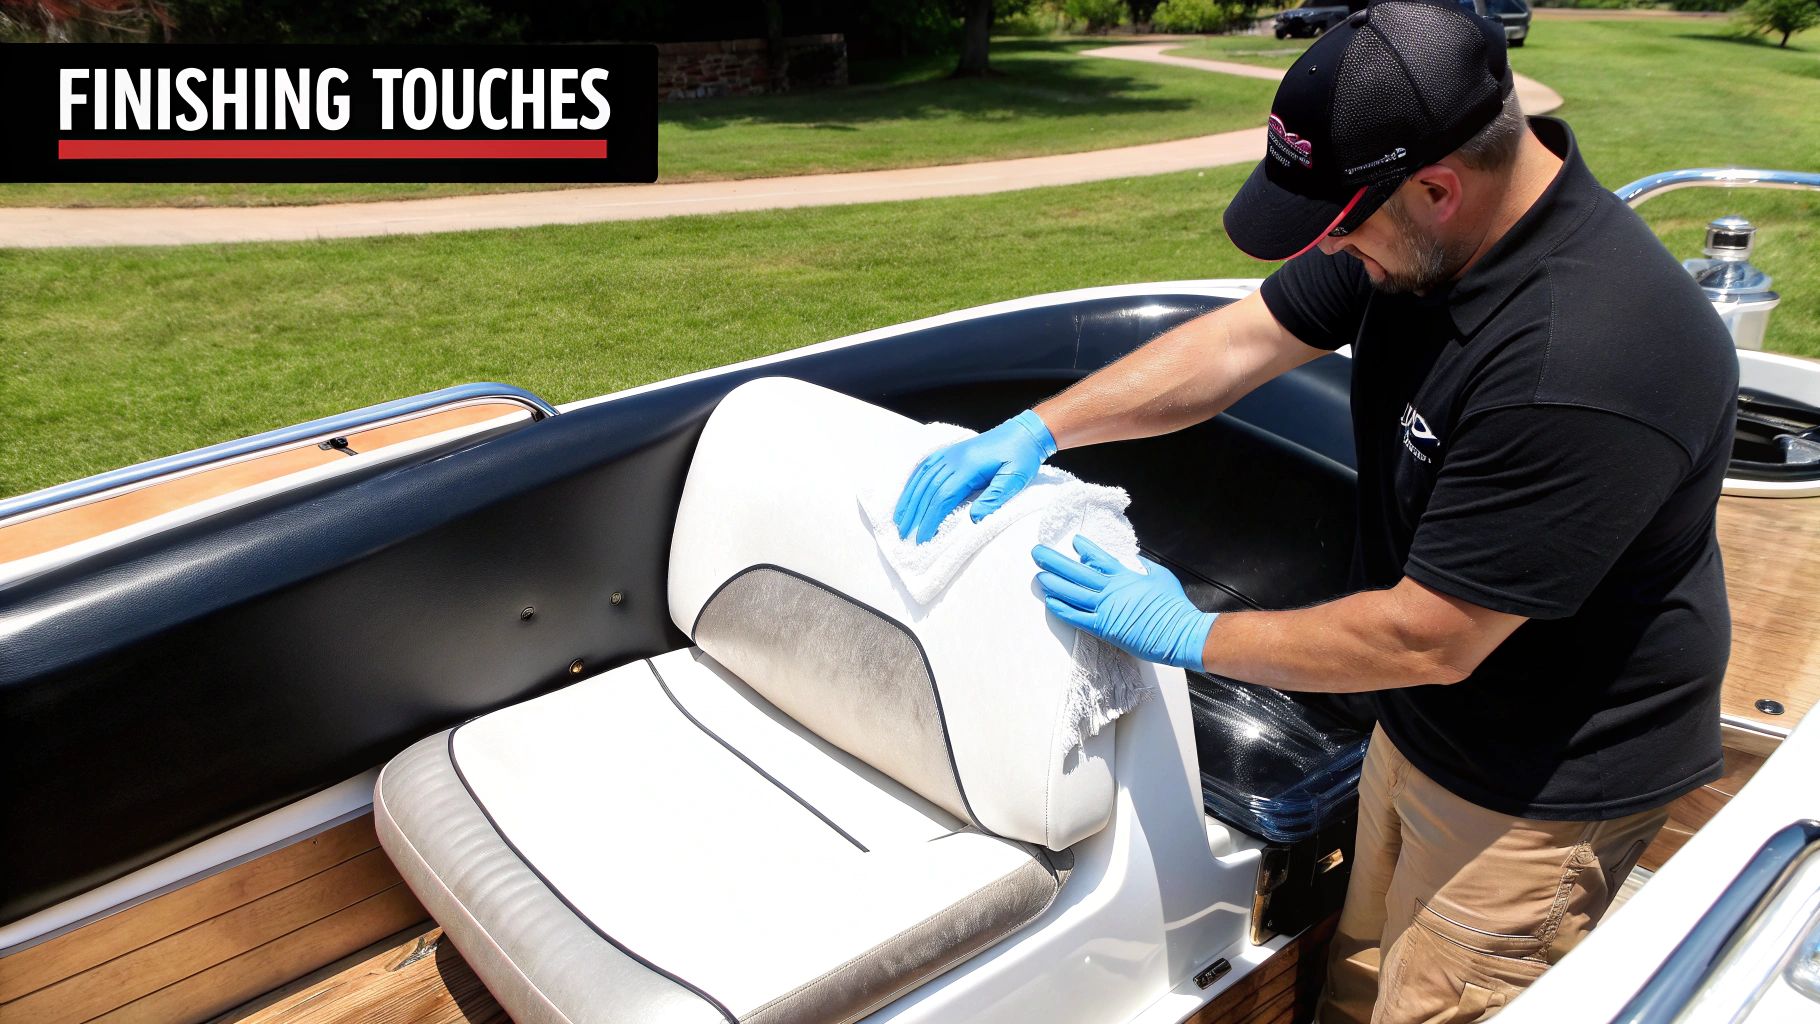
You’ve applied the patch, the color match is spot-on, and it looks great. Don't pack up your tools just yet, though. A successful repair is only half the battle; these final steps are what lock in that durability and make sure your hard work lasts for seasons, not just a few weeks.
This final stage is all about patience and protection. One of the most common mistakes I see boat owners make is rushing to use their newly fixed seat. You have to give it time.
Most vinyl repair compounds need a full 24 to 48 hours to cure completely. Keep in mind, this timeline can change depending on your environment. High humidity will slow things down, while warm, dry air helps speed it up.
Sealing the Deal with a Protective Topcoat
Once the repair has fully cured and feels firm when you press on it, it’s time to add a critical layer of defense. Think of a clear, marine-grade vinyl sealant as an invisible shield, protecting the repaired spot from the very elements that likely caused the damage in the first place.
This topcoat provides a tough barrier against the big three:
- UV Radiation: It stops the new patch from fading or getting brittle under the relentless sun.
- Moisture Intrusion: The sealant keeps water from working its way into the microscopic edges of your repair, which can cause it to lift over time.
- Stains and Grime: It makes the surface less porous, so spills and dirt are a simple wipe away instead of a permanent problem.
When you apply it, use a thin, even coat over the entire repair. I like to extend it about half an inch onto the surrounding original vinyl. This simple trick helps to blend and "feather" the edges, making the transition from old to new material almost undetectable.
A great repair is one that becomes part of the seat's history, not a glaring reminder of damage. Taking these final steps ensures the fix is not just strong, but also seamlessly integrated.
Long-Term Care for Lasting Results
Protecting your repair with a top-quality vinyl protectant is really part of a bigger picture: ongoing maintenance for all your boat's upholstery. This proactive approach is what separates a boat that looks its age from one that looks pristine year after year. For a deeper look into this, check out our guide on the best practices to maintain vinyl boat seats.
Beyond the immediate fix, understanding the long-term advantages can motivate you to keep your vinyl boat seats in top condition. You can explore the broader benefits of restoring your surfaces to extend their lifespan and value. The effort you put into properly repairing vinyl boat seats contributes to a larger trend.
The global marine seats market was valued at USD 419 million in 2023 and is projected to grow, with North America holding the dominant market share. This growth reflects the importance of durable materials like vinyl that can withstand harsh marine conditions.

Got Questions About Vinyl Seat Repair?
Even with the best guide in hand, getting into a DIY project like this always brings up a few questions. I've seen just about every possible scenario over the years, so let's tackle some of the most common ones that pop up when you're working to repair vinyl boat seats.
Can I Fix a Big Tear Right on the Seam?
You absolutely can, but it’s a different beast than a simple rip in the middle of a cushion. A tear along a seam isn't just cosmetic; it's a structural problem. Just slapping some filler on top won't hold up to the stress of people sitting down and shifting around.
For this, you have to think like a surgeon. The first step is to reinforce the seam from the inside using a sub-patch and a really solid, flexible marine-grade adhesive. If the original thread has rotted out (which is super common), you might even need to re-stitch that section with heavy-duty, UV-resistant thread before you even think about the filler. You're rebuilding the seam's strength first, then making it look pretty.
How Can I Get a Perfect Color Match on Faded Vinyl?
Matching sun-faded vinyl is definitely more art than science, and the key is patience. Most good repair kits will give you a handful of color tints to mix your own custom shade.
Here’s a pro tip I swear by: mix up a tiny test batch and dab it onto a piece of plain white paper or, even better, a hidden spot on the vinyl itself. Let it dry completely—and I mean completely. The color almost always darkens as it cures. Start with your closest base color and add the tiniest drops of other tints until you get it just right.
Should I Repair or Just Replace My Boat Seats?
This is the big question, and it really boils down to the extent of the damage. If you've got a few small cracks, a puncture, or one torn seam, a DIY repair is a fantastic, cost-effective way to get a few more seasons out of your seats.
However, there's a tipping point where replacement is the smarter move in the long run. Here’s when I tell people to seriously consider new seats:
- The Vinyl is Brittle Everywhere: If you touch the vinyl and it feels stiff and has tiny cracks spreading all over, that's a sign of terminal sun damage.
- The Foam is Shot: Push down on the cushion. If the foam underneath is waterlogged, moldy, or has totally lost its shape, a new vinyl cover won't fix the real problem.
- It's Just Too Far Gone: My rule of thumb? If more than 30% of the seat's surface is damaged, the time, effort, and cost of patching it all up just isn't worth it compared to a full replacement.
What are the Biggest Mistakes People Make?
After seeing countless repairs (both good and bad), three mistakes pop up over and over again. If you can avoid these, you're way ahead of the game.
First is just not prepping the surface properly. If you don't clean and degrease the area thoroughly, your patch or filler is doomed to fail. It simply won't stick.
Second, getting too aggressive with the heat gun. Too much heat will melt or warp the surrounding vinyl in a heartbeat, making the problem way worse than when you started. A little goes a long way.
And finally, the classic mistake: being impatient. People rush the curing time and use the seats before the repair compound has fully hardened. This almost guarantees the patch will peel up or fail within a week. Let it cure!
At Better Boat, we have all the premium products you need to get the job done right, from marine-grade cleaners to complete repair kits. We're here to help you clean, maintain, and repair your vessel with confidence. Take a look at our full lineup of boating supplies at https://www.betterboat.com.


