


A Practical Guide to Repairing Boat Covers
Your boat cover is the single best way to protect your vessel and extend its life, so keeping it in top shape is a no-brainer. From patching small punctures to reinforcing tired seams, you can fix most common damage yourself with the right gear and a little know-how. This guide will walk you through durable, long-term solutions that will save you a ton of money and keep your boat protected.
Why Bother with Boat Cover Maintenance?
Think of a high-quality boat cover as your boat's personal bodyguard against harsh weather, relentless UV radiation, and all sorts of debris. When you ignore those small tears or weakened seams, you're inviting trouble. Water starts to pool, mildew takes hold, and before you know it, you're looking at costly damage to your boat's interior, upholstery, and even its fiberglass.
This isn't just about looks; it's about protecting your boat's value and structural integrity.
The marine industry gets it, too. The global market for boat covers is already valued at around USD 1.2 billion and is expected to keep growing. That tells you just how many boat owners are prioritizing this crucial accessory.
This trend underscores the importance of regular upkeep—proper maintenance is the secret to getting the most out of your cover for years to come. You can read the full research about boat cover market trends to see the data for yourself.
This guide is all about real fixes, not temporary patches. We'll get into how to:
- Decide if a repair makes sense or if it’s time for a new cover.
- Tackle everything from tiny punctures to widespread sun rot.
- Put together a reliable repair kit with all the essentials.
By spending just a little time on inspection and repair, you can stop minor issues from turning into catastrophic failures. That means your cover will keep doing its job, season after season.
Your Essential Repair Toolkit
Before you jump into any repairs, getting your supplies in order is the first step. A well-stocked kit means you can handle problems as soon as you spot them, preventing a small issue from becoming a big headache.
Here’s a quick rundown of the must-have items for your boat cover repair arsenal. Having these on hand will prepare you for just about any common repair job.
Essential Boat Cover Repair Toolkit
| Item | Purpose | Best For |
|---|---|---|
| Marine-Grade Fabric Patch | Covering holes and tears | Canvas, polyester, and vinyl |
| Seam Sealer | Waterproofing stitched areas | Leaky or deteriorating seams |
| UV-Resistant Thread | Restitching seams and patches | All long-term sewing repairs |
| Heavy-Duty Needles | Penetrating thick marine fabric | Hand-sewing or machine repairs |
| Fabric Cleaner | Prepping the repair area | Removing dirt, grime, and mildew |
| Waterproofing Spray | Restoring water repellency | Entire cover after cleaning/repair |
With these tools at your disposal, you’re well on your way to making repairs that last.
How to Properly Inspect Your Cover for Damage
A good repair always begins with a thorough inspection. Trust me, it’s far better to catch every little issue at once than to spend your season chasing down one new problem after another. Before you even think about repairing boat covers, you need to know exactly what you’re up against.
First things first, find a large, clean, and well-lit area where you can spread the cover out completely. A driveway or a big patch of lawn on a sunny day is perfect for this. Laying it flat allows you to see the entire surface without folds or shadows hiding any sneaky damage.
Give the cover a good sweep with a soft brush to knock off any loose dirt, leaves, and other debris. This quick cleanup is crucial because it prevents grime from masking smaller tears or weak spots.
If you’re dealing with mildew or stubborn stains, you'll want to give it a deeper clean. We've got a complete guide to proper boat canvas cleaning that will get your cover prepped and ready for inspection.
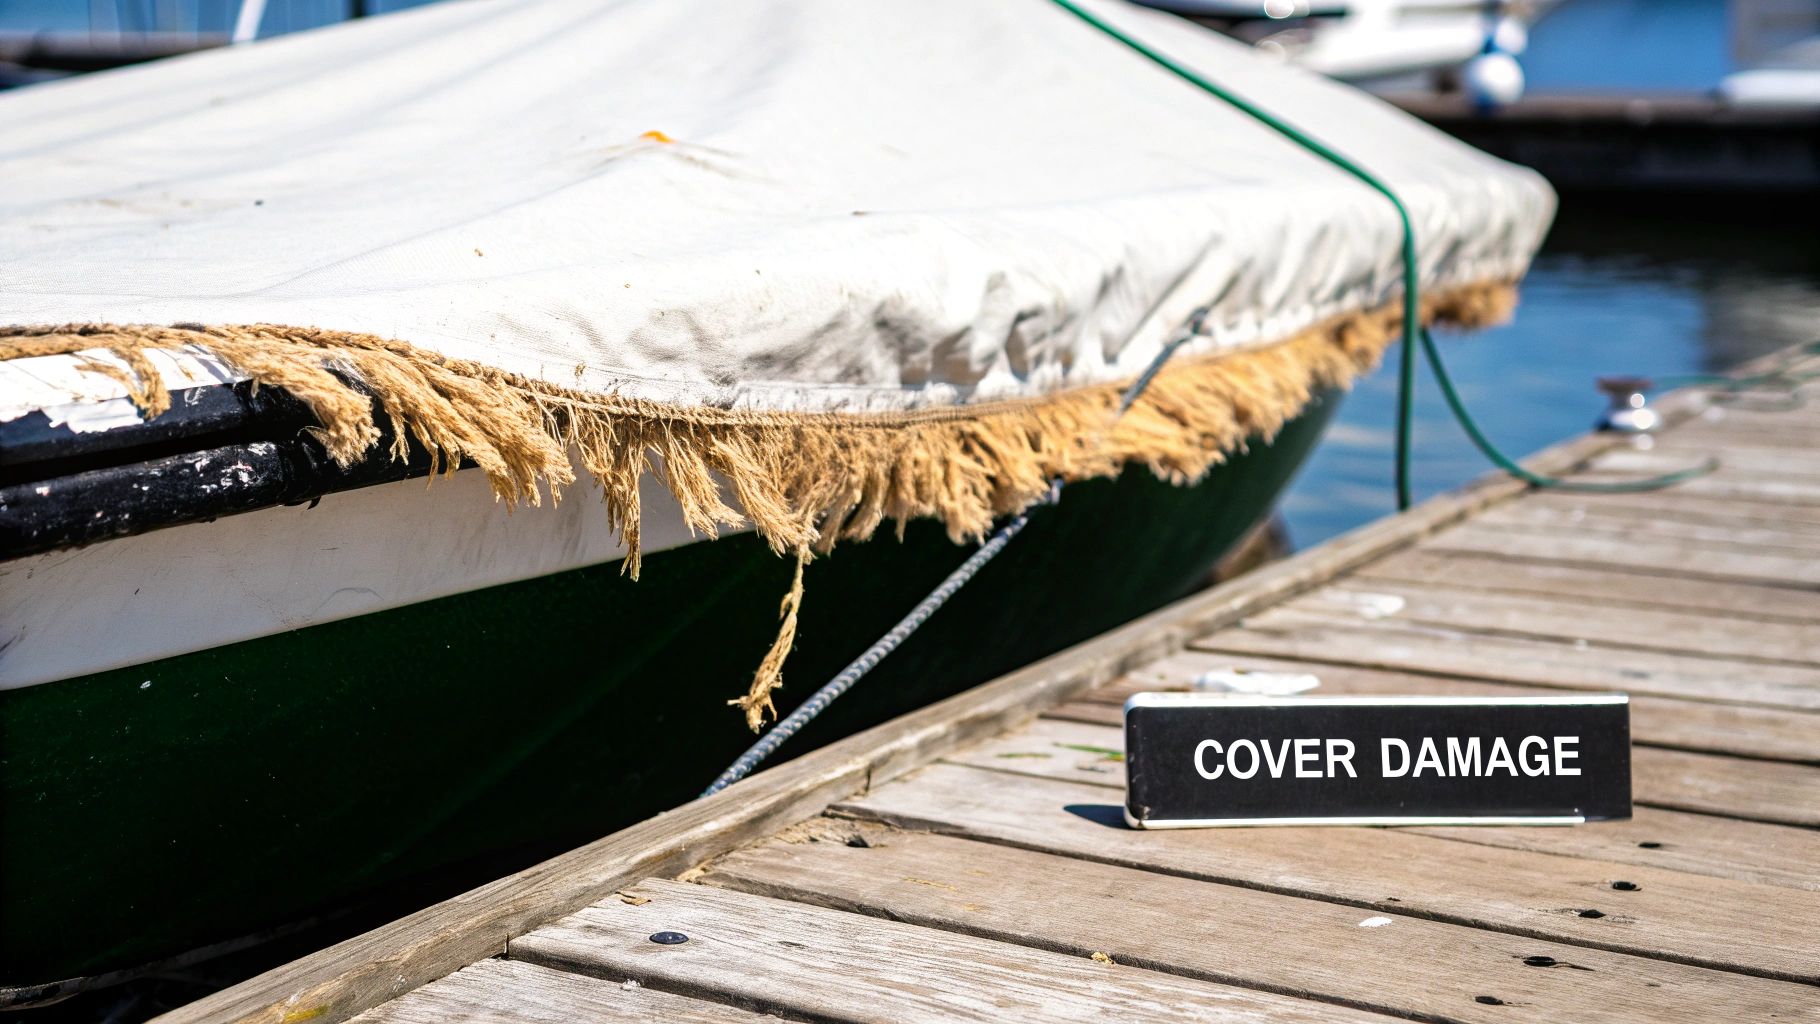
Look for Obvious and Hidden Damage
With the cover laid out flat and clean, it’s time to play detective. Start with the easy stuff: big rips, punctures, and worn-out corners. Pay extra attention to high-stress areas—think about where the cover stretches over a windshield, a tower, or cleats. These spots are always the first to show signs of abrasion and tearing.
But the real troublemakers are often the ones you can’t see at first glance. You have to look closer for the subtle clues that point to future failure.
- Weakened Stitching: Grab a seam and give it a gentle pull. If the thread stretches, feels brittle, or snaps easily, that seam is on its last legs. Even if it looks fine from a distance, it needs to be reseamed.
- Fabric Thinning: Hold different sections of the fabric up to the light. If you can see more light coming through in some spots, that’s a clear sign of UV degradation. That fabric has become weak and is just waiting for an excuse to tear.
- Pinholes and Micro-Tears: These tiny holes are the source of those frustrating, slow leaks that are so hard to track down. From the top, they're practically invisible.
Pro Tip: My go-to trick for finding pinholes is to get underneath the cover and have a friend shine a bright flashlight all over the top. Every single tiny hole will light up like a star in the night sky. It instantly reveals every potential leak you would have otherwise missed.
Test Structural Integrity
A visual check is only half the battle; you also need to get hands-on. This is where I use the "tug test." Take a small section of fabric between your hands and give it a firm, steady pull. If the material feels strong and puts up a fight, it's probably in good shape.
However, if the fabric tears with very little effort, you’ve got sun rot. That section has lost all its structural integrity. This is a critical distinction. Patching a small hole in healthy fabric is easy. But if the material around the hole is brittle, a simple patch won't hold for long. You might be looking at replacing a whole panel or, in some cases, the entire cover.
By systematically going through your cover this way—from a big-picture overview to a detailed, hands-on exam— you'll build a complete repair list. This approach ensures you fix everything in one go, restoring your cover’s ability to protect your boat and adding years to its life.
Mastering Patches for Tears and Punctures
A nasty tear or a puncture from a stray branch doesn't mean you need to shell out for a brand-new boat cover. The truth is, most of this damage is completely fixable. With the right approach, you can make a durable, waterproof repair that blends right in and gets your cover back to doing its job.
Don't feel bad if your cover is looking a little beat up; you're not alone. We've seen stats showing that up to 40% of boat owners deal with some kind of minor to moderate cover damage within just three to five years. It's usually the result of relentless UV exposure or wind stress, which makes knowing how to patch your own cover an incredibly valuable skill.
Choosing Your Patching Method
How you tackle the repair really boils down to the type of damage you're facing and how much time you've got. If you need a quick fix right at the dock, an adhesive-backed patch is your best friend. These are essentially peel-and-stick solutions that create a strong, immediate seal to keep water out.
But for a truly permanent, long-lasting repair—especially in high-stress areas like corners or around snap fasteners—a sewn-on patch is the way to go. Yes, it takes more effort, but a sewn patch delivers unmatched durability that will hold up against years of tension and rough weather.
This simple infographic breaks down the core decision-making process for any patch job.
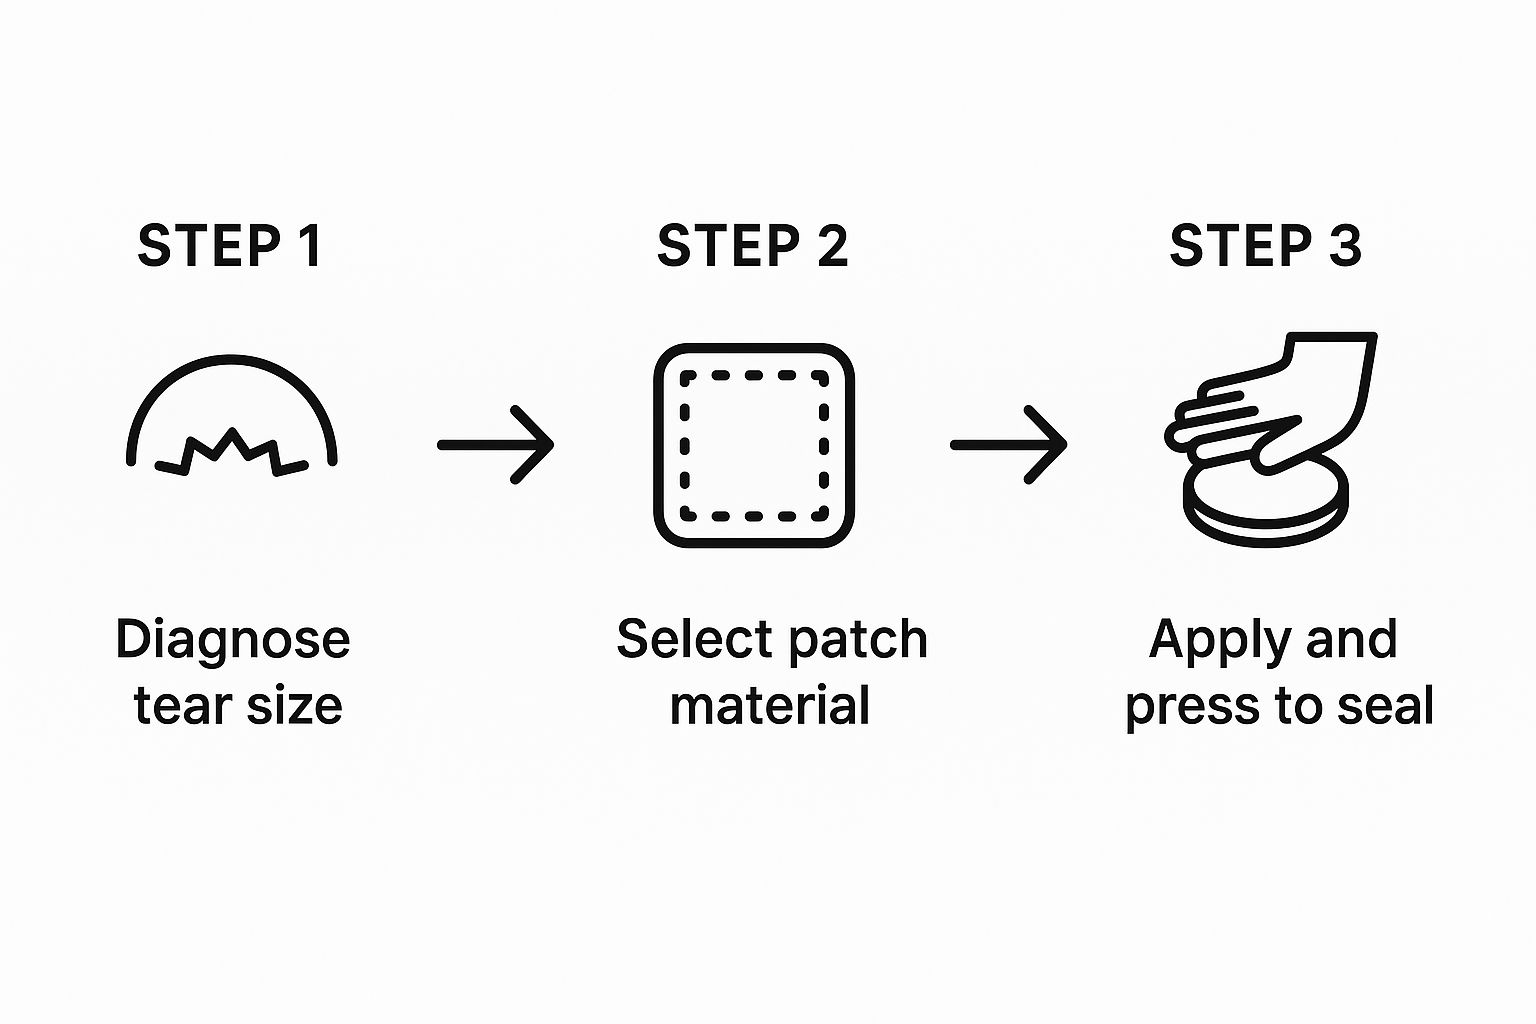
This visual guide simplifies the repair sequence, showing that diagnosing the problem first helps you select the best materials for a successful application.
Preparing the Damaged Area
Proper prep work is the single most critical factor for a patch that actually sticks and lasts. Seriously, don't skip this.
Start by giving the area around the tear a thorough cleaning with a good fabric cleaner and a soft brush. Any dirt, mildew, or leftover waterproofing treatment will absolutely ruin the bond.
Once it's clean and—this is key—completely dry, grab some sharp scissors and carefully trim away any frayed threads or jagged edges from the tear. This gives you a clean, stable edge for the patch to grab onto and stops the damage from spreading under your repair.
A clean surface ensures maximum adhesion. I once rushed a patch on a damp corner, and it peeled off within a month. Take the extra 30 minutes to let it dry completely—it makes all the difference.

Applying the Patch
If you're using an adhesive patch, cut it to overlap the tear by at least one inch on all sides. A great pro tip is to round the corners of the patch; this little step helps prevent them from catching on things and peeling up over time.
For a super-strong bond, you can apply a thin layer of marine-grade fabric adhesive to both the cover and the patch, let it get tacky for a minute, then press them together firmly.
For a fast and reliable option, consider using a specialized fabric repair tape designed for boat covers and awnings.
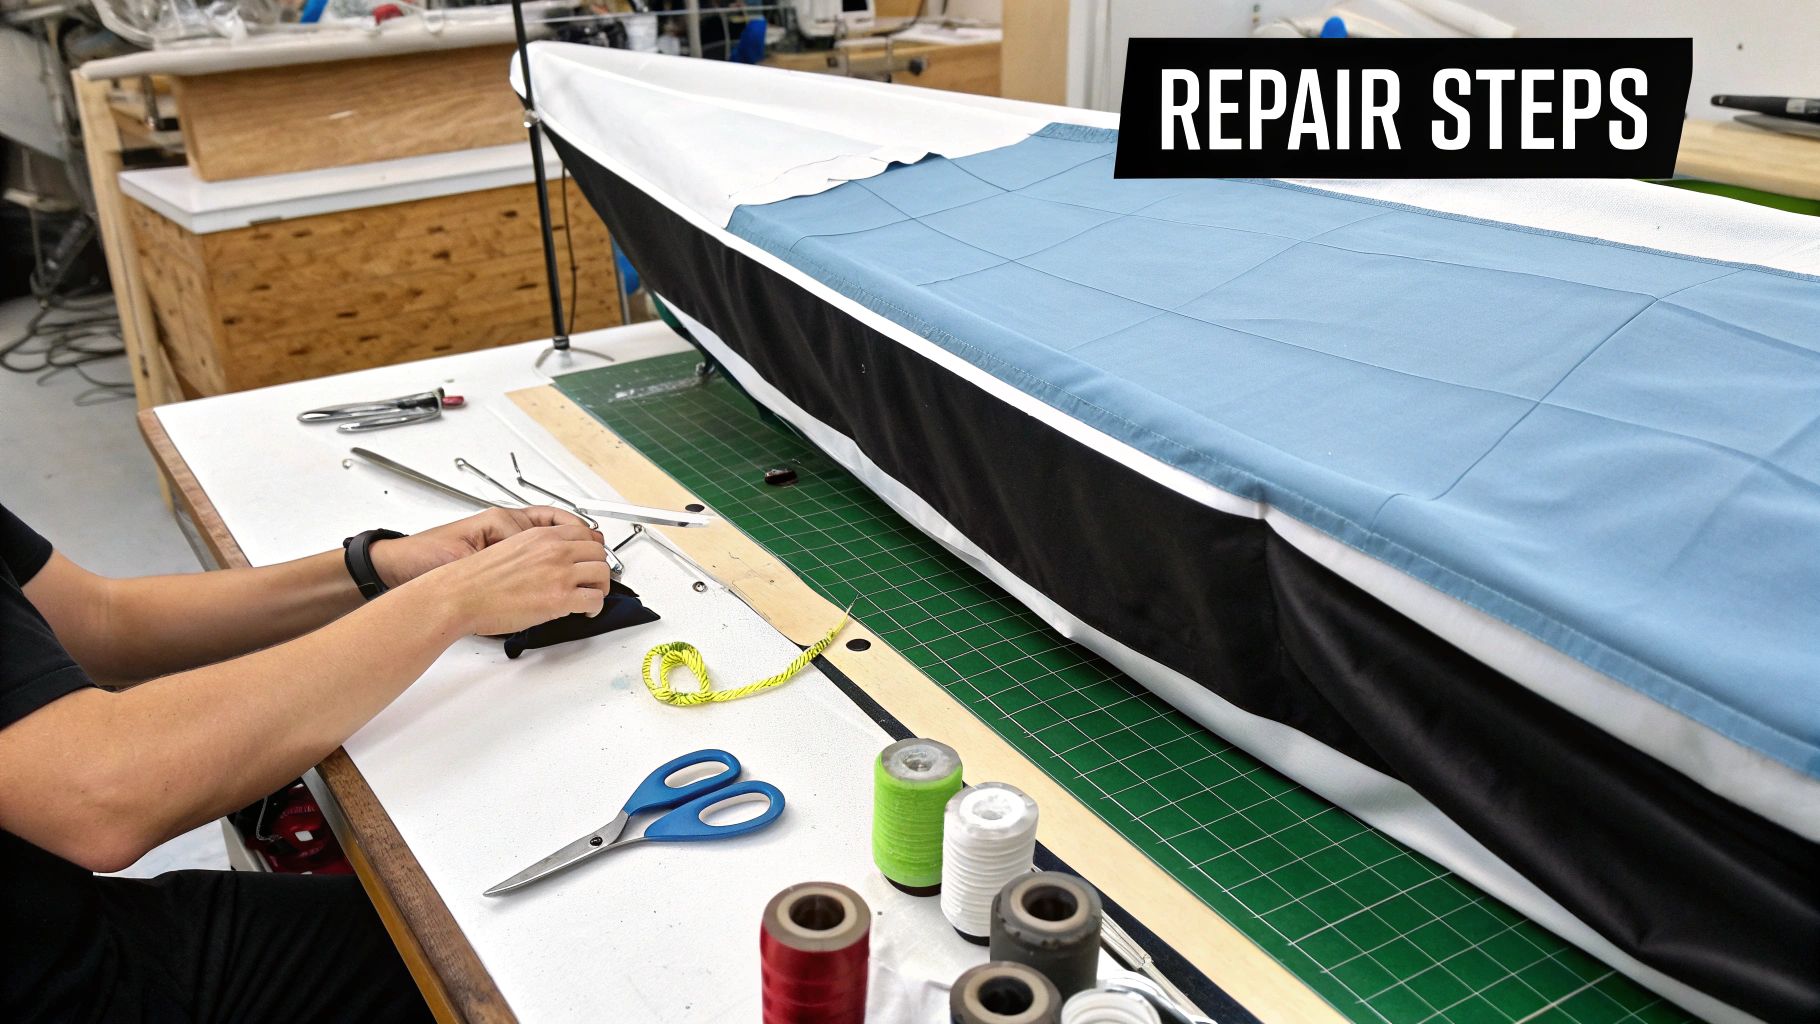
Now, if you’re sewing, the process is more involved but creates an incredibly strong repair. Here’s the rundown:
- First, cut a fabric patch that’s a bit larger than the damaged area.
- Use basting tape or a light coat of fabric glue to hold it in place so it doesn’t shift while you work.
- Finally, stitch around the entire perimeter of the patch using a sturdy sewing awl or a heavy-duty sewing machine.
When you're working on tough materials, selecting the correct needle is absolutely crucial for a lasting repair. The wrong one can lead to skipped stitches or even damage the fabric you're trying to fix. For more guidance, this resource on selecting the correct needle is incredibly helpful. And always, always use a UV-resistant, marine-grade thread to make sure your hard work doesn't degrade in the sun.
How to Reseal and Reinforce Failing Seams
Leaky seams are the number one villain in the story of a failing boat cover. They turn a reliable shield into a leaky sieve, letting water seep in and ruin your boat’s interior. Tackling these failing seams is a core part of keeping your cover in fighting shape, and it's a lot easier than you might think.
The problem almost always starts with the thread. Over time, UV radiation from the sun just eats away at the stitching, causing it to become brittle and weak. You'll spot it as faded, fuzzy, or even visibly broken threads along the seam lines. If you give a suspect seam a gentle tug and see the stitches pull apart, it's time to act before a small drip becomes a major flood.
Applying Liquid Seam Sealer For Minor Leaks
For seams that are just starting to weep or have minor thread degradation, a liquid seam sealer is your first line of defense. This is a simple, effective fix that can add years to a seam's life. Think of it like applying a waterproof bandage directly over the vulnerable stitching.
Before you apply anything, the seam must be perfectly clean and dry. I mean perfectly. Use a stiff brush to scrub away any dirt, mildew, or loose thread fragments. If you skip this, the sealer won't bond correctly and will peel right off, wasting your time and money.
Once clean, apply a thin, even bead of a quality marine seam sealer directly onto the stitching. You really want to work it into the needle holes and along the entire thread line. Most products come with a convenient applicator tip, which makes this process pretty straightforward. Let it cure completely according to the manufacturer's instructions—usually about 24 hours.
A single application of seam sealer can stop a frustrating leak in its tracks. It creates a flexible, waterproof barrier that moves with the fabric, preventing future water intrusion from ruining your day on the water.
Hand-Stitching For Separated Seams
When a seam has split wide open, seam sealer alone won't cut it. You have to physically bring the fabric back together. This is where a sewing awl, often called a speedy stitcher, becomes an indispensable tool for any boat owner. It allows you to create strong, durable lock stitches by hand that are just as tough as those from an industrial machine.
To get this repair done right, here's what you do:
- Clean the Area: Thoroughly clean both edges of the separated seam to remove any remnants of old thread and grime.
- Align the Fabric: Pull the two pieces of fabric together so they overlap exactly as they did originally. Use some fabric clips or even pins to hold them firmly in place while you work.
- Start Stitching: Use the sewing awl to create a lock stitch, following the existing needle holes. This ensures your new seam is straight and just as strong as the original.
The most critical element for this repair is the thread. Always, and I mean always, use a marine-grade, UV-resistant polyester thread. Using standard cotton or nylon thread is a total waste of time; the sun will destroy it in a single season, and you'll be right back where you started.
And while strong adhesives are great for some jobs, they are not a substitute for proper stitching in this situation. If you want to learn more about which glues work best where, our guide comparing popular marine adhesives like 3M 4200 vs 5200 can help you sort it out.
Renewing Your Cover's Waterproofing and UV Shield
After enough seasons under the blazing sun and getting pounded by rain, the factory-applied water and UV repellents on your boat cover are going to wear out. It's inevitable. This leaves the fabric exposed and vulnerable, but thankfully, bringing that protective shield back to life is pretty straightforward and will add years to your cover's lifespan.
Before you do anything else, the cover has to be completely clean. This part is non-negotiable. You simply can't spray a new protective coating over dirt, mildew stains, or last week's bird droppings. Any grime you leave on the surface will stop the new treatment from bonding to the fabric, making the whole effort a waste of time.
Choosing the Right Treatment
Once your cover is spotless and bone-dry, it's time to pick your protectant. Don't just run to the hardware store and grab any old waterproofing spray; you need a product specifically formulated for marine fabrics. These treatments are built to handle the harsh realities of saltwater, constant UV bombardment, and mildew.
Your best bet is to find a two-in-one product that offers both waterproofing and UV protection. Using a single, dual-action formula is a huge time-saver and guarantees you're getting comprehensive protection against everything the elements can throw at it.
Think of it this way: applying a new coating without cleaning first is like painting over rust. It might look okay for a moment, but the underlying problem will quickly ruin your work. A clean, dry surface is the foundation of a lasting waterproof seal.
The materials used for boat covers have come a long way. Market data actually shows that woven covers, usually made from tough polyester blends, make up over 65% of the market because of how well they hold up. These are the exact materials that benefit most from having their protective coatings renewed every so often. If you're curious about the industry specifics, you can learn about the latest boat cover market research and see the trends for yourself.
Application for Maximum Protection
How you apply the stuff is just as important as what you buy. The idea is to get a light, even mist across the entire surface without soaking it.
Here’s how to get it right:
- Work in Sections: Lay the cover out flat if you can. Tackle it in manageable three-by-three-foot sections. This helps you maintain a "wet edge" and prevents you from getting a splotchy, uneven finish.
- Spray Systematically: Hold the can or spray bottle about 10-12 inches from the fabric. Start at one end and move in a steady, overlapping pattern, almost like you're spray painting a piece of furniture.
- Check for Evenness: The fabric should look uniformly damp, but not dripping wet. If you see puddles forming or solution running, you’re putting on too much. Just grab a clean, lint-free cloth and gently wipe up the excess.
Let that first coat dry completely. Depending on the temperature and humidity, this could take a few hours. For the best, most durable results, go back and apply a second light coat to catch any spots you might have missed.
Finally, give the cover a full 24 hours to cure before you fold it up or put it back on the boat. Making this a simple yearly ritual is one of the smartest things you can do to keep your cover performing like new.
Common Questions About Repairing Boat Covers
When you get into the nitty-gritty of repairing boat covers, you’re bound to run into a few questions. Trust me, I’ve been there. Getting clear, straightforward answers can be the difference between a quick, successful fix and a frustrating afternoon that ends with a bigger mess than when you started.
Let's walk through some of the most common questions I hear from fellow boaters. My goal is to get you feeling confident enough to tackle these repairs yourself.
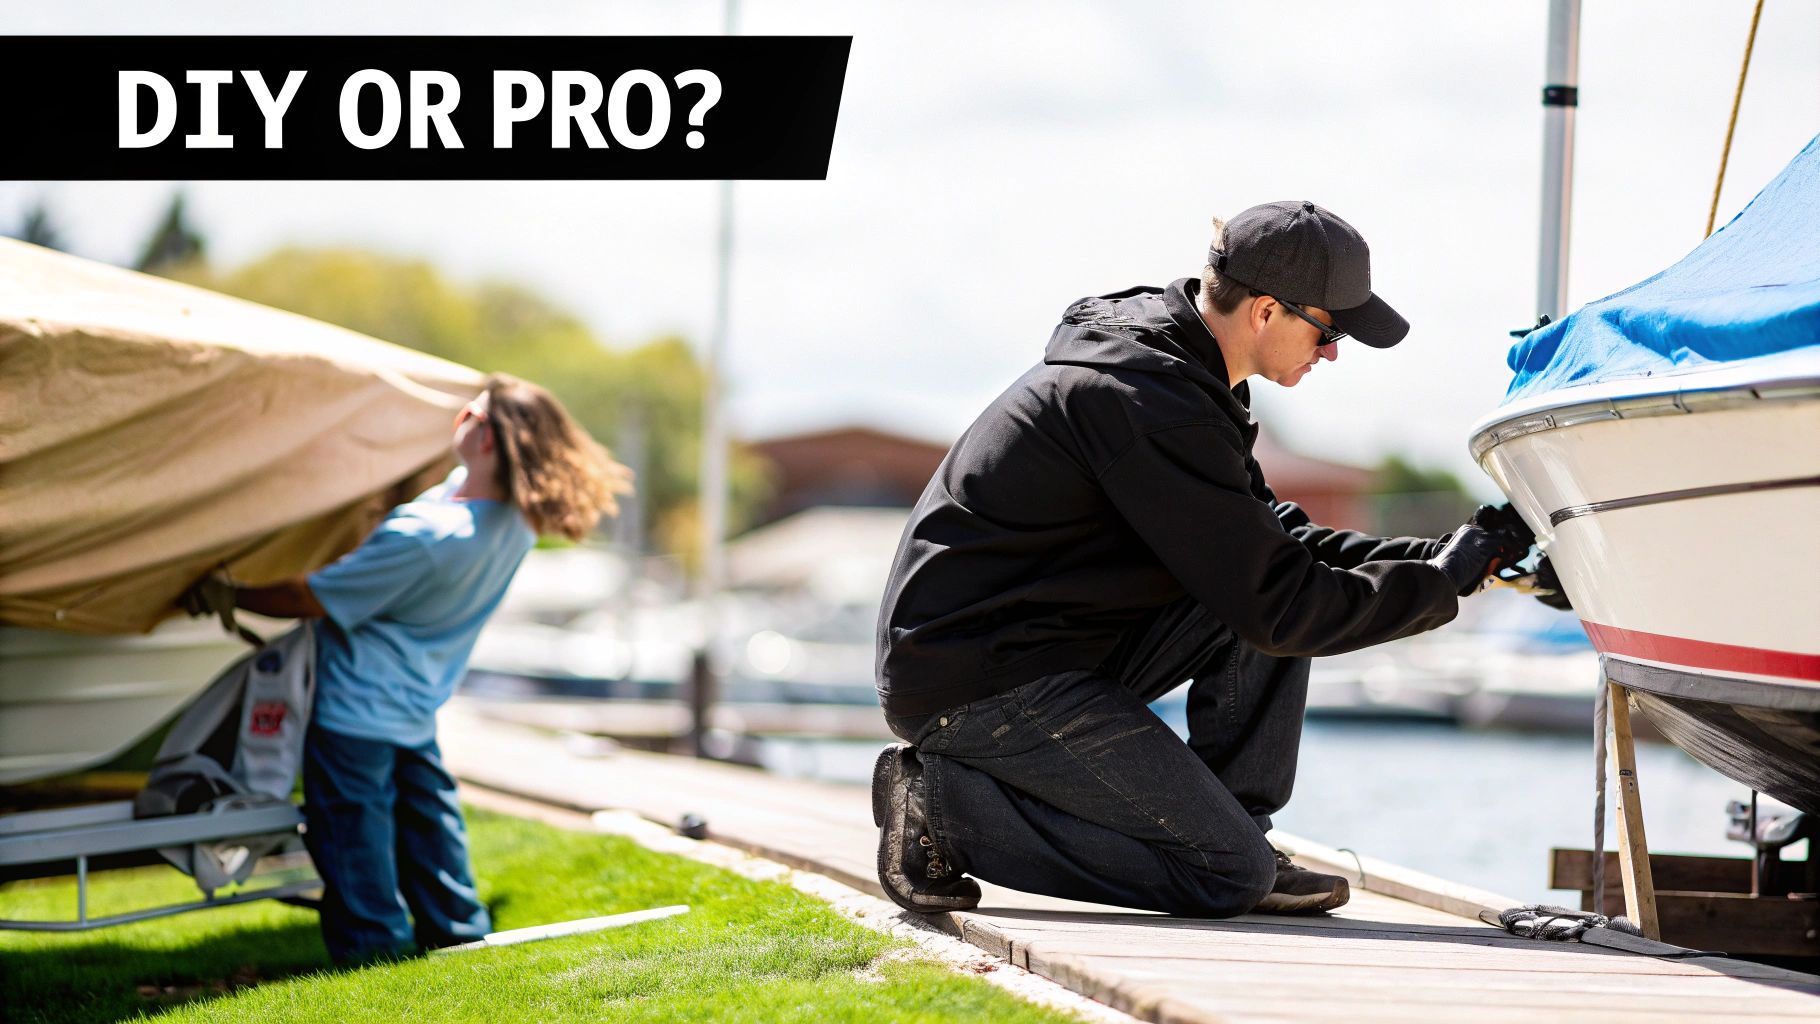
Can I Use a Regular Sewing Machine for Boat Cover Repairs?
This is probably the number one question people ask, and it's a critical one. While it’s tempting to pull out your home sewing machine, I have to advise against it. It’s almost always a bad idea.
Marine-grade materials like heavy canvas and vinyl are just too thick and tough for a domestic machine. You’ll hear it straining to push the needle through, and that's your first warning sign. Best case scenario, you end up with a mess of skipped stitches. Worst case? You'll be dealing with broken needles and a burnt-out motor.
For serious seam repairs, the pros use an industrial or semi-industrial machine equipped with a walking foot. That foot is the key—it’s designed to grip and pull those thick fabric layers through evenly. But let’s be real, most of us don’t have one of those sitting in a closet.
For the rest of us doing DIY repairs, the best tool for the job is a speedy stitcher sewing awl. It’s a fantastic handheld tool that creates a strong lock stitch that's just as durable as a machine's. It's absolutely perfect for smaller, targeted repairs on heavy-duty fabric.
What Is the Best Way to Clean My Boat Cover Before Repairing It?
You have to clean the cover first. It's a non-negotiable step for any repair or re-waterproofing job. If you try to stick a patch or apply a sealer over a dirty, grimy surface, it's guaranteed to peel off sooner rather than later. The prep work is just as important as the repair itself.
Start by laying the cover out flat and giving it a good sweep with a soft-bristle brush to knock off all the loose dirt, bird droppings, and leaves. Once that's done, you can get to the real grime.
- Go with a Mild Soap: A dedicated boat cover cleaner is great, but a gentle soap like Woolite will also do the trick.
- Avoid Harsh Chemicals: Whatever you do, stay away from harsh detergents, bleach, or any abrasive cleaners. They will absolutely wreck the fabric's fibers and strip off any protective coatings that are still hanging on.
- Scrub Gently: Grab that soft brush again and scrub the fabric in gentle, circular motions.
- Rinse Thoroughly: This part is critical. Use a hose and rinse, rinse, rinse until you're positive every bit of soap residue is gone.
- Air Dry Completely: Hang the cover up or lay it flat and let it air dry. It needs to be 100% dry before you even think about starting a repair or applying a waterproofing treatment.
A clean, dry canvas is the foundation of a lasting repair. Attempting to patch a damp or dirty cover is like trying to put a bandage on wet skin—it simply won't hold.
How Do I Know if My Boat Cover Is Beyond Repair?
Knowing when to call it quits is just as important as knowing how to fix something. You don’t want to waste your time and money on a cover that's at the end of its life. While many rips and tears are perfectly fixable, some covers just can't be saved.
The most obvious sign of a lost cause is severe UV degradation, what we often call "sun rot." If the fabric feels brittle and tears with just a little bit of pressure, it's done for. The material has lost all its structural integrity. Any patch you put on will probably just rip out an even bigger hole around it.
You also have to consider the scale of the damage. Are there massive, widespread tears? Or do you see large sections where the fabric layers are delaminating and separating from each other? If so, a replacement is probably your most practical option.
A good rule of thumb I like to use is the 50% rule. If the total cost of your repair materials and the value of your time will add up to around 50-60% of what a new cover costs, it just makes more sense to invest in a new one. But if the damage is just in one or two spots and the rest of the fabric is still strong and flexible, a repair is an excellent, cost-effective way to go.
At Better Boat, we provide everything you need to keep your vessel in prime condition, from high-quality cleaners to durable repair accessories. We make boat maintenance simple so you can spend more time enjoying the water. Explore our full range of easy-to-use products at https://www.betterboat.com.


