


Best Vinyl Cleaner Marine for Your Boat Seats | Top Tips
When it comes to keeping your boat’s upholstery looking sharp, the best products out there are typically pH-neutral for routine wipe-downs and enzyme-based or mildew-specific formulas for the really tough stuff. Whatever you do, steer clear of harsh household chemicals like bleach or ammonia—they can cause irreversible damage.
Choosing the Right Marine Vinyl Cleaner
Walking down the cleaning aisle can be overwhelming. With so many products promising miracles, it’s easy to get lost in the marketing noise. The real secret is matching the cleaner to the problem you’re actually facing, whether that's just everyday grime or a full-blown mildew invasion.
This is the first and most critical step in bringing your boat seats back to life.
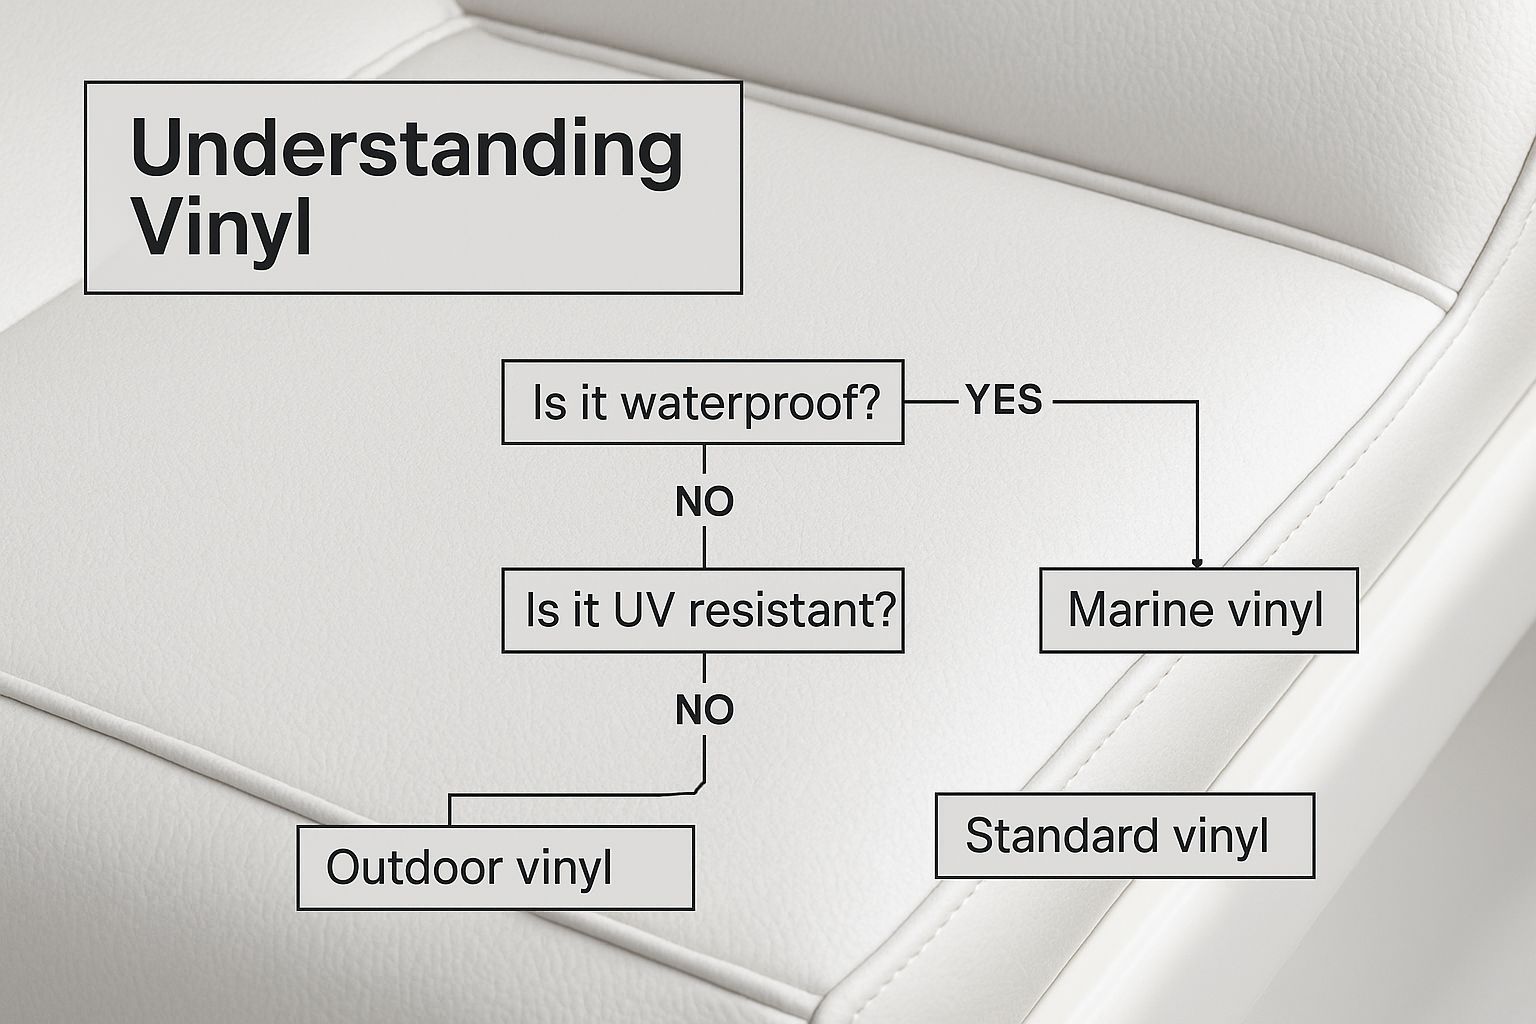
As you can see, understanding your vinyl's specific texture and protective coating is a huge part of the battle before you even start spraying.
Differentiating Between Cleaner Types
Not all cleaners are created equal, and your approach should change depending on the mess. Think of it like having different tools for different jobs.

Core cleaner for this job
Boat Interior Vinyl Cleaner
A dedicated marine vinyl cleaner handles everyday grime, salt spray, and sunscreen residue without stripping protective coatings. Keeping one on board makes those regular wipe-downs quick and safe for the vinyl.
- pH-Neutral Sprays: These are your daily drivers. Perfect for weekly wipe-downs to gently lift dirt, sunscreen residue, and salt spray without damaging the vinyl's protective topcoat.
- Heavy-Duty Cleaners: When you’re dealing with deeper grime, you need something with more muscle. These formulas often have stronger surfactants to break down things like fish blood, spilled drinks, or dirt that’s been ground in all season.
- Mold & Mildew Removers: For boaters in humid climates, these are non-negotiable. They use targeted ingredients to kill mildew spores at the source and lift those ugly black stains they leave behind.
The most common mistake I see boat owners make is grabbing a household all-purpose cleaner. Those formulas are just way too aggressive for specialized marine vinyl.
A quick way to figure out what you need is to match the cleaner type to the specific stain you're dealing with.
Matching the Cleaner to the Stain
| Stain Type | Recommended Cleaner Type | Key Ingredients to Look For |
|---|---|---|
| Sunscreen, Dirt, Salt Spray | pH-Neutral Spray | Gentle surfactants, biodegradable formulas |
| Food Spills, Grime | Heavy-Duty Cleaner | Stronger surfactants, degreasing agents |
| Black Mildew Spots | Mold & Mildew Remover | Sodium hypochlorite, enzyme blends |
| Ink, Pen Marks | Solvent-Based Spot Cleaner | Isopropyl alcohol, specialized solvents |
| Fish Blood, Organic Stains | Enzyme-Based Cleaner | Protease, amylase enzymes |
This table should give you a good starting point for your next trip to the store.
Decoding Product Labels to Avoid Damage
Always, always read the label before you spray anything on your vinyl. There’s a reason we discourage using regular household cleaners. Harsh chemicals like bleach or ammonia will strip protective coatings, speed up wear and tear, and can cause permanent discoloration.
Look for cleaners that are explicitly labeled “safe for marine vinyl.” If you want to dive deeper, you can explore our comprehensive guide on marine vinyl cleaners for specific product recommendations. By choosing a formula designed for the unique challenges of a marine environment, you're making sure your boat's upholstery stays vibrant and tough for years to come.
Prepping Your Seats for a Deeper Clean
It’s tempting to just grab your cleaner and start scrubbing away, but hold on. Jumping the gun is one of the biggest mistakes you can make. It can actually grind tiny abrasive particles like sand and salt crystals right into your upholstery, causing more harm than good.
Proper prep is the secret to getting a truly professional-grade finish. It ensures your vinyl cleaner marine solution is attacking the stain itself, not just pushing surface debris around.
First things first, give your seats a thorough vacuuming. Use a soft brush attachment to really get into the seams and textured areas where dirt loves to hide. A shop vac is your best friend here—it’s got the muscle to pull out the fine grit that can act like sandpaper when you start cleaning.
After vacuuming, a simple freshwater rinse is your next move. A light spray-down will dislodge any leftover surface grime or salt residue that the vacuum missed. This little step makes a huge difference.
Gear Up for Success
Using the wrong tools can be just as damaging as using the wrong chemicals. You're trying to lift stains, not scratch up the vinyl. Here’s a quick rundown of what you’ll need:
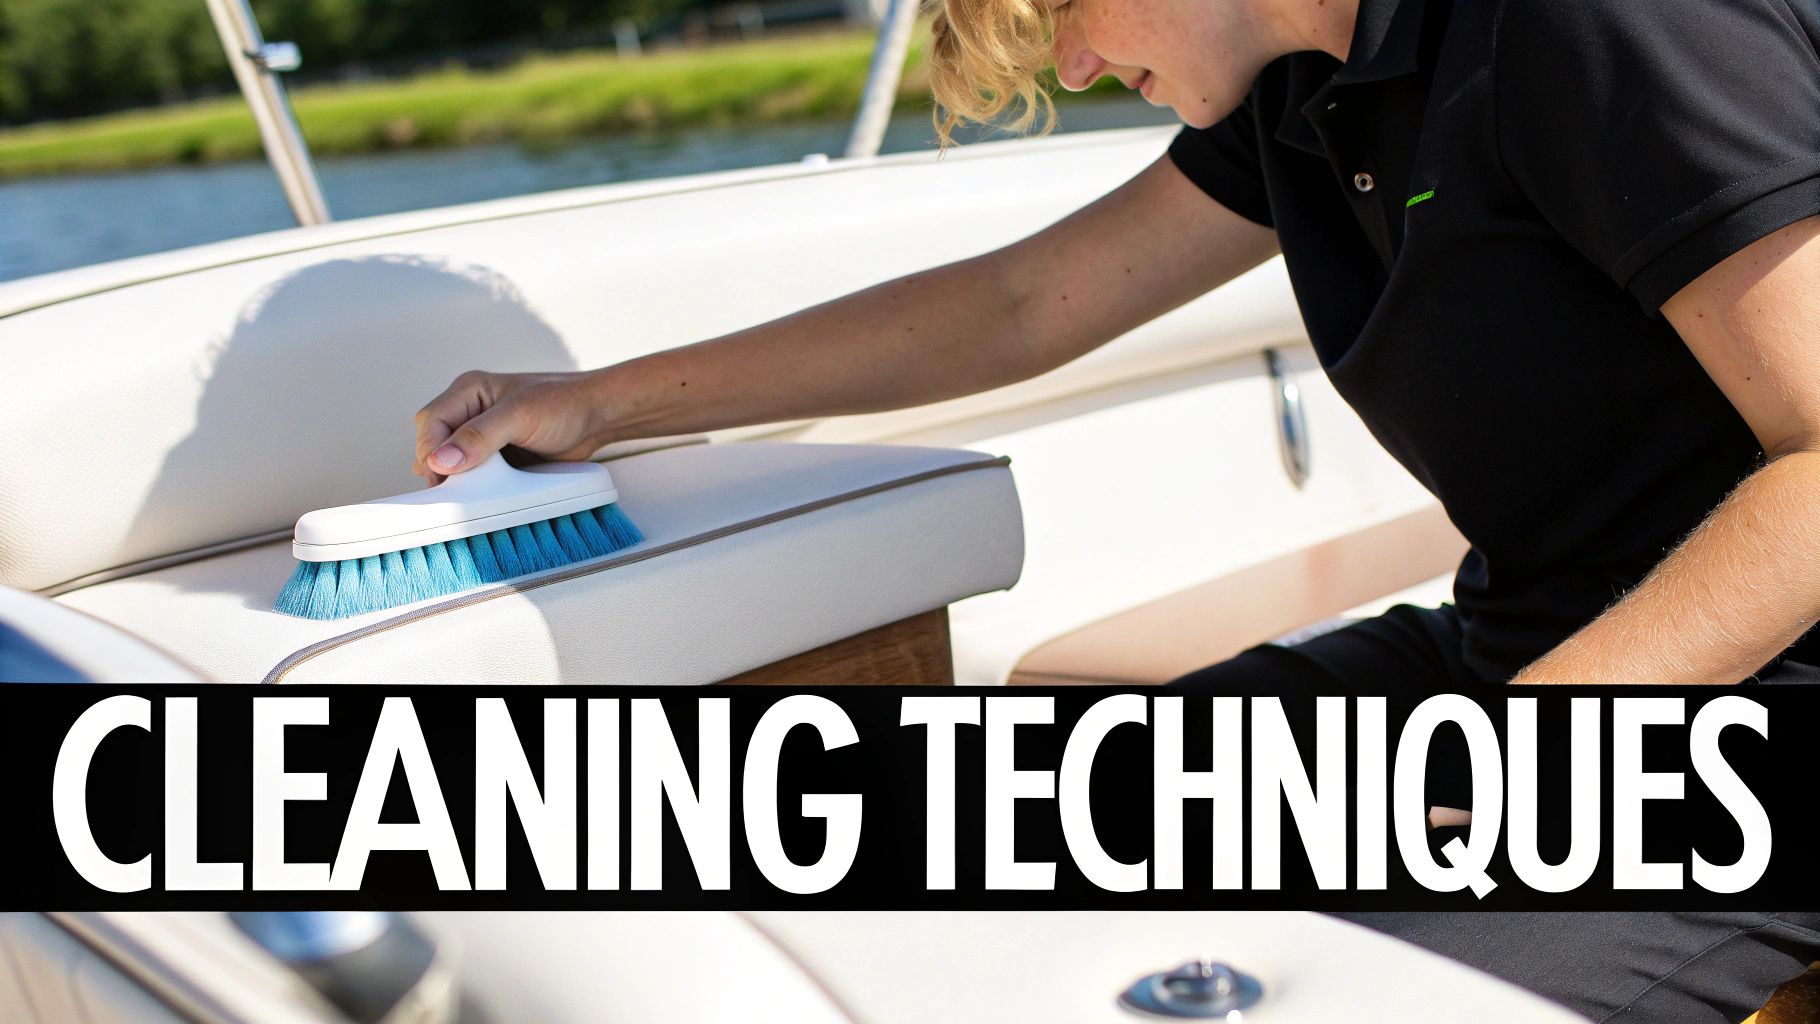
- Soft-Bristle Brushes: These are non-negotiable. They’re tough enough to agitate the cleaner but gentle enough to protect the vinyl’s topcoat.
- Microfiber Towels: You need these for their super-absorbent, non-abrasive qualities. They’re perfect for wiping away cleaner and drying everything off.
- Two Buckets: Keep one for your cleaning solution (if you're mixing one) and a separate one for clean rinse water. This prevents you from re-applying dirty water to your seats.
Before you go all-in with any new product, always, always do a spot test. Find an inconspicuous area—like the underside of a cushion—and apply a small amount of your vinyl cleaner. You’re checking for any discoloration or weird reactions.
This is a critical step that can save you from a very expensive headache.
For a more detailed look at the entire process, our guide on how to clean boat seats has even more tips and visuals. Trust me, taking a few extra minutes to prep correctly is what separates an okay job from a fantastic one.
The Pro Method for Applying Vinyl Cleaner
Alright, now that your boat seats are prepped and ready, it's time for the main event. Correctly applying a vinyl cleaner marine solution is much more about finesse than it is about elbow grease. The whole point is to get a deep, streak-free clean that brings back that original shine without hurting the vinyl.

Whatever you do, don't just soak the entire seat in cleaner all at once. The way the pros do it is by working in small, manageable sections—think two-by-two feet at a time. This is especially critical on a sunny or windy day because it keeps the cleaner from drying out too fast. If it evaporates, it leaves behind a sticky film that's a real pain to get off.
Agitate and Lift Without Abrasion
After you've sprayed a section, it's time to work the cleaner in. This is where that soft-bristle brush is your best friend. The trick is to use light, overlapping circular motions. This lets the bristles get down into the texture of the vinyl, lifting out all that embedded dirt, old sunscreen, and general grime without scratching the surface.
You're polishing, not scrubbing a deck. Going at it with aggressive back-and-forth motions can create tiny scratches in the vinyl's protective topcoat. Over time, that leads to a dull finish and causes the material to wear out faster.
Let the cleaner do the heavy lifting for you. After agitating, just let the product sit for the time recommended on the bottle—usually a minute or two is all it needs. This "dwell time" is what allows the active ingredients to really break down and suspend the dirt.
If you rush this part, you're just making more work for yourself.
The Final Rinse and Wipe
Once the cleaner has worked its magic, these last steps are probably the most important. You absolutely have to rinse it thoroughly. Grab a clean microfiber towel, dip it in fresh water, and wipe away every last bit of the cleaner and the dirt it lifted up.
Skipping a complete rinse is a classic mistake. It leaves a chemical residue that actually attracts more dirt, so your seats will get grimy again in no time. It completely undermines all the effort you just put in.
Here’s a simple routine to follow for each section:
- Spray the Section: Give the small area a light misting with your marine vinyl cleaner.
- Gently Agitate: Use your soft-bristle brush in circular motions to work the cleaner into the vinyl's grain.
- Let it Dwell: Give the cleaner about 60-90 seconds to sit and break down the grime.
- Rinse Thoroughly: Wipe the area clean with a fresh, damp microfiber towel.
- Dry Completely: Use a second, dry microfiber towel to buff the section dry before starting on the next one.
This step-by-step approach makes sure every inch of your upholstery gets the right amount of attention, leaving you with a clean, uniform finish that looks fantastic.
Protecting Your Vinyl for Long-Term Durability
Cleaning your boat seats is really only half the battle. Think of it like washing your car but skipping the wax—you’ve knocked the grime off, but you’ve left the surface totally exposed to the elements. A good, thorough application of a quality protectant is what truly locks in that clean look and defends against future damage.

Lock in that clean finish
Boat Interior Vinyl Protectant
After the seats are clean, a quality vinyl protectant bonds to the surface and builds a barrier against UV rays, saltwater, and mildew. Applying it right after cleaning is when it delivers the most protection.
Freshly cleaned vinyl is a vulnerable surface. Without that protective layer, it’s basically a magnet for UV radiation, salt spray, and the inevitable spill. Applying a marine-grade vinyl protectant isn't some optional, feel-good step; it’s a critical part of preventing the cracking and fading that will absolutely shorten the life of your upholstery.
Shielding Against the Elements
The best protectants on the market do a lot more than just add a temporary shine. They bond with the vinyl to create a microscopic barrier that actively repels all the nasty stuff you want to keep out.
- UV Inhibitors: These are the most important ingredients by far. They act like a powerful, invisible sunscreen for your vinyl, blocking the harsh solar rays that break down the material and bleach out the colors.
- Hydrophobic Properties: A quality protectant makes water bead up and roll right off the surface. This is huge for preventing moisture from seeping into the seams and causing mildew problems down the line.
- Stain Resistance: That same barrier helps fend off common boat stains from things like sunscreen, food, and drinks, which makes your future cleanups a whole lot easier.
A common myth is that protectants make vinyl feel greasy or slippery. That might have been true years ago, but modern formulas are designed to absorb completely. They leave a non-greasy, satin finish that looks and feels like it just came from the factory.
Thanks to new developments in the industry, today's products offer seriously enhanced UV resistance and textures that improve both the look and durability of marine vinyl, a material already prized for its toughness. You can read more about the evolution of marine vinyl from Grand View Research if you're curious.
Applying the product evenly is the key to getting it right. Lightly mist a specialized boat interior vinyl protectant onto a clean microfiber applicator or towel—not directly onto the seat itself. This prevents blotchy spots. Gently wipe it across the surface in smooth, overlapping motions to ensure you get complete, even coverage.
Finish up with a quick, light buff using a separate dry microfiber towel. This little step removes any excess product, leaving behind nothing but a durable shield that preserves your boat’s value and appearance.
Don't Make These Common Boat Vinyl Cleaning Mistakes
Even the best marine vinyl cleaner on the market can't save your upholstery from a few simple, yet costly, mistakes. I've seen it happen time and time again—boat owners with the best intentions accidentally do more harm than good. Let's walk through the common pitfalls so you can keep your boat's interior looking sharp.
One of the biggest blunders is grabbing the wrong tool for the job. You see a tough stain, and your first instinct might be to attack it with a stiff-bristled brush. Resist that urge.
Those aggressive bristles will absolutely create tiny scratches in the vinyl's protective topcoat. You might not see them at first, but you'll notice when the finish looks dull and seems to attract stains and sun damage faster than before. Always, always stick with a soft or medium-bristle brush.
The Problem with Haste and Harsh Methods
Another shortcut that ends in disaster is pulling out the pressure washer. It feels like a quick fix for blasting away grime, but that high-pressure stream is way too aggressive for marine vinyl. It can easily pop the seams, tear the fabric, and—worst of all—force water deep inside your foam cushions. That's a one-way ticket to a nasty mold and mildew infestation you'll be fighting for ages.
Just as damaging is trying to clean your vinyl seats under the blazing sun. When it's hot out, your vinyl cleaner marine solution evaporates almost the second it hits the surface. Instead of lifting the dirt, the cleaner just dries into a sticky, gummy residue that’s a nightmare to remove. And guess what? That residue attracts even more dirt. Do yourself a favor and work in the shade or on a cooler, overcast day.
"So many people think 'more is better' when it comes to cleaner. It's a trap. Dousing your seats won't get them any cleaner; it just means you've got way more residue to rinse away. A light, even mist is all you really need."
Resisting Chemical Cocktails and Overkill
Finally, please don't play chemist in your cockpit. Mixing different cleaning products is a bad idea. At best, it's ineffective. At worst, you could create toxic fumes or a chemical reaction that permanently ruins your vinyl. If one product isn't cutting it, rinse it off completely before you even think about trying another one.
On that same note, avoid the temptation to just spray more and more cleaner on a spot. A heavy-handed application doesn't clean any better, but it does make the rinsing process ten times harder.
If you don't rinse every last bit of it off, you'll be left with a sticky film that makes your seats feel gross and acts like a magnet for fresh dirt. Just follow the directions on the bottle and trust that the product is formulated to work without overdoing it.
Of course. Here is the rewritten section, crafted to sound like an experienced human expert and formatted according to your requirements.
Your Top Vinyl Care Questions Answered
Even after you've nailed down the cleaning and protecting routine, a few specific questions always seem to surface. Don't worry, you're not alone. Most boat owners bump into the same tricky situations, so I've pulled together the most common ones I hear.
Let's dive right in.
How Often Should I Really Be Cleaning My Boat Seats?
This is a big one. For most of us out on the water regularly, a quick wipe-down with a quality vinyl cleaner marine spray every two to four weeks is a solid baseline. This is especially true if you’re in saltwater—you want to get those salt crystals and sunscreen residue off before they cause trouble.
The real key, though, is to tackle spills, bird droppings, or any other mess immediately. The longer they sit, the tougher they are to get out.
As for a full-on deep clean and protectant application? Make that a bookend for your season. Do it once at the beginning to get the vinyl ready for action and once at the end before you put her away for storage.
A quick but critical warning: Never, ever use Magic Erasers or any of those melamine foam sponges on your boat's vinyl. They're basically super-fine sandpaper. They'll strip the protective topcoat right off, leaving the material dull, porous, and wide open to future stains, cracks, and sun damage.
What's the Best Way to Get Rid of Stubborn Mildew Stains?
Ah, the dreaded black spots. When you're up against tough mildew, you need to bring in a cleaner made specifically for marine mold and mildew. Don't just grab anything.
Apply the product exactly as the manufacturer recommends. Let it sit for the prescribed time—this is crucial for it to actually kill the spores—then get in there with a soft-bristle brush and gently work the area.
Whatever you do, don't reach for straight bleach. It’s way too aggressive and will absolutely destroy your vinyl and the stitching holding it all together. It's always better to do a few gentle cleaning passes than one heavy-handed attempt that causes permanent damage.
Can I Just Use an All-Purpose Cleaner on My Boat Seats?
It’s tempting to just grab a household cleaner from under the sink, but this is a huge mistake. The short answer is a hard no—all-purpose cleaners are not safe for marine vinyl.
These products are packed with harsh chemicals, mystery solvents, and aggressive degreasers meant for countertops and floors, not your boat's pliable upholstery. They'll suck the moisture right out of your vinyl, leaving it brittle and on a fast track to cracking.
Always, always stick with products formulated specifically for marine-grade vinyl. You'll be preserving its special coatings, not stripping them away.
Ready to give your boat's interior the care it deserves? The premium cleaners and protectants from Better Boat are specifically formulated to tackle the toughest marine grime while protecting your investment. Explore our complete line of boat care products today.


