Skip to content

A Boater's Guide to West Marine Bottom Paint
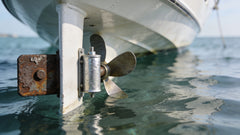
If you’ve ever seen a boat out of the water, you’ve probably noticed the paint below the waterline looks a little different. That’s not just for looks—it’s a specialized coating called bottom paint, and it's one of the most important things protecting your hull.
Its main job is to stop marine life like barnacles, slime, and algae from turning your hull into their new home. This is essential for keeping your boat’s performance and fuel efficiency right where they should be.
Why Your Boat Needs Antifouling Bottom Paint

Think of bottom paint less like a cosmetic choice and more like a high-tech shield for your hull. Its real purpose is to be your number one defense against biofouling—the official term for that slimy, crusty ecosystem of organisms that love to latch onto your boat.
Once that growth takes hold, it creates a massive amount of drag. Your boat has to fight the water, forcing the engine to work harder, burn more fuel, and wear out faster. It’s a quiet but constant drain on your wallet and your boat's performance.
The Hidden Costs of a "Dirty" Hull
A hull covered in marine growth isn't just slow; it's incredibly expensive to run. Studies have shown that an unprotected hull can suffer a 20-40% drop in fuel efficiency because of the drag from biofouling. That’s a huge performance hit.
Luckily, the right bottom paint offers a powerful fix. A fresh coat can provide solid protection for up to 24 months, keeping your hull slick and clean. This doesn't just help maintain your top speed—it can cut drag by 10-15%, potentially saving you thousands in fuel costs over the life of the paint job.
More Than Just a Paint Job
Applying bottom paint is a real investment in your boat’s health. It also shields the hull from the physical damage that stubborn critters like barnacles can cause. Scraping them off is a tough job and can easily gouge or scratch your gelcoat.
Choosing and applying the right bottom paint is a foundational part of boat maintenance. It ensures a clean hull remains a fast and efficient hull, protecting your investment for seasons to come.
By stopping this growth before it starts, you can head off costly and frustrating repairs down the road. If you're already dealing with some unwanted passengers, check out our guide on how to remove barnacles before you even think about painting.
Now, let's dive into the different types of bottom paint so you can find the perfect protection for your boat.
Decoding Hard Versus Ablative Bottom Paints
When it comes to bottom paint, you’ll mainly see two types on the shelf: hard and ablative. Figuring out the difference is the single most important step in choosing the right one. It's a bit like picking out a jacket—what you need for a blizzard isn't going to work for a light spring rain.
Let's look at how these two categories work, so you can match the right paint to your boat's lifestyle.
Hard Bottom Paint The Durable Suit of Armor
Hard bottom paint, which is often a modified epoxy paint, cures into a tough, slick shell around your hull. Think of it as a suit of armor. You can scrub it, wipe it, and even burnish it without wearing away the paint itself. This makes it perfect for boats that are trailered, kept on a lift, or raced.
The antifouling power comes from biocides that slowly leach out from the paint's surface, creating a toxic barrier that marine critters can't stand. Because the paint film stays put, it provides a super-smooth finish that minimizes drag. This is a huge deal for performance boats or any vessel where speed is a priority.
The real trade-off with hard paint is its lifespan. It provides a tough, scrubbable finish, but once the biocides run out, its antifouling job is over—even if the paint itself still looks perfect.
This durability is why hard modified epoxy paints are so popular. They're a top choice not just for recreational boaters, who make up 60% of the market, but also for commercial ships, which account for the other 40%. For many boat owners, the friction reduction alone can cut operational costs by 10-25%.
Ablative Bottom Paint The Eroding Bar of Soap
Ablative bottom paint works in a completely different way. The best analogy is a bar of soap that slowly dissolves with use. As your boat moves through the water, or even just sits at the dock, the outermost layer of paint slowly wears away, or "ablates."
This constant, controlled erosion is what keeps the protection fresh. As the old layer wears off, a new, potent layer of antifouling paint is exposed. This self-polishing action means the paint is always working at its best. Another huge plus? You won't get that thick, flaky paint buildup after a few seasons, which makes your next paint job a whole lot easier.
Ablative paints have some clear advantages:
- Consistent Protection: By constantly revealing a fresh active layer, the antifouling power stays strong all season.
- No Heavy Buildup: The paint wears away, so you avoid the dreaded task of sanding off years of accumulated hard paint.
- Great for Most Boats: It’s perfect for cruisers, sailboats, or any boat that spends weeks or months at a time in the water, since the paint works even when the boat is stationary.
This "set it and forget it" nature makes ablative paints a favorite for boaters who want reliable protection with less prep work next season. To see how these paints fit into a full maintenance plan, take a look at our complete guide to boat bottom paint.
Comparing Hard vs Ablative Bottom Paint
Choosing between hard and ablative paint really comes down to how you use your boat. This quick-reference table breaks down the key differences to help you decide which one is right for your hull.
| Feature | Hard Bottom Paint (e.g., Modified Epoxy) | Ablative Bottom Paint (Self-Polishing) |
|---|---|---|
| How It Works | Releases biocides from a durable, non-eroding film. The paint itself stays put. | The paint film slowly wears away (ablates), constantly exposing a fresh layer of biocide. |
| Best For | Fast boats, race boats, and boats that are trailered, dry-stored, or kept on a lift. | Cruising boats, sailboats, and any vessel that stays in the water for the entire season. |
| Maintenance | Can be scrubbed clean without removing paint. Ideal for burnishing to a racing finish. | Self-cleaning. Aggressive scrubbing will remove active paint, so it's not recommended. |
| Repainting | Requires heavy sanding to rough up the surface and prevent thick, heavy buildup over time. | Needs only a light scuff-sand before applying a fresh coat, as most of the old paint is gone. |
| Longevity | Single-season protection. Effectiveness fades as biocides are depleted from the static paint film. | Consistent protection until the paint is gone. Multi-season options are widely available. |
Ultimately, both paint types do a great job when used correctly. The key is to be honest about your boating habits and maintenance preferences to make sure you get the performance you expect.
How to Choose the Right Bottom Paint
Picking the right bottom paint is about a lot more than just choosing a color. Think of it as your boat’s first line of defense against barnacles, slime, and all the other performance-robbing growth that lives in the water. Making the right choice keeps your hull slick and efficient.
To get it right, you just need to answer a few key questions about your boat and your time on the water. Let’s walk through the factors that will point you to the perfect paint for your vessel.
How and Where You Boat Matters
The first thing to consider is your own boating style. Are you a weekend cruiser, a competitive racer, or does your boat stay tied to the dock for months at a time?
- How often you go out: A high-speed powerboat that’s used frequently benefits from a tough, hard paint. The constant friction of the water rushing over the hull actually helps keep it clean. On the other hand, a sailboat that sits idle for long stretches is a perfect home for marine growth, making it a prime candidate for an ablative paint that works even when the boat is stationary.
- The water you're in: Saltwater is a much tougher environment for biofouling than freshwater. Paints made for saltwater pack stronger biocides to fight off barnacles and other stubborn critters. Freshwater paints are geared toward the specific types of slime and algae you’ll find in lakes and rivers.
- Local growth conditions: Some areas are just notorious "high-fouling" zones where growth happens fast and furious. If you're boating in warm, nutrient-rich water like in Florida or the Caribbean, you're going to need a much more powerful antifouling paint than someone in the cooler waters of Maine.
This flowchart is a great way to visualize the choice between a hard or ablative paint based on how you use your boat.

As you can see, fast boats get the most out of a hard paint’s slick finish, while cruising boats often get better protection over the long haul from an ablative paint's self-polishing action.
Hull Material and Paint Compatibility
Your hull’s material is a huge factor in what paint you can safely use. Applying the wrong type can cause some serious, and expensive, damage—especially on metal hulls.
- Fiberglass: Good news here. Most bottom paints on the market are designed for fiberglass, so you'll have the widest selection to choose from.
- Aluminum: This is where you need to pay close attention. Standard copper-based paints will trigger galvanic corrosion on aluminum hulls and outdrives, literally eating away at the metal. You must use a copper-free paint or one specifically made with a non-metallic biocide like ECONEA™.
- Wood: Wooden hulls can handle most types of bottom paint, but they have to be properly sealed and primed first. This prevents the wood from soaking up the paint's solvents, which can damage the hull over time.
The single biggest mistake you can make in bottom painting is putting an incompatible paint over an old coat. Never apply hard paint over an ablative paint. The soft, eroding ablative layer will just flake off, taking your new, expensive hard paint right along with it.
If you have no idea what kind of paint is on your hull, you can do the "Scotch-Brite test." Just take a wet abrasive pad and scrub a small spot on the hull. If a good bit of paint color comes off on the pad, you’ve likely got an ablative. If the surface just gets a little dull with almost no color transfer, it's probably a hard paint.
Environmental Rules and Modern Paint Tech
The boat paint world is always changing to keep up with stricter environmental regulations. This has pushed manufacturers to develop new, effective antifouling solutions that don't rely on traditional copper. This is a huge part of the industry, with anti-fouling solutions making up 64% of an $8.7 billion market. You can read the full research about the boat bottom paint market for a deeper dive.
Today's eco-friendly paints often use biocides like ECONEA™ combined with a zinc-based slime fighter. These formulas perform just as well as many copper paints but are safe for every hull type—including aluminum—and can be used in areas where copper is restricted.
Before you even think about opening a can of paint, you have to get the surface ready. Whether you're working with a bare hull or switching paint types, a quality primer is non-negotiable. Using a good marine epoxy primer and sealant from Better Boat creates a waterproof barrier and gives your new bottom paint the strongest possible grip, preventing peeling and making sure your protection lasts.
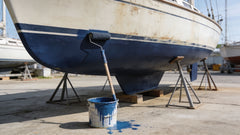
Preparing Your Hull for a Flawless Paint Job

If you ask any seasoned boat painter for their secret, they’ll all tell you the same thing: a perfect paint job is 90% preparation. The final coat of antifouling paint gets all the attention, but it's the work you do beforehand that determines whether it will stick, perform, and last.
Think of it like building a house. You wouldn't dare put up walls without first pouring a solid, level foundation. Cutting corners here is a surefire way to see peeling, blistering, and a total waste of your weekend and your money. Let's walk through how to build that perfect foundation for your new paint.
Step 1: Start with a Deep Clean
Before a single piece of sandpaper touches your hull, it needs to be completely clean. Over a season in the water, your boat collects a stubborn film of salt, oil, scum, and leftover marine growth that has to go.
Start by giving the entire bottom a good pressure wash to blast off all the heavy, loose gunk. After it dries, it's time to get down to business. To really cut through the stubborn marine buildup and oily residue, you’ll need a powerful cleaning combo. We recommend a quality Marine Soap from Better Boat for the general grime, followed by a heavy-duty Hull Cleaner from Better Boat to dissolve those tough waterline stains and scum lines that soap can't handle alone.
Step 2: Sanding for Maximum Adhesion
Sanding is probably the most important part of the entire process. The point isn't just to make the surface smooth; it's to create a "tooth"—a microscopic, rough texture that the new paint can physically grab onto. Without a good sanding job, even the best bottom paint will have a hard time forming a solid mechanical bond.
Your goal is to create a uniformly dull, matte finish across the whole hull.
- If your old paint is in good shape: A light but thorough scuff-sanding with 80-grit sandpaper is all you need. You aren't trying to remove the old paint, just rough it up.
- If your old paint is flaking or peeling: Any loose and failing paint has to come off. Use a paint scraper to lift the bad spots, then sand the edges to "feather" them smoothly into the areas that are still sound. If the old paint is in really bad shape, you might have to strip it all off. We've got great advice on that in our complete guide to boat bottom paint removal process.
Be smart about safety when sanding. Antifouling paint dust contains biocides that are dangerous if inhaled. Always wear a properly-fitted respirator, safety glasses, and gloves.
Step 3: Repair and Prime for a Perfect Surface
With the hull clean and sanded, it's time to play detective. Get up close and inspect the surface for any dings, scratches, or blisters in the gelcoat. You have to fill and seal these before you can even think about priming.
Using a good marine filler or a Two-Part Epoxy Resin Kit from Better Boat is the best way to make a permanent, waterproof repair. Once the filler has fully cured, sand it down until it's perfectly flush with the rest of the hull.
Priming is the final, non-negotiable step before you crack open a can of bottom paint. Primer does two critical jobs:
- It seals the surface: For a bare hull, primer creates a waterproof barrier that protects your fiberglass from osmosis and future blistering.
- It ensures compatibility: If you're not sure what kind of paint is on your hull, or you’re switching from ablative to hard paint (or vice-versa), a "tie-coat" primer acts as a bridge. It bonds to the old layer and creates a fresh surface that the new paint can stick to without issues.
Applying the right primer gives your new bottom paint the absolute best chance for success. This is how you get the long-lasting, reliable protection your boat deserves.
Applying Bottom Paint Like a Pro

Alright, your hull is perfectly cleaned, sanded, and primed. You’re finally ready for the main event. Putting on the actual bottom paint is easily the most rewarding part of the job, but getting that smooth, professional-grade finish takes a methodical approach.
Before you even crack open a can of paint, let’s talk safety. Antifouling paints are packed with biocides that are no joke—they’re harmful if you breathe them in or get them on your skin. Gearing up with the right Personal Protective Equipment (PPE) isn't just a suggestion; it’s absolutely essential.
Don't even start until you have this gear ready to go:
- A NIOSH-approved respirator with organic vapor cartridges. This protects your lungs from nasty paint fumes and sanding dust.
- Chemical-resistant gloves, like nitrile, to keep the paint off your hands.
- Safety glasses or goggles to shield your eyes from any drips or splashes.
- Disposable coveralls to keep paint off your skin and clothes.
Mastering Your Application Technique
The whole point is to get a smooth, even layer of paint for a durable and effective coating. For most of us doing this ourselves, the best and most efficient way to get it done is the "roll and tip" technique. It gives you the speed of a roller and the flawless finish of a brush.
First things first, mix that paint like you mean it. The biocides, especially copper, are heavy and sink to the bottom of the can. Grab a drill-powered mixing attachment to get everything suspended evenly, then pour a manageable amount into a roller tray.
Now, grab a short-nap, solvent-resistant roller and apply the paint in sections about three feet wide. Right after you roll a section, follow up with a high-quality brush. Use light, overlapping strokes to "tip" the paint, which smooths out the roller texture and gets rid of drips. It’s a simple trick for a finish that looks like it was sprayed on.
Always roll an extra coat along the waterline and leading edges. These high-wear spots—like the bow, keel, and rudder—get hammered by water flow and need more protection.
Professional Tips for a Flawless Finish
It’s the little details that separate a DIY job from a pro job. Take taping the waterline, for example. A crisp, clean paint line just makes the whole project look sharp. Use a good-quality painter's tape and run your finger along the edge to press it down firmly. This prevents any paint from bleeding underneath.
Paying attention to your paint’s specific recoat and launch times is just as crucial. You'll find these on the can or the product data sheet, and they change based on temperature and humidity. Slap on a second coat too soon, and you can trap solvents. Wait too long, and the layers might not bond right.
For decades, marine brands have focused on helping boaters avoid the common pitfalls that ruin a good paint job. Since the early 2000s, solid guides on proper paint selection and application have helped boaters steer clear of simple mistakes like bad prep, which can cause a 20-30% loss in paint performance. You can discover more insights about boat bottom paint analytics on marketreportanalytics.com.
When you apply a quality bottom paint the right way, you ensure you’re getting all the antifouling muscle you paid for. Take your time, follow these steps, and respect the product. You'll be rewarded with a protective coating that holds up all season long.
Maintaining Your New Paint for Lasting Protection
Getting that fresh coat of bottom paint on is a huge milestone, but the job isn't quite done. Splashing your boat back into the water is the goal, but to get the most out of your investment, a little routine care goes a long way. The right maintenance will maximize your paint's lifespan and keep your hull slicing through the water efficiently.
How you care for it, though, really boils down to the type of paint you chose. Ablative and hard paints are polar opposites when it comes to upkeep.
Caring for Ablative and Hard Paints
Think of ablative paints as a bar of soap. They're designed to wear away slowly as the boat moves, constantly revealing a fresh, active layer of biocide. Because of this self-polishing nature, you want to avoid aggressive scrubbing at all costs—you’ll just be washing away perfectly good paint and shortening its effective life. If you spot a light layer of slime, a gentle wipe with a soft cloth is all you need to knock it off without stripping your protection.
Hard paints, on the other hand, are built tough. They dry to a hard, porous surface that doesn't wear away, which means they can, and should, be scrubbed.
Periodic scrubbing is absolutely essential for hard bottom paint. This not only clears away slime but also "reactivates" the surface by exposing fresh biocides, keeping its antifouling power at its peak all season long.
For this job, you'll need tools that are tough on marine growth but won't gouge or damage the paint itself.
The Right Tools for the Job
To make cleaning your hull less of a chore, having the right gear is key. A long-handled scrub brush is your best friend here, letting you reach the entire bottom of your boat whether you're working from the dock or in the water. Pairing it with a quality boat soap will make the whole process much quicker.
We always recommend using one of Better Boat's soft-bristle scrub brushes with our specially formulated Marine Soap. This combo is designed to power through grime and slime while being gentle on your antifouling paint, so you can clean the hull without hurting its integrity.
For a deeper dive into the best techniques, check out our complete guide on how to clean your boat's bottom. A little proactive care ensures you get the most out of every dollar and hour you spent on your bottom job, keeping your boat running as efficiently as possible.
Common Questions About Bottom Painting
Even the most seasoned boat owners had to start somewhere, and when it comes to bottom painting, there's a lot to learn. It's one of those jobs where a few key details can make all the difference between a season of smooth sailing and a summer spent scraping.
Let's tackle some of the most common questions we hear. Getting these right will ensure your hard work pays off with lasting, effective protection for your hull.
How Many Coats of Bottom Paint Do I Really Need?
When you’re talking about most antifouling paints, the magic number is two full coats. This is your gold standard for getting season-long protection. This is especially true for ablative paints, since they're designed to wear away. Trying to get by with just one coat is a false economy—you'll just be re-doing the job much sooner.
But don't stop there. Some parts of your hull work a lot harder than others.
Think of it like the tires on your car—some areas just see more wear. Always give a "bonus" third coat to high-friction spots like the waterline, the rudder, the keel, and the leading edge of your bow. These areas are magnets for growth, and that extra layer is the best insurance you can buy.
Can I Paint Over My Old Bottom Paint?
Yes, you usually can, but this is where you need to be careful. The golden rule is compatibility. Generally, you’re safe applying a new ablative paint over an old, prepped ablative coat, or a new hard paint over an old hard coat. Just give it a good clean and a light sanding first.
The one mistake you absolutely cannot make is putting hard paint over an old ablative coating. The ablative paint underneath is soft and designed to flake away, and it will take your brand new, expensive hard paint right along with it.
If you have no idea what’s currently on your hull, you have two safe options: use a special tie-coat primer made to bond different paint types, or bite the bullet and sand the hull back to a fresh surface.
How Long After Painting Can I Launch My Boat?
This is a critical question, and the honest answer is: it depends. The right time to launch can be anywhere from a few hours to several days. It all comes down to the specific bottom paint you've used, plus the temperature and humidity on painting day.
Some hard paints, for example, have an incredibly strict launch window. If you miss it, the biocide won't activate correctly, and you’ll have wasted all your time and money. Your new best friend is the manufacturer's product data sheet—treat it as the absolute authority on dry times and launch windows. Don't guess!
What Is the Difference Between Saltwater and Freshwater Paint?
The main difference is the muscle behind the paint—specifically, the type and strength of the biocide in the formula. Saltwater is home to some seriously stubborn critters like barnacles and tube worms. Paints designed for this environment need a heavy-hitting biocide to keep them at bay.
Freshwater paints, on the other hand, are geared toward fighting the slime, weeds, and algae you find in lakes and rivers. If you use a freshwater paint in the ocean, you're going to have a hull covered in hard growth in no time. It just doesn't have the knockout power needed for saltwater organisms.
As you get ready for your bottom painting project, from the first scrub-down to the final brush stroke, having the right gear is half the battle. At Better Boat, we have everything you need to get a finish you can be proud of. From our tough Hull Cleaner and Marine Soap to our reliable Epoxy Resin Kits for making perfect repairs, our products are built to make your job easier and the results better.
Related Posts
Choose & Apply Ablative Boat Bottom Paint
Teak Wood for Boat: The Ultimate 2026 Owner's Guide