


A DIY Guide to Flawless Boat Repair Epoxy
That sinking feeling when you spot a new crack on your hull is something every boater knows. Before you start tallying up yard fees, just remember: with the right boat repair epoxy, you can absolutely handle this yourself. This is about more than just patching a hole—it’s about knowing your boat inside and out.
Why Epoxy Is Your Most Valuable Repair Tool
Today's marine epoxies are incredible. They're engineered to create bonds that are often stronger than the original material you're fixing. Unlike old-school polyester resins that shrink up as they cure, epoxy forms a rock-solid, waterproof barrier with almost no shrinkage. That means you get a durable, long-lasting fix you can count on.
This reliability is exactly why boat repair epoxy is such a big deal for DIYers and pros alike. The market for it is huge—the global transport boat epoxy resin market hit $1.5 billion in 2025 alone. With adhesion strength clocking in at up to 4,000 PSI and enough flexibility to handle hull flex without cracking, a good epoxy repair can last 10-15 years.
That's a huge leap from traditional fillers that might give out in just two or three seasons. It's why families like ours at Better Boat are focused on creating products that let you fix your own fiberglass hull or seal a leak, saving up to 70% on professional yard costs.
The Power of DIY Epoxy Repairs
Taking on these repairs yourself does more than just save you a boatload of money. It gives you a much deeper understanding of your vessel and the confidence to handle whatever comes your way. A simple gelcoat spider crack or a small gouge in the fiberglass shouldn't be a weekend-ender.
With the right products, these are straightforward fixes. The trick is to use a system that’s actually designed for the marine environment and for someone who isn't a full-time boatwright.
- Real Structural Strength: Epoxy doesn't just sit on top of a surface; it creates a chemical bond that integrates with fiberglass, wood, and even metal, truly restoring its integrity.
- A True Waterproof Barrier: It cures into a non-porous solid that is completely impervious to water. This is critical for preventing future moisture intrusion and delamination.
- Incredible Versatility: Whether you're fairing a hull, filling deep gouges, or sealing a stubborn leak, there's an epoxy formulation made for the job. You can get a closer look at how marine-grade epoxy resin benefits your boat in our detailed guide.
Products Designed for the Boater
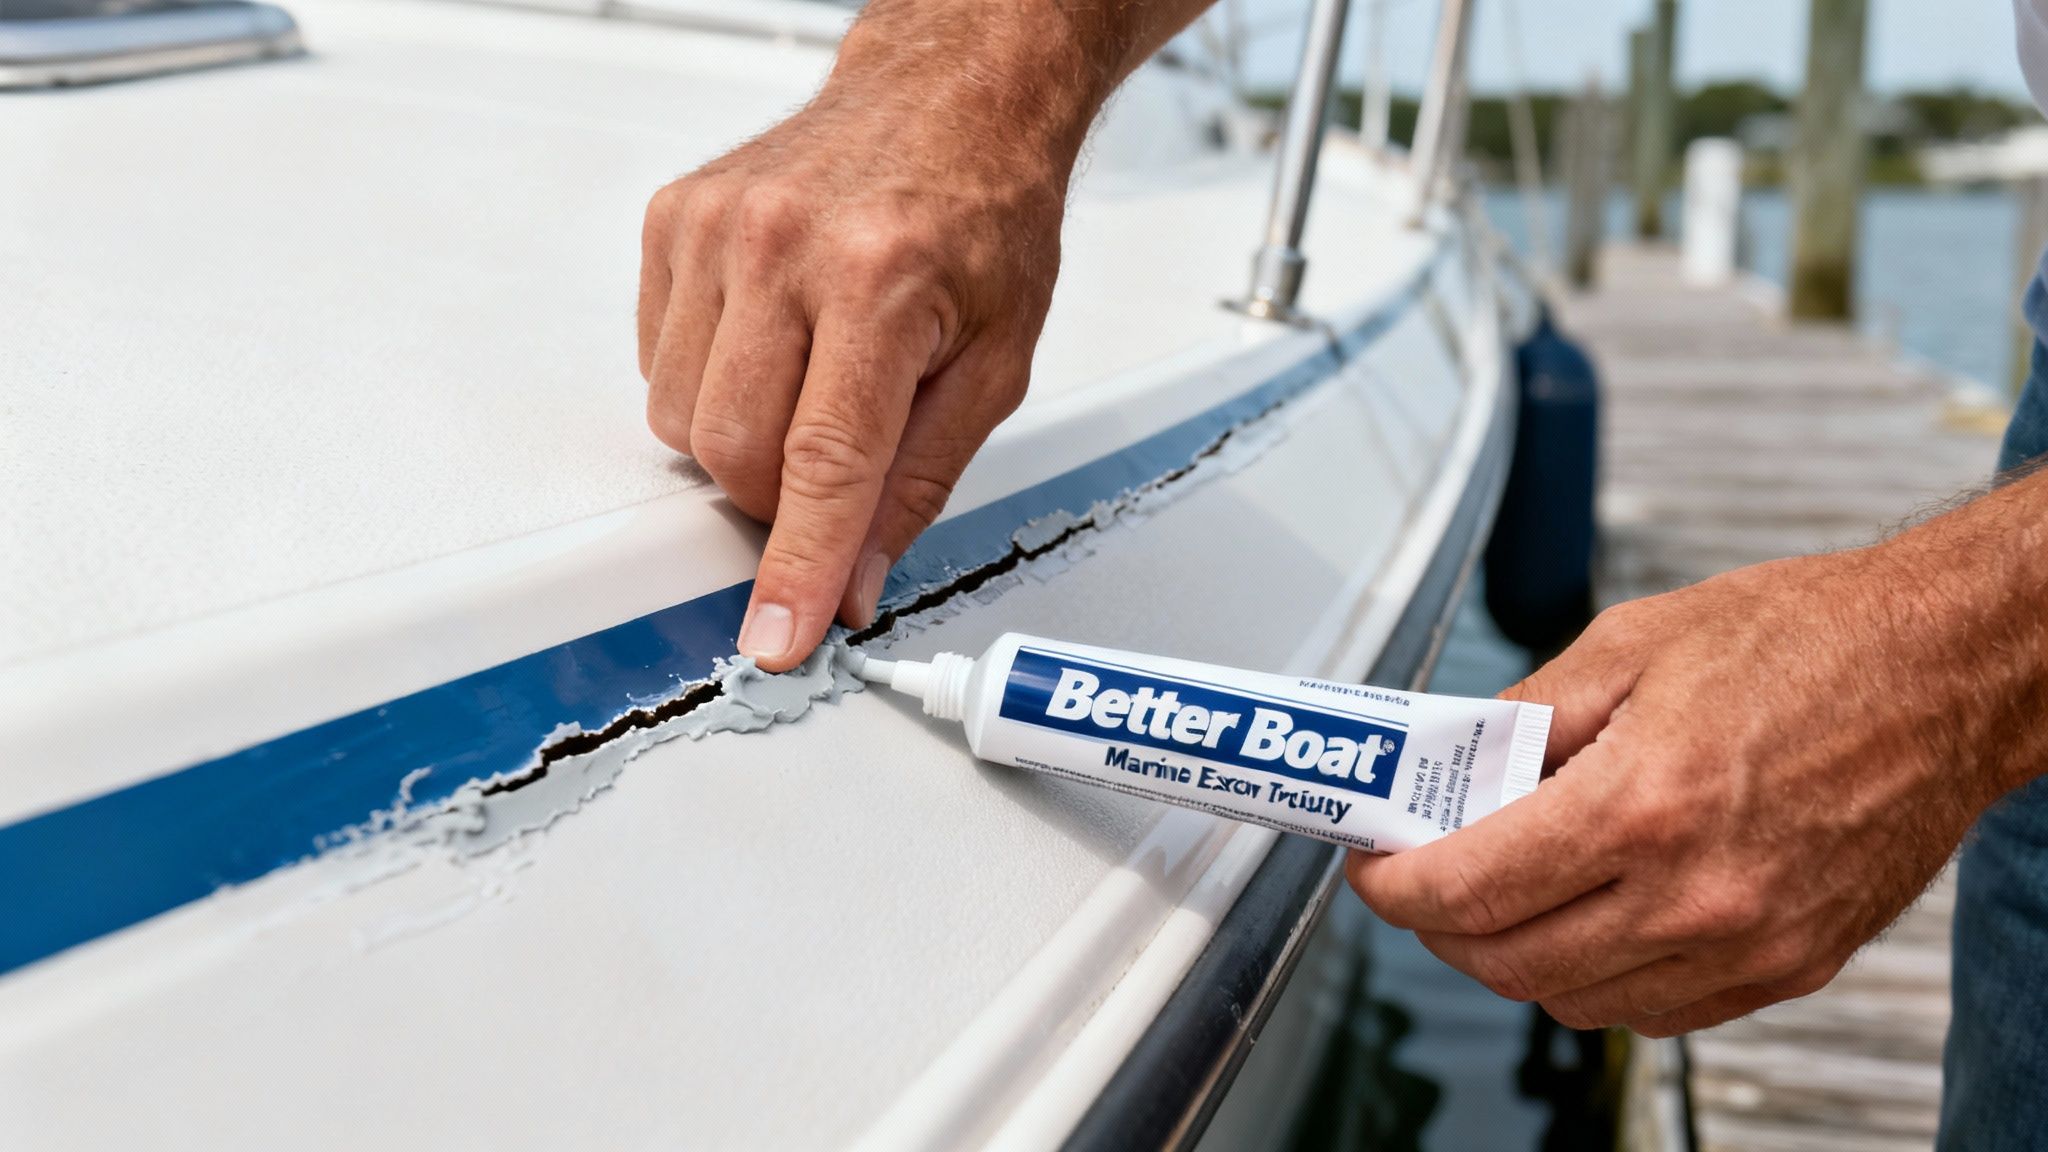
We developed our products to solve these exact problems without needing a workshop full of specialized gear. Our Better Boat Marine-Grade Epoxy Resin, for instance, is a simple, hand-moldable solution. It's perfect for filling holes or rebuilding a chipped corner—you can even use it underwater.
For those quick, on-the-spot fixes, a reliable epoxy putty is a must-have in any toolkit. It cuts out the hassle of complex mixing and measuring, so you can just knead, apply, and get back to your day on the water.
In the same way, our Instant Watertight Epoxy Sealant is the go-to for stopping leaks around fittings, seams, and small cracks. These tools are made to be straightforward, giving you professional-grade results that let you boat with confidence.
Choosing the Right Marine Epoxy for the Job
Walking into a marine supply store can feel like stepping into a science lab. You’re hit with a wall of different epoxy products, each throwing around jargon like "viscosity," "pot life," and "thixotropic agent." Let's cut through the noise so you can grab the right stuff for your boat with confidence.
Not all epoxies are created equal—and that’s a good thing. The perfect product for one repair could be a disaster for another. It’s just like picking the right tool from your toolbox; you wouldn’t use a sledgehammer to tap in a finishing nail.
The two main players you’ll see are thick, moldable putties and thin, penetrating liquids. Knowing when to use each one is the real key to a successful, long-lasting repair.
When to Use a Thick Epoxy Putty
Think of thick, paste-like epoxies as your go-to for filling gaps and rebuilding structure. Their high viscosity is a fancy way of saying they won't sag, drip, or run, even when you’re working on the side of your hull or another vertical surface. This makes them perfect for any repair that requires adding material back.
Here are a few classic scenarios where a putty is the hero:
- Deep Gouges: That nasty scrape you got from a close encounter with a dock piling needs to be filled. A putty will pack into the gouge and hold its shape perfectly while it cures.
- Chipped Gelcoat: The corners of a transom or swim platform are magnets for getting chipped. A moldable epoxy putty can be shaped by hand to rebuild that original contour before you move on to finishing.
- Underwater Emergencies: Picture this: you’re out on the water and discover a small leak from a loose fitting. A product like our Better Boat Marine-Grade Epoxy Resin was made for this exact moment. You just knead the two parts together and can apply it right over the leak—even underwater—to get an instant seal.
The beauty of an epoxy putty stick is its sheer simplicity and speed. For those unexpected dings and small holes, it gets rid of the hassle of measuring and mixing, giving you a tough, waterproof fix in minutes.
The growth in the marine adhesive market, which hit an impressive $494.57 million in 2024, is a testament to how effective these specialized epoxies are. With the average boat on the water being around 20 years old, the demand for reliable repair solutions is booming.
Epoxy is a game-changer because it bonds to wet surfaces and can even cure underwater, which can slash repair times by 60% compared to old-school methods. In the U.S. alone, the Coast Guard logs over 15,000 hull repair incidents each year, and a huge number of them are affordably fixed with the right epoxy. You can find more insights on the booming marine adhesive market here.
When a Liquid Epoxy Sealant Is Best
On the other end of the spectrum, you have thin, low-viscosity liquid epoxies. These formulas are designed to flow like water, penetrating into the tightest spaces and soaking into fiberglass cloth. Their job isn’t to fill big voids but to seal, saturate, and create a thin, incredibly strong waterproof barrier.
Here’s when you should be reaching for a liquid epoxy:
- Sealing Leaky Rivets or Seams: A slow weep from a rivet on an aluminum boat is a classic headache. A thin sealant like our Better Boat Instant Watertight Epoxy Sealant will wick right into that tiny gap around the rivet head and cure, stopping the leak for good.
- Fixing Fiberglass Delamination: When layers of fiberglass start to separate, you need an epoxy that can seep deep into that void and re-bond them. A thick putty just can't get in there.
- Wetting Out Fiberglass Cloth: For any serious structural patch, you’ll lay fiberglass cloth over the damaged area and saturate it with liquid epoxy. The epoxy soaks into every fiber and cures into a rock-solid composite patch that’s often stronger than the original material.
Better Boat Epoxy Product Selector
Picking the right epoxy is the first step to a successful repair. To make it easier, here's a quick look at our epoxy solutions and what they do best.
| Product | Best For | Cure Time | Key Feature |
|---|---|---|---|
| Marine-Grade Epoxy Putty Stick | Quick fixes, small holes, underwater repairs | 20-30 minutes | Knead-and-apply, no measuring required |
| Instant Watertight Epoxy Sealant | Leaky rivets, hairline cracks, sealing seams | 5-10 minutes | Low viscosity for deep penetration |
| 2-Part Marine Epoxy Resin | Fiberglass patching, structural bonding | 24 hours | High-strength structural bond, wets out cloth |
Whether you need to fill a gouge or seal a stubborn leak, matching the product to the problem will give you a professional-quality result that lasts.
Ultimately, choosing between a putty and a liquid just comes down to the nature of the damage. For a more detailed breakdown of different resin types and their specific uses, you can check out our ultimate guide to choosing epoxy resin for your boat. Honestly, having both types on hand is the best way to make sure you’re prepared for nearly any repair scenario that comes your way.

Prepping Surfaces for an Unbreakable Bond
Here’s a truth every seasoned boatbuilder knows by heart: a professional-grade boat repair epoxy job is 90% preparation and only 10% application. If you skip or rush this stage, even the best epoxy in the world is going to fail. Think of it as the foundation of your repair—get it right, and your work will be unbreakable for years to come.
This isn't just about a quick wipe-down and some sanding. To create a bond that’s actually stronger than the original material, you need to give the epoxy a perfectly clean, abraded, and contaminant-free surface to grab onto. Whether you're working on fiberglass, wood, or aluminum, the core ideas are the same, even if the techniques vary slightly.
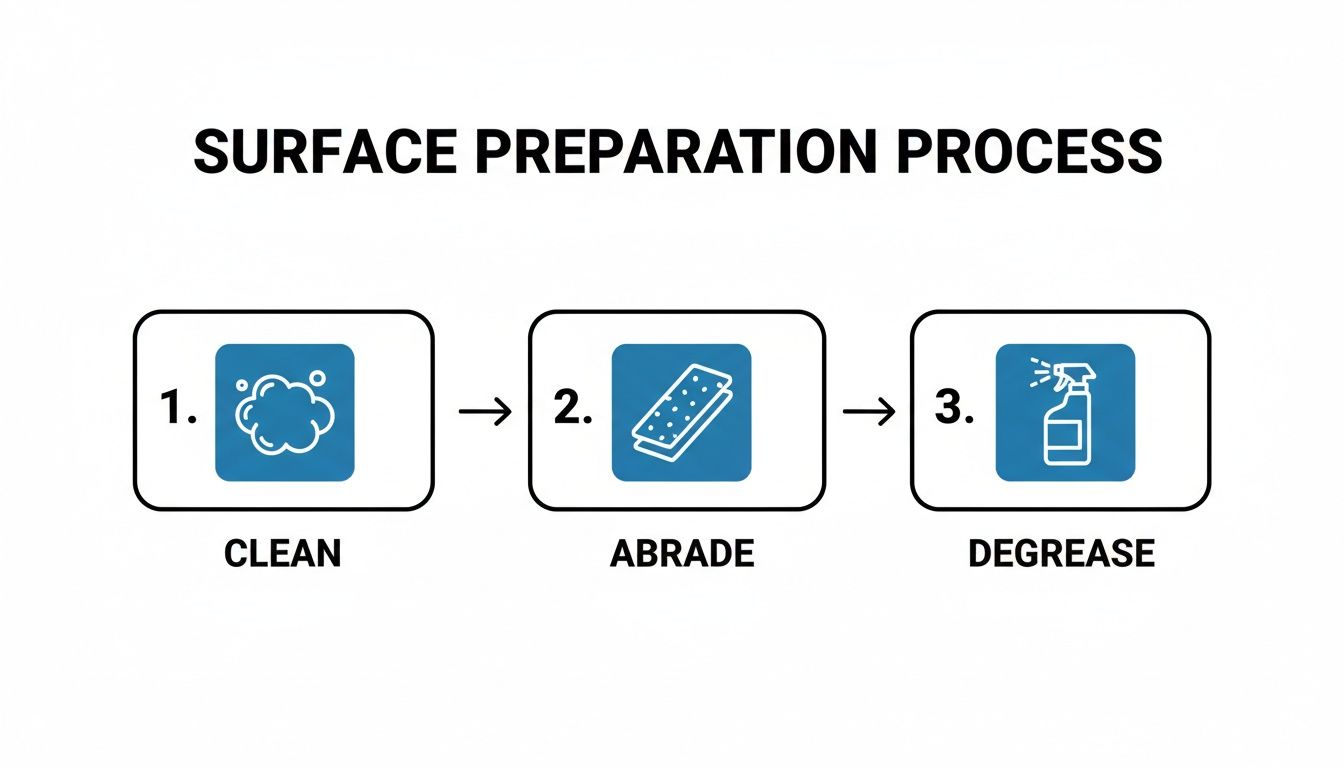
The Three Pillars of Perfect Prep
Every successful epoxy project is built on three non-negotiable steps: cleaning, abrading, and degreasing. Get one wrong, and you risk the whole repair delaminating or just plain failing when put under stress.
First, you have to deep clean the area. This means getting rid of more than just visible dirt; it's about eliminating salt, grime, and any old wax or polish that will absolutely interfere with adhesion. A high-quality marine soap is your best friend here.
- Deep Cleaning: Start with a thorough wash using a product designed to cut through tough marine buildup. Scrub the area well beyond the immediate damage with a stiff brush, then rinse completely with fresh water. Let it dry completely.
Once it's clean, the next job is creating a "mechanical profile" for the epoxy to lock into. A smooth, glossy surface is epoxy’s worst enemy. You need to rough it up to create microscopic peaks and valleys for the adhesive to grip.
- Abrading the Surface: For most fiberglass repairs, 80-grit sandpaper is the sweet spot. It's aggressive enough to create a strong profile without gouging the substrate. Sand the damaged area, then feather the edges out into the surrounding, undamaged surface. This tapering helps distribute the load and makes the final repair invisible.
Finally, you have to get rid of any hidden contaminants that could weaken the bond. Oils, grease, and even the residue from your own hands can prevent the epoxy from making full contact. This final wipe-down is a must-do step.
Advanced Techniques for Common Repairs
Beyond the basics, certain types of damage demand their own prep methods. Understanding these nuances is what separates a quick amateur patch from a professional structural fix that lasts.
A common sight on older boats is the dreaded gelcoat "spider crack." Just sanding over these and filling them is a temporary fix at best—the cracks will almost certainly reappear. The proper method involves getting rid of the damaged material entirely.
To properly prep a spider crack, use a Dremel tool with a small V-shaped grinding bit to carefully grind out each crack line. This turns the narrow fracture into a clean, shallow trench that the epoxy can fully penetrate and bond with, preventing the crack from propagating further.
Part of achieving an unbreakable bond also involves addressing deeper structural imperfections. For insights into general techniques for filling cracks and gaps, it's helpful to see how professionals in other fields approach similar challenges. These principles of creating a solid foundation for fillers apply across various materials. For a comprehensive overview focused specifically on boat materials, you can explore our complete guide to executing a flawless epoxy fiberglass repair.
Safety Is Part of the Prep
Your prep work isn't done until you’ve taken the right safety precautions. The dust from sanding fiberglass contains tiny glass fibers that are nasty stuff for your lungs, and the solvents used for degreasing can be harsh on your skin and respiratory system.
Before you start sanding or wiping, make sure you're properly geared up:
- Wear a Respirator: A NIOSH-approved respirator with P100 cartridges is essential for filtering out that fine particulate dust.
- Use Eye Protection: Safety glasses or goggles will protect your eyes from flying debris and chemical splashes.
- Protect Your Skin: Nitrile gloves are a must to keep solvents and epoxy resin off your hands.
Taking a few extra minutes for safety ensures your project is not only successful but also safe from start to finish.
Mastering Epoxy Mixing and Application
Once you’ve got your surface prepped and ready, it's time to dive into the heart of any boat repair epoxy project: the mixing and application. This is where the science of the chemicals meets your hands-on skill. Getting this part right is the difference between a rock-solid, invisible repair and a sticky, frustrating mess you’ll have to scrape off and start all over again.
The process itself isn't terribly complicated, but it is incredibly unforgiving. Unlike stirring a can of paint, mixing epoxy is a chemical reaction. If you get the ratio even a little bit off, the mixture might never cure to its full strength, leaving you with a tacky finish that’s a nightmare to fix.
The Unbreakable Rules of Mixing Epoxy
Before you even think about popping the top on a container of resin or hardener, you need to get a handle on two terms that will rule your world for the next little while: pot life and working time.
Pot life is how long you have before the epoxy in your mixing cup starts to heat up and cure, becoming unusable. Working time, on the other hand, is the window you actually have to apply that epoxy to your repair before it gets too stiff to spread.
Temperature is the big variable here.
- Warm Weather: On a hot day, both your pot life and working time shrink significantly. The chemical reaction kicks into high gear, so you'll need to work fast and only mix small batches.
- Cool Weather: When it's cold, the reaction slows way down. You get more working time, but the epoxy can get thick and syrupy. A pro tip is to gently warm the resin container in a bucket of warm water (never use a direct flame!) to make it easier to pour and spread.
A great way to manage this is to always mix your epoxy in a wide, shallow container. This increases the surface area, letting the heat from the reaction escape and giving you a bit more working time than if you used a deep, narrow cup.
Achieving the Perfect Mix Every Time
The number one reason DIY epoxy jobs fail is a bad mix. It doesn’t matter if you’re using a two-part liquid or a putty stick—precision is everything.
For liquid systems, stick to the manufacturer's specified ratio like glue, whether it’s 2:1, 5:1, or something else. Use graduated measuring cups or, even better, a digital scale. Stir everything together for at least two solid minutes, making sure you scrape the sides and bottom of the container to get every last bit incorporated.
For bigger jobs, you can save your arm and get a much better result by using a dedicated tool like our Epoxy and Paint Mixer attachment on a drill. It ensures a perfectly consistent mix without whipping in a bunch of air bubbles.
If you’re using something like our Better Boat Epoxy Putty Stick, we’ve done the measuring for you. Just slice off what you need. The inner and outer materials are already in the correct ratio. Your only job is to knead it until the color is completely uniform—that’s your signal that it’s fully blended and ready to go.
Before you even get to this stage, though, remember that your prep work is the foundation for everything that follows.
This guide is a great reminder that a clean, abraded, and degreased surface isn't just a suggestion; it's the mandatory first step for any epoxy repair that’s meant to last.
Application Techniques for Common Repairs
How you put the epoxy on the boat is just as crucial as how you mix it. The right technique will give you a stronger bond and save you a ton of sanding and finishing work later.
When you're fairing a surface or filling a shallow gouge, grab a plastic spreader. Start by applying a thin, tight "scratch coat." Really force the epoxy into all those little sanding scratches you made during prep. Once that’s on, you can build up with more layers, spreading each one as smoothly as you can.
Got some delaminated fiberglass? You need to get that epoxy deep into the void. A slick technique is to drill a few small, discreet holes along the edge of the delaminated area and use a syringe to inject a low-viscosity liquid epoxy. The pressure will force the adhesive into every nook and cranny, re-bonding those separated layers from the inside out.
It's these kinds of powerful, durable repairs that are driving the growth of the epoxy composites market, which is projected to hit $41.33 billion globally by 2025. For us boat owners, who often see 20-30% hull degradation from UV rays and moisture, epoxy is a lifesaver. It restores strength-to-weight ratios that can top 50 ksi—more than double that of aluminum.
The key is to apply epoxy with firm, even pressure. This "wets out" the surface properly, pushing out any trapped air. A void-free bond is absolutely critical for structural integrity and a finish that looks professional.
Finishing Your Repair Like a Pro
Once the chemistry has done its work and your boat repair epoxy is rock hard, the structural part of the job is behind you. Now, the artistry begins.
The true mark of a great repair isn’t just that it’s strong—that’s the whole point—but whether you can even tell it was ever there. The goal is an invisible fix, and getting that seamless look is all about the finishing process. This is what separates a durable patch from a flawless part of your boat's hull. Don't rush this part; a lumpy, obvious patch screams "amateur hour" from across the dock.
Achieving a Perfectly Fair Surface
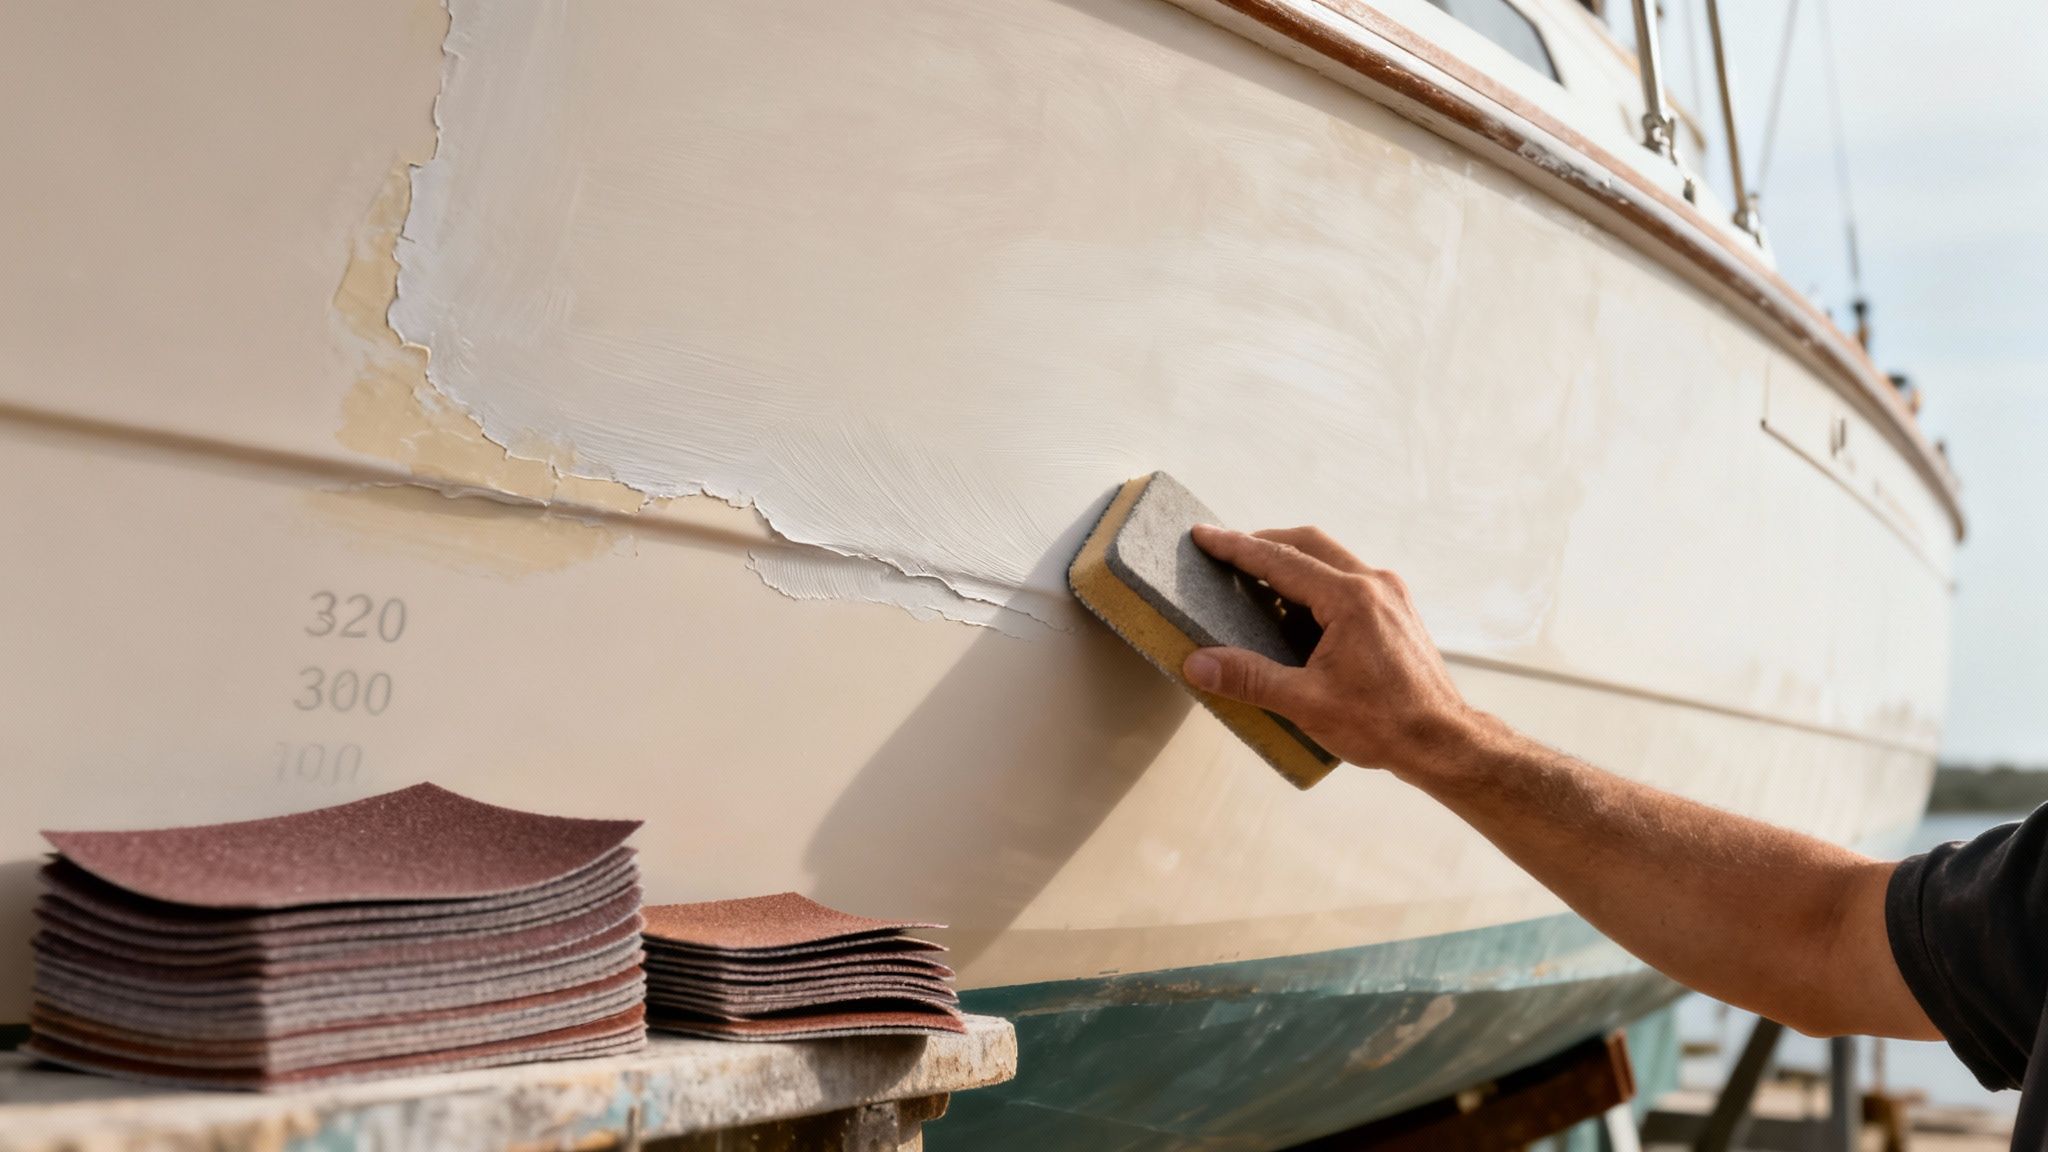
Your first mission is to get that cured epoxy perfectly level with the surrounding surface. This process, called "fairing," is almost entirely about sanding. You’ll want to start with a more aggressive grit to knock down any high spots and begin shaping the patch.
I always grab 80-grit sandpaper on a longboard or a good-sized sanding block to start. Using a block is critical—it prevents you from creating little dips and waves with your fingertips and keeps the whole surface flat. As you sand, the dust will collect in any low spots, which is actually helpful because it shows you exactly where you need to focus.
Here's an old boatyard trick: use a "guide coat." After your first pass with the sander, lightly mist a contrasting color of spray paint over the area. When you go back to sanding, the paint will come off the high spots first, leaving color behind in the low spots. It makes them impossible to miss.
If you find any dips, you'll need to apply a very thin skim coat of a fairing compound or more epoxy to fill them in. Let it cure completely, then get back to sanding. It can feel like a bit of a back-and-forth, but this is the only way to get a truly smooth, professional-looking surface.
The Sanding Sequence for a Glass-Like Finish
Once the repair is perfectly level, you can shift your focus from shaping to smoothing. This means working your way down through progressively finer grits of sandpaper. If you jump from a coarse grit straight to a fine one, you’ll be left with deep sanding scratches that will telegraph right through your final paint or gelcoat.
A typical sanding progression looks something like this:
- Initial Shaping: Kick things off with 80-grit to level the epoxy and feather the edges into the surrounding area.
- Scratch Removal: Next, switch to 120-grit. This will smooth out the deeper scratches left behind by the 80-grit paper.
- Pre-Primer Smoothing: Finish up with 220-grit. This creates a beautifully smooth surface that's ready to accept primer.
Always remember to clean the surface thoroughly between grits. A tack cloth is your best friend here, as it picks up any leftover abrasive particles from the previous step. By the time you’re done with the 220-grit, the surface should feel silky smooth and be ready for its protective topcoats.
Applying Primer and Topcoat
With the surface perfectly faired and smooth, it's time to seal and protect all your hard work. Primer is non-negotiable. It creates a uniform base for your topcoat to stick to and adds another layer of protection against moisture.
Apply two or three thin coats of a high-quality marine primer, making sure to follow the recommended drying times between coats. A quick, light sanding with 320-grit or 400-grit paper after the final primer coat will knock down any dust nibs and give you the perfect canvas for your finish.
Matching your existing finish is the final challenge. If you have a gelcoat finish, you'll need a color-matched gelcoat and catalyst. For painted hulls, use a top-shelf marine paint. The key for both is to apply thin, even coats to avoid drips and runs.

Protecting Your Pristine Repair for the Long Haul
After all that effort, the last thing you want is for your perfect repair to get chalky, dull, or damaged by the sun. Once the topcoat is fully cured, it's time for one last step.
Applying a quality marine polish and wax is what locks in that shine and protects the finish. Our Better Boat Marine Polish with Wax is made for exactly this. It polishes the surface to a high-gloss shine while leaving behind a tough layer of carnauba wax. This barrier shields your brand-new finish from UV rays, salt, and grime, making sure your invisible repair stays that way for seasons to come.
Got Questions About Boat Epoxy? We've Got Answers
Even after you've got the basics down, a few questions always pop up. It’s completely normal. Think of this as the part of the guide where we sit down and tackle those common "what ifs" and "how comes" that boat owners run into with epoxy repairs.
My goal here is to give you straight-up, practical answers based on years of experience, clearing up any confusion so you can tackle your next project like you've been doing it for decades.
Can I Use Boat Repair Epoxy Below the Waterline?
You absolutely can, but this is where you can't cut corners. You must use an epoxy that's specifically rated for continuous submersion. That off-the-shelf stuff from the hardware store? It'll absorb water, soften, and fail. It’s a matter of when, not if.
Products designed for marine environments, like our Better Boat Marine-Grade Epoxy Resin, are built for this exact scenario. It’s formulated not just to survive underwater but to actually be applied and cure while fully submerged. That makes it a lifesaver for those unexpected on-the-water emergencies. Always double-check the product specs to be certain it's made for life below the waterline.
How Long Does Epoxy Really Need to Cure?
This is a classic question, and the honest answer is: it depends. Cure time isn't a single number; it's a moving target that gets pushed and pulled by the epoxy formula itself, the ambient temperature, and even the humidity.
Here's a general idea:
- A fast-setting formula might be ready for sanding in just a few hours.
- A heavy-duty structural epoxy could need a full 24 to 72 hours to reach its peak strength.
A good old-fashioned trick is the "fingernail test." If you press your fingernail into the surface and can't make a dent, it's probably hard enough for light sanding. But—and this is a big but—for anything structural or below the waterline, you have to follow the manufacturer's full cure time. No exceptions. Being patient now saves you from a massive headache later.
When in doubt, give it more time. Rushing the cure, especially when it's cool or damp, is the number one reason for a weak bond that fails under stress.
What Are the Most Common Epoxy Mistakes to Avoid?
I’ve seen it all over the years, and it's almost always the same few slip-ups that turn a simple repair into a sticky disaster. If you can sidestep these, you’re 90% of the way to a pro-level finish.
The big three mistakes are, without a doubt, poor surface prep, incorrect mixing ratios, and ignoring the temperature. If you don't clean and scuff up the surface, the epoxy has nothing to bite into. If you just guess at the resin-to-hardener ratio, you'll end up with a gummy mess that never fully hardens.
And temperature is the silent killer of good epoxy work. Too cold, and the chemical reaction just stalls out. Too hot, and your epoxy can kick off in the pot before you even get it on the boat. Nail these three things, and you've basically mastered epoxy. For those interested in other hands-on projects around the house, checking out general DIY repair and refinishing guides can build on these same core principles of patience and proper prep.
Do I Always Need to Use Fiberglass Cloth With Epoxy?
Great question. The answer boils down to one thing: are you doing a cosmetic fix or a structural repair?
For purely cosmetic jobs—filling a small gouge, fairing a surface to make it smooth, or sealing a hairline crack—you don't need fiberglass cloth. A thickened epoxy or a dedicated putty has all the strength you need for that kind of work.
But the moment a repair needs to restore structural integrity, fiberglass cloth (or a similar fabric) becomes non-negotiable. Think patching holes, bridging a wide crack, or beefing up a flimsy, flexing deck. In these cases, the cloth provides the muscle—the tensile strength—while the epoxy acts as the super-strong glue locking all those fibers together into a rock-solid composite patch.
Whether it's a tiny chip in the gelcoat or a more serious structural fix, having the right materials is what separates a temporary patch from a permanent repair. At Better Boat, we've developed our epoxy solutions to be tough, dependable, and straightforward enough for any boat owner to use. Stock your toolkit with products you can trust and get ready to tackle your next project with confidence. Check out our full lineup of marine maintenance solutions at https://www.betterboat.com.


