


Your Essential Guide to Flawless Gel Coat Repair
A good gel coat repair isn't just about making your boat look pretty again—it's about restoring its armor. Think of that glossy finish as the first line of defense, shielding the fiberglass hull from UV rays and water. Get this wrong, and you're opening the door to much bigger, more expensive problems. This guide will walk you through how to nail a professional-looking repair yourself.
Why a Perfect Gel Coat Is So Much More Than a Shiny Finish
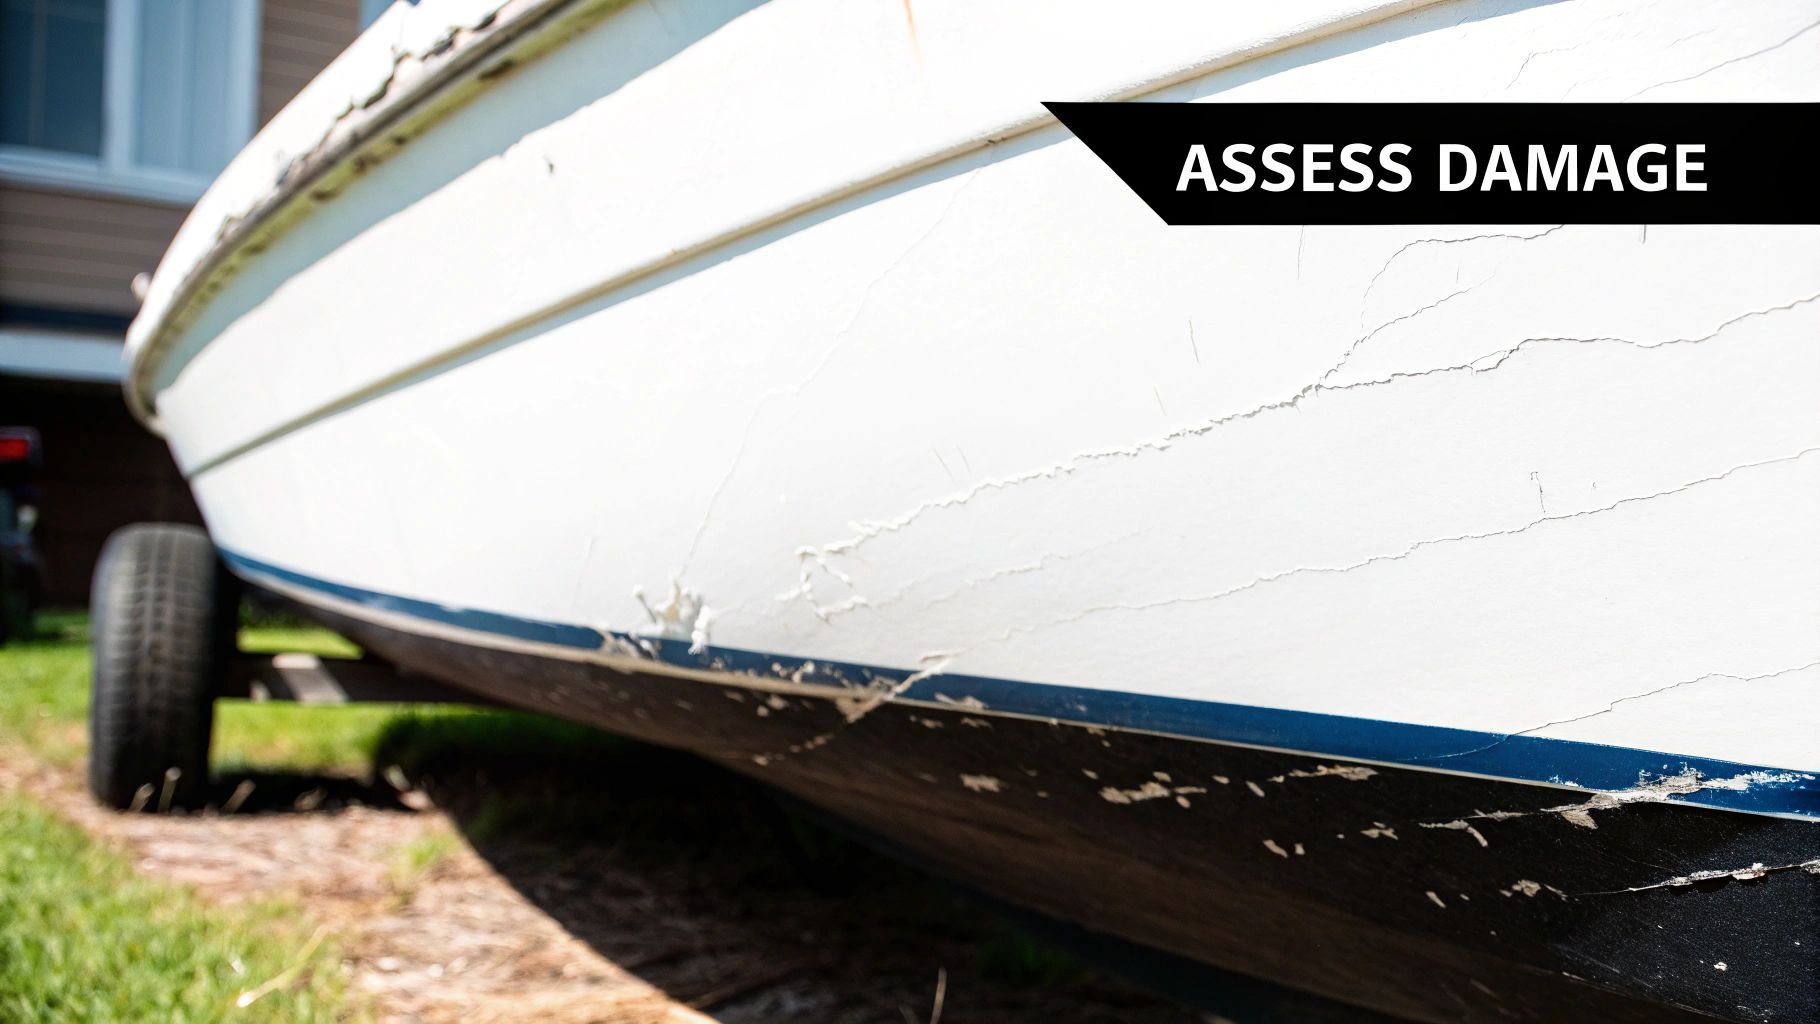
Every boat owner knows that gut-sinking feeling of finding the first scratch or spider crack. It’s tempting to write it off as just a cosmetic issue, but those little blemishes are often the first sign of trouble. That gel coat is the most critical barrier protecting your boat's composite structure.
When that protective skin is broken, it's an open invitation for moisture to get into the fiberglass laminate. Let that go, and you're looking at delamination, blisters, and a compromised hull. Suddenly, what could have been a simple gel coat patch becomes a major fiberglass project.
What Gel Coat Actually Does
Gel coat is a specific type of polyester resin that cures into a tough, glossy, and durable surface. It does a lot more than just look good.
- UV Shield: It’s packed with additives that stop the sun's harsh UV rays from degrading the fiberglass resin underneath, which would otherwise turn brittle.
- Waterproof Barrier: It creates a waterproof seal, preventing water from seeping into the fiberglass and compromising the boat’s structural integrity.
- Chemical Armor: It stands up to fuel, oil, and other chemicals you’ll inevitably encounter on the water.
Its importance is clear when you look at the numbers. The global market for gelcoat was valued at around USD 1.5 billion in 2024 and is expected to hit nearly USD 3.4 billion by 2033. The marine industry is a massive driver of that growth, and you can learn more about this trend and its impact if you're interested in the market side of things.
How a Small Crack Becomes a Big Headache
Picture this: you've got some fine spider cracks around a cleat on your deck. They look harmless enough. But every time a wave hits or the temperature shifts, those cracks flex. Water gets in. In colder climates, that water freezes and expands, forcing the cracks wider. Soon, the core underneath is soaked, and you've got a soft spot on your deck.
Taking care of gel coat damage as soon as you spot it is the best insurance you can get against serious structural problems later on. A quick fix keeps your boat looking its best and protects its value and lifespan.
By learning to do this yourself, you're doing more than just maintenance. You're taking an active role in your boat's health, making sure it stays strong, safe, and beautiful for years of enjoyment.
Figuring Out Your Game Plan and Getting the Right Gear
Before you even think about picking up a sander, the most critical part of any gel coat repair is figuring out exactly what you're up against. Getting this wrong is the classic rookie mistake. It's like trying to fix a major hull breach with a bit of polish—you'll just end up making things worse. You need to know how to read the signs your boat is giving you, whether it’s a tiny crack or a nasty gouge, to pick the right fight.
A light scuff from a fender rubbing against the dock is a completely different beast than a deep chunk taken out by a submerged rock. One is a quick cosmetic touch-up; the other is a structural repair needed to keep water from seeping into the fiberglass. Rushing this initial assessment is how a simple weekend job turns into a month-long nightmare. Trust me on that.
Reading the Damage: What Is Your Boat Telling You?
Get up close and personal with the damaged spot. Are you looking at a delicate, spidery web of cracks? You often see these in high-stress zones, like around cleats or sharp corners. Those are usually just cosmetic stress cracks. Or is it a deep, ugly chip with sharp edges where you can actually see the fuzzy fiberglass underneath? That's a sign of a direct hit, and it needs a much more serious approach.
The depth of the damage dictates your entire strategy. This handy guide breaks it down visually, helping you see what kind of repair you're in for.
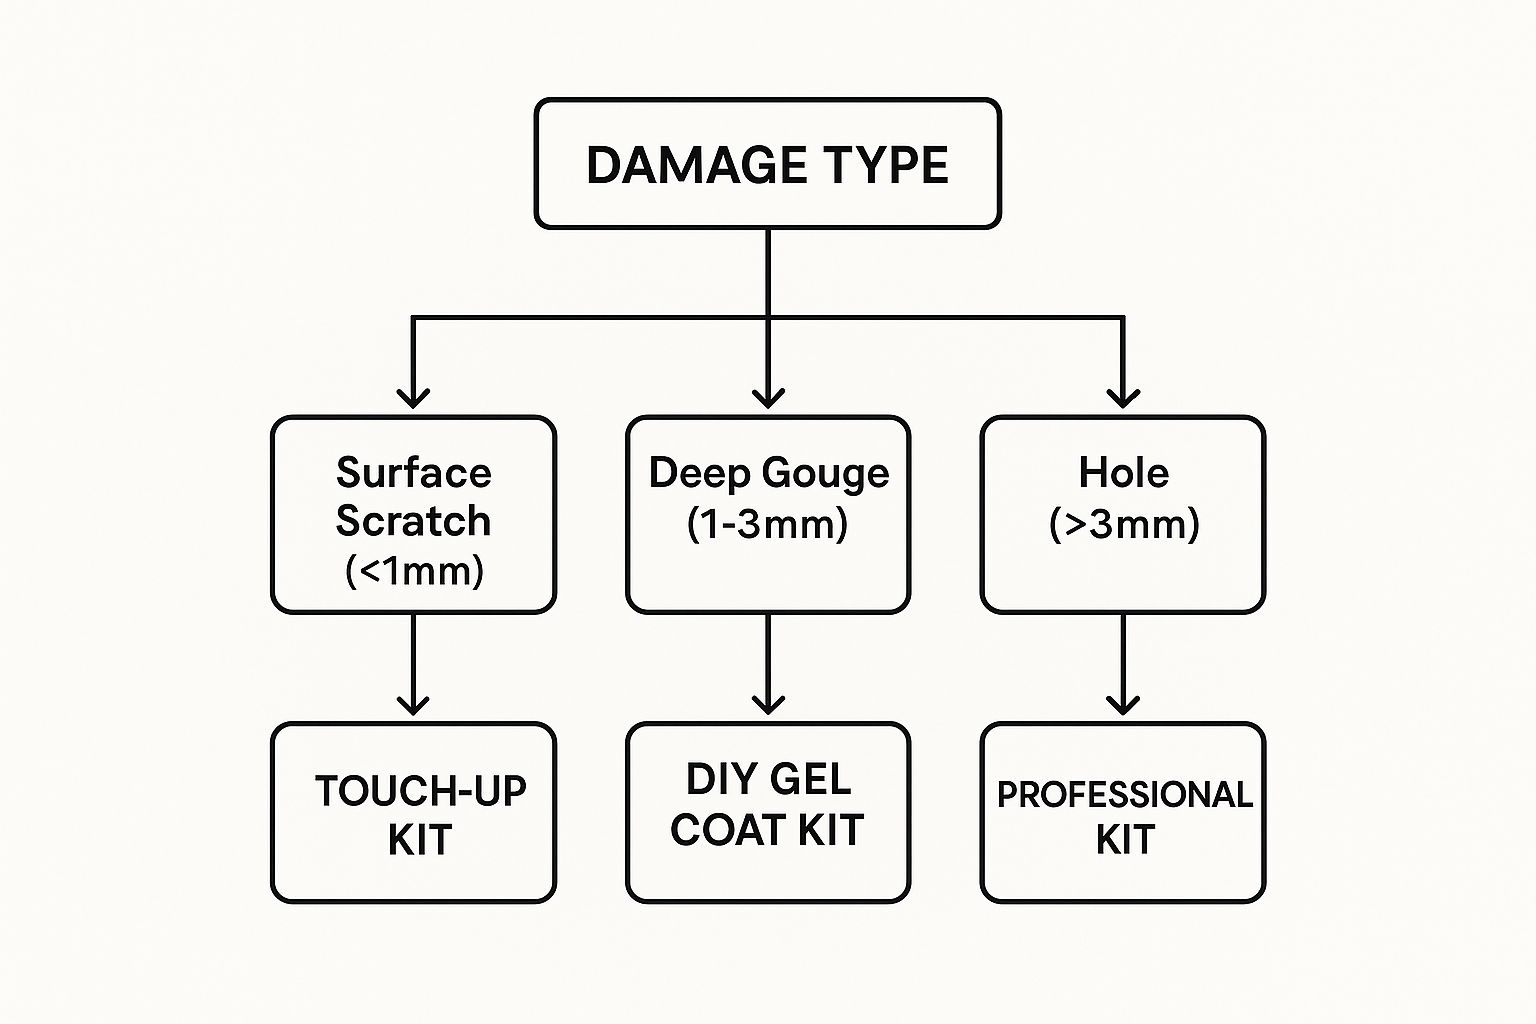
As you can see, the deeper the wound, the more involved the repair becomes. A deep gouge requires a much stronger fix to ensure it’s permanent and structurally sound.
Your Go-To Repair Toolkit
Once you know what you’re dealing with, it’s time to gather your supplies. There’s nothing more frustrating than having a batch of gel coat starting to kick off while you’re scrambling to find a roll of tape. Lay everything out before you start.
Your exact list might change a bit depending on the job, but this covers the essentials for most common repairs:
- Safety First: Don't skip this. You'll want nitrile gloves, safety glasses, and a good respirator. Gel coat dust and catalyst fumes are no joke, and you really don't want to be breathing that stuff in.
- The Clean-Up Crew: Acetone or a similar solvent is non-negotiable. You have to wipe the area clean of any wax, oil, or grime, or your new gel coat just won't stick properly.
- Prep Tools: A rotary tool, like a Dremel, with a small V-shaped grinding bit is your best friend for opening up cracks and beveling the edges of chips. You'll also need some quality painter's tape to get those clean, professional lines.
- Mixing Gear: Grab some small mixing cups, stir sticks (tongue depressors are perfect), and a flexible plastic spreader for applying the gel coat filler.
Pro Tip: Always use a fresh cup and a clean stick for every single batch of gel coat you mix. Even a tiny, almost invisible fleck of cured gel coat can mess up the chemical reaction in your new mix, leaving you with a weak, sticky patch that never fully hardens.
Decoding Damage for the Right Repair Strategy
Knowing what kind of damage you have is key to picking the right products and techniques. This table is a quick cheat sheet to help you match the problem with the right solution and the gear you'll need to do it right. Think of it as your pre-flight checklist before you get your hands dirty.
| Type of Damage | Visual Cues | Recommended Repair Approach | Essential Products |
|---|---|---|---|
| Surface Scuffs | Light scratches; color is off but the fiberglass isn't showing. | Polish it out with a fine compound. For anything deeper, a bit of gel coat paste is the way to go. | Fine-grit polishing compound, clean microfiber cloths, Better Boat Gel Coat Repair Kit. |
| Stress Cracks | Fine, spider-web cracks, usually spreading out from a single point. | Use a rotary tool to gently grind out the crack into a "V" shape to stop it from spreading, then fill it with gel coat paste. | Rotary tool with a fine bit, gel coat paste, acetone, tape. |
| Deep Gouges | Damage goes right through the gel coat and you can see the fiberglass laminate underneath. | Bevel the edges of the gouge to create more surface area for the new gel coat to grab onto. Fill it in layers with thickened gel coat. | Rotary tool with a grinding bit, Better Boat Epoxy Resin for deep fills, gel coat paste. |
| Impact Chips | A chunk of gel coat is missing, leaving sharp, defined edges from whatever hit it. | Clean and bevel the chip's edges, then carefully fill with color-matched gel coat. Overfill it slightly so you can sand it perfectly flush. | Putty knife, gel coat paste, mixing supplies, acetone. |
Using this as a guide, you can confidently tackle most common gel coat issues and get a result that looks like it came straight from the factory.
Prepping the Surface for an Invisible Repair
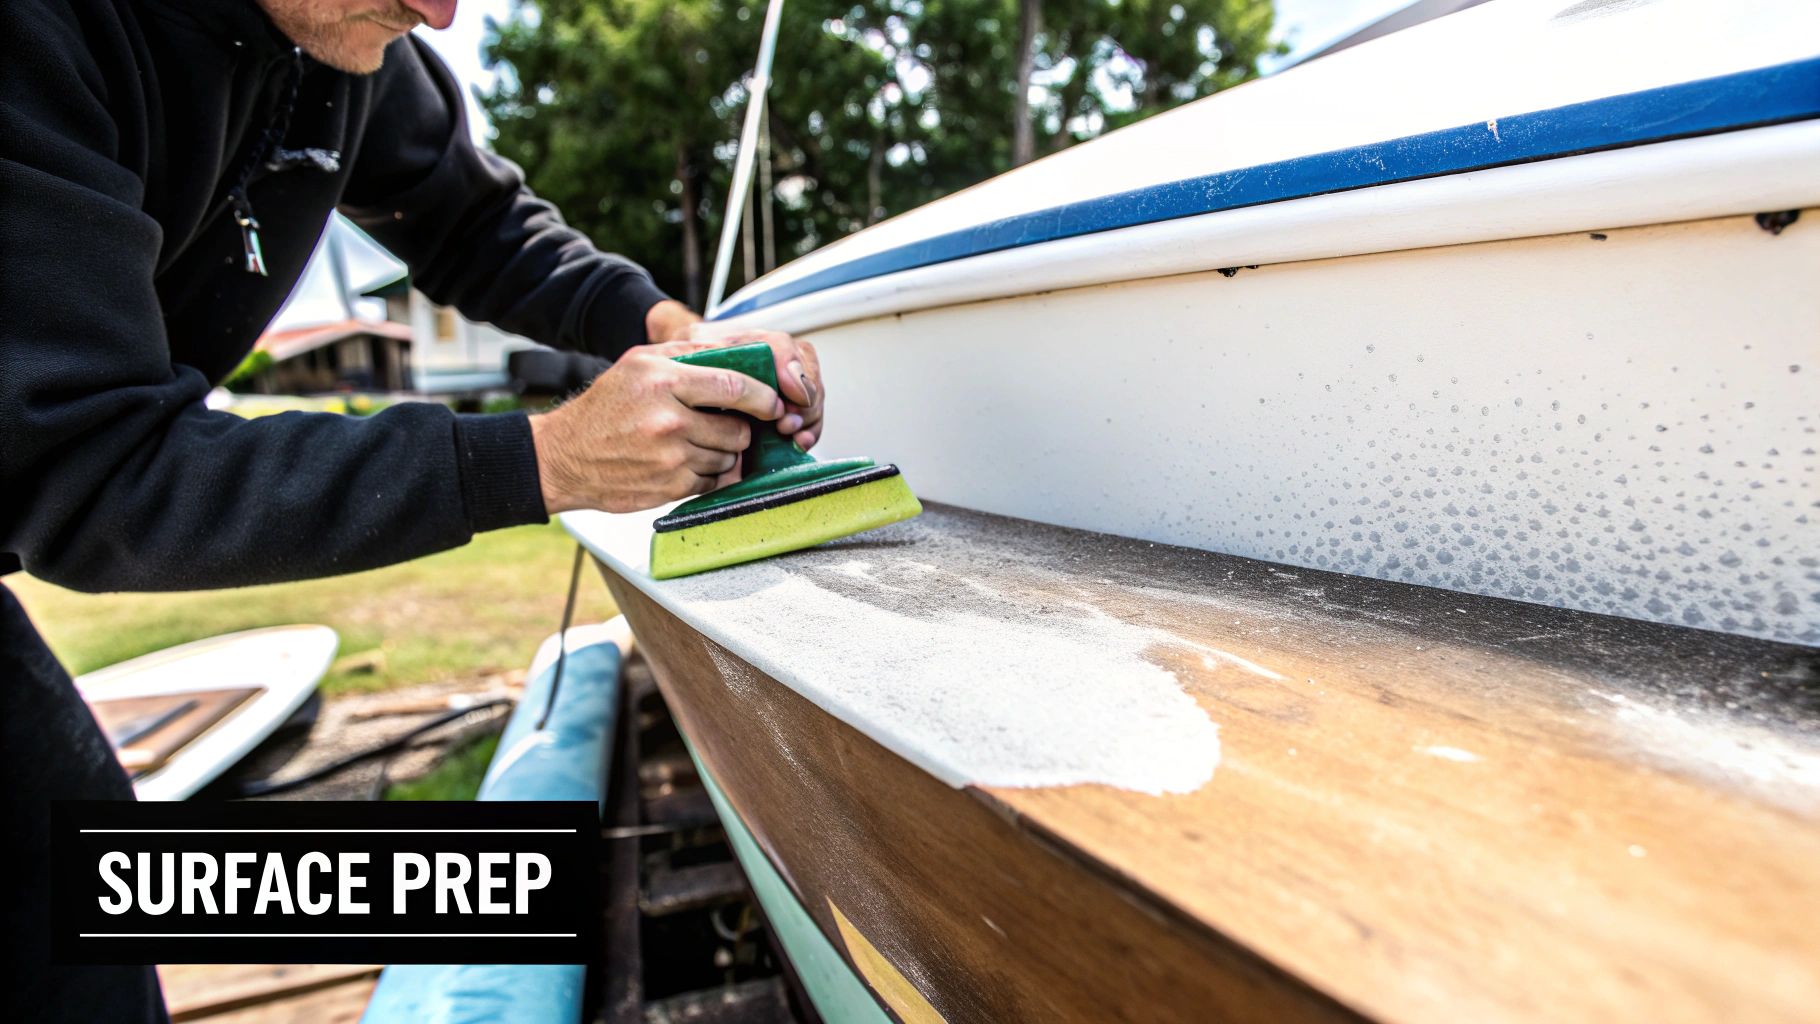
Ask any seasoned pro, and they'll tell you the same thing: a successful gel coat repair is 90% preparation. This is the part that isn't glamorous, but it’s absolutely where the magic happens. Getting this foundation right is what separates a seamless, permanent fix from a patch that sticks out like a sore thumb—or worse, pops right out after a few months on the water.
Rushing the prep work is the number one mistake I see people make. You’re not just cleaning the spot; you're creating the perfect canvas for the new gel coat to bite into the old surface and form a powerful mechanical bond that will last for years.
The Initial Deep Clean
Before you even think about picking up a tool, you have to get the area surgically clean. Your boat’s hull is coated in layers of wax, polish, salt, and grime, even when it looks perfectly fine. Trying to repair over that is a recipe for disaster because the new gel coat will have nothing solid to adhere to.
Start with a thorough wash using a quality boat soap and plenty of fresh water. After it’s completely dry, you have to tackle the wax. This is non-negotiable. Grab two clean, lint-free rags and a can of acetone.
- Wipe On: Soak one rag with acetone and wipe down an area slightly larger than your repair zone. Don't be shy with the solvent.
- Wipe Off: Immediately, with your second clean rag, wipe the acetone off before it can evaporate. This is key—it lifts the dissolved wax off the surface instead of just smearing it around.
- Repeat: Keep folding your rags to clean sections until they come away spotless.
This meticulous cleaning ensures your sandpaper and repair materials are working directly on the gel coat itself, not some slick layer of old wax. For more on keeping your hull pristine, our guide on how to clean a fiberglass boat has some great techniques that are useful here, too.
Opening Up the Wound
With the surface contamination gone, it's time to deal with the damage head-on. You have to get rid of any loose, fractured, or compromised gel coat to get down to a solid foundation. A rotary tool with a small V-shaped grinding bit is your best friend for this job.
If you're dealing with stress cracks, just filling them is a waste of time. They will come back, guaranteed. The only permanent fix is to grind out the crack along its entire length, turning that hairline fracture into a shallow "V" groove. This not only removes the weak material but also stops the crack from spreading under the new repair.
Think of it like a dentist fixing a cavity. They don't just slap a filling on top of the decay. They carefully drill out all the compromised material first to ensure the filling has a solid, healthy tooth to bond with. Your approach to gel coat repair should be just as thorough.
Beveling Edges for Maximum Adhesion
For deeper gouges and chips, just cleaning them out isn't enough. You need to create more surface area for the new gel coat to grip. The best way to achieve this is by beveling the edges of the damage to create a tapered profile.
Using your rotary tool or even a sharp scraper, grind the edges of the gouge down at roughly a 45-degree angle. This creates a gentle slope from the surrounding surface down to the bottom of the repair. A repair with straight, 90-degree "walls" has very little surface area to bond to and can easily be popped out. A beveled repair, however, creates a much stronger, wedge-like lock that’s incredibly durable.
As a rule of thumb, aim for a bevel ratio of about 8:1—the width of your beveled edge should be about eight times the depth of the repair.
Taping Off Your Workspace
The final prep step is to isolate your work area. Using high-quality painter's tape, carefully mask off a square or rectangle just slightly larger than the beveled damage. This does two very important things for you.
- Containment: It keeps your gel coat application neat and prevents you from smearing it onto the good surface around the repair.
- Sanding Guide: The tape creates a clear boundary and a slight ridge, which is a massive help when you start sanding the repair flush later on. It keeps you from accidentally sanding down the good gel coat.
Take your time with the tape. Sharp, clean tape lines are a hallmark of a professional job and lead to a much cleaner, more invisible final result. Once everything is taped off, give the repair area one last wipe with acetone to remove any dust from grinding, and you're officially ready to mix your gel coat.
Mixing and Applying Gel Coat Without the Guesswork
Alright, with the prep work done, we're at the fun part—the place where chemistry meets craftsmanship. Mixing and applying gel coat can feel a little intimidating if you've never done it, but it’s actually a very logical process. This is where you bring that damaged spot back to life and create a seamless, durable patch.
Honestly, there are two main things that trip people up: getting the color right and mixing in the perfect amount of catalyst. Let's walk through both so you can tackle your gel coat repair like a pro.
Achieving the Perfect Color Match
You could do the most structurally sound repair in the world, but if the color is off, it’s going to stick out like a sore thumb. The tricky part is that factory gel coat colors fade and shift over time thanks to the sun, so a brand-new batch of your boat’s original color probably won't be a perfect match anymore.
The real goal is to match the current color of your hull, not what it looked like on day one. This usually takes a little patience and some trial and error with tinting pigments.
- Start with a Light Base: Always begin with a white or neutral gel coat that's a shade lighter than what you're aiming for. It's so much easier to darken a color than it is to lighten it.
- Add Tint Sparingly: Use gel coat tinting pigments, adding them literally one drop at a time. Mix everything completely after each drop before you even think about adding more. A little goes a long way.
- Test on a Scrap: Dab a small amount of your mixture onto a piece of cardboard or scrap plastic and let it fully cure. Wet gel coat is a liar; it often darkens a bit as it hardens.
Take your cured test swatch right up to the hull in natural sunlight to see how it looks. You might have to make a few test batches to get it spot-on, but trust me, the extra time is worth it for a flawless finish.
The Catalyst Chemistry Explained
Gel coat doesn’t "dry" like paint does. It cures through a chemical reaction kicked off by a catalyst, which is almost always Methyl Ethyl Ketone Peroxide (MEKP). Nailing this ratio is absolutely critical for a strong repair that will last. The biggest factor influencing how much you need is the ambient temperature.
Think of MEKP as the accelerator pedal for the curing process. Too little, and your gel coat stays tacky forever. Too much, and it cures too fast, becoming brittle and prone to cracking.
As a rule of thumb, you'll add catalyst at a ratio of about 1% to 2% by volume. Warmer days mean you need less catalyst, while cooler weather requires a bit more to get the reaction going.
| Temperature Range | Recommended MEKP Drops per Ounce |
|---|---|
| Cool (60-70°F) | 10-12 drops |
| Moderate (70-80°F) | 8-10 drops |
| Warm (80-90°F) | 6-8 drops |
Whatever you do, never go below 1% or above 3% MEKP. Mixing outside that range will give you a weak, under-cured patch or a brittle, over-cured one. I recommend using a simple medicine dropper for accuracy. And remember to mix in small batches you can comfortably use within 10-15 minutes.
Applying the Gel Coat
Once your color is matched and the catalyst is mixed in, it's go-time. The gel coat will start to thicken pretty quickly, so have your tools laid out and ready.
For small nicks and deeper scratches, a flexible plastic spreader is your best friend. The key here is to apply the gel coat so it slightly overfills the repair area. This is not a mistake; it's a crucial step. Gel coat shrinks just a little as it cures, so that extra material ensures that after sanding, the repair will be perfectly flush with the surrounding surface.
Press the mixture firmly into the groove you prepped, making sure you work out any trapped air bubbles. Smooth it off with the spreader, leaving it sitting just proud of the surface—a little "hump" of excess material is exactly what you want to see.
While gel coat is fantastic for cosmetic repairs, deeper structural damage might need a different solution. For big voids or spots that need more strength than a simple filler, you might want to look at other options, such as marine-grade epoxy or a fiberglass repair system rated for the job. To help with that, check out our guide on using epoxy resin for boat repair.
Some of the newer repair methods even use different curing agents. Exploring UV cure finish technologies can give you an idea of some of the faster and more durable options pros are using today. Once your gel coat is applied, the final step is to seal it from the air so it can cure properly, which we'll cover next.
Sanding and Polishing for a Mirror Finish
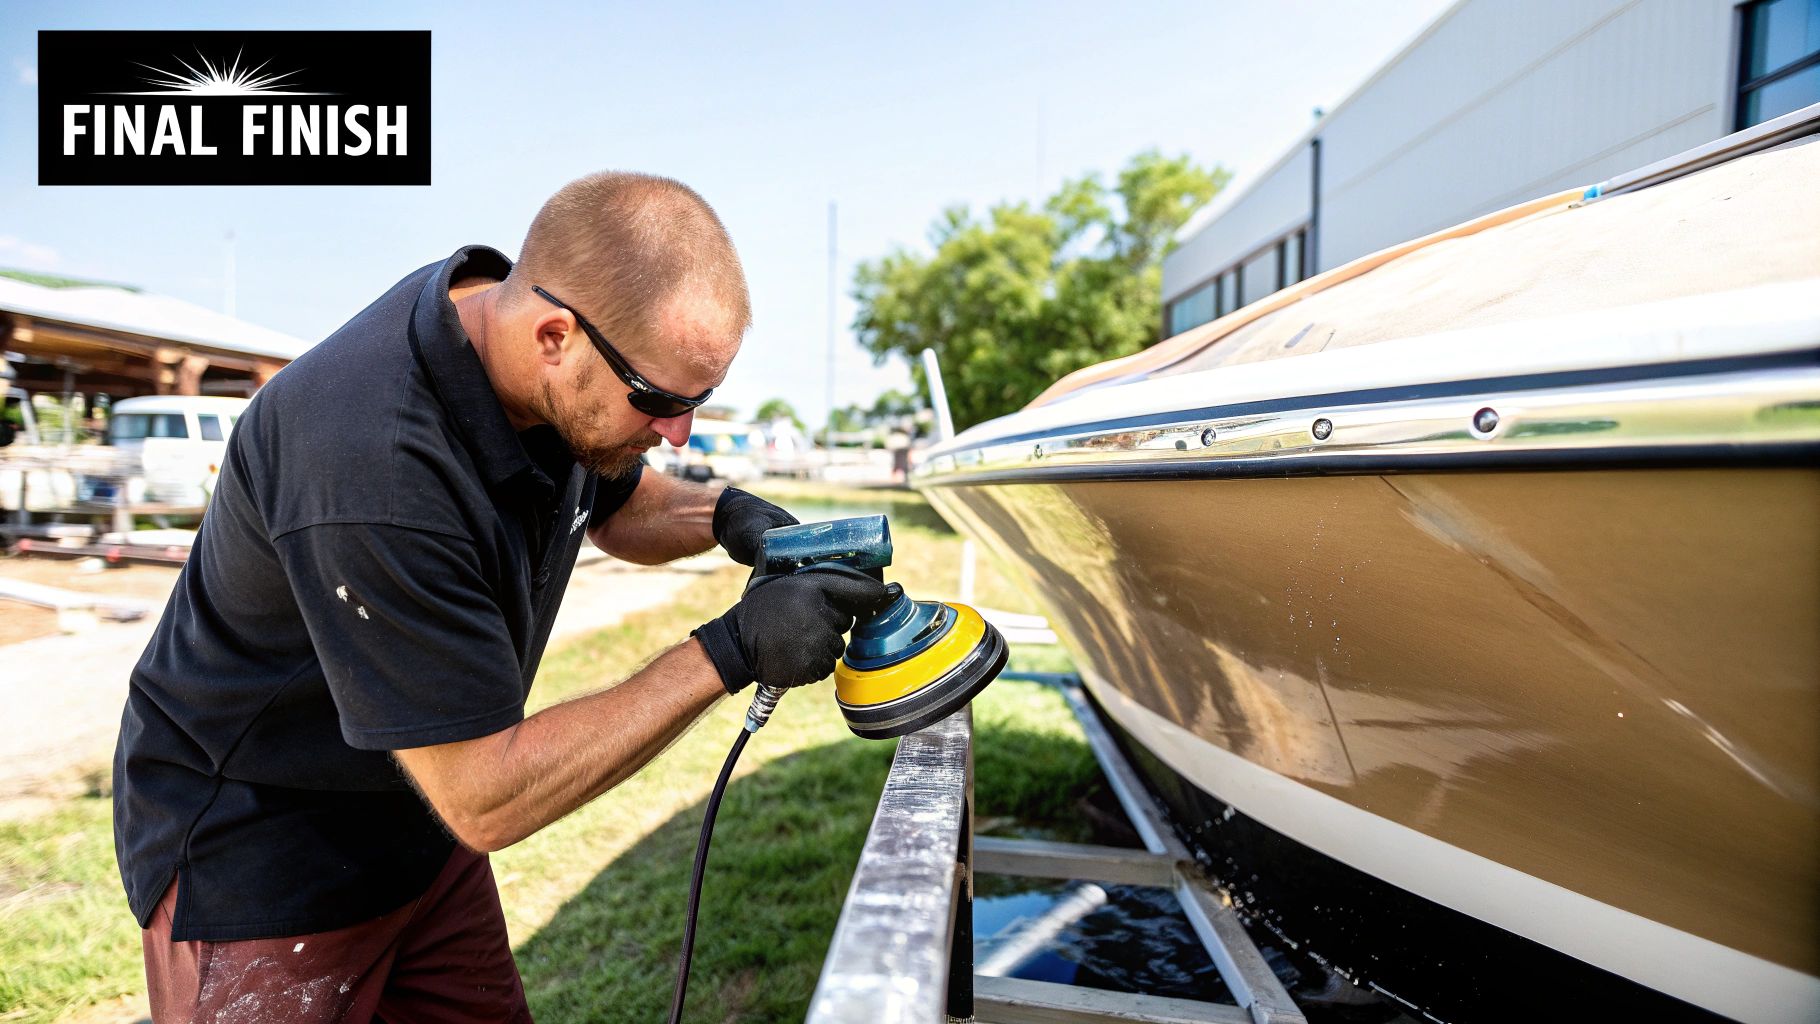
This is where the real magic happens. All that careful prep work comes down to these final steps, which will take your repair from a dull, lumpy patch to a seamless, high-gloss finish that blends right into the hull. It’s all about patience and a methodical approach.
Right after the gel coat has fully cured, it’s going to look a bit rough. You'll have a raised, uneven area, and that's perfectly normal. In fact, that excess material is exactly what you need to sand down for a perfectly flush, professional-looking result.
Leveling the Repair with Wet Sanding
Your first job is to knock down that overfilled patch so it’s completely level with the surrounding gel coat. The best way to tackle this is with wet sanding. Using water as you sand not only prevents the paper from getting clogged up with dust but also gives you a much smoother finish and is far gentler on the gel coat.
A critical tip: always wrap your sandpaper around a hard sanding block. If you just use your fingers, you’ll apply uneven pressure and end up with frustrating dips and waves in the surface. A rigid, flat block is the only way to ensure you're just taking down the high spots.
The key is to start with a coarser grit and progressively move to finer ones. Don't try to jump from 320-grit straight to 800-grit; each step is designed to smooth out the scratches from the one before it.
- Initial Leveling (320-400 Grit): Think of this as the heavy-lifting stage. Grab your 320 or 400-grit wet/dry sandpaper and get to work. Keep the area wet, use light but firm strokes, and keep going until you feel the block gliding smoothly across both the patch and the original gel coat.
- Refining the Surface (600-800 Grit): Once the repair is flush, switch over to 600-grit to erase the deeper scratches from the first pass. Follow that up with 800-grit to refine the surface even more. You'll be left with a smooth, but hazy, finish.
A great trick is to use painter's tape to mask off the area right around the repair. The moment you see the sandpaper starting to scuff the tape, you know you’re getting perfectly level with the original surface. It's a fantastic visual guide.
Bringing Back the Shine with Compounding
After you're done with the 800-grit paper, the patch will be perfectly smooth but will look dull and matte. This is where rubbing compound comes into play. A good compound is basically a very fine liquid abrasive that polishes away those tiny sanding scratches and starts to bring back the gloss.
You can do this by hand with a microfiber cloth, but for a truly professional finish, a variable-speed power buffer is your best friend. Use a wool compounding pad, add a small amount of marine-grade compound, and let the tool do the work.
Keep the buffer moving in overlapping patterns to avoid burning or overheating the gel coat. You don't need to press down hard. After a few passes, you'll see that haze disappear, replaced by a satisfying semi-gloss shine.
Polishing for That Final Mirror Finish
The last step is the polish. Polishing is a lot like compounding, but it uses an even finer abrasive to get rid of any faint swirl marks left by the compound. This is what brings out that deep, wet look that makes a repair totally invisible.
Switch to a soft foam polishing pad on your buffer, apply a quality marine polish, and work it in at a low to medium speed. As you work the polish, you’ll see the gloss get deeper and richer until it's a perfect match for the factory finish.
For a more detailed look at these final stages, our guide on how to polish a boat has you covered. And if you're really aiming for that next level, you can find some pro-level polishing techniques for a showroom shine.
Getting these finishes right is more important than ever. The global market for epoxy gelcoat—a top choice for its incredible durability and gloss—is expected to grow from USD 1.33 billion in 2025 to USD 1.81 billion by 2032. This shows just how vital these protective coatings are for keeping boats in prime condition for years to come.

Got Questions About Gel Coat Repair? You're Not Alone.
Even the most detailed guide can't cover every little thing that pops up when you're in the middle of a project. It’s one thing to read about gel coat repair; it's another to actually do it. Let's tackle some of the most common questions I hear from boat owners, so you can move forward with confidence and get that repair looking factory-fresh.
We've all been there, covered in dust and wondering if we're doing it right. These are the answers I wish I'd had when I first started.
Can I Just Put New Gel Coat Over the Old Stuff?
This is probably the most frequent question, and getting it wrong can ruin your whole day. The short answer is: it depends.
You can never apply new gel coat over paint. Period. The powerful solvents in the gel coat will attack the paint, causing it to bubble up and peel away. It'll be a gooey mess, and your repair will fail.
Now, if you're going over an old gel coat finish, you can do it, but prep is everything. You have to be absolutely sure the surface is stripped of all wax, squeaky clean, and sanded aggressively (think 80-grit) to give the new gel coat something to bite into.
That said, for a proper structural repair of a gouge or crack, you should always grind out the damaged material right down to the bare fiberglass. This creates the strongest possible bond and ensures the repair will last as long as the boat.
What's the Deal with Gel Coat With and Without Wax?
This is a big one, and it's all about how gel coat cures. Gel coat is an anaerobic resin, which is a fancy way of saying it needs to be cut off from oxygen to harden properly. The wax is how we do that.
-
Gel Coat WITH Wax: This is your finishing coat. It has paraffin wax mixed right in. As the gel coat starts to set, that wax floats to the top and forms a thin, airtight film. This barrier blocks the oxygen, allowing the resin underneath to achieve a hard, tack-free cure.
-
Gel Coat WITHOUT Wax: People often call this "laminating gel coat." It's designed to stay slightly sticky on the surface, even after it has cured. Why? That tackiness allows the next layer of fiberglass or gel coat to form a powerful chemical bond, which is perfect when you're building up a deep repair in several layers.
Pro Tip: If you find yourself with only non-waxed gel coat for a final coat, don't panic. You can still force a full cure by sealing it from the air yourself. A spray-on PVA (polyvinyl alcohol) release agent is the professional choice, but even a smooth, taped-down piece of plastic wrap or Mylar sheeting will do the trick in a pinch.
How Long Until I Can Actually Sand This Stuff?
Patience is a virtue, especially with gel coat. The cure time isn't set in stone; it's a moving target based on the temperature, humidity, and how much catalyst (MEKP) you mixed in.
On a warm, dry day, your repair might feel hard to the touch in just a few hours. Don't be fooled! It’s not ready for sanding yet. If you jump the gun, you'll just clog your sandpaper and risk tearing up the soft surface.
As a rule of thumb, give it a solid 24 hours before you even think about starting your finishing work. A full, rock-hard cure at the molecular level can actually take a few days, so rushing it is one of the easiest ways to mess up a perfectly good application. Always defer to the manufacturer's instructions on the can.
For every scratch, chip, and gouge, having the right products makes all the difference. Better Boat provides a complete lineup of marine-grade repair and maintenance supplies designed to deliver professional results with ease. Equip yourself for a flawless gel coat repair by visiting https://www.betterboat.com.


