 Skip to content

How to Repair Skeg on Outboard Motor A DIY Guide
Ignoring a bent or chipped skeg might feel like a problem for another day, but it's a mistake that can cost you dearly. Getting that repair skeg on outboard motor job done quickly is one of the smartest things you can do to protect your propeller, keep your steering true, and prevent a much bigger, more expensive failure in your lower unit.
That simple fin isn't just for looks—it's the bodyguard for your entire propulsion system.
Why That Damaged Skeg Can't Be Ignored
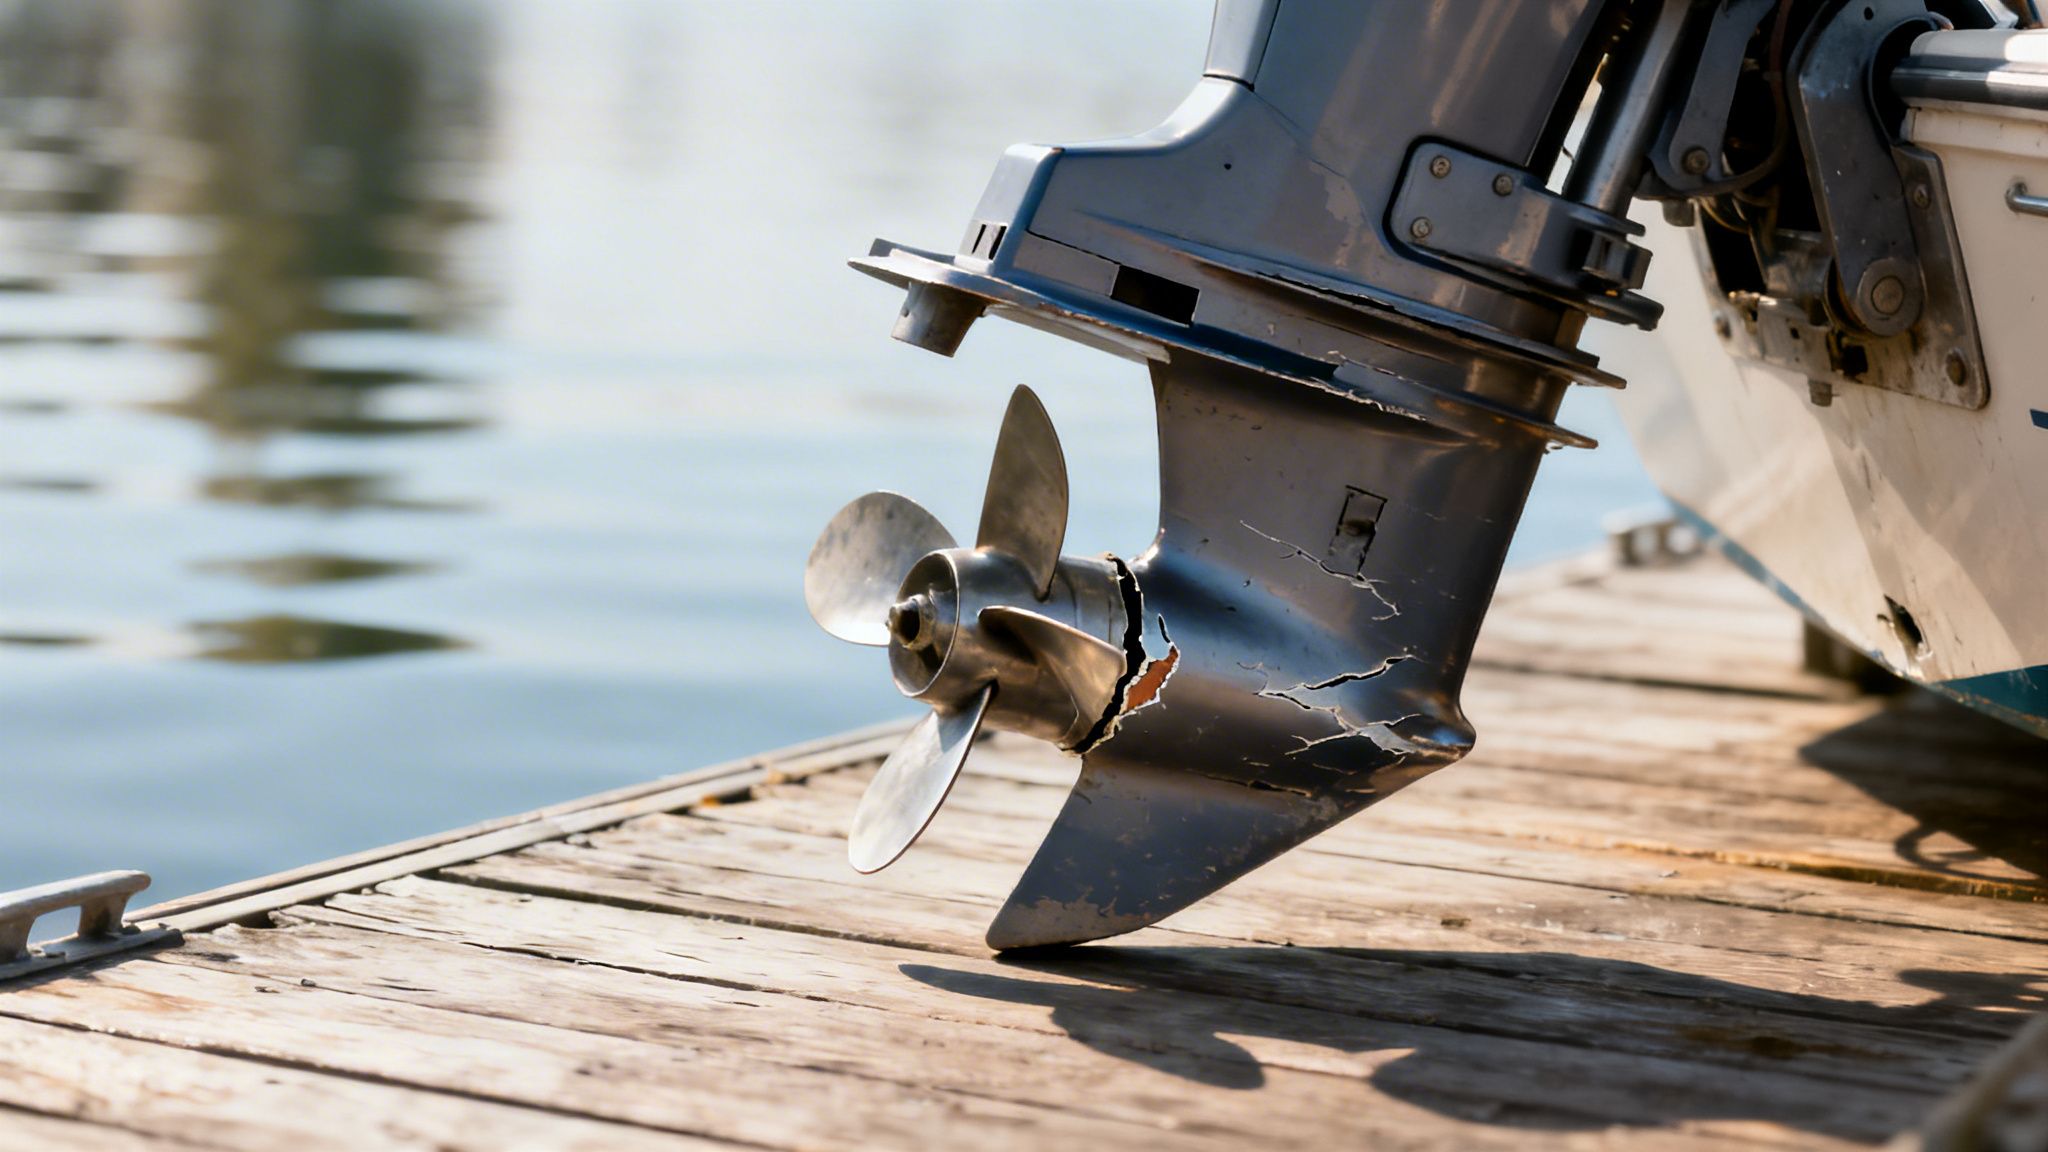
That scrape or bend on your outboard's skeg is way more than a cosmetic flaw. You have to think of the skeg as the unsung hero of your lower unit. Its main gig is to act like a rudder, giving you directional stability and stopping your boat from sliding sideways when you're carving through a turn. Without a straight and true skeg, your boat's handling gets sloppy and unpredictable, something you'll really notice at lower speeds.
Its other, and maybe even more important, job is to be the first line of defense for your expensive propeller. When you're poking around in the shallows or easing up to a ramp, the skeg is designed to take the hit from rocks, stumps, or sandbars.
It's a sacrificial part, built to bend or break before that impact force can wreck your prop shaft or, even worse, crack the entire gearcase housing.
Understanding the Risks of a Compromised Skeg
Running your boat with a busted-up skeg opens the door to a bunch of risks that can quickly snowball from a minor annoyance into a catastrophic mechanical failure. Even a slight bend can mess up the clean flow of water to your propeller, leading to cavitation or "prop slip."
This creates a whole host of problems:
- Poor Performance: Your boat will have a tough time getting on plane, you'll lose that top-end speed, and you’ll burn through a lot more fuel.
- Handling Issues: Steering will feel mushy and less responsive. You might even feel a constant pull to one side as you're cruising.
- Increased Vibration: An out-of-line skeg creates vibrations that run right through the lower unit, putting a ton of stress on your seals, bearings, and gears.
A damaged skeg isn't a "maybe" problem; it's happening right now. Every trip you take with a compromised skeg is a gamble, increasing the odds of a more severe and costly failure. Staying on top of things is everything, and you can find more great tips in our comprehensive guide to outboard motor maintenance.
Assessing the Severity of the Damage
Skeg damage is incredibly common. In fact, marine industry surveys show that it impacts up to 25% of all recreational boats every single year. Here in North America, which accounts for over 40% of the massive US$5.349 billion global outboard market, fixing skegs is a daily job in boatyards from coast to coast.
The damage usually falls into one of three buckets:
- Minor Scrapes and Chips: These are mostly cosmetic, but they scrape away the protective paint and expose the raw aluminum to corrosion.
- Bent Skeg: This is a bigger deal. A bent skeg will absolutely affect your boat's handling and can cause vibrations that slowly destroy internal components.
- Broken or Missing Sections: This is the most serious damage. It leaves your propeller almost completely naked and vulnerable to the next thing you hit.
I've put together a quick table to help you figure out what you're dealing with.
Skeg Damage Assessment Guide
Use this quick reference table to diagnose your skeg damage and determine the best course of action.
| Damage Level | Visual Cues | On-Water Impact | Recommended Action |
|---|---|---|---|
| Minor (Chips/Scrapes) | Small nicks, paint missing, rough edges, less than 1/2" of material gone. | None to negligible. You likely won't feel any difference in performance. | File smooth, apply primer and matching paint to prevent corrosion. Easy DIY fix. |
| Moderate (Bent) | Skeg is visibly bent to one side. No cracks are visible near the base. | Noticeable pull in steering, potential vibration, difficulty getting on plane. | Can often be straightened with heat and pressure. DIY is possible but tricky. |
| Severe (Broken) | A significant piece is missing (more than 1"), or cracks are visible. | Poor handling, severe vibration, high risk of propeller damage on next impact. | Welding a new piece on, installing a bolt-on skeg guard, or lower unit replacement. |
Usually, a quick visual inspection is all you need to figure out how bad it is. If you spot any cracks creeping up toward the gearcase or see that a big chunk of the skeg is gone, that's your sign to take immediate action. Ignoring it is like driving a car with a wheel that's about to fall off—it’s only going to lead to bigger, more expensive problems.
Your Essential Skeg Repair Toolkit
Trying to tackle a skeg repair without the right tools is like navigating a channel without a chart—you might get somewhere, but you're setting yourself up for a lot of frustration and a lousy outcome. Getting everything you need laid out beforehand is the key to making the job go smoothly. A well-prepped workspace is the first step to a fix that’s strong, durable, and looks like a pro did it.
Before you even think about picking up a grinder, let's talk safety. You're going to be working with heat, chemicals, and tools that can send metal flying. Respect them. At the absolute minimum, you need high-impact safety glasses or goggles and a solid pair of work gloves. Don't be a hero; an emergency room visit is a guaranteed way to ruin your weekend.
Tools for Preparation and Cleaning
The strength of any repair, especially one involving epoxy, is 100% dependent on how well you prep the surface. If that aluminum isn't perfectly clean and scuffed up, your filler won't stick, and all your hard work will be for nothing. Trust me, a contaminated surface is the number one reason these repairs fail.
Here’s what your cleaning arsenal should look like:
- A High-Quality Degreaser: You’ve got to cut through years of oil, exhaust grime, and whatever else is caked on there.
- Stiff Wire Brush: This is your first pass for scrubbing away loose paint, barnacles, and any crusty oxidation.
- Angle Grinder with Sanding Disc: Essential for grinding down to clean, bare metal. This also creates the rough texture epoxy needs to get a death grip.
- Acetone or Denatured Alcohol: This is for the final wipe-down right before you apply anything, ensuring no oils or dust remain.
To get the best possible starting point, we always begin the prep with our Better Boat Boat Soap. It's formulated to power through the gunk, giving you a pristine surface to work with. A clean foundation is simply non-negotiable.

Tools for Shaping and Repairing
Okay, with the skeg all prepped, it's time for the actual repair. The tools you grab next depend on whether you're straightening a bend or rebuilding a missing chunk.
If you're just dealing with a bent skeg, these are your go-to tools:
- Propane or MAPP Gas Torch: A little localized heat makes the aluminum workable and keeps it from cracking when you start persuading it back into shape.
- Heavy Hammer or Mallet: Use this for gentle, persuasive taps to nudge the skeg back into alignment.
- Block of Wood: Always put this between the hammer and the skeg. It distributes the force and prevents you from denting or marring the metal.
Pro Tip: Don't get crazy with the heat. You want the aluminum hot enough to be malleable, but not glowing red. A good trick is to heat the area until a drop of water sizzles and vanishes instantly.
If a piece of your skeg is missing in action, you're going to be rebuilding it. For this job, our Better Boat Instant Hull Cleaner is the perfect solution. It’s a high-strength, waterproof, and sandable two-part epoxy built for the tough marine world. It bonds like crazy to properly prepped aluminum, letting you sculpt the skeg back to its original hydrodynamic shape.
Final Finishing Supplies
Once the structural work is done, it's time to make it look good and protect it from corrosion. This is the home stretch.
You'll need a few last items:
- Files and Sandpaper (various grits): Use these to shape the cured epoxy and feather the edges so the repair is completely seamless.
- Marine-Grade Metal Primer: This is critical. It prevents corrosion and gives the topcoat of paint something to really stick to.
- Color-Matched Outboard Motor Spray Paint: Find the right color for your engine brand to make the repair totally disappear.
Having this full kit ready to go turns what seems like a daunting job into a manageable and seriously rewarding project. For a deeper dive into other must-have gear, check out our guide on essential boat tools to keep aboard.
Matching Your Repair Method to the Damage
Not all skeg damage is created equal. A small bend from a soft grounding is a world away from a big chunk missing after a run-in with a rock pile. Choosing the right repair is the most critical decision you'll make, and trying to force the wrong fix is a surefire way to make things worse.
The whole point here is to restore the skeg's hydrodynamic function, not just make it look pretty. Getting this right is a smart investment in your outboard's performance, steering stability, and overall longevity.
Handling a Bent Skeg
A bent skeg is probably the most common damage you'll see. The good news? If there are no cracks, especially up near the gearcase, you can often straighten it yourself with a little heat and a lot of patience. Aluminum has a memory, but it hates being bent cold—that’s how you turn a simple bend into a fracture.
The trick is to apply just enough localized heat to make the metal pliable. A simple propane or MAPP gas torch will do the job.
- Heat Application: You're not trying to get it glowing red hot. Gently sweep the flame over the thickest part of the bend until a drop of water sizzles and evaporates instantly. That’s your sweet spot.
- The Right Tools: You'll want a heavy hammer and a solid block of wood. Never, ever hit the skeg directly with the hammer. You'll just dent and mar the surface. The wood block is your best friend here, as it distributes the force of the blow evenly.
- Gentle Persuasion: With the wood block held firmly against the bend, use controlled taps with the hammer to gradually nudge the skeg back into alignment. Use a straightedge to check your progress constantly. Rushing this step is how you overcorrect and create a new problem.
This method really requires a delicate touch. Too much force will crack the metal, but too little won't get you anywhere. Patience is key.
Rebuilding with Marine Epoxy for Chips and Cracks
What if you're dealing with missing pieces, deep gouges, or small cracks that aren't a structural threat? This is where a high-quality, marine-grade epoxy filler shines. It’s a fantastic way to restore the skeg's original profile without firing up a welder.
Our Better Boat Instant Hull Cleaner is purpose-built for this kind of repair. It’s a two-part system that creates a waterproof, sandable, and incredibly tough material that bonds like crazy to properly prepped aluminum.
The process is pretty straightforward. You'll build a temporary mold around the damaged area using cardboard and tape, mix the epoxy, and press it firmly into the void. The trick is to overfill it just a bit. Once the epoxy has cured to the consistency of hard soap—firm but not rock-hard—you can easily carve and shape it with a file. This is way easier than trying to sand down fully cured, rock-hard epoxy.
When you repair a skeg on an outboard motor, especially with epoxy, you're not just patching a hole. You are restoring the precise hydrodynamic shape that dictates how your boat handles. A lumpy or misshapen repair will create turbulence and negatively impact performance.
DIY Repair Method Comparison
To help you pick the best approach for your situation, here's a quick comparison of the main DIY repair methods. This table should make it easier to select the best fit for your damage type, budget, and skill set.
| Repair Method | Ideal For | Skill Level | Typical Cost | Key Supplies |
|---|---|---|---|---|
| Straightening | Minor to moderate bends without cracks | Beginner | $20 - $50 | Propane/MAPP torch, heavy hammer, wood block, straightedge |
| Epoxy/Filler | Chips, gouges, small cracks, missing pieces | Intermediate | $40 - $75 | Marine epoxy, sandpaper, files, mold material (cardboard/tape) |
| Skeg Guard | Major breaks, large missing sections, previous failed repairs | Beginner | $60 - $120 | Skeg guard kit, power drill, basic hand tools |
Ultimately, the goal is to choose a repair that not only fixes the visible damage but also restores the skeg's strength and function for the long haul.
Addressing Major Breaks The Skeg Guard Solution
If a big piece of your skeg is just gone, or if you have a deep crack running up toward the gearcase, you're looking at a more serious problem. Professional welding is an option, but it can be pricey, and finding a welder who's truly skilled with cast aluminum can be a challenge. A much more practical and robust DIY solution is a bolt-on skeg guard.
Think of a skeg guard as a thick, stainless-steel shield that fits right over what's left of your original skeg. It doesn't just replace the missing material; it armors the most vulnerable part of your lower unit against future impacts.
Installation is surprisingly easy:
- File down any jagged edges on the broken skeg.
- Slide the skeg guard over the remaining portion.
- Drill holes through the skeg using the guard itself as your template.
- Secure it with the stainless steel hardware that comes in the kit.
This fix is often stronger than the original skeg and can be done in less than an hour. It’s a fantastic choice if you frequent shallow or rocky waters. When you're considering your options, especially if a full replacement is on the table, knowing how to approach evaluating replacement part quality is a crucial skill.
Making the right choice is also a sound financial decision. Skegs fail in roughly 18% of outboard incidents logged by the US Coast Guard, and groundings account for a staggering 35% of all propulsion failures. A proper fix is vital, especially since North America holds the largest market share at over 35%, and keeping your motor in top shape helps maintain its value. You can discover more insights about the outboard motor market on mordorintelligence.com to see why these repairs matter in the bigger picture.
A Practical Guide to Epoxy Skeg Repair
When you've had a nasty run-in with a submerged rock and taken a chunk out of your skeg, rebuilding it with marine-grade epoxy is one of the best and most approachable DIY fixes out there.
This isn't just about slapping some filler on; it's about carefully restoring the skeg's hydrodynamic shape, which is critical for proper steering and overall performance. A well-done epoxy repair is incredibly strong, sands down beautifully, and once you've painted it, you'll never even know it was damaged.
The key to a long-lasting repair of a skeg on an outboard motor is all in the prep work. If you leave behind any grease, oil, or even a hint of oxidation on the aluminum, the epoxy simply won't get a permanent grip. This will lead to a failed repair down the road. This is the one part of the job you absolutely cannot rush—take your time here, and it'll pay off.
This diagram shows the usual approaches for different kinds of skeg damage, from a simple bend to a more serious break.
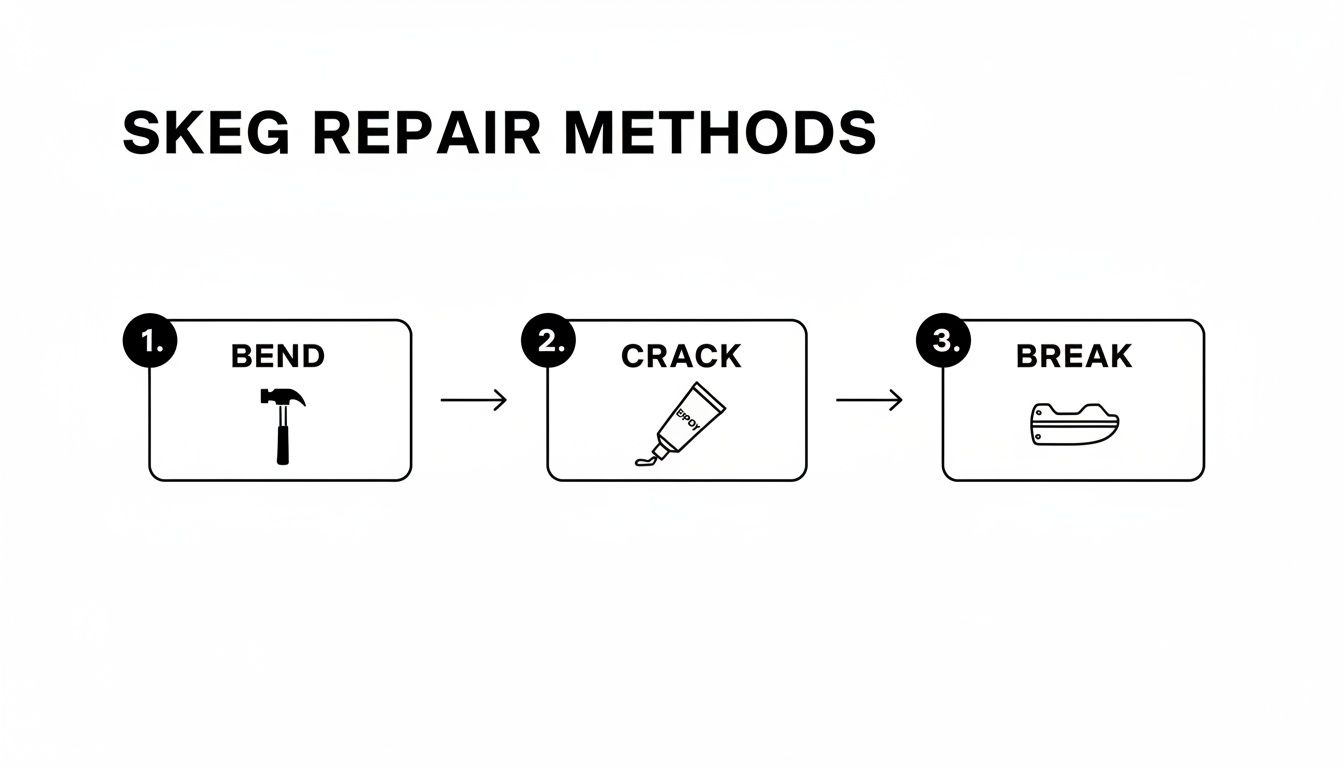
As you can see, the fix directly relates to how bad the damage is. You can go from a simple mechanical fix for a bend all the way to a full rebuild for chips and cracks.
Step 1: Thorough Preparation and Cleaning
First things first, give that entire lower unit a serious cleaning. You have to get rid of every bit of grease, algae, and grime that could mess up your repair area. For this critical step, our Better Boat Boat Soap is the perfect tool for the job, designed to cut right through that tough marine gunk without leaving any film behind.
With the skeg clean and completely dry, it's time to get down to bare metal. Grab an angle grinder with a flap disc or a coarse sanding disc and carefully grind away the paint around the damaged section. You're aiming for a clean, bright metal surface that extends at least an inch past the break. Bevel the edges of the broken piece to create a "V" groove. This little trick massively increases the surface area for the epoxy to grab onto.
Just before you mix your filler, wipe the entire area down with acetone or denatured alcohol on a clean rag. This removes any final traces of dust or oil.
Step 2: Building a Form and Applying Epoxy
To get that original skeg shape back, you'll need to make a temporary mold. A piece of cardboard covered in clear packing tape is a classic, effective solution—epoxy won't stick to the tape. Cut the cardboard to match the skeg's original profile and tape it on securely, creating a little dam to hold the epoxy in place.
Now it's time to mix the filler. Our Better Boat Instant Hull Cleaner is a two-part system made for exactly this kind of work. Mix the resin and hardener exactly as the directions say, making sure it’s one consistent color.
Using a putty knife, really press the epoxy into the damaged area. You want to force out any potential air pockets. Overfill the form just slightly; this gives you extra material to work with when you start shaping.
Pro Tip: Don't wait until the epoxy is rock-hard to start shaping it. After a few hours (depending on the temperature), the epoxy will hit a "green" stage. It's firm but can still be easily carved with a Surform file or a sharp utility knife. Doing this now will save you a ton of sanding later on.
Step 3: Shaping and Finishing Your Repair
Once the epoxy has partially cured, you can peel off the cardboard form. This is where the artistry comes in—shaping the filler to match the skeg's original hydrodynamic contours. Start with a rasp or file for the rough shaping, and keep checking your work against the undamaged side of the skeg to get the profile right.
After you've got the basic shape down, let the epoxy fully cure for about 24 hours. Now, switch to sandpaper. Start with a coarse grit like 80-grit and work your way up to finer grits, finishing with something around 220-grit for a perfectly smooth surface. Feather the edges of the repair into the surrounding metal until you can't feel the transition with your fingers. For a deeper dive into working with these materials, you can check out our guide on epoxy and fiberglass repair.
A proper repair here is more important than you might think. Damaged skegs are a factor in 22% of all lower unit rebuilds worldwide. Even a slightly bent skeg can increase vibration by up to 30%, which causes accelerated wear on your gears.
A solid DIY repair using quality cleaners and epoxy can restore up to 95% of the skeg's original strength. This kind of proactive fix can actually extend your motor's life by 25-40%. That final bit of attention to detail ensures your repair isn't just strong—it actually improves how your boat runs.
Finishing and Protecting Your Skeg Repair
Getting the structural part of your skeg repair done feels great, but don't call it a day just yet. The final steps—sanding, painting, and protecting—are what really separate a functional fix from a professional-grade repair that will actually last. This is where you make it look like it never happened, and more importantly, where you protect it from the harsh marine environment.
It’s tempting to rush this stage, but proper finishing is your best defense against saltwater, abrasion, and algae. All that hard work shaping and filling can be undone by corrosion if you don't seal it up right.
Achieving a Seamless Finish with Sanding and Priming
Your first goal here is to make the repair area disappear. You should have already done most of the heavy sanding while shaping the epoxy, but now it's time for the finesse work. Grab some 220-grit sandpaper and then move to a 320-grit to knock down any last scratches or high spots. You’re aiming for a surface that’s perfectly smooth to the touch, where the repair feathers invisibly into the original metal.
Once it feels right, give the whole lower unit a final, thorough wipe-down with acetone or a good degreaser. You want to get every last bit of sanding dust off before you even think about picking up a can of primer.
Whatever you do, don't skip the primer. It’s the glue that holds everything together, creating a tenacious bond between the bare metal, the epoxy filler, and your topcoat. A quality self-etching marine primer is your best bet, as it chemically bites into the aluminum for incredible adhesion and corrosion resistance.
Lay down two or three light, even coats. Don't rush it. Let each one dry according to the can's instructions. This builds the tough foundation your paint job needs.
Painting for Protection and Aesthetics
After the primer has fully cured, it’s paint time. This is what brings the visual part of the repair home. To get that factory look, you really need to use color-matched spray paint from your outboard's manufacturer. It's formulated to match perfectly, making your repair skeg on outboard motor practically undetectable.
The trick is to apply several thin coats instead of one heavy one. A thick coat will just run and drip, creating more work for you. Hold the can about 10-12 inches away from the skeg and use a steady, sweeping motion.
Let each coat get a little tacky before you hit it with the next one. For an extra layer of durability and gloss, a clear coat is a great final step. If you want to dive deeper into that, we have a whole article on clear coating a boat.
Long-Term Protection Strategies
Your skeg is now repaired, painted, and ready for the water. But if you’re like me and tend to find shallow spots and hidden stumps, you might want to think about adding some armor for the future.
Here are a couple of solid options to future-proof your work:
- Install a Skeg Guard: Think of this as a helmet for your skeg. It's a stainless steel shield that slips right over your new repair. It takes the brunt of any future impacts, protecting both your handiwork and the paint job.
- Apply a Protective Coating: For the ultimate defense, a marine ceramic coating creates an incredibly hard, slick surface. It's way tougher than paint alone and does a fantastic job resisting scratches, marine growth, and corrosion.
By taking these finishing steps seriously, you're not just making your skeg look good—you're ensuring the repair holds up, keeping your outboard in top shape for many seasons to come.
Common Skeg Repair Questions Answered
Even after a step-by-step walkthrough, it's totally normal to have a few questions rolling around in your head. Every boat is different, and every rock you hit leaves its own unique signature. Getting clear answers to the most common questions can give you the confidence to get the job done right.
Think of this as your final pre-flight check before you get your hands dirty.
Can I Use My Boat with a Slightly Damaged Skeg?
You technically can, but it’s a really bad idea. That "minor" bend or chip completely messes up the clean flow of water past your lower unit. You'll feel it in the boat's handling, especially at low speeds, and you might notice the propeller ventilating or "blowing out" more easily.
Even a small chip that exposes the raw aluminum is like an open invitation for corrosion to set in. Trust me, ignoring a small problem now almost always guarantees a bigger, more expensive one down the road. It's always best to tackle skeg damage as soon as you spot it.
Is an Epoxy Repair as Strong as the Original Skeg?
A top-shelf marine epoxy, like our Better Boat Instant Hull Cleaner, creates a rock-solid repair that brings the skeg's crucial hydrodynamic shape back to life. But is it as strong as the original cast aluminum if you hit another rock at speed? No, and that's actually the point.
The repaired section is designed to be sacrificial. It's far better for a chunk of epoxy to break away on impact than for that force to transfer up the skeg and crack your expensive gearcase.
The real job of an epoxy repair is to restore the shape for proper handling and to shield your propeller from damage. For the most common chips and chunks missing, it does that job perfectly. It's a proven and reliable fix you can count on.
How Do I Know if the Damage Is Too Severe for DIY?
Knowing when to put the tools down and call a pro is one of the smartest things a boat owner can do. If you see any of the following, it's time to get a certified marine technician involved:
- A visible crack that runs from the skeg up into the main gearcase housing itself. This is a big red flag.
- The skeg is bent at a gnarly angle, typically anything more than 30 degrees.
- More than half of the skeg is just gone.
These are not DIY jobs. They demand professional welding, special jigs for alignment, and pressure testing to make sure the lower unit is still sealed and structurally sound. Trying to patch up damage this bad yourself is a gamble that could lead to catastrophic failure on the water.
What's the Difference Between a Skeg Guard and an Epoxy Repair?
A skeg guard and an epoxy repair tackle the same problem from different angles. A skeg guard is basically a suit of armor—a thick stainless steel cover that bolts right over your existing (and often busted) skeg. It's a fantastic, quick, and super-durable fix, especially if a good chunk of your skeg is already missing.
An epoxy repair, on the other hand, is about rebuilding. You're sculpting the skeg back to its factory shape using a powerful filler. This is the perfect solution for smaller chips, gouges, and missing pieces where the main structure is still in decent shape.
For boaters who spend a lot of time in shallow, tricky waters, a combination of the two is the ultimate protection: rebuild the shape with epoxy, then bolt on a skeg guard for maximum defense.
Here at Better Boat, our goal is to help you take on these projects with total confidence. Our marine-grade products, from our heavy-duty Boat Soap for perfect prep work to our reliable Better Boat Instant Hull Cleaner for lasting repairs, are made to give the DIY boater professional-level results. Get yourself set up for success by checking out our full lineup of maintenance solutions at https://www.betterboat.com.