


Gel Coat Painting Your Boat for a Professional Finish
Applying a fresh coat of gelcoat is about much more than just a cosmetic touch-up; it's one of the most important things you can do to protect your boat's fiberglass hull from the harsh marine environment. This durable layer is your first line of defense against UV radiation and water intrusion, preserving the structural integrity of your vessel for years to come.
Why Gel Coat Painting Is a Crucial Skill
That brilliant, glossy finish you see on a boat isn't just paint. It’s actually a thick, tough layer of specialized polyester resin that shields the fiberglass laminate underneath. Without a healthy gelcoat, your boat is exposed to some seriously expensive problems.
Think of it as your boat's skin. Over time, constant exposure to sun, saltwater, and weather can cause it to fade, get chalky, and develop those dreaded spider cracks. While these might seem like small cosmetic issues at first, they're often the first warning signs of bigger trouble ahead.
The Real Dangers of Neglected Gelcoat
Letting a worn-out gelcoat go can lead to a nightmare scenario for any boat owner: osmosis. This happens when water seeps through the compromised gelcoat and gets trapped in the fiberglass laminate, forming blisters that can eventually cause the hull's layers to separate (delamination). Fixing osmosis is a massive and costly job, often requiring the entire hull to be stripped, dried out for months, and completely refinished.
Getting ahead of these issues with proper gelcoat maintenance is a proactive step that pays off in a big way. Here’s what you get for your effort:
- Structural Protection: A fresh coat of gelcoat seals the fiberglass, stopping water from getting in and protecting against UV rays that weaken the hull structure over time.
- Enhanced Durability: Gelcoat is incredibly hard and resists scratches and dings far better than typical marine paint. It's built for the boating life.
- Improved Resale Value: A boat with a pristine, glossy finish doesn't just look better—it commands a higher price and attracts buyers who know what they're looking for.
- Restored Appearance: Nothing brings an older boat back to life quite like a fresh, gleaming gelcoat finish. It can honestly look like it just rolled out of the factory.
Taking on a gelcoat project yourself might feel like a huge undertaking, but it’s an incredibly rewarding and totally achievable DIY task. You’ll save a ton of money compared to hiring a pro, and you'll gain a much deeper understanding of how to care for your vessel.
This guide is here to cut through the confusion and break the process down into simple, actionable steps. We'll walk you through everything, from figuring out what kind of shape your hull is in to laying down that final, perfect coat. By the time you're done, you'll have the skills and confidence to get a professional-quality finish that protects your investment and keeps your boat looking sharp.
To get a better handle on the basics, you might be interested in learning more about what gelcoat is and why it's so important for your boat in our detailed article.
Assessing Your Project and Gathering the Right Gear
Before you even think about cracking open a can of gelcoat, the success of your whole project comes down to one thing: an honest, thorough look at your boat's current condition. A beautiful finish is only as good as the foundation it's on, and that means you need to know exactly what you’re dealing with.
Start by giving your boat a good, complete wash. Use a quality marine boat soap to scrub away all the salt, grime, and general dock crud. This isn't just about cleaning; it's about revealing the true state of the gelcoat hiding underneath.
Once she’s clean and dry, walk around the entire boat. Do this in different lighting conditions—the morning sun can reveal flaws that afternoon shade might hide. Look for those dull, chalky areas that scream oxidation. A quick test? Run your hand over the surface. If you come away with a powdery residue, you’ve got significant oxidation to tackle.
Next, get your eyes peeled for those fine, web-like patterns known as spider cracks. They’re usually just cosmetic but can sometimes point to underlying stress in the fiberglass.
You’ll also want to hunt for deeper issues. Blisters can be a sign of osmosis, a problem you can't just paint over. Even more serious is delamination, where the gelcoat is lifting or separating from the fiberglass below. These are not simple cosmetic flaws; they're structural red flags that demand serious repair before you can even think about applying new gelcoat.
Distinguishing Minor Flaws From Major Problems
It's absolutely critical to know what you can fix with some sanding and fresh gelcoat versus what needs a much more serious, structural approach.
- Cosmetic Issues: Think light oxidation, minor scuffs and scratches, and those surface-level spider cracks. These are the kinds of things you can typically handle with some aggressive sanding followed by a new gelcoat application.
- Structural Issues: Delamination, deep gouges that expose the raw fiberglass mat, and widespread blistering are in a different league. These point to problems that go way beyond the surface. They must be properly repaired, often involving grinding out the bad spots and filling with an epoxy sealant, before you move forward.
Pro Tip: Grab a screwdriver and gently tap suspect areas with the plastic handle. A sharp, solid sound is what you want to hear—that’s healthy fiberglass. If you get a dull thud, that’s a classic sign of delamination or a void underneath that needs immediate attention.
At its core, gelcoat is a specialized, high-performance product, often formulated from a durable synthetic compound much like a typical polyester resin kit. This is what gives it far superior protective qualities compared to regular paint, and it’s why choosing the right materials for the job is so important.
Your Essential Gel Coat Painting Gear Checklist
With a clear picture of the job ahead, it's time to gear up. Trust me, having everything you need within arm's reach before you start mixing is the key to a stress-free project.
The global gelcoat market, valued at USD 981.28 million in 2024, is expected to hit USD 1,403.74 million by 2030. That’s no surprise—it’s the stuff that protects our investments from harsh UV rays and corrosive saltwater. This growth just underscores how critical these materials are, so think of buying quality products as an investment in your boat’s future. You can see more findings on the expanding gelcoat market to understand the industry trends.
To get organized, let's break down everything you’ll need into the different stages of the project.
Essential Gear Checklist for Your Gel Coat Project
Here’s a complete list of all the tools and materials you'll need to get the job done right, from start to finish. Having this stuff ready to go will make the whole process smoother and help you achieve a professional-looking result.
| Phase | Essential Item | What It's For & Key Features | Recommended Product Link |
|---|---|---|---|
| Preparation & Safety | Personal Protective Equipment (PPE) | Respirator, safety glasses, nitrile gloves. This is non-negotiable. | Safety Gear Set |
| Preparation & Safety | Cleaning Supplies | Quality boat soap, buckets, scrub brushes. For removing surface contaminants. | Boat Soap |
| Preparation & Safety | Masking Materials | Marine painter's tape and plastic sheeting. Protects trim, hardware, and non-target areas. | 3M Marine Tape |
| Preparation & Safety | Sanding Tools & Paper | Orbital sander, sanding blocks, and grits from 80 to 320. For stripping old gelcoat and feathering edges. | Orbital Sander |
| Application | Marine-Grade Gelcoat | Choose "laminating" (unwaxed) for initial coats and "finishing" (waxed) for the final coat. | TotalBoat Gelcoat |
| Application | Catalyst (MEKP) | Methyl Ethyl Ketone Peroxide. The hardener for the gelcoat, requires precise mixing. | MEKP Catalyst |
| Application | Mixing Supplies | Graduated mixing cups, stir sticks, and acetone for cleanup. | Mixing Cup Set |
| Application | Application Tools | Quality solvent-resistant brushes, foam rollers, or an HVLP spray gun. | HVLP Spray Gun |
| Finishing | Wet Sandpaper | A progression of fine grits: 400, 600, 800, 1200, 2000. For a glass-smooth finish. | Wet/Dry Sandpaper Assortment |
| Finishing | Polishing Compound & Buffer | A variable-speed polisher with wool pads is best for bringing out the shine. | Marine Polishing Compound |
| Finishing | Finishing Polish & Wax | A high-quality polish and a durable marine wax to protect your new finish. | Marine Wax |
With this checklist, you can be confident you have everything required to tackle your gelcoat project like a pro. Preparation is half the battle, and being well-equipped is a massive step in the right direction.
Mastering the Art of Surface Preparation
Talk to any seasoned marine pro, and they'll tell you the same thing: a flawless gelcoat job is 80% preparation and only 20% application. This is the stage where you earn that mirror-like finish. Cutting corners here is the fastest way to a failed project, so let's walk through how to get the surface perfectly dialed in for its new protective layer.
It all starts with a deep, thorough cleaning. You've got to strip away years of built-up wax, oils, grime, and other hidden contaminants that will absolutely prevent the new gelcoat from getting a solid grip.
Grab a powerful marine boat soap and put some real elbow grease into scrubbing every inch of the project area. This first wash is what reveals the true condition of the surface you’re dealing with.
The Foundation of a Flawless Finish: Sanding
Once the hull is clean and bone-dry, it's time for the most critical part of the whole prep phase: sanding. The goal isn't just to scuff things up. You're physically removing the damaged, oxidized top layer of old gelcoat to create a uniform texture for the new coat to bite into.
Your choice of sandpaper grit is crucial here, and it all depends on the current state of your hull.
- For heavy oxidation and minor scratches: Start with a more aggressive 80-grit sandpaper on an orbital sander. This will chew through that chalky, faded layer in no time.
- For moderate wear or after the first pass: Step down to a 120-grit to smooth out the deeper scratches the 80-grit paper left behind.
- For the final preparation pass: Finish up with 220-grit. This creates the perfect surface profile—smooth to the touch, but with just enough "tooth" for the new gelcoat to adhere tenaciously.
And please, always wear a high-quality respirator during this stage. Sanding gelcoat kicks up a fine cloud of fiberglass and resin dust you do not want to be breathing. Safety glasses and gloves are non-negotiable, too.
Repairing Cracks and Voids
As you sand, you’ll almost certainly uncover deeper issues like spider cracks, small voids, or gouges. Just painting over them is not an option; they will telegraph right through the new finish and compromise the whole job. These spots have to be fixed properly.
Grab a Dremel tool with a V-shaped grinding bit and carefully "vee out" each crack. This little trick removes any fractured material and widens the channel, which allows your filler to penetrate deeply and form a rock-solid repair.
After grinding, give the area a thorough wipe-down with acetone to get rid of every last bit of dust. Next, fill the prepped cracks and voids with a dependable marine-grade epoxy putty stick. Epoxy is the right choice here—it's incredibly strong, totally waterproof, and bonds exceptionally well to fiberglass.
Overfill the repair just a little, as the epoxy will shrink a tiny bit as it cures. Once it's fully hardened, sand it flush with the surrounding surface, feathering the edges until they're seamless.
It’s worth noting that this kind of work has real economic weight. The global boating market is a massive $150 billion industry, and gelcoat maintenance accounts for a huge piece of that pie—somewhere around $3-5 billion each year. Investing your time in proper prep directly protects your boat's value in this market. You can dig into more insights on the growth of the premium gelcoat sector to see just why quality finishes matter so much.

Masking for Professional Results
The very last thing you do before even thinking about mixing gelcoat is masking. This is what separates a pro-level job from a messy, amateur attempt. Use a high-quality marine painter's tape to create razor-sharp lines around hardware, trim, and any other areas you don't want to coat.
Don't rush this step. Burnish the edges of the tape with a plastic scraper or even just your thumbnail to ensure no gelcoat can bleed underneath. For protecting larger areas like decks or non-skid surfaces, use masking paper or plastic sheeting along with your tape to shield them from overspray.
Once your surface is cleaned, sanded, repaired, and meticulously masked, you've built the perfect foundation. This painstaking effort is the single most important factor in achieving a durable, long-lasting, and beautiful gelcoat result. You can learn more about the initial steps by checking out our comprehensive guide on how to clean a fiberglass boat to ensure you start with the best possible canvas.
Gelcoat Mixing and Application Techniques That Work
Alright, with your surface prepped and looking pristine, it's time for the main event. This is where all that careful prep work pays off and you start to see that beautiful, durable finish take shape. Getting this part right comes down to a bit of precision, a lot of patience, and a healthy respect for the chemical reaction you’re about to kick off.
The first thing on the docket is mixing the gelcoat with its catalyst, Methyl Ethyl Ketone Peroxide (MEKP). This isn't just stirring paint; it's a chemical process where getting the ratio right is everything. The catalyst is what starts the hardening, or curing, of the gelcoat, and you're in control of how fast that happens.
The Science of a Perfect Mix
For most gelcoats, the sweet spot for the catalyst ratio is between 1.5% and 2.0% by volume, and that range depends almost entirely on the ambient temperature. A solid rule of thumb is about 12 drops of MEKP per ounce of gelcoat when it's around 77°F. But don't treat that as gospel—temperature and humidity are running the show here, and they'll dictate how much working time you have.
- Cooler Conditions (60-65°F): You'll need to nudge the catalyst amount up, closer to the 2.0% mark, just to get the reaction going properly.
- Ideal Conditions (70-80°F): Stick close to the standard 1.8%. This should give you a predictable and manageable window to work in.
- Warmer Conditions (85-90°F): Back off the catalyst to around 1.5%. If you don't, the gelcoat can "kick" (harden) in the pot before you even get a chance to apply it.
Always work in small batches—a pint at a time is plenty. This keeps the mixture from generating too much heat on its own and hardening up on you. Here's a pro tip: once you've mixed your batch, pour it into a second, clean container before you start applying. This simple step ensures no un-catalyzed gelcoat stuck to the sides of the first pot makes it onto your hull.
This process flow diagram breaks down the essential prep work that has to be done before you even think about opening a can of MEKP.
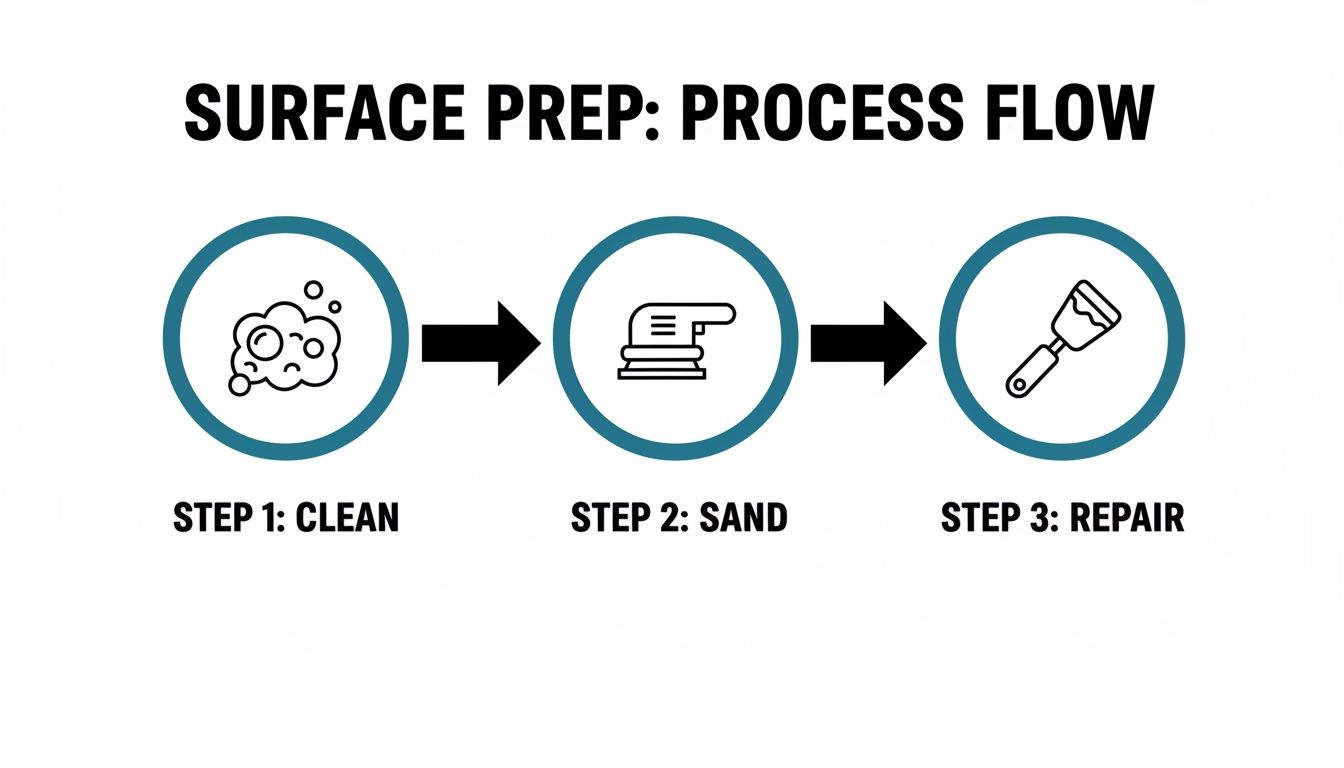
Think of it this way: cleaning, sanding, and repairing are the non-negotiable foundation for any successful gelcoat job.
Choosing Your Application Method
With your gelcoat properly catalyzed and ready to go, you've got three main ways to get it onto the hull. The best choice really depends on the size of your project and the kind of finish you're after.
1. Brushing for Small Repairs For little touch-ups like filling scratches or fixing small dings, a high-quality, solvent-resistant brush is your best friend. It gives you fantastic control for detailed work. The trick is to lay the gelcoat on with smooth, even strokes and then leave it alone. Don't overwork it as it starts to set.
2. Rolling for Medium-Sized Areas If you're tackling something bigger, like a deck hatch or a section of the cabin, rolling is the way to go. Use a solvent-resistant, short-nap foam roller for this. The classic "roll and tip" method works beautifully here: one person rolls on a thin, even coat, and someone follows right behind with a dry, high-quality brush, using just the tip to lightly knock down the roller texture for a smoother finish.
3. Spraying for the Ultimate Finish For a full hull repaint or a large deck area, spraying is the only method that will give you that flawless, straight-from-the-factory look. An HVLP (High Volume, Low Pressure) spray gun is the tool for the job. Spraying lays down thin, uniform coats that help you avoid sags and runs, but it definitely requires more equipment and a bit of practice to get right.
No matter which method you choose, the golden rule is to apply multiple thin coats instead of trying to get it all done in one thick layer. A proper gelcoat finish needs to be about 15-20 mils thick to cure correctly and provide the protection your boat needs. If you go too thin, it won't generate enough heat to harden properly. Too thick, and you're asking for sags and wrinkles.
For anyone running a charter or just trying to keep their boat in top shape, mastering this process is huge. Following best practices—like sanding to 220 grit and applying 2-3 coats to the right thickness—can add 5-7 years to the life of the surface, which means way less money spent on repairs down the line.
If you’re leaning toward spraying for a big project, it’s worth doing a little more homework on the technique. You can dive into our guide on the nuances of spraying gelcoat for more detailed tips on gun settings and application.
How to Achieve That Perfect Mirror Finish
You’ve cleaned the spray gun, put the rollers away, and the new gelcoat is finally on the hull. It’s tempting to call it a day, but this next phase is where the real magic happens. These are the steps that transform a good DIY job into a professional-grade, glass-like finish that will turn heads at the dock.
First things first: be patient. Gelcoat hardens through a chemical reaction that generates its own heat, and it needs time to fully cure. If you jump the gun and start sanding a soft surface, you’ll just create a gummy mess and clog up your sandpaper.
In ideal conditions, around 77°F, your gelcoat should feel tack-free in a few hours. Give it a full 24 hours to get hard enough for sanding. If you’re working in cooler temps, give it even more time—patience now is going to pay off big time.
The Magic of Wet Sanding
Once the gelcoat is rock hard, you’ll probably notice a subtle texture on the surface, something we call "orange peel." This is perfectly normal, but it's the main obstacle standing between you and that mirror shine. Wet sanding is how we knock it down and prep the surface for polishing.
The process uses water as a lubricant for the sandpaper, which keeps it from getting clogged with dust and also keeps the surface cool. The key here is a methodical approach, working your way through progressively finer grits of sandpaper. Don't be tempted to skip a grit; each one is designed to erase the scratches left by the one before it.
- Initial Leveling (400-600 Grit): Kick things off with 400-grit wet/dry sandpaper on a soft block. This will gently flatten the high spots of the orange peel. Follow that up with 600-grit to smooth things out and remove those initial 400-grit scratches.
- Refining the Surface (800-1200 Grit): Now, switch to 800-grit. You'll start to see a smooth, hazy sheen develop. After you've covered the whole area, move on to 1200-grit. By now, the surface should feel silky smooth.
- Final Polish Prep (1500-2000 Grit): The final sanding stages involve ultra-fine grits like 1500 and sometimes even 2000-grit. At this point, you're essentially polishing with sandpaper, leaving behind microscopic scratches that the buffer will make quick work of.
Pro Tip: Keep a spray bottle of water nearby and use a small squeegee between grits. Wiping the surface clean lets you inspect your work and make sure you’ve removed all the scratches from the previous grit before moving on.
Compounding and Polishing for Deep Gloss
With the surface sanded to a perfectly uniform, hazy finish, it's time to bring out that deep, wet-look gloss. This is a two-part process using a cutting compound and then a fine polish. Your best friend for this job is a variable-speed rotary buffer.
Start by applying a quality marine rubbing compound to a wool cutting pad. Work in small, manageable sections, about two-by-two feet. Use a low speed to spread the compound, then crank it up to work it into the surface. The compound is a liquid abrasive that will buff out those fine 2000-grit scratches, revealing the first hints of a real shine.
Next, swap to a soft foam polishing pad and a high-quality marine polish. This finer abrasive refines the finish even more, eliminating any swirl marks left by the compound and creating that brilliant, reflective gloss. You can find more in-depth techniques in our guide on how to polish fiberglass for the best results.
Protecting Your Hard Work
This last step is non-negotiable. After all that effort, you have to protect your new finish from the elements. A layer of high-quality marine wax is the final piece of the puzzle, creating a barrier against UV rays, salt, and grime.
Apply the wax just like the directions say, let it haze up, and then buff it off with a fresh microfiber cloth. This doesn't just deepen the shine; it makes your boat easier to clean and will seriously extend the life of your new gelcoat.
Common Questions About Gel Coat Painting
Tackling a gel coat project for the first time? You probably have a few questions. Getting straight answers can be the difference between a job you're proud of and one you have to redo. Let's walk through some of the most common things boat owners ask.
Can I Apply New Gelcoat Over an Old Finish?
Yes, absolutely—as long as the original surface is in good shape. But here's the catch: the success of the job lives and dies by the prep work. You can't just slap a new coat on and call it a day.
First, the old surface has to be completely de-waxed and cleaned of every last bit of contaminant. After that, you need to sand the entire area, and don't be shy about it. This is a non-negotiable step that creates the mechanical "teeth" the new gelcoat needs to grab onto for a permanent bond. In my experience, rushing the sanding is the number one reason new gelcoat fails and starts peeling down the road.
What Is the Best Temperature for Applying Gelcoat?
Temperature is a huge deal when you're working with gelcoat. The sweet spot for application is between 60°F and 80°F (16°C to 27°C). This range lets the chemical curing process happen at just the right speed.
If you try to apply it when it's too cold, the cure time will drag on forever, and it might not even harden properly. On the other hand, working in the blazing sun or high heat is just as bad. It can cause the gelcoat to "kick" way too fast, leaving you with wrinkles, a rough finish, and almost no time to work with it before it turns to goo in the tray. Always double-check the manufacturer's specs, as different formulas can have slightly different requirements.
A well-applied DIY gelcoat finish isn't just a temporary fix. With proper preparation, quality materials, and consistent maintenance, you can expect it to last anywhere from 5 to 10 years, sometimes even longer.
Is Gelcoat Better Than Marine Paint?
That's the classic debate, isn't it? The real answer is, it depends on what you're trying to achieve. Gelcoat and high-end marine paints, like two-part polyurethanes, are both fantastic, but they're fundamentally different animals.
Gelcoat is a thick, pigmented polyester resin that literally becomes part of the boat's fiberglass structure. It's what the factory uses for a reason—it's incredibly tough and stands up to scratches and dings like nothing else.
Marine paints are more like a skin; they're high-performance coatings that stick to the surface. Modern paints can give you a stunning, high-gloss shine and are often a bit more forgiving for a DIYer to apply, especially with a roller. But when it comes to raw durability and impact resistance, gelcoat usually wins.
Why Is My Gelcoat Still Tacky After 24 Hours?
If you come back the next day and your gelcoat is still sticky, it’s almost always one of two things: you got the catalyst ratio wrong, or you forgot the wax additive. If you didn't mix in enough MEKP catalyst, the chemical reaction needed to harden the resin never really finished.
But the most common culprit is forgetting to add a surfacing wax agent to that final coat. Standard gelcoat is anaerobic, which means it won't fully cure if it's exposed to the air. That wax additive is the magic ingredient. As the gelcoat starts to set up, the wax floats to the top, creating an airtight seal. This barrier allows the gelcoat underneath to get rock-hard and ready for sanding.
Keeping that new finish looking its best is all about having the right routine. At Better Boat, we've developed a full line of marine care products designed to protect your investment. From our powerful Marine Polish to our long-lasting Marine Wax, we have everything you need to maintain that perfect mirror shine.


