


Replacing Rub Rail on Boat: A Complete DIY Guide
Replacing your boat's rub rail is one of those projects that pays you back in two big ways: it keeps your hull safe from dings and scrapes, and it gives the whole boat a massive facelift. This job is all about taking off the old, beat-up rail, cleaning up the hull surface, and then carefully fitting the new one for that clean, straight-from-the-factory look. It's a totally doable DIY job that will protect your investment for years.
Why Replacing Your Rub Rail Is a Critical Upgrade

Think of your rub rail as the sacrificial bumper for your boat. It’s built to take the abuse from docks, pilings, and the occasional clumsy approach to another boat. Without that strip of rubber or vinyl, your gelcoat and fiberglass would get chewed up with every little bump, leading to repairs that are both expensive and a huge headache. Over time, that protective barrier just wears out, and replacing it is about more than just looks—it’s about preserving the integrity of your hull.
More and more boaters are realizing how important this is. The global market for boat rub rails is on the rise, with experts predicting a 6.6% compound annual growth rate (CAGR) from 2025 to 2035. This isn't surprising when you consider the boom in recreational boating. For perspective, a typical 20-foot fiberglass boat can show serious rub rail damage after just two or three seasons of regular use in a busy marina.
Telltale Signs It's Time for a Replacement
Knowing when your rub rail is toast is the key to stopping bigger problems before they start. If you ignore the warning signs, you could be looking at water getting in and causing hidden damage to the crucial hull-to-deck joint.
Keep a sharp eye out for these dead giveaways:
- Visible Cracking and Brittleness: After years of baking in the sun, vinyl and rubber get hard and brittle. If you see a network of spiderweb cracks or the material feels more like hard plastic than flexible rubber, it’s lost its ability to absorb any impact.
- Deep Gouges and Missing Chunks: A few scuffs are just part of boating, but deep cuts or entire sections torn away mean the rail isn't doing its job anymore.
- Pulling Away from the Hull: This one is a big deal. If you can see gaps opening up between the rail and the boat, the fasteners or adhesive have failed. That gap is a welcome mat for water to seep right into your hull.
- Persistent Discoloration and Stains: When the rail looks chalky, faded, and no amount of cleaning brings it back to life, the material itself has degraded. While it might seem cosmetic, it's usually a sign of structural weakness, too.
Choosing the Right Rub Rail Material
The material you go with will dictate the project's difficulty, its final look, and how long it'll last.
For most recreational boats, flexible vinyl is the go-to. It's affordable and, most importantly, it can bend around the curves of your hull without a fight.
If you want a step up in protection, look for a rigid vinyl rail that has a stainless steel insert. This combo gives you much better impact resistance. For the ultimate in durability and a sharp, modern look, a full stainless steel rail is the top choice, but be prepared for a higher price tag and a more challenging installation. Weighing these options is a key part of your overall boat maintenance plan.
Assembling Your Toolkit for a Flawless Finish
Tackling a project like replacing a boat's rub rail is all about preparation. Trust me, there’s nothing more frustrating than getting halfway through a job and realizing you're missing a key tool, forcing you to make multiple trips back to the garage or truck.
Gathering everything you need beforehand is the secret to a smooth, efficient process that ends with a professional-looking result. Think of it as setting up your workshop right there on the dock. You'll need a solid mix of hand tools, a couple of power tools, and the right supplies to get that new rub rail on securely and, most importantly, completely waterproof.
Essential Tools for Removal and Installation
Your toolkit for this project doesn't have to be massive, but every single item plays a vital role. Having the right gear on hand is the difference between fighting with brittle old plastic and having it peel away with relative ease.
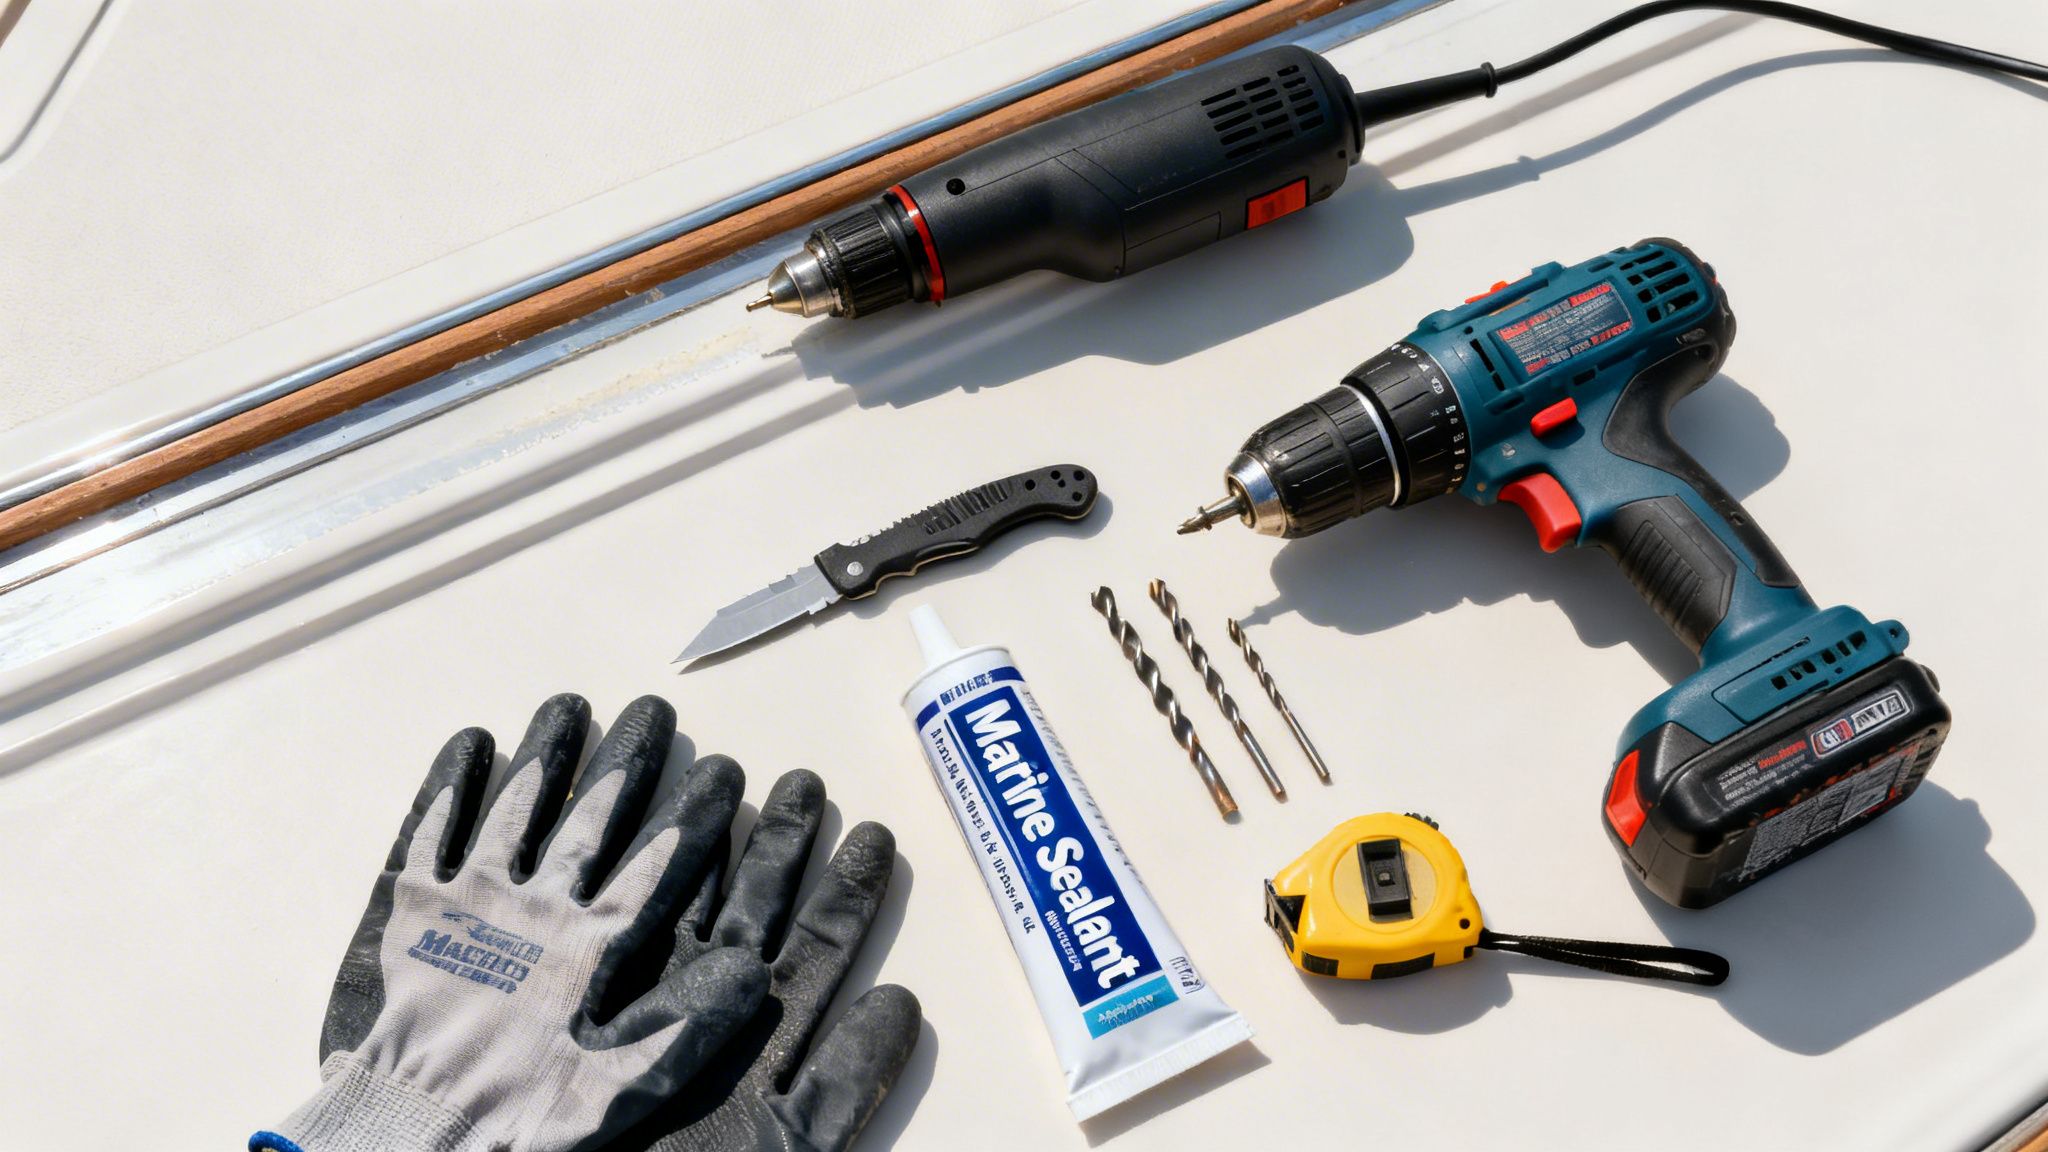
- Heat Gun: This is your MVP for both removal and installation, hands down. A little bit of gentle, even heat makes old vinyl pliable enough to pull off without taking chunks of your gelcoat with it. It’s also the key to warming up the new rail so it bends smoothly around the tight curve of the bow without kinking.
- Power Drill/Driver: You’ll be leaning on this for backing out old screws and drilling fresh pilot holes for the new fasteners. A cordless model with a fully charged battery (or two) is your best friend here.
- Pry Tools and Scrapers: A set of plastic and metal pry tools will help you gently lift the old rail away from the hull. A sturdy putty knife or scraper is also crucial for scraping off all that old, crusty sealant.
- Utility Knife: A fresh, sharp blade is non-negotiable. You’ll need it to cleanly trim the ends of the new rub rail for a perfect, seamless fit.
- Caulking Gun: Don't skimp here. A good caulking gun gives you the control needed to lay down a consistent, even bead of sealant, which is absolutely critical for a watertight seal.
Beyond these essentials, don't forget the basics like a tape measure, safety glasses, gloves, and a big roll of paper towels for cleanup. Having a complete checklist of boating tools can be a great way to make sure you're covered for any surprises.

Selecting the Right Sealant and Fasteners
The longevity of your brand-new rub rail comes down to one thing: what's holding it to the boat. The sealant and fasteners you choose have a tough job—they need to withstand constant punishment from water, UV rays, and the bumps and scrapes of docking.
For the sealant, you absolutely must use a marine-grade product. Your standard household silicone or construction adhesive will give up the ghost in a marine environment in no time. We recommend our Better Boat Marine Sealant & Adhesive, which is formulated to create a tough, flexible, waterproof bond that holds up to life on the water. It grabs onto fiberglass, metal, and vinyl like nothing else while staying flexible enough to move with the hull.
Pro Tip: When you apply sealant, lay down a continuous bead inside the rub rail track. This is called "bedding" the rail, and it ensures there are zero gaps for water to sneak in and compromise the critical hull-to-deck joint.
Fasteners are just as important. Stainless steel screws are the industry standard for a reason—their corrosion resistance is second to none. The size and type will vary depending on your boat's construction and the specific rub rail you bought. Always, always use brand-new fasteners. Reusing old, potentially weakened screws is just asking for problems down the line.
To help you sort through the options at the marine store, here’s a quick guide to what you’ll be looking for.
Choosing Your Sealant and Fasteners
A quick comparison to help you select the best marine-grade sealant and fasteners for your rub rail replacement project.
| Component | Type | Best For | Pros | Cons |
|---|---|---|---|---|
| Sealant | Marine Polyurethane | Fiberglass, Metal, Wood | Extremely strong bond, flexible, UV resistant, waterproof | Longer cure time, can be difficult to remove |
| Sealant | Marine Polysulfide | Below Waterline Sealing | Good chemical resistance, flexible, bonds well to plastics | Can degrade certain plastics, slower cure |
| Fasteners | Stainless Steel Screws | Most Applications | Excellent corrosion resistance, strong, widely available | Higher initial cost than galvanized steel |
| Fasteners | Stainless Steel Rivets | Rigid Rails & Inserts | Very secure, clean look, vibration resistant | Requires a special tool, not easily removable |
Ultimately, for a rub rail project, a high-quality marine polyurethane sealant paired with the correct size stainless steel screws is the go-to combination for a durable, long-lasting, and professional repair.
Removing the Old Rub Rail Without Damaging Your Hull
Let's be honest: getting the old, weathered rub rail off your boat is the least glamorous part of this whole project. This is where patience really is a virtue. If you rush this stage, you're almost guaranteed to chip your gelcoat, and suddenly you've got a much bigger repair job on your hands.
The secret is to work methodically. You're trying to persuade the old rail to let go, not rip it off in a fit of rage. This means a bit of detective work to find the fasteners, some strategic use of heat, and a healthy dose of elbow grease.
Locating and Removing Fasteners
Before you even think about prying, you have to find every single screw or rivet holding that old rail in place. Most rub rails are secured with fasteners that go through the rail, clinch the hull-to-deck joint, and anchor into a backing plate or the deck itself. If you have a vinyl rail, these are usually hiding under a flexible insert running down the center.
Start at one end of the boat—I usually begin at the stern—and use a flathead screwdriver or a plastic pry tool to gently lift the insert out of its track. Just work your way down the line, pulling the insert out as you go. Be prepared for it to be brittle from years of sun exposure; it will likely snap into pieces, and that's perfectly fine.
With the insert gone, you'll see all the screw heads. Now you can grab your power drill and start backing them out.
Real-World Tip: Some of these screws are going to be stubborn. It's inevitable. If a screw head strips out, a screw extractor bit will be your best friend. For those screws that just spin without backing out, apply some gentle upward pressure with a pry tool right under the rub rail as you run the drill in reverse. That little bit of tension is often enough to get it to bite.
The Art of Using a Heat Gun
Your heat gun is your most valuable player for this part of the job. Old vinyl gets incredibly brittle, and trying to pull it off cold is a recipe for cracked plastic and a damaged hull. A little bit of consistent heat makes the material pliable again and, just as importantly, softens the old sealant underneath.
Set your heat gun to a low or medium setting. You don't need to cook it. Hold it about six to eight inches from the rub rail and keep it moving in a constant, sweeping motion. Never hold it in one spot. If you do, you risk scorching the vinyl and, even worse, blistering your boat's gelcoat.
I find it's best to work in small, manageable sections, maybe two or three feet at a time. Heat the area until the vinyl feels soft and flexible when you touch it. Once it's warm, you can get your pry tools in there and carefully work it away from the hull. This combination of heat and gentle prying is the key to a clean, damage-free removal.
Tackling Old Sealant and Stubborn Sections
Once the rail is off, you'll be staring at a line of old, rock-hard sealant. This is, without a doubt, the most tedious part of the prep work. You'll need a combination of plastic scrapers, a putty knife (used with extreme care), and a whole lot of patience.
- Scrape Methodically: Start with a plastic razor blade or scraper. This will let you get the bulk of the old gunk off without scratching the gelcoat.
- Heat It Up: Just like with the rail itself, a little bit of gentle heat can soften stubborn sealant, making it much easier to scrape away.
- Chemical Assistance: For that last, sticky film of residue that just refuses to budge, a good solvent is the only way to go.
For this final cleanup, we swear by our Better Boat De-Solv-it Citrus Solution. It's made specifically to break down and dissolve tough adhesives and sealant residue without being harsh on your boat's finish. Just spray it on, give it a few minutes to do its thing, and then wipe the mess away. Getting this surface perfectly clean is non-negotiable if you want the new sealant to create a perfect, waterproof bond. The process is very similar to what you'd do when you need to get rid of old vinyl decals from your boat.
This is a common job, especially for boats in coastal areas where saltwater rapidly degrades materials. In fact, research shows that 65% of rub rails on these boats show significant wear within just 18-24 months, making proactive replacement a smart move to prevent costly hull damage down the road.
For a typical 25-foot powerboat, you're dealing with 40 to 50 feet of material, so an efficient removal strategy will save you a ton of time and frustration. Once you're done, you'll have a clean, smooth surface, ready for the fun part—installing the new rail.
Installing the New Rub Rail for a Professional Look
Alright, the old, beat-up rub rail is gone and you’ve prepped the hull until it’s perfect. Now comes the satisfying part. This is where all that prep work pays off as you transform your boat's look and restore its protective bumper. The keys here are precision and patience—a careful installation is what gives you that clean, factory-fresh finish.
It all boils down to that classic craftsman's rule: measure twice, cut once. Nailing the fit, getting a perfect seal against the elements, and finishing cleanly is what separates a DIY job from a professional one. In a way, the same principles apply here as they do for other detailed jobs like replacing protective seals on other vehicles—meticulous prep leads to a great outcome.
Pre-Drilling and Initial Fitting
Your journey to a flawless finish starts with a tape measure and a drill. Unroll the new rub rail alongside your boat, preferably on a clean tarp or drop cloth to keep it from getting scuffed up.
Now, carefully transfer the screw hole locations from your old rub rail directly onto the new one. Trust me, this simple step saves a ton of time and guarantees your fasteners will line up with the solid backing inside the hull.
If the old rail is long gone, you'll have to measure the hole spacing on the hull itself and transfer those marks. Once everything is marked, go ahead and pre-drill all the holes.
Time for a dry fit. Grab a helper and start at the stern, loosely attaching the rail with a few screws. The trick is to work your way forward on both sides at the same time. This balanced approach is critical for making sure the rail is perfectly centered and sits symmetrically on the boat.
Mastering the Bow Curve with Gentle Heat
That sharp curve at the bow is where most people get into trouble. If you try to force cold, rigid vinyl around that bend, you're going to end up with ugly kinks and gaps. This is where your heat gun becomes your best friend.
Set your heat gun to a low or medium setting and keep it moving constantly, holding it about six inches away from the vinyl. You’re just trying to warm it gently until it becomes pliable, not melt it. As you apply heat, gently press the rail against the hull, letting it mold itself to the curve. Your helper should be ready to pop in a few screws to hold that perfect shape in place.
Takeaway Tip: Patience is everything here. Rushing the heating process is the #1 mistake I see. A little extra time spent carefully warming the rail will give you a much better result that hugs the hull without any gaps.
This diagram breaks down the removal concepts you just completed, which are the foundation for a good installation.

As it shows, a successful installation starts with a clean slate, achieved by systematically locating fasteners, applying heat, and scraping away the old gunk.
Applying Sealant for a Watertight Bond
With the rail dry-fitted and the bow curve conquered, it's time to create that waterproof seal. Remove the screws and take the rail off one last time. This is where you'll lay down a bead of high-quality marine adhesive to keep water from ever getting into the hull-to-deck joint.
Using a caulking gun, apply a continuous, steady 1/4-inch bead of Better Boat Marine Sealant & Adhesive inside the rub rail channel. Don't be shy with it; you want just enough sealant to squeeze out when the rail is tightened down. That little squeeze-out is your sign of a complete, gap-free seal.
Once the sealant is applied, carefully place the rail back on the hull, starting at the stern again. Insert and loosely tighten all the stainless steel screws first. Then, go back and snug them all down, working from the center out toward the ends. You should see a small, uniform bead of sealant squeezing out along the top and bottom edges. That's exactly what you want to see.
There are a lot of sealants out there. If you want to get into the weeds on what makes them different, check out our guide on 3M 4200 vs 5200 to see what properties matter most for a job like this.
Finishing Touches for a Polished Result
The final steps are all about getting that clean, finished look. With the main rail body secure, it's time to pop in the flexible insert. Start at one end and use a rubber mallet to gently tap the insert into its track. On a cool day, a little bit of heat from your heat gun can make this part go a lot smoother.
After the insert is fully seated, grab a sharp utility knife and trim the ends flush for a perfect fit against the transom or end caps.
The very last step is cleaning up that excess sealant. Let it cure for a few hours until it gets rubbery, then use a plastic scraper or a rag with a little mineral spirits to carefully trim it away. What you're left with is a crisp, professional line that looks fantastic.
Applying Finishing Touches and Maintaining Your Work
With the new rub rail screwed down tight and the insert popped in, you're on the home stretch. This last part is all about the details—getting that crisp, professional look and making sure all your hard work lasts for years to come.
First up is dealing with any sealant that oozed out during the install. Don't worry, a little squeeze-out is actually a good thing; it means you've got a solid, waterproof seal. But you don't want to leave it looking messy. The trick is to catch it after it has started to cure but before it’s rock-hard. When it feels firm and rubbery, grab a plastic razor blade and carefully trim the excess away from the hull. You'll be left with a sharp, clean line that looks fantastic.
Protecting Your New Rub Rail
Once your sealant has fully cured—check the manufacturer’s instructions, but it's usually 24-48 hours to be tack-free and up to a week for a full bond—it's time to think about protection. Your new rub rail is going to live its life out in the sun, and those UV rays are brutal. They can make even the toughest vinyl fade, turn brittle, and eventually crack.
Applying a high-quality protective coating is the single most important thing you can do to extend the life of your new rub rail. It’s like sunscreen for your boat, creating a barrier that fights off the sun and grime.
A good marine wax is your best friend here. Our Better Boat Boat Wax & Sealant is packed with polymers that provide serious, long-lasting UV protection. Slap a coat on right after your installation is complete, and then make it a habit once or twice a season. This will keep the vinyl from fading and, just as importantly, keep it supple enough to absorb those little bumps and nudges at the dock without cracking.
A Simple Maintenance Checklist
Keeping your rub rail in top shape isn't a huge chore. Just roll a few small tasks into your regular boat cleaning routine, and you'll be set. A well-maintained rub rail is the final piece of the puzzle for a successful, long-term replacement.
Here’s a simple checklist to keep in mind:
- Wash It Down: Every time you wash the boat, give the rub rail some attention. Use a gentle, pH-neutral soap like our Better Boat Boat Soap to get rid of the salt and grime that can break down the material over time.
- Check the Fasteners: At least once a season, take a slow walk around the boat and check the screws. It’s not uncommon for one or two to work themselves a little loose. Just tighten them up to keep the rail snug against the hull.
- Look for Damage: After a rough docking or rafting up with friends, give the rail a quick once-over. You’re looking for any deep gouges or cuts that might need a little extra attention before they get worse.
- Re-apply Protectant: Set a reminder on your phone to reapply your UV protectant or wax at the start and middle of your boating season. Consistency is the key to fighting off sun damage.
Follow these simple steps, and all the effort you just put into this project will pay off for years, keeping your boat protected and looking sharp out on the water.
Common Questions About Replacing Rub Rail
Even with the best guide in hand, swapping out a rub rail can feel a little daunting. It’s one of those projects where a few specific questions always seem to pop up right when you're about to get started.
Let's walk through some of the most common ones we hear from fellow boaters. Getting these answers sorted out now will make the whole job go a lot smoother.
How Do I Know Which Type of Rub Rail Is Right for My Boat?
The right rub rail really comes down to three things: your boat's size, its hull material, and what kind of abuse it takes. For most smaller fiberglass boats that spend their time in relatively calm waters, a flexible vinyl rail is a fantastic choice. It’s affordable, forgiving to install, and gets the job done.
Now, if you're skippering a larger vessel or you're constantly squeezing into tight marina slips, you’ll want to step it up. A rigid vinyl rail with a stainless steel insert provides way more impact protection and holds up better over the long haul.
No matter which way you go, always measure the height and width of your old rail first. You need to make sure the new one will sit snugly in the channel. And don't discount the aesthetics—a shiny stainless insert can give your boat a surprisingly modern facelift.
Can I Replace Just a Damaged Section of My Rub Rail?
I know it’s tempting to try and patch just one dinged-up section to save a few bucks, but trust me, it’s almost never a good idea in the long run. The first problem is cosmetic. Years of sun exposure change the color of vinyl, so a brand-new piece will stick out like a sore thumb against the older, faded material.
But the bigger issue is creating a solid, waterproof seam where the old and new pieces meet. It's incredibly difficult to get a perfect, watertight seal at those splice points. You're basically creating a weak spot that’s just inviting water to seep into your hull-to-deck joint. For a clean look and a seal you can count on, always replace the entire length on that side of the boat.
What Is the Most Common Mistake During Installation?
This one’s easy: not using enough heat when you get to the bow. By far, this is the number one mistake people make. Cold vinyl is stiff and has zero interest in bending around a sharp curve. If you try to force it, you’ll end up with ugly kinks, puckers, and gaps that ruin the whole job.
The fix is simple: patience and a heat gun.
- Stick to a low-to-medium heat setting. High heat will melt or scorch the vinyl in a heartbeat.
- Keep the gun moving constantly. Hold it about six inches away and sweep it back and forth to warm the section evenly.
- You’re aiming for pliable, not molten. It should be flexible enough to bend smoothly into place with your hands.
Rushing this step is a classic rookie mistake. Take your time, warm the rail properly, and the bow will look professionally done.
How Long Should the Sealant Cure Before Using the Boat?
Letting your sealant fully cure is a critical last step, and the exact time depends on the product you're using, plus the temperature and humidity. For most quality marine-grade polyurethane sealants, you need to give it a minimum of 24-48 hours before the boat even thinks about touching water. That's usually enough time for it to "skin over" and become tack-free.
However, for a full, bulletproof cure that can handle the stress of docking and waves, waiting 5-7 days is the sweet spot. This ensures the sealant has reached its maximum strength and flexibility. When in doubt, always read the manufacturer’s instructions on the tube—they know their product best.
At Better Boat, our goal is to make boat care simple and effective. We’re boaters ourselves, and we design products that solve real-world problems on the water. With the right tools and a little know-how, you can keep your investment protected and looking sharp.
Explore our full range of premium marine maintenance products today.


