


Sealer for Aluminum Boat: Choosing the Best Option
Using the right sealer for an aluminum boat isn't just an upgrade—it's one of the most important pieces of maintenance you can do to protect your investment. This simple, proactive step can save you a world of hurt and costly repairs down the road. It creates a tough barrier against corrosion, pitting, and leaks, making sure your boat stays seaworthy for years.
Why Sealing Your Aluminum Boat Is So Important
It’s easy to look at a rugged aluminum boat and think it’s indestructible. After all, aluminum doesn't rust like steel, right? While that's technically true, it faces its own set of enemies that can quietly eat away at its integrity. This is a common blind spot for a lot of owners, and it can lead to some serious headaches if ignored.
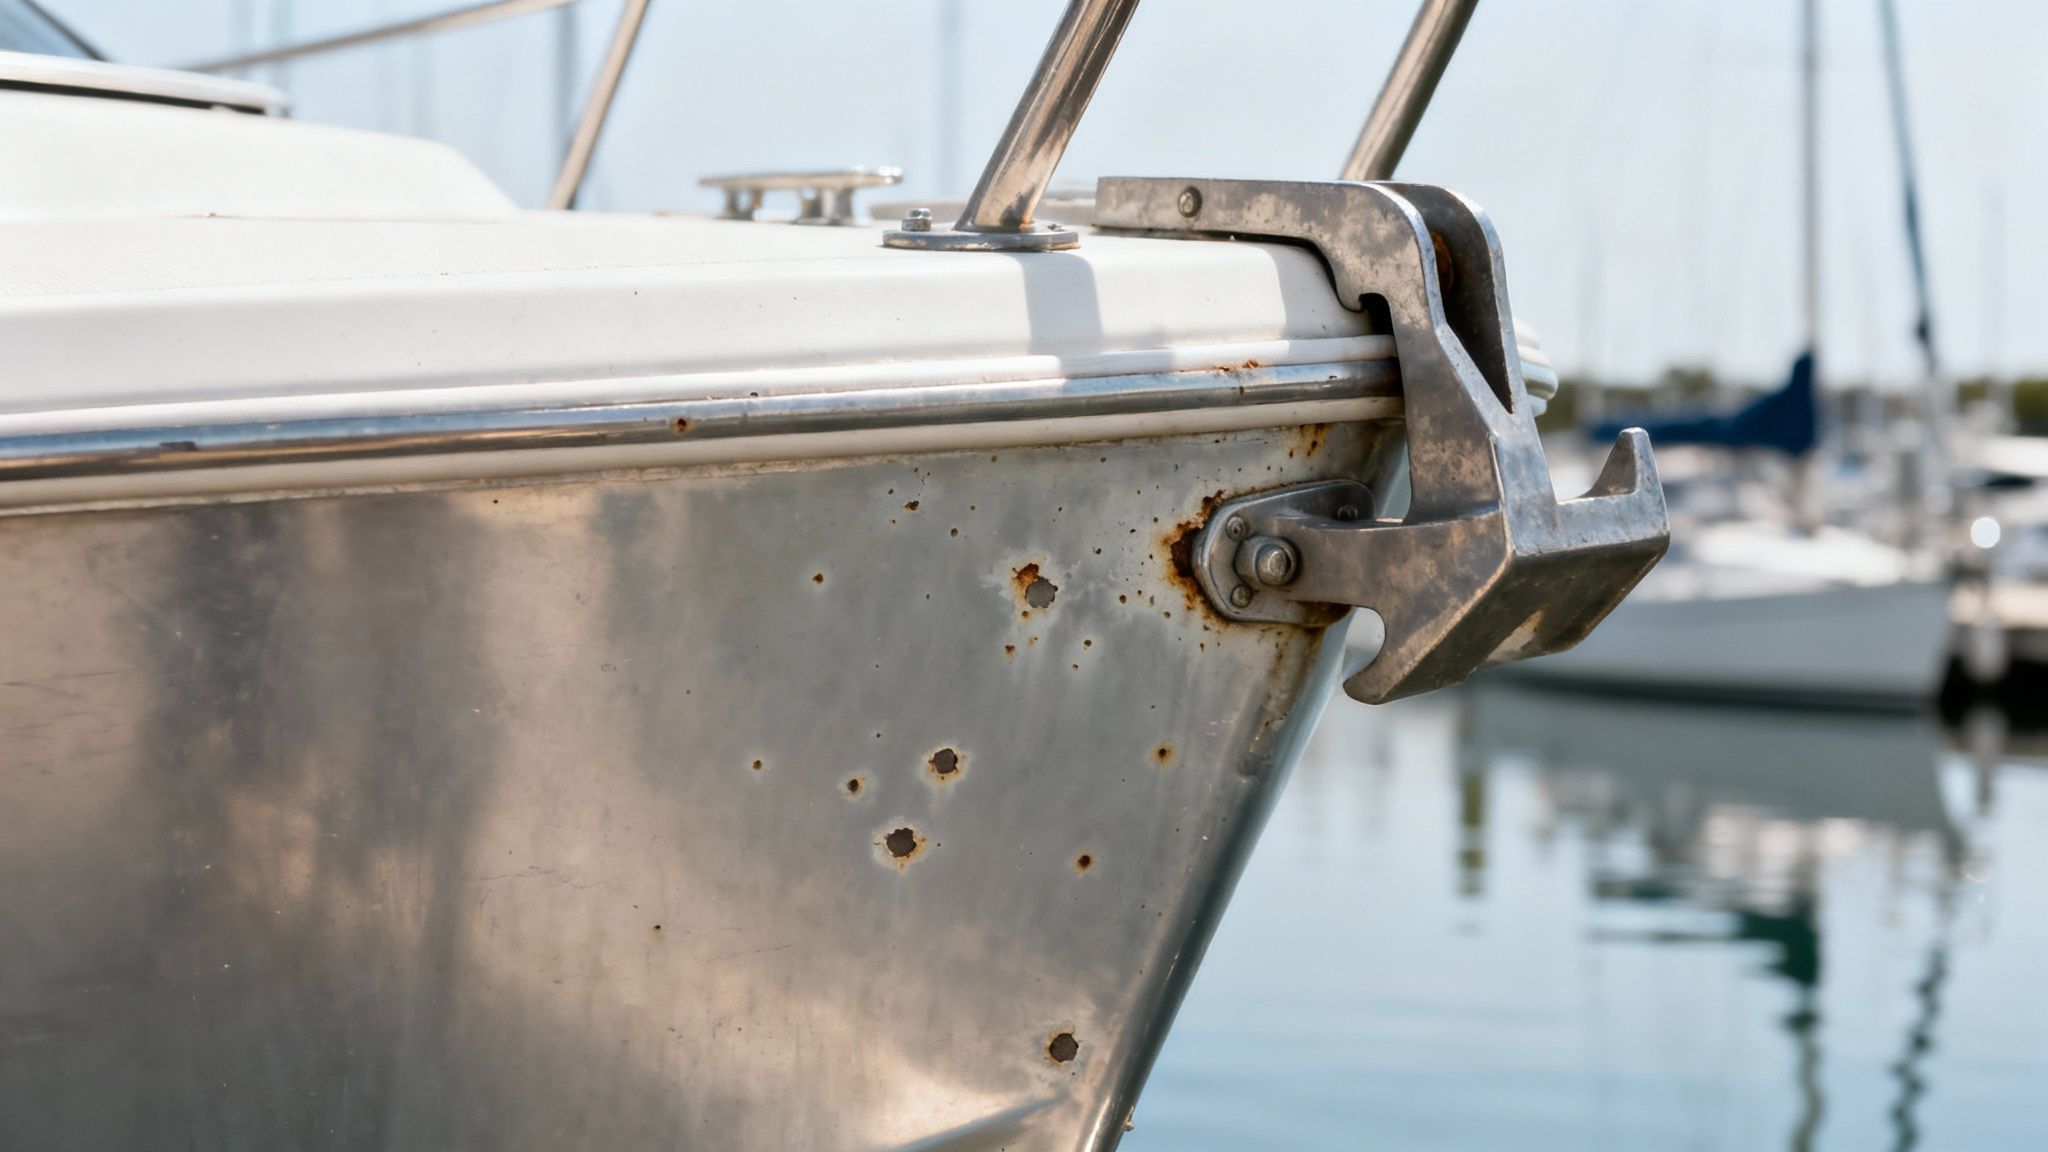
Plenty of boat owners learn this lesson the hard way. Take, for instance, an angler who picked up a used aluminum fishing boat. After just two seasons in a coastal bay, he kept finding water in the bilge and couldn't figure out why.
He eventually discovered tiny pinhole leaks caused by saltwater-induced pitting—a slow, creeping corrosion that had weakened the hull. Not only was the repair bill steep, but his boat was also stuck in the yard during prime fishing season.
This kind of story is exactly why sealing your boat should be a non-negotiable part of your maintenance routine.
The Hidden Dangers Facing Your Hull
Even the toughest aluminum hull is vulnerable to a few specific threats. Once you know what they are, the need for a good sealer becomes crystal clear. Here are the main culprits:
- Galvanic Corrosion: This is a nasty one. It happens when different metals, like stainless steel screws or bronze fittings, are in electrical contact with your aluminum hull in the water. The aluminum essentially sacrifices itself, leading to rapid, localized corrosion right around those fittings.
- Saltwater Pitting: Saltwater is incredibly aggressive. It chews through aluminum's natural protective oxide layer, causing tiny pits and craters to form. Over time, these pits get deeper and can eventually turn into those dreaded pinhole leaks.
- UV Damage: The sun is relentless. Its ultraviolet rays break down coatings and primers, leaving the raw aluminum exposed and speeding up oxidation. That chalky, white powder you sometimes see is a sign of the metal breaking down.
Applying a high-quality sealer creates a non-conductive barrier that effectively isolates the aluminum from these corrosive elements. It’s like giving your boat a suit of armor against the very things trying to wear it down.
The Growing Need for Protection
Aluminum boats are more popular than ever, with the market expected to jump from USD 6.15 billion in 2024 to USD 9.67 billion by 2035. As more of these boats hit the water, the need for proper protection is becoming even more critical.
Without sealing, some studies show that up to 25% of aluminum hulls can develop osmosis blisters within just five years in saltwater. Using a reliable epoxy sealant, like our Marine Sealant, can extend the life of your hull by 30-50% and slash future maintenance costs. If you want to dive deeper into this trend, you can explore the full market research on aluminum vessels to see just how important this is for modern boat owners.

Finding The Right Type Of Boat Sealer
Choosing a sealer for an aluminum boat isn't a simple grab-and-go from the marine store shelf. The market is packed with options, and each one is engineered for a specific job. Picking the right one means knowing the difference between the main types of sealants and matching their strengths to your boat's unique needs.
Think of it like having the right tool. You wouldn’t use a sledgehammer to hang a picture frame, would you? In the same way, the rock-solid epoxy you need below the waterline would be a terrible choice for a seam that needs to flex and move with the boat.
The Major Players in Marine Sealants
Your boat’s aluminum surface—whether it’s bare, painted, or anodized—plays a huge role in which sealant will actually stick and last. Let's break down the most common types you'll run into.
-
Epoxy Sealants: These are the heavyweights. Epoxies are typically a two-part system you mix together, and they cure into an incredibly hard, durable, and completely waterproof barrier. They're fantastic for anything below the waterline, like sealing through-hull fittings or patching up small dings and pits, because they offer unbeatable adhesion and strength.
-
Polyurethane Sealants: Known for their bulldog grip and impressive flexibility, polyurethanes are a go-to for all sorts of bonding and sealing jobs. They stick to just about anything and stay tough once cured. Just be aware that some formulas can get chalky and break down under UV rays over time if you don't paint over them. For a deeper dive, check out our guide comparing popular polyurethane sealants like 3M’s 4200 vs. 5200.
-
Polysulfide Sealants: If you need something that can move, polysulfide is your answer. This stuff is perfect for sealing seams and joints that see a lot of movement, like where the hull meets the deck. It stays pliable long after it cures, soaking up the natural flexing of the boat, and it laughs off chemicals and fuel spills.
-
Hybrid Polymers (MS Polymers): These are the modern all-rounders. They pull the best qualities from both silicone and polyurethane, offering great UV resistance, flexibility, and strong adhesion, often without needing a primer. Our Marine Sealant & Adhesive is a fast-curing hybrid polymer that creates a tough, flexible, and waterproof seal, making it an excellent choice for general-purpose sealing work above the waterline.
The demand for the right sealant is no joke. The marine sealant market is projected to hit USD 687.4 million by 2030, and polysulfide sealants alone make up a USD 125.1 million slice of that pie, mostly because of how well they flex on metal. It's not just about stopping leaks; it's about efficiency. One study found that when a builder switched to advanced MS polymer hybrids for their aluminum joints, they slashed warranty claims by over 60% and cut installation time by 40%.
Matching The Sealer To Your Boat's Finish
The current state of your aluminum hull is probably the most critical factor. Slapping the wrong product on the wrong surface is just a recipe for failure. A good seal depends on a solid chemical and mechanical bond, and the surface you're working with dictates how well that can happen.
Bare or Anodized Aluminum
For raw or anodized aluminum, getting the sealant to grab on is everything. The surface is smooth and non-porous, which can be tricky. You’ll almost always need to scuff the surface and apply an etching primer first. This creates a microscopic texture for the sealer to lock onto. Epoxies and specially formulated hybrid polymers are usually the best performers here.
Painted Aluminum
If your boat is painted, your first job is to play inspector. Is the paint solid, well-adhered, and in good shape? If so, you can probably apply a compatible sealer right over it after a good cleaning and a light scuff. Polyurethanes and hybrid polymers are excellent for this.
But if that paint is flaking, peeling, or bubbling, you have to stop right there. You must remove it down to a solid layer before sealing. Slathering new sealant over failing paint is a complete waste of time and money.
Comparison of Marine Sealants for Aluminum Boats
To make things even clearer, we've put together a table that compares the most common types of marine sealants. This should help you pinpoint the best option based on where you're working and what you need it to do.
| Sealer Type | Best For | Flexibility | UV Resistance | Application Notes |
|---|---|---|---|---|
| Epoxy | Below-waterline repairs, patching pits, structural bonding | Low | Varies | Must be painted for UV protection. Incredibly strong but rigid. |
| Polyurethane | General bonding, hardware installation | Medium | Good | Extremely strong adhesive; can be very difficult to remove later. |
| Polysulfide | Deck-to-hull joints, seams that move | High | Excellent | Stays flexible to handle vibration and temperature changes. |
| Hybrid Polymer | Above-waterline sealing, windows, hatches | High | Excellent | Versatile and easy to use; often doesn't require a primer. |
At the end of the day, choosing the right sealer comes down to three things: where you're applying it, how much that spot flexes, and what the surface finish is like. Get that combination right, and you’ll have a durable, long-lasting seal that keeps the water out and protects your boat for seasons to come.
Prepping Your Hull For A Flawless Finish
Ask any seasoned boater what the secret to a lasting seal on an aluminum boat is, and they'll tell you the same thing: it’s 90% preparation and 10% application. I can't stress this enough. Rushing the prep work is the single biggest reason sealants fail. A perfect, long-lasting finish doesn't just come out of a tube; it comes from creating an impeccably clean and receptive surface for the sealer to grab onto for good.
Taking the time to do this right ensures the sealer forms a powerful mechanical and chemical bond with the hull. It’s the difference between a job that looks great for years and one that’s peeling, bubbling, and failing by next season, forcing you to do it all over again.
Removing Old And Failing Sealant
First things first: the old stuff has to go. Trying to put a new high-tech sealer over old, cracked, or chalky sealant is like building a new house on a crumbling foundation. It’s just not going to work. You need a completely clean slate.
The tools for this part are pretty basic, but you'll need a healthy dose of patience. A good set of plastic scrapers is non-negotiable—they’ll get the job done without gouging the soft aluminum. For those really stubborn spots, a heat gun can be your best friend, gently softening the old sealant so it peels away much more easily.
- Heat and Peel: Set your heat gun to a low setting and keep it moving over a small section at a time. The idea is to make the sealant pliable, not cook it. Once it softens up, get your plastic scraper under it and lift it off.
- Mechanical Removal: For hardened bits that won't budge, a wire wheel on a drill can work. Just be sure to use a soft brass or stainless steel wheel and apply light pressure. You want to remove the sealant, not the aluminum.
- Chemical Solvents: In some cases, a dedicated sealant remover can break down the old material. But always—always—test it on a small, hidden spot first to make sure it doesn’t react badly with the aluminum or any nearby paint.
This step is messy and can feel tedious, but there’s no shortcut to getting a professional-grade result.
Degreasing And Deep Cleaning The Surface
With the old sealant gone, your next battle is against contamination. Over the years, your hull has been exposed to everything: fuel, oil, grime, and who knows what else. All of that leaves behind a residue that will absolutely wreck adhesion. Even the natural oils from your fingerprints can create a weak spot.
Start with a solid, deep clean. A quality All-Purpose Cleaner, like boat soap, and some heavy-duty scrub brushes will cut through most of the general marine buildup. For a comprehensive breakdown of getting your hull spotless, check out our guide on how to properly clean aluminum pontoons and other surfaces.
After the initial wash, it's time to bring out the solvents. Grab a couple of clean, lint-free rags and some acetone or a marine-grade degreaser. Wipe down every single inch of the area you plan to seal. I highly recommend the two-rag method: use one rag to apply the solvent, and a second, clean rag to wipe it all away before it evaporates. This lifts the contaminants right off the surface instead of just spreading them around.
Pro Tip: Don't cut corners here. A surface can look clean, but microscopic residues are all it takes to ruin the bond. Keep wiping until your clean rag comes back spotless.
Creating The Perfect Profile For Adhesion
Now that the surface is clean and bare, there's one last prep step: creating a "mechanical tooth." A perfectly smooth, glossy aluminum surface doesn't give the sealer much to grip. By scuffing the surface, you create thousands of microscopic peaks and valleys, which massively increases the surface area and gives the primer and sealer a texture to lock into.
For bare aluminum, grab some 80- to 120-grit sandpaper. You aren't trying to grind away metal here, just dulling the finish to create a uniform, matte look. An orbital sander will speed things up on big, flat sections, but make sure you get into the corners and tight spots by hand.
Proper preparation is everything in projects like this, and you can find great general advice in articles that cover vehicle detailing tips for a flawless finish. Once you're done sanding, give the whole area one final wipe-down with your degreasing solvent to get rid of every last speck of sanding dust.
If you're working with bare aluminum, using an etching primer is a total game-changer. This stuff contains a mild acid that microscopically etches the metal surface, creating the strongest possible foundation for your sealer. It's the ultimate insurance policy for all your hard work.
A Practical Guide To Applying Aluminum Boat Sealer
Alright, with your hull perfectly prepped, it's time for the main event. I get it—the application stage can feel like the most intimidating part of the job. But with the right approach and a bit of patience, you can get a professional-grade finish that not only looks fantastic but offers some serious protection. The real key is to work methodically, know your product, and keep an eye on your surroundings.
This diagram is a great visual recap of the prep work we just covered, showing how each step flows into the next.
It really reinforces that every part of the process—stripping old gunk, degreasing thoroughly, and scuffing for grip—builds the foundation you need for a seal that actually lasts.
Mixing And Preparing Your Sealer
If you've grabbed a single-part sealant, you're in luck; you can skip this step. But for the heavy-duty, two-part systems like epoxies, proper mixing is non-negotiable. These sealants harden through a precise chemical reaction between the resin and the hardener.
Follow the manufacturer's mix ratio to the letter. This is not the time to eyeball it. Grab some clean measuring cups and a fresh stir stick for every batch you mix. Stir the components for the recommended time (usually just a few minutes), making sure to scrape the sides and bottom of your container so everything is fully incorporated. An uneven mix is a recipe for soft spots that will simply never cure.
Pro Tip: Only mix as much sealer as you can comfortably apply within its "pot life"—that's the window you have before it starts to harden right there in the container. For most epoxies, you're looking at around 20-30 minutes. Working in smaller batches saves you from wasting product and rushing the job.
Techniques For A Smooth Application
The goal here is a smooth, even coat without any drips, runs, or thin patches. The tool you use will really depend on the area you're sealing.
- Rollers: A small, high-density foam roller is your best friend for covering big, flat areas like the hull bottom quickly and evenly.
- Brushes: Keep some high-quality chip brushes on hand. They're great for "tipping off" a rolled coat to pop any bubbles and for working sealant into tight corners or around rivets.
- Squeegees: For laying down a super smooth, consistent layer over seams or repairs, a flexible plastic squeegee is perfect.
Always start at the highest point and work your way down to stay ahead of any drips. If you're on a vertical surface, go with a slightly thinner coat to prevent sagging. Trust me, it's much better to apply two thin coats than one thick, heavy one. As you work, maintain a "wet edge" by overlapping each pass slightly. This simple trick is what prevents those ugly seam lines and gives you that flawless, pro look.

The Importance Of Working In Sections
Trying to seal the entire hull in one go is asking for trouble. The sealer will start to set up before you're even halfway done, leaving you with a messy, uneven finish. The smarter way is to divide your boat into logical, smaller sections—think one side of the transom, a four-foot stretch of the hull, or the area around a specific fitting.
Tackle each section completely before you even think about moving on to the next one. This lets you focus on getting a perfect coat on one area at a time and guarantees you’re always working with fresh, workable sealer. This is where products like our Marine Sealant & Adhesive come in handy, as they're often designed with clear instructions that make it easier for a first-timer to get it right.
There’s a reason the industry has moved toward better product formulations. Corrosion is a massive threat to aluminum, but a proper seal can slash it by 70-90%. A big shift happened with the adoption of silane-modified sealants, which dropped failure rates from happening within 18 months to lasting over five years. That change alone cut warranty claims by 60%, which shows how the right product and technique directly impact long-term durability.

Managing Temperature And Humidity
The environment you work in plays a huge role in how your sealer cures. Temperature and humidity are the two big ones you need to get a handle on. Most sealants have an ideal application range, typically somewhere between 50°F and 80°F (10°C to 27°C).
If you apply sealer when it's too cold, the curing process will slow to a crawl or even stop altogether, leaving you with a tacky, weak finish. On the flip side, working in direct sun or high heat can make the sealer kick off way too fast, trapping bubbles and creating a poor bond. High humidity is another enemy, as it can introduce moisture into the cure and compromise the final strength.
Always try to plan your project for a day with moderate temperatures and low humidity. Working in a shaded, well-ventilated spot is your best bet. If you're also planning on priming, our guide on choosing an aluminum boat primer and paint has more tips on dealing with the weather for a perfect finish. Nailing these environmental factors is the last step to making sure all your hard work pays off.
Maintaining Your Newly Sealed Boat
You did it. You put in the hours prepping and applying the sealer, and your aluminum boat looks incredible. But don't kick back just yet—the job isn't quite finished. To make sure that protective coat lasts for years instead of just one season, you need to nail the curing process and stick to a simple maintenance plan.
This last part is all about patience followed by some basic upkeep. If you rush it, you can undo all your hard work and watch that sealant fail way too soon. Understanding what’s happening on the surface and how to care for it is the key to getting the most out of your efforts.
Understanding Curing Times
One of the biggest mistakes I see boat owners make is getting their boat back in the water too fast. It's so important to know the difference between a sealant that's "touch-dry" and one that's fully cured. They are not the same thing.
- Touch-Dry: This happens pretty quickly, usually in just a few hours. The surface won't feel tacky, but underneath, the chemical hardening process is still in full swing.
- Full Cure: This is the magic moment when the sealant hits its peak hardness, durability, and chemical resistance. This can take anywhere from 24 hours to a full week, depending on the sealer you used, the temperature, and the humidity.
Putting the boat in the water before a full cure can trap moisture under the sealant, which absolutely wrecks the bond and kills its protective power. Always follow the manufacturer's instructions to the letter—a little patience now saves you a world of headaches later.
Rushing the cure is like pulling a cake out of the oven too early. It might look done on the outside, but the inside is still a mess. Give your sealant the time it needs to fully cross-link and form the tough, impenetrable barrier you worked so hard to create.
Creating A Gentle Cleaning Routine
Once your sealer is fully cured, the best thing you can do for it is keep it clean. But step away from the harsh, abrasive cleaners and stiff brushes. Those will just scratch up and wear away the protection you just applied. Gentle is the name of the game here.
For regular washes, grab a pH-neutral soap made for marine surfaces. A product like our Boat Soap is designed to lift away salt and grime without stripping off protective coatings like your new sealer. Use it with a soft-bristled deck brush or a microfiber wash mitt to avoid creating tiny scratches. Even just a good rinse with fresh water after every trip—especially in saltwater—will make a huge difference in preventing buildup.
Inspection And Touch-Up Schedule
Good maintenance is all about spotting small problems before they turn into big, expensive ones. A quick inspection schedule is your best friend for staying ahead of any issues.
Get into the habit of doing a quick visual check after every few trips. Then, plan on a more thorough inspection at least twice a season—once mid-season and again when you're winterizing.
Here’s what to look for:
- Scuffs and Scratches: Look closely at high-impact spots like the keel, chines, and anywhere the boat rubs against the trailer or docks.
- Bubbling or Blistering: This is a red flag for a loss of adhesion, often caused by trapped moisture or contamination under the sealant.
- Peeling Edges: Pay close attention to the edges of sealed areas. This is usually where sealant failure starts.
If you find a minor nick or scratch, fix it right away. Just clean the spot, lightly scuff it with some fine-grit sandpaper, wipe it with a solvent, and dab on a bit of the same sealer you used before. A five-minute touch-up now can stop water from creeping underneath and wrecking a much bigger area. For more ideas on what to check regularly, our complete boat maintenance checklist has you covered.
Got Questions About Sealing Your Aluminum Boat?
Even the most straightforward projects can throw you a curveball. When it to comes to sealing your boat, a few common questions always seem to pop up. Let's tackle them head-on so you can get the job done with confidence.
How Often Should I Reseal My Aluminum Boat?
There's really no magic number here. The life of a good sealer for an aluminum boat depends on the product you use, how hard you run your boat, and whether you're in fresh or saltwater. A top-shelf epoxy sealant, applied right, can easily give you 5 to 10 years of protection under normal conditions.
But don't just circle a date on the calendar. The real key is regular inspection.
At least once a year, give the whole boat a good once-over. You're looking for the subtle tell-tale signs of wear: any peeling, hairline cracks, or areas that look dull and chalky. If your boat spends a lot of time beached on sand or battling corrosive saltwater, you'll want to check it more often. Those high-friction spots will always be the first to show wear and will likely need a touch-up to keep the hull fully protected.
Can I Apply Sealer Directly Over Old Paint?
This is a big one, and the answer is a qualified maybe. You can, but only if the paint is in almost perfect condition. We're talking zero flaking, no bubbling, and absolutely no peeling. If it's solid, you'd need to give it a thorough cleaning and then scuff it up to give the new sealer something to bite into.
Honestly, though, if the paint is compromised in any way, the answer is a hard no. Slapping a new sealer over failing paint is like putting a new roof on a house with a rotten frame. It’s just a matter of time before the new layer fails right along with the old one. If you see any issues, your only real option is to strip that paint down to bare, clean metal.
The bottom line is this: Your new sealer is only as good as the surface it’s sticking to. If that surface is weak, you're just wasting your time and money.
What Is The Best Temperature For Application?
Weather is your best friend or worst enemy on application day. Most marine sealants are happiest in moderate temperatures, somewhere in the ballpark of 50°F to 80°F (10°C to 27°C). But always, always read the label on your specific product—that's the final word.
If you try to apply it when it's too cold, the sealer might never cure properly, leaving you with a weak, tacky finish that offers little protection. On the flip side, working in direct sun or high heat is just as bad. The sealer can "flash cure" or dry too fast, which traps bubbles and prevents it from forming a strong bond with the aluminum.
Your perfect day is clear and dry with low humidity. Try to work in the shade or in a well-ventilated garage to get the best possible results.
Keeping your aluminum boat protected is just part of being a responsible owner, and having the right tools makes all the difference. At Better Boat, we carry everything from heavy-duty epoxy sealants to marine-grade cleaners, all designed to give you pro-level results without the guesswork. Check out our collection at https://www.betterboat.com and make sure your boat is ready for whatever the water throws at it.


