


A Practical Guide to Boat Bottom Paint Removal
Stripping your boat's bottom paint is a massive job—there's no sugarcoating it. But it's absolutely critical for keeping your boat running efficiently. Letting old, failing paint build up creates a surprising amount of drag, which slows you down and burns more fuel. Knowing when to bite the bullet and strip it all off is just as important as knowing how.
Why Your Boat Needs a Fresh Start
Let's be real—nobody looks forward to stripping bottom paint. It's a messy, back-breaking chore that can feel totally overwhelming. So, why even bother? The simple truth is that ignoring years of built-up or failing paint is like throwing money overboard while slowly hurting your boat's performance.
Think of your hull like an athlete; layers of cracked, flaky paint are like trying to run a marathon with a parachute strapped to your back.
All that extra resistance forces your engine to work harder just to maintain speed. A 30-foot cruiser, for example, can easily lose several knots from a rough, fouled bottom. Over a single season, that inefficiency adds up to hundreds of extra dollars spent on fuel.
This isn't just another maintenance task; it's a direct investment in your boat’s speed and fuel economy. A smooth hull is a huge part of how you properly clean your boat's bottom for peak performance.
Telltale Signs It's Time to Strip
So, when is it time for a full reset? You can get away with a light sanding and a fresh coat for a few seasons, but eventually, you'll have to take it all the way back to the gelcoat. Keep an eye out for these dead giveaways that your hull is ready for a full strip-down:
- Excessive Flaking or Cracking: If you're seeing large patches of paint peeling away, it's a clear sign the layers underneath have lost their grip. Painting over this is just putting a band-aid on a bigger problem.
- Widespread Blistering: Blisters are little pockets of solvent or water trapped between paint layers, or between the paint and the hull itself. They signal a failure that a quick sanding just can't fix.
- Thick Paint Buildup: After 5-7 seasons of repainting, all those accumulated layers add serious weight and create a weak foundation for new paint. A thick, uneven surface is just asking to crack and chip.
- Switching Paint Types: This is a big one. If you're moving from a hard bottom paint to a softer ablative one (or the other way around), you absolutely have to remove the old stuff. Incompatible paints just won't stick to each other properly, leading to a massive failure.
Tackling a full paint removal project does more than just restore your hull's hydrodynamic efficiency. It gives you a clean slate to inspect the gelcoat for hidden issues like osmosis blisters, protecting the structural integrity of your vessel for years to come.
Comparing the Best Paint Removal Methods
Choosing the right way to strip your boat's bottom paint is a big decision, and honestly, it should be. The path you pick dictates your budget, your time spent in the boatyard, and just how much elbow grease you're in for. We'll walk through the four main approaches: chemical stripping, mechanical sanding, media blasting, and using a heat gun.
Let's move beyond a generic pros-and-cons list and get into some real-world, practical insights. You need to know which method is going to work for your boat, your paint, and your skill level. The whole point is to get that hull stripped clean without causing damage, setting you up for a flawless new paint job.
Chemical Strippers: The DIY Favorite
For boat owners tackling this job themselves, chemical strippers are often the go-to choice. Today's marine strippers are a far cry from old-school industrial chemicals and are formulated to be much safer on fiberglass and gelcoat. That said, their effectiveness can be a mixed bag.
The real key is matching the stripper to the paint you're trying to remove. Softer, single-season ablative paints will often dissolve pretty quickly, sometimes in just a few hours. On the other hand, tough epoxy paints or hulls caked with years of thick layers might need a more potent, slow-acting formula that has to stay wet for up to 24 hours to really do its job.
The evolution of these products is a direct response to a major shift in the industry. Historically, since the 1970s ban on tributyltin (TBT) paints due to their devastating environmental impact, boaters shifted to copper-based alternatives.
These paints, which now dominate the market, require removal every few years to prevent the buildup of multiple layers that can add hundreds of pounds to a hull. In major markets, DIY removal accounts for 60% of these jobs, with chemical strippers dissolving 80-90% of old paint within 4-24 hours, dramatically cutting down labor time.
Mechanical Sanding: The Labor-Intensive Classic
Mechanical sanding is, without a doubt, the most physically demanding route you can take. It means getting up close and personal with a dual-action (DA) orbital sander and some aggressive sandpaper, usually around 40- to 60-grit, to grind off the old paint. While it seems straightforward, this method kicks up a massive amount of toxic dust and carries the highest risk of damaging your hull.
One wrong move or a moment of too much pressure, and you can burn right through the paint and gouge the gelcoat. Suddenly, your paint removal project has turned into an expensive fiberglass repair job.
This method is really best left to those with a steady, experienced hand or for small, targeted repairs instead of an entire hull. When dealing with rust stains on other parts of your boat, a different approach is needed. You can check out our guide on using acid to safely remove rust from marine surfaces.
Pro Tip: If you decide to sand, do yourself a favor and use a top-quality random orbital sander hooked up to a vacuum system. It will capture a huge portion of the hazardous dust, making the job safer for you and a lot cleaner for the boatyard.
Media Blasting: The Professional Powerhouse
Often called the gold standard for speed and efficiency, media blasting uses compressed air to shoot a medium—like sand, soda, or even dry ice—at the hull to obliterate the old paint. This is almost exclusively a job for the pros, as it requires specialized equipment and a ton of expertise to do it right.
The choice of media is everything:
- Soda Blasting: Uses baking soda, which is soft, water-soluble, and gentle on fiberglass. It won't profile (roughen up) the gelcoat, making it a very popular choice.
- Sand or Grit Blasting: This is much more aggressive and faster but can easily damage the underlying surface if not handled by an expert. It’s a better fit for tough steel or aluminum hulls.
While it's the fastest method by a long shot—a professional can often strip a 30-foot boat in a single day—it’s also the most expensive. You're paying a premium for the convenience and a perfectly prepped surface. When weighing the options, many people look into various DIY paint removal methods as a more cost-effective alternative to professional services.
This decision tree can help you visualize those first crucial steps in figuring out whether you need to strip everything off or just prep for another coat.
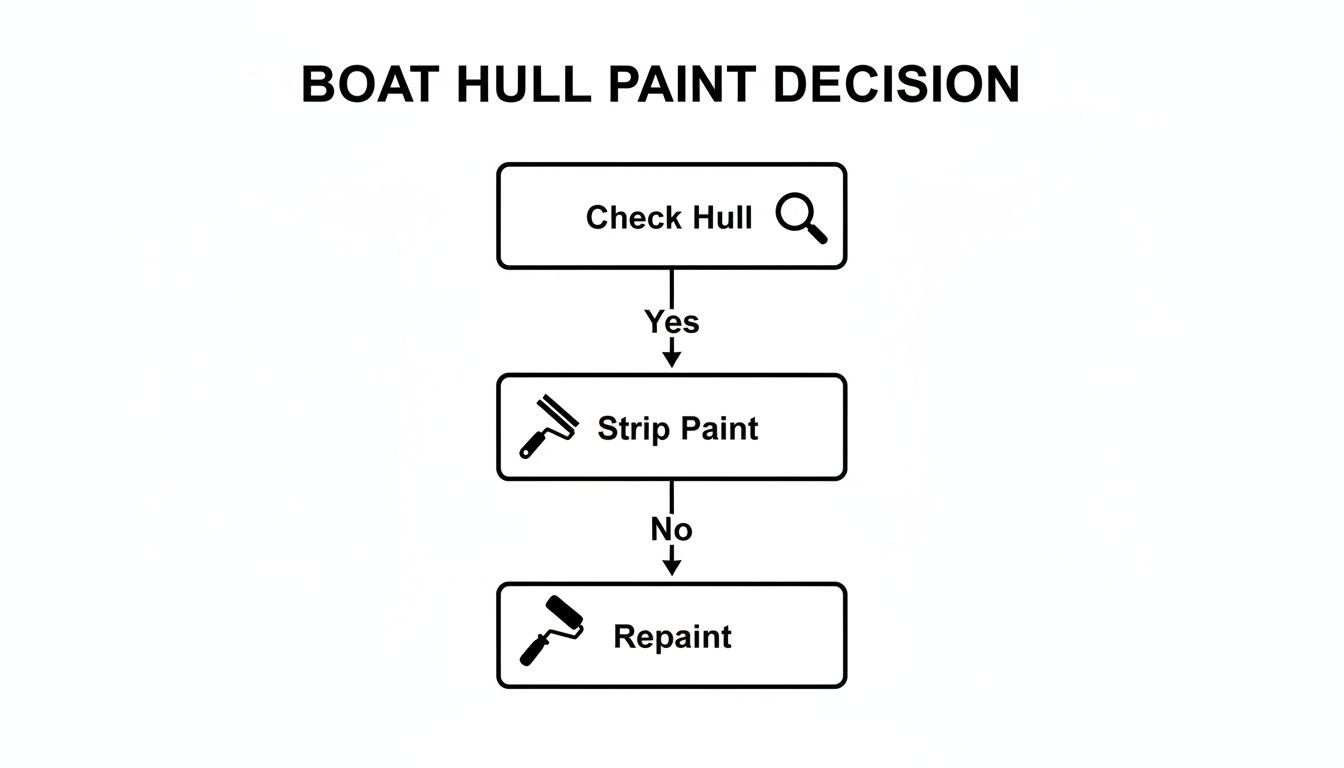
The flowchart simplifies the process, guiding you from a basic hull check to the fundamental choice of stripping old paint versus applying a new coat.
Heat Guns: A Niche Technique
Using a heat gun with a scraper is another way to get the job done, though it's not very common for stripping entire hulls. The process is simple: you heat a small section of paint until it softens and bubbles, then immediately scrape it away while it's still pliable.
It’s slow, tedious work that requires a delicate touch to avoid overheating and blistering the gelcoat. This technique is best saved for small problem areas or for boats with incredibly thick, stubborn paint layers that just won't budge with chemical strippers. On the plus side, it’s a completely dust-free alternative to sanding, but it definitely demands patience.
Making Your Final Decision
To pull it all together, the table below breaks down these four methods across the most important factors a boat owner needs to consider. Think about your budget, timeline, and comfort level as you weigh the pros and cons to make the best call for your vessel.
Comparison of Boat Bottom Paint Removal Methods
| Method | Best For Hull Type | Effort Level | Cost | Pros | Cons |
|---|---|---|---|---|---|
| Chemical Stripping | Fiberglass, Wood, Aluminum | Medium | Moderate | Less risk of hull damage, effective on thick layers. | Messy, requires careful cleanup, temperature-sensitive. |
| Mechanical Sanding | Experienced DIYers on any hull | High | Low | Inexpensive materials, gives user total control. | Very labor-intensive, high risk of gelcoat damage, creates toxic dust. |
| Media Blasting | All types (with correct media) | Low (for owner) | High | Extremely fast, provides an ideal surface for priming. | Expensive, requires professional service, can be noisy and disruptive. |
| Heat Gun | Wood, small sections on fiberglass | High | Low | No chemical use, low material cost, dust-free. | Extremely slow, high risk of heat damage to gelcoat or wood. |
Ultimately, there's no single "best" method—it all comes down to your specific situation. For most DIY boaters, chemical strippers hit that sweet spot of effectiveness, safety, and cost. But if time is your biggest enemy and the budget allows, you simply can't beat hiring a pro for media blasting.
How to Use Chemical Strippers Like a Pro
If you're looking to get your hands dirty, chemical stripping is hands-down the most popular and effective DIY method for taking off old bottom paint. When you do it right, it saves you from the absolutely back-breaking labor of sanding and the hefty price tag that comes with media blasting.
Here’s the thing, though. The real secret to success isn't about how hard you scrape—it’s all in the prep work and how you put the stripper on.
We'll walk you through the process, from figuring out how much product you’ll need to the final, all-important cleanup. Follow these steps, and you’ll end up with a clean, damage-free hull that’s ready for a fresh coat of paint.
Setting Up Your Workspace Correctly
Before you even think about cracking open a can of stripper, you have to prep your work area. This isn't just about keeping things neat; it's about following the rules and making the whole job easier on yourself. Most boatyards have very strict policies about containing waste, and a little prep work saves a ton of headaches.
Start by laying down heavy-duty plastic sheeting under the entire boat, making sure it extends several feet out from all sides. Use tape to secure it to the jack stands and the ground, creating a sort of "bowl."
This setup will catch every single drop of stripper and every flake of old paint. This containment is non-negotiable for keeping the yard manager happy and preventing nasty chemicals from soaking into the ground.
Calculating How Much Stripper You Need
Nothing is more frustrating than running out of stripper halfway through the job. To avoid this common mistake, you just need to do a quick bit of math. Most marine paint strippers list an estimated coverage rate right on the can, usually in square feet per gallon.
To get a rough idea of your hull's wetted surface area, use this simple formula:
Length of Waterline (LWL) x (Beam + Draft) = Approximate Square Footage
For instance, a 30-foot boat with a 10-foot beam and a 4-foot draft has an approximate surface area of 30 x (10 + 4) = 420 square feet. I always recommend buying a little more than you think you need. It's much better to have some left over than to make a second trip to the store with your boat half-covered in goo.
Key Takeaway: The golden rule of chemical stripping is to apply it thickly. A thin coat will just dry out before it gets a chance to work, meaning you'll be reapplying and scraping over and over. You want a coat that's at least 1/8 inch thick—think about the consistency of cake frosting.
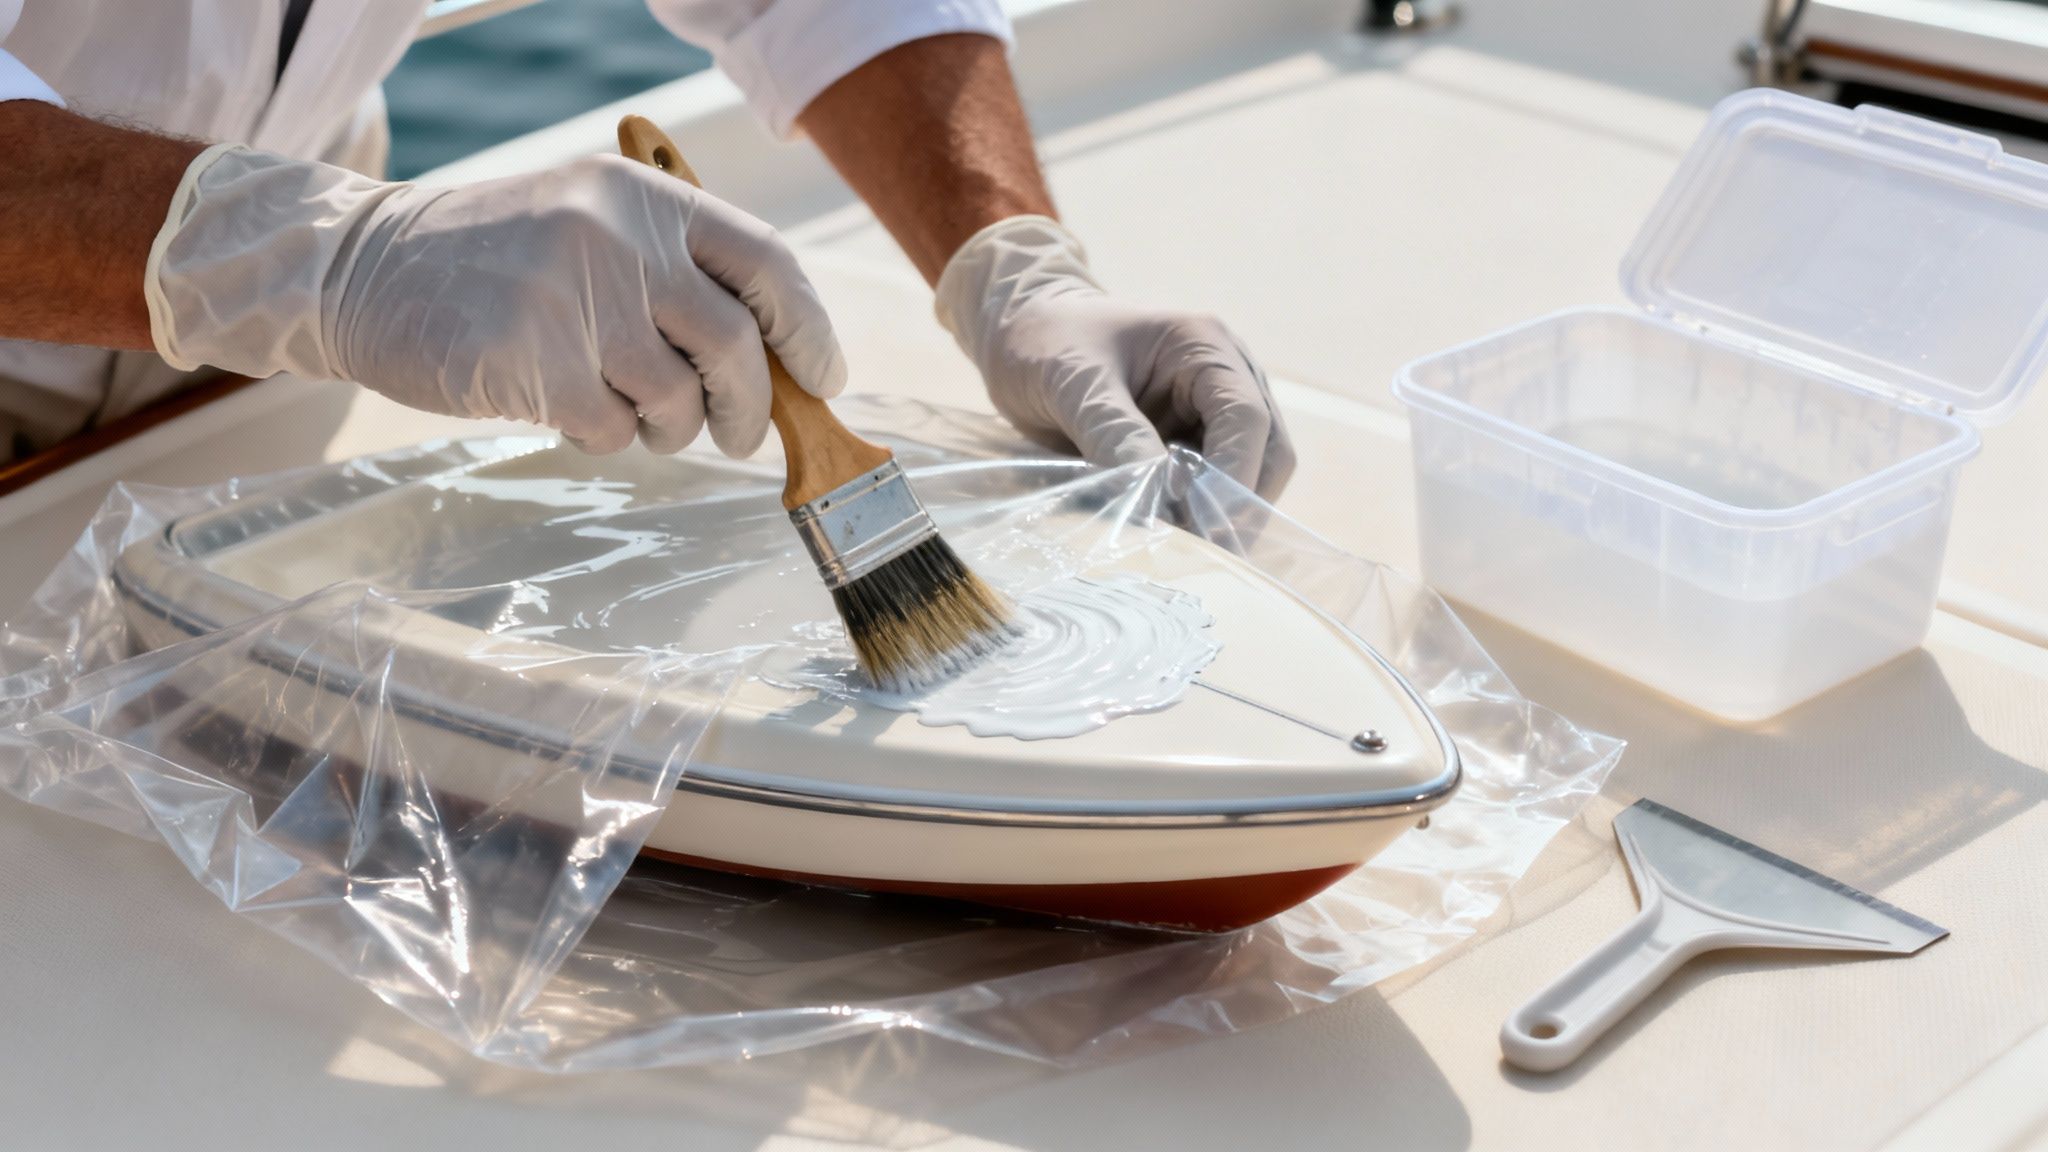
The Professional Application Technique
Alright, on to the main event. The way you apply the stripper makes all the difference. Don't try to "paint" it on in thin, neat strokes. The goal here is to slather it on, creating a thick blanket over the old paint.
- Load Up Your Brush: Grab an inexpensive, natural-bristle chip brush. Synthetic bristles can actually be dissolved by some of the more aggressive strippers.
- Apply Liberally: Slop the stripper on in one direction. Work in manageable sections, maybe 4x4 feet at a time. Don't brush back and forth—that just thins out the layer you're trying to build up.
- Cover and Wait: This is the single most important pro tip. As soon as you finish a section, immediately cover it with thin plastic sheeting or even wax paper. This traps the active solvents, keeping the stripper from evaporating. This one step is often the difference between paint that scrapes off like butter and a frustrating, sticky mess.
How long you wait can vary a lot, anywhere from a few hours to a full day, depending on the stripper, the paint, and the temperature.
Knowing When to Scrape
So, how do you know when it’s ready? After the recommended wait time, peel back a small corner of the plastic and do a test scrape in a spot that's out of sight.
Use a dull scraper—plastic or carbide with rounded corners works best to avoid gouging your fiberglass. If the paint peels off easily in long, gummy sheets right down to the gelcoat, you're good to go. If you hit a hard layer or the paint just chips off, it needs more time. Cover it back up and check again in a few hours.
The Final and Most Important Step: Cleanup
Once all the old paint is scraped off and collected on your plastic tarp, you're not done yet. The final cleanup is probably the most critical step for making sure your new paint job sticks properly. Your hull is now coated in a chemical residue that has to be completely removed and neutralized.
For this, we recommend a two-step process:
- Initial Wash: First, wash the entire hull with a dewaxing solvent or whatever specific wash the stripper manufacturer recommends. This gets rid of the bulk of the chemical gunk.
- Deep Clean and Neutralize: Next, give it a serious scrub with our powerful On and Off Hull & Bottom Cleaner. Its formula is designed to cut right through that stubborn residue, lifting any lingering contaminants out of the gelcoat's pores. This ensures the surface is truly clean and properly neutralized.
After that final scrub, give the hull a thorough rinse with fresh water and let it dry completely. A job done right leaves you with a perfectly prepped, pristine surface, setting you up for a flawless new coat of bottom paint that will last.
Essential Safety and Environmental Practices
Let's get one thing straight right out of the gate: when it comes to removing boat bottom paint, safety and environmental rules are the one part of the job you absolutely can't cut corners on. This isn't just about making a mess. You're dealing with materials that are seriously hazardous to your health and the local marine life.
This is non-negotiable. Following the right protocols isn't just about dodging a massive fine from the EPA or your marina—it’s about protecting yourself from very real health risks and keeping the waters we all love clean.
Protecting Yourself: Get the Right PPE
First things first, let’s talk Personal Protective Equipment, or PPE. I'm not talking about a flimsy paper dust mask and an old pair of gardening gloves. The dust and fumes kicking up from antifouling paint are loaded with nasty stuff like copper and other biocides. You do not want to be breathing that in or getting it on your skin.
Here's your must-have PPE checklist. Don't even think about starting without it:
- A High-Quality Respirator: A half-mask respirator fitted with P100 cartridges is your baseline. These are specifically rated to filter out the heavy metal particulates found in bottom paint dust, as well as lead and asbestos.
- Chemical-Resistant Gloves: Forget standard latex gloves; chemical strippers will eat right through them. You need a serious pair of heavy-duty nitrile or butyl rubber gloves to keep your hands safe.
- Full-Coverage Eye Protection: Vented goggles are essential. They form a complete seal around your eyes to block out chemical splashes and fine dust—something your everyday safety glasses just can't do.
- Disposable Coveralls: Get yourself a full-body Tyvek suit, complete with a hood. This keeps the toxic dust and chemical gunk off your clothes and skin, preventing you from tracking it home.
Think of it this way: investing in the right PPE is a whole lot cheaper than a medical bill. The small upfront cost is nothing compared to the long-term health problems you could face from exposure to these toxins.
Environmental Compliance and Containment
Protecting the environment is just as important as protecting yourself. Copper runoff from ablative paints is a massive problem—it contaminates 40% of U.S. marinas, with some hotspots showing levels 200% over the EPA limit. As the global antifouling market grows, this issue only gets worse. Every boat can shed kilograms of biocides each year, poisoning local marine ecosystems.
To do this right and stay compliant, you have to create a totally contained work area. Start by laying down heavy-duty plastic sheeting (6-mil or thicker) that covers the ground under the entire hull.
Make sure it extends at least 10 feet out from the boat's perimeter on all sides. Use strong tape to secure the sheeting up and around the jack stands, creating a "bowl" that will catch every single speck of dust, paint chip, and drop of chemical stripper.
Proper Disposal of Hazardous Waste
When the scraping and sanding is done, you’ll be left with a pile of contaminated plastic, used PPE, and a sludge of toxic paint. You can't just roll this up and toss it in the dumpster. In virtually every case, this material is classified as hazardous waste.
Talk to your boatyard manager about their specific disposal rules. Most marinas have designated collection areas or can point you to the local hazardous waste facility. You'll need to bag all the debris in heavy-duty plastic bags and label them clearly—something like "Hazardous Waste: Antifouling Paint Debris." Following the proper disposal process is a critical final step.
Being an environmentally responsible boater means seeing the job through from start to finish. If you're looking for more ways to lessen your impact, check out our 8 tips for environmentally conscious boating.
Prepping Your Hull for a Perfect New Finish
The hard part is over—you've muscled through the boat bottom paint removal. Now comes the part that really determines how good your new paint job will look and how long it will last: meticulous prep work. You can't rush this stage. A professional-grade finish is built on a flawless foundation.
This is your golden opportunity to inspect the hull, fix any issues that were hiding under all that old paint, and create the perfect canvas for the new coating to bite into.
A Detailed Hull Inspection
With the hull stripped bare, you have a rare, unobstructed view of your gelcoat's true condition. Take your time. Go over every single square inch, looking for trouble spots that need attention before you even think about cracking open a can of primer.
You’re mainly hunting for two things: blisters and damage. Osmotic blisters look like bubbles and mean moisture has gotten into the gelcoat. You can often grind out small, isolated blisters, fill them with an epoxy fairing compound, and sand them smooth. Widespread blistering, however, is a much bigger headache and usually means it's time to call in a professional.
Also, keep an eye out for stress cracks (especially around thru-hulls), gouges from past groundings, or any signs of delamination. While you can handle minor scratches easily, deeper structural problems should get a look from a marine surveyor or a fiberglass expert.
The Final Sanding for Adhesion
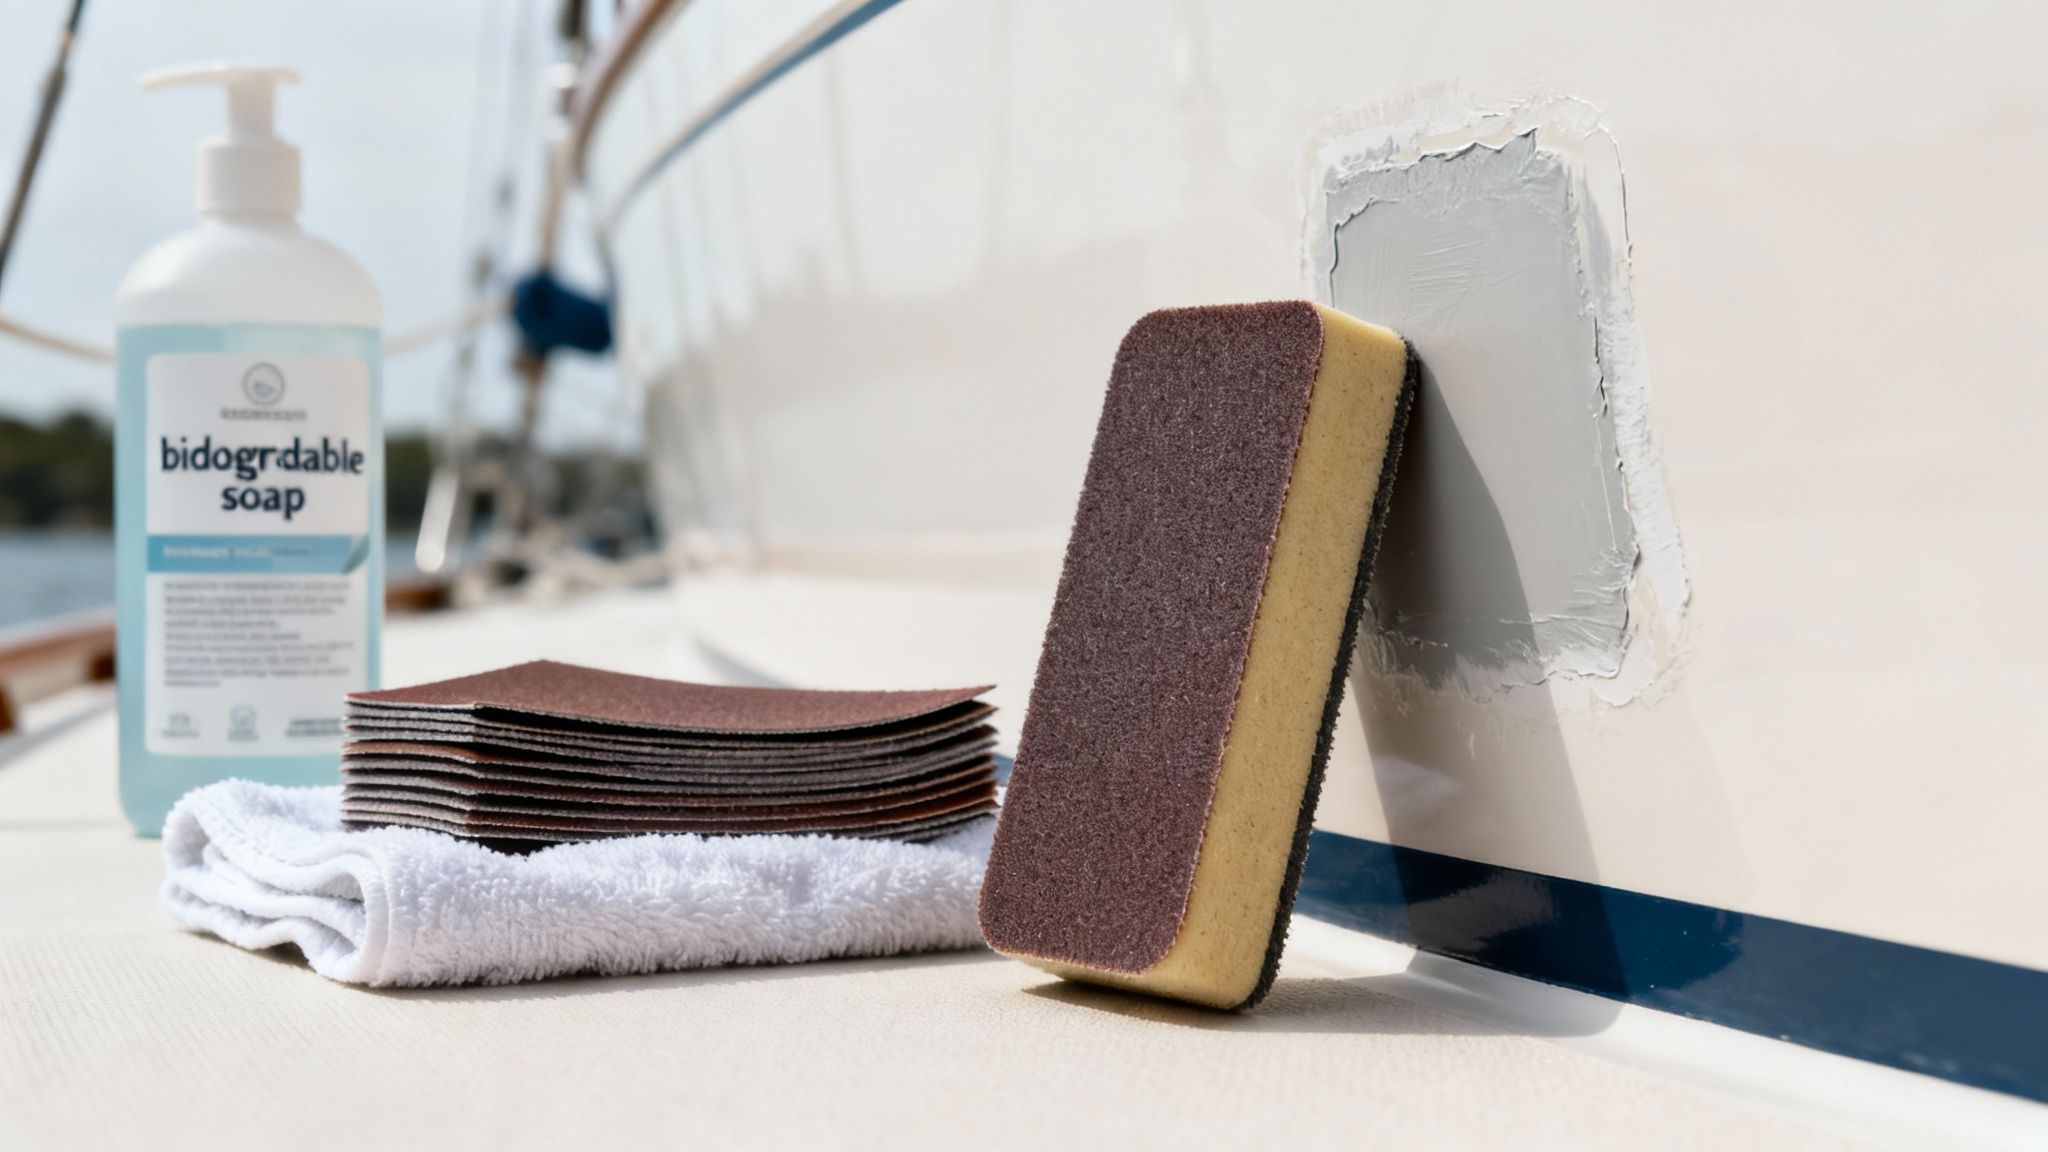
Even though the old paint is gone, the surface still needs one last sanding. This isn't about removal; it’s about creating a uniform "tooth" so the new primer has something to mechanically grip. A surface that's too smooth is a recipe for paint failure down the road.
For this critical step, grab a dual-action (DA) orbital sander and some 80-grit sandpaper. This grit is the industry standard for a reason—it's coarse enough to create a great mechanical profile but won't gouge your gelcoat.
Work in smooth, overlapping passes until the entire hull has a consistent, dull finish that feels slightly rough.
Key Insight: This final sanding creates microscopic peaks and valleys on the gelcoat. This massively increases the surface area, giving the epoxy primer a much stronger, more durable bond—the secret to preventing future paint peeling and blistering.
The Non-Negotiable Final Cleaning
After all that sanding, your hull is going to be covered in a fine layer of dust. Painting over this is a surefire way to waste all your hard work, because the new paint will stick to the dust, not the hull. A thorough cleaning is absolutely essential.
First, wipe down the entire hull with a solvent like acetone or a dedicated marine dewaxer on a clean rag. This will cut through any remaining oils, grease, or other contaminants.
Now, it's time for a proper wash.
- Use a quality soap: Mix our biodegradable Better Boat Soap with water. It’s tough on grime but won't harm your boat's surfaces.
- Scrub it down: Wash the whole hull to lift away every last speck of sanding dust.
- Rinse completely: Give the hull a thorough rinse with fresh water, making sure no soap residue is left behind.
- Dry it perfectly: Don't introduce new contaminants with old, dirty rags. Dry the hull using our lint-free Microfiber Towel Set. This guarantees you have a perfectly clean and dry canvas, ready for a flawless primer application.

Common Questions About Boat Bottom Paint Removal
Even the best-laid plans can hit a snag. When it comes to stripping bottom paint, a few questions pop up time and time again. Let’s tackle some of the most common ones boat owners have, so you can move forward with confidence.
Full Strip or Just Sand and Repaint?
This is a classic dilemma. The short answer is, your hull will tell you what it needs. If you're seeing widespread flaking, cracking, or big blisters, that’s a clear signal the old paint is failing. Slapping a new coat over a bad foundation is just asking for the new paint to fail, too. Time for a full strip.
Another tell-tale sign is paint buildup. Once you've got 3-5 layers caked on there, the sheer weight and thickness can cause the whole mess to lose its grip. You also absolutely have to strip it all off if you’re switching between incompatible paint types, like going from a hard epoxy to a soft ablative paint. The only time a simple scuff-and-repaint makes sense is when you have a single, solid layer of compatible paint that's in great shape.
The Biggest Mistake to Avoid
Hands down, the most common (and expensive) mistake is getting too aggressive with power tools. It’s incredibly easy to get carried away with an orbital sander or angle grinder. One heavy-handed pass with a coarse-grit disc can tear right through the paint and gouge the gelcoat. Suddenly, your paint job has turned into a major fiberglass repair project.
When using chemical strippers, the biggest mistake is skimping on the application. You need a thick, even coat. If you apply it too thin or let it dry out, it won't be able to do its job. You’ll end up scraping and reapplying over and over, wasting a ton of time, money, and elbow grease.
Professional vs. DIY Costs
There's a pretty big gap in cost here. Hiring a pro to strip your boat will typically run you somewhere between $35 to $70 per linear foot. So for a 30-foot boat, you're looking at a bill of $1,050 to $2,100, and maybe even more if they’re media blasting.
Going the DIY route brings that cost way down, usually into the $300 to $700 range for the same boat. That covers your stripper, tools, and all the safety gear you'll need. The trade-off, of course, is your own time and labor. What a pro crew can knock out in a day could easily take you a full weekend or more.
For commercial operations like boat rental businesses, paying for a professional job often makes financial sense. Data has shown that a properly stripped hull can push back dry-dock intervals by up to six months, saving as much as $3,000 per vessel each year.
As recreational boating continues to grow, DIY products are getting better, helping owners prevent issues like osmotic blistering, which is estimated to affect 30% of neglected hulls. You can dig deeper into these trends in the global boat bottom paint market report.
Important Note: Whatever you do, never grab a generic paint stripper from the hardware store. Those products are made for houses, not boats. They contain harsh solvents that can permanently melt or damage your boat’s gelcoat and fiberglass, leading to serious and expensive structural repairs.
At Better Boat, we’re all about making boat care simple and effective. As a family-owned American company, we offer a complete lineup of top-quality, easy-to-use cleaning products and boat accessories to help you protect your investment. Whether you're just out for the weekend or you're a seasoned mariner, you can find everything you need to keep your boat in pristine condition at https://www.betterboat.com.


