


How to Remove Barnacles from Boat: A DIY Guide
The best way to get barnacles off your boat is to haul it out of the water first. From there, a mix of good old-fashioned scraping, a pressure washer, and maybe some chemical help will get the job done right. This approach makes sure you can safely clear every bit of marine growth off the hull without damaging it, bringing back your boat's performance and fuel efficiency.
Why Barnacle Removal Is Essential for Your Boat
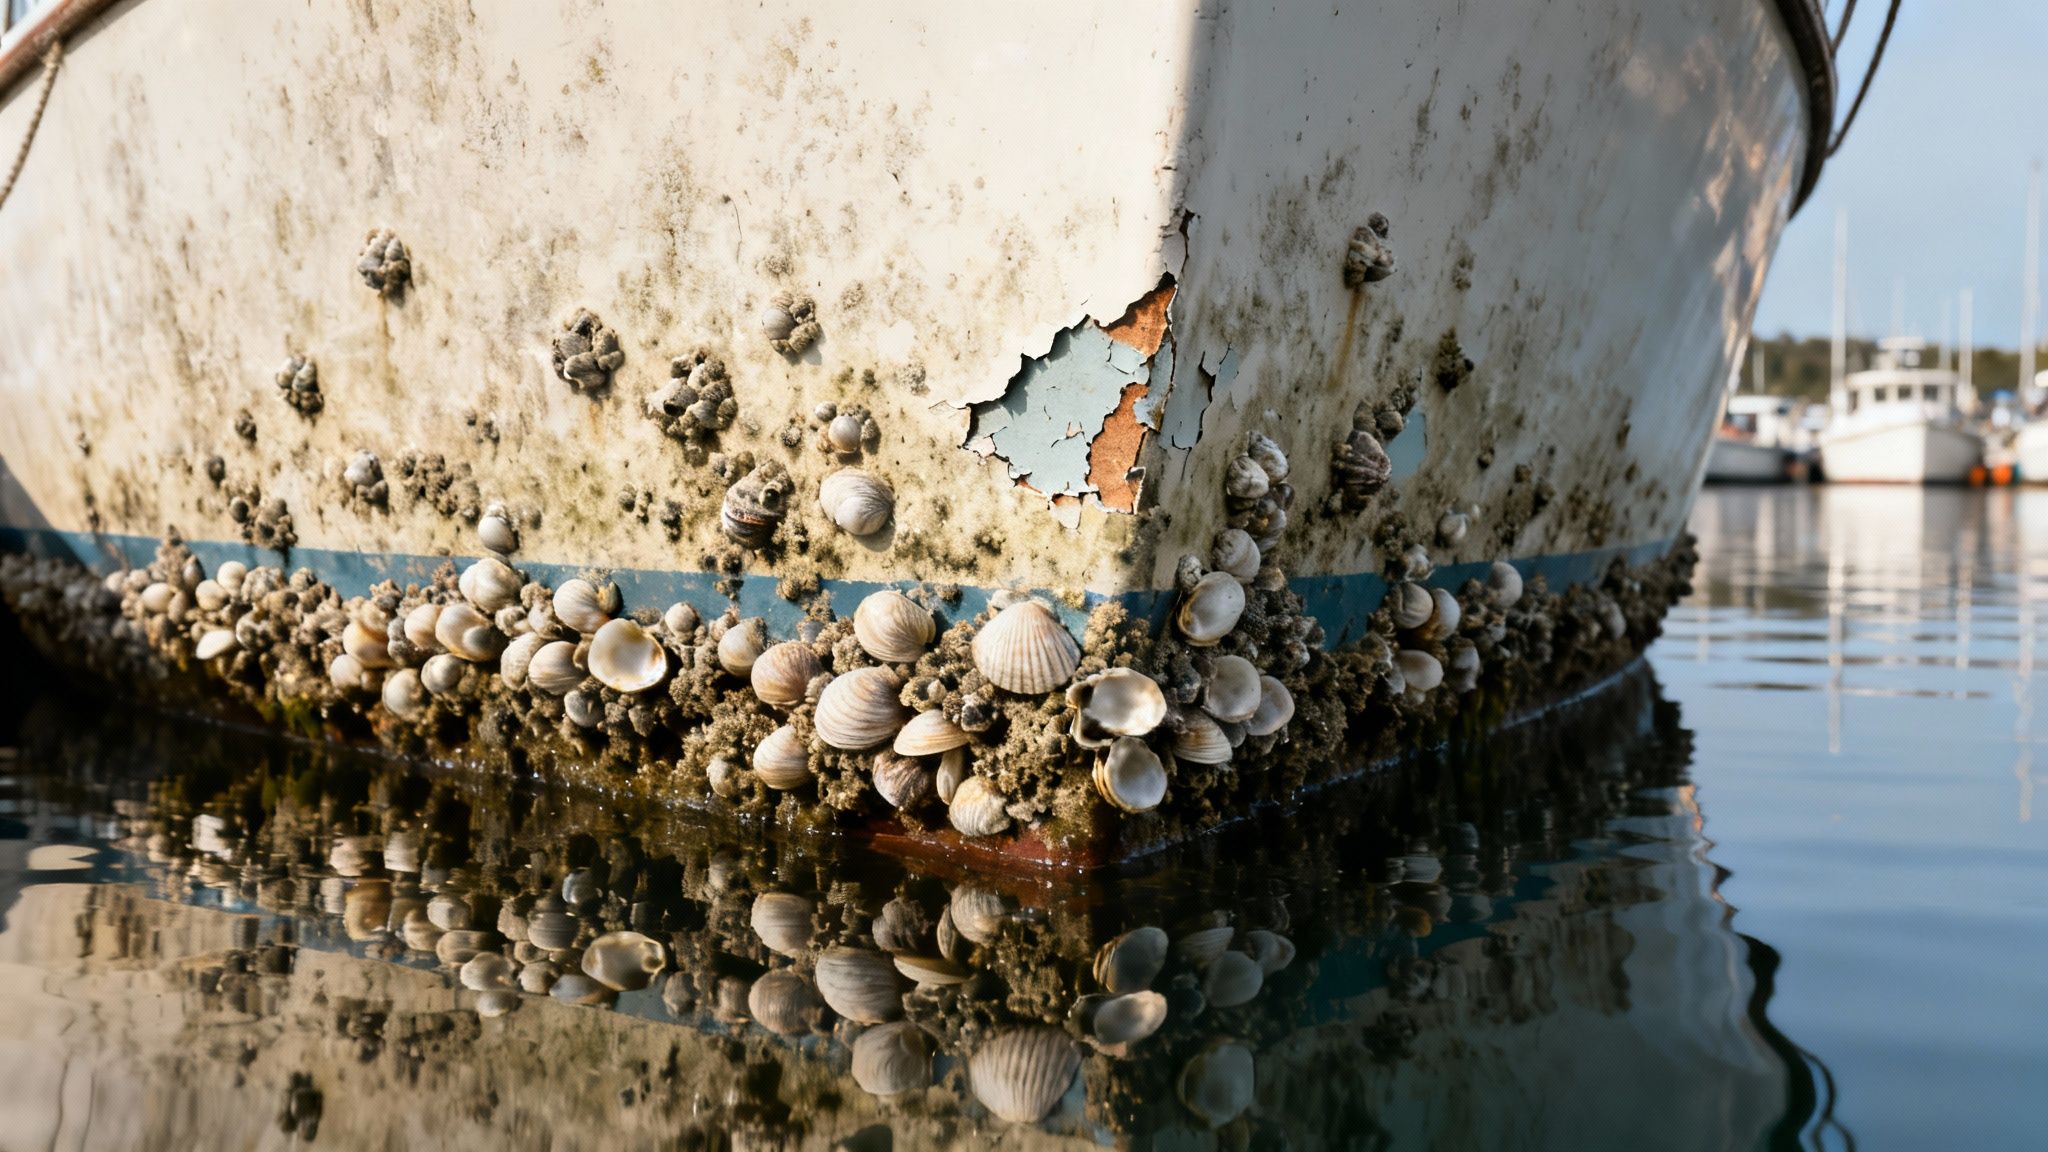
Finding a crusty layer of barnacles clinging to your hull is more than just an ugly surprise. These stubborn hitchhikers are a direct assault on your boat's performance, safety, and ultimately, your wallet. It's a problem every single boat owner has to deal with sooner or later.
Here’s a classic scenario I’ve seen countless times: You notice your boat feels sluggish and struggles to get on plane. Your top speed is definitely not what it used to be, and a quick glance at the fuel gauge confirms what you already suspect—you're burning through gas way too fast. This isn't a mechanical failure; it's the textbook sign of biofouling.
The True Cost of Neglecting Your Hull
That rough, bumpy surface created by barnacles massively increases the drag on your hull as it cuts through the water. Your engine has to work much harder to fight that resistance, which leads directly to slower speeds and terrible efficiency. It’s like trying to run through waist-deep water instead of on a dry track; the extra effort changes everything.
And this isn't just a small dip in performance. Research has shown that a severe barnacle problem can spike your fuel consumption by as much as 36%. For the average boater, that can mean hundreds, if not thousands, of extra dollars burned up in fuel over a single season. The full picture is laid out in reports on the economic impact of hull cleaning on Data Insights Market, and the numbers are staggering.
Beyond the hit to your wallet, letting barnacles build up can cause even bigger headaches:
- Engine Strain: The extra load can make your engine run hot, especially if barnacles block the water intakes needed for proper cooling.
- Structural Damage: These critters can eat through protective coatings and, given enough time, can compromise the integrity of your gelcoat or paint.
- Maneuverability Issues: A fouled hull doesn't handle as well. You'll notice a difference in steering and responsiveness, which can become a real safety concern.
Getting those barnacles off isn't just a chore; it's a crucial, cost-saving maintenance task that protects your investment. A clean hull means a faster, more fuel-efficient, and safer boat.
This guide is here to give you a practical, DIY approach to getting rid of barnacles for good. With the right tools and a little know-how, you can get your hull back to a smooth, clean finish and start enjoying your time on the water without the drag.
Assembling Your Barnacle Busting Toolkit
Walking into a barnacle removal job without the right gear is a recipe for a long, frustrating day. If you want to get this done efficiently and without tearing up your hull, you need to have the right tools ready to go. Think of it as gearing up for a specific, tough-as-nails mission—because that’s exactly what it is.
The absolute foundation of your toolkit will be a good set of manual scrapers. Don't just grab one. You'll want a few different sizes and materials. A wide, stiff plastic scraper is your workhorse for the big, flat areas of the hull; it's much less likely to gouge your fiberglass or gelcoat. For those tricky spots around props, rudders, and intakes, a narrower tool is a must-have.
Manual and Powered Tools for the Job
Scraping is the main event, but a few other key players can make the work go a whole lot smoother. A decent pressure washer, for example, can be a game-changer. It'll blast away much of the growth and dramatically cut down on the elbow grease you'll need later.
I've found that a machine in the 2,000 to 4,000 PSI range is the sweet spot. It's got enough muscle to knock off stubborn hangers-on without being so aggressive it damages your hull's finish.
Once the heavy lifting is done, it's time for the detail work with the right scrubbers. A little prep here really pays off. Soaking the remaining tough spots with a good marine soap helps loosen that biological "cement" barnacles use to weld themselves to your boat.
- Heavy Duty Boat Soap: Mix this up in a bucket and slop it onto the stubborn areas with a brush or sponge. Let it sit for 10-15 minutes before you start scraping. You’ll be surprised at how much easier the shells pop off.
- Stiff-Bristled Brushes: Your arms will thank you for this one. Our 3-Pack of Drill Brushes hooks up to any standard drill, turning a tedious scrubbing job into a quick power-cleaning session. They’re perfect for grinding away the stubborn rings and bases left behind after the main shells are gone.
- Scrub Pads: For the final cleanup on more delicate surfaces, our Boat Scuff Erasers & Hull Scrubber pads are what you want. They’ll take off the last traces of grime without scratching up your finish, leaving the surface clean and ready for a fresh coat of wax or paint.

Chemical Solutions and Safety Gear
Sometimes, elbow grease and power tools just don't cut it. That's when you might reach for a chemical remover. These are usually acid-based formulas that dissolve the calcium carbonate shells. But listen—these are serious chemicals and you have to treat them with respect. It's absolutely critical to understand the proper handling of corrosive cleaning agents before you even think about using them.
Safety here is completely non-negotiable. Barnacle shells are like tiny razors, and the whole process kicks up a lot of sharp debris. Always, always wear thick, waterproof gloves, full-coverage safety goggles, and old clothes you don’t care about.
With the right mix of tools, cleaners, and safety gear, you're set up to tackle this job like a pro. Having a well-stocked kit means you can adapt to whatever level of fouling you're facing and get a clean, professional result.
For a deeper dive into what makes a great marine cleaning kit, take a look at our guide to the best boat cleaning products. Being prepared makes all the difference, not just for barnacles, but for any cleaning challenge that comes your way.
Your Barnacle Removal Game Plan
Alright, this is where we get our hands dirty. With your tools laid out and safety gear on, it’s time to tackle the main event: getting those stubborn barnacles off your boat's hull. The key here isn't just brute force; it's about using the right technique for your boat to get a clean, damage-free finish.
The first big decision is choosing your weapon: manual scraping or high-pressure water. This choice really comes down to how bad the infestation is. A few scattered barnacles don't warrant firing up heavy machinery, but a hull that looks like a reef exhibit demands a more powerful approach.
This simple flowchart can help you decide where to start.
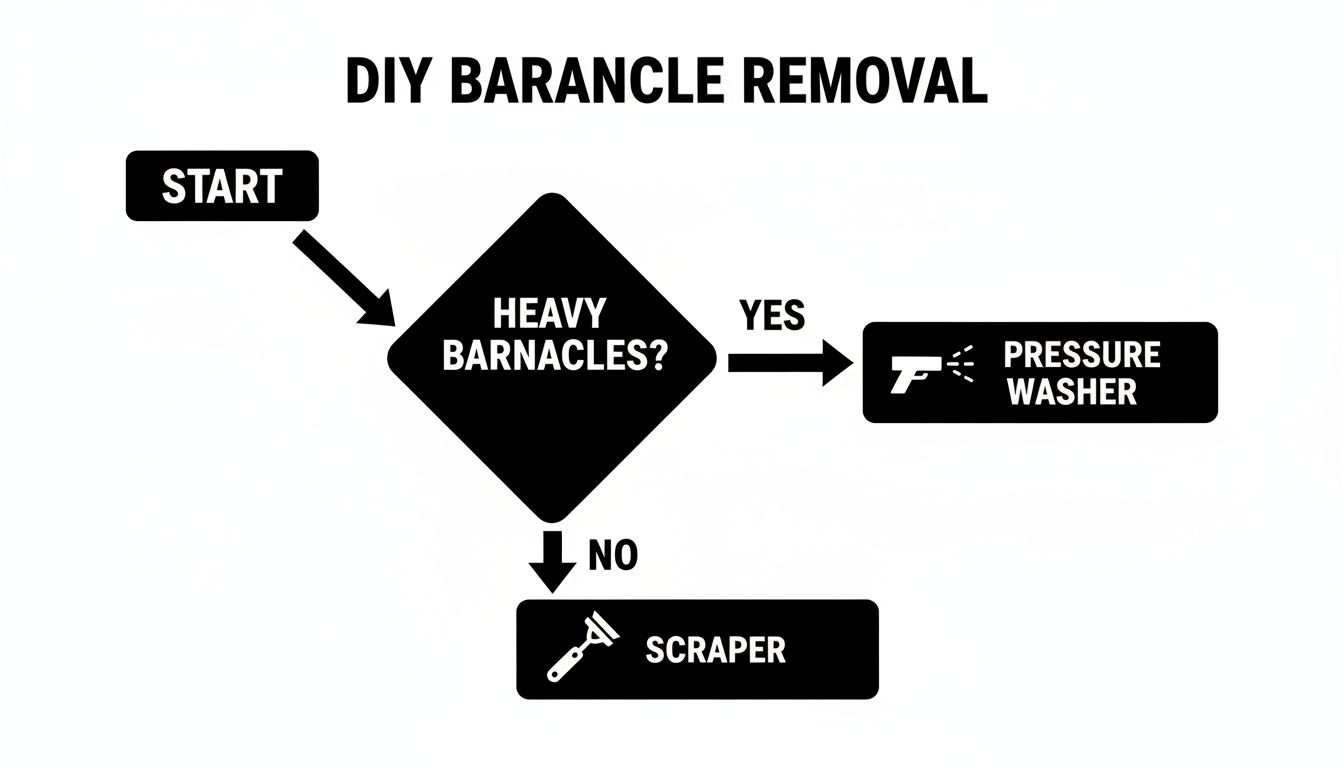
Essentially, a pressure washer is your most efficient tool for heavy growth, while manual scrapers are perfect for lighter work and the final cleanup.
Choosing Your Barnacle Removal Method
Use this quick-reference guide to select the best barnacle removal technique based on infestation severity and your boat's hull material.
| Method | Best For | Pros | Cons and Precautions |
|---|---|---|---|
| Manual Scraping | Light infestations, sensitive areas, final cleanup of base rings. | Low cost, high precision, minimal risk of damage to hull. | Labor-intensive, slow for heavy growth, requires physical effort. |
| Pressure Washing | Heavy, widespread infestations of barnacles and algae. | Extremely fast, removes bulk growth with less effort. | Can damage gelcoat, paint, or wood if pressure is too high or used incorrectly. |
| Drill Brush | Stubborn calcium base rings left after scraping or washing. | More effective than hand scrubbing, less effort. | Can cause swirl marks if used too aggressively on a single spot. |
Each method has its place, and you'll likely use a combination of them to get the job done right.
Starting with Manual Scraping
For lighter infestations or for getting into tight spots, manual scraping is your go-to. The goal is to apply firm, steady pressure at a low angle—think about 30 to 45 degrees—to get under the barnacle's edge and pop it off. If you go too steep, you risk digging into your gelcoat, which is exactly what you want to avoid.
Start with a wide, stiff plastic scraper for the large, flat sections. This spreads the pressure out and is much kinder to your finish than a metal tool. Work in small, manageable sections, moving methodically across the hull.
You’ll quickly find that even after the main shell is gone, a hard, white ring (the barnacle’s base) remains cemented on. This is where patience comes in. A narrower scraper or a putty knife can help you chip away at these stubborn leftovers.
Bringing In the Heavy Artillery: Pressure Washing
When your hull looks more like a coral reef than a boat, a pressure washer is your best friend. This tool strips away the bulk of the growth in a fraction of the time it would take to scrape by hand, saving you a ton of physical effort. But with great power comes the need for great caution.
It’s crucial to use the right settings. Industry pros often use 2,000-4,000 PSI to knock off 95% of growth in a single pass without damaging the gelcoat. If you dial the pressure too high, you can easily strip paint or even etch the fiberglass, creating more work for yourself later.
- Pick the Right Nozzle: Start with a wider-angle nozzle, like a 25 or 40-degree tip, to distribute the force. A zero-degree "pencil" jet is way too aggressive and will almost certainly cause damage.
- Keep Your Distance: Hold the nozzle about 12-18 inches from the hull. Getting too close concentrates the pressure and dramatically increases the risk of gouging.
- Use a Sweeping Motion: Keep the wand moving in smooth, overlapping sweeps. Never let the jet sit in one spot.
For an extra boost, you can run a marine-grade soap through your pressure washer. Adding our Boat Soap to the mix helps break down the slime and algae that come with barnacles, making the whole process more effective. It’s also biodegradable, so it's tough on grime but easy on the environment.
Tackling Different Hull Materials
Your boat’s hull material dictates how aggressive you can really be. What works for a rugged fiberglass hull could be a disaster for a painted aluminum or classic wooden boat.
Fiberglass and Gelcoat
Fiberglass is tough, but it's the gelcoat you need to protect. Stick with plastic scrapers to avoid scratches. If you must use a metal scraper on a stubborn spot, use it with extreme care and at a very shallow angle. After the big stuff is gone, you'll have those tough calcium base rings left. This is a perfect job for a Drill Brush Attachment Set. Paired with a paste of Boat Soap and water, the stiff bristles will scrub away the residue without harming the gelcoat.
Aluminum Hulls
Whether it's painted or not, aluminum is softer than fiberglass and needs a gentler touch.
- Painted Aluminum: Never use metal scrapers here. You'll easily chip the paint and open the door for corrosion. Stick exclusively to plastic tools.
- Unpainted Aluminum: You have a bit more leeway, but still be careful. Any deep gouges can become spots for pitting and corrosion down the road.
Pro Tip: For any hull type, working while the growth is still damp makes a huge difference. If the barnacles dry out completely, they turn rock-hard. Keep a hose handy to wet down the area you’re working on.
Wooden Hulls
Wood is the most delicate of all. A pressure washer should be on its lowest effective setting and used from a greater distance. Aggressive scraping can splinter and gouge the wood, which means a lot of repair work. Use flexible plastic scrapers and just take your time. This is a job that rewards patience over power.
The Final Cleanup and Inspection
Once the last barnacle base has been scrubbed away, it's time for a thorough wash-down. Give the entire hull a good cleaning with Boat Soap and water to remove all the debris, shell fragments, and residue.
Finally, wipe the hull down with our premium, non-abrasive microfiber towels. This isn't just about making it look good; it's your chance to do a close-up inspection. Look for any scratches, gouges, or blisters that might have been hiding under all that marine growth.
This detailed process is a core part of comprehensive boat bottom cleaning, ensuring your hull is not just clean but also sound. To learn more about this critical maintenance step, check out our guide on how to clean your boat bottom effectively. Catching small issues now prevents them from becoming major headaches later.
Protecting Your Hull After Barnacle Removal
Getting that last barnacle off your hull feels like a huge win, but your work isn’t quite done yet. With the surface finally clean, your immediate next step is to inspect and protect it. This is the crucial stage that really safeguards your boat and, trust me, makes future cleanups so much easier.
With the hull completely bare, you have a perfect, unfiltered view of what's been going on underneath all that marine growth. You might not realize it, but barnacles can be surprisingly destructive, trapping moisture against the gelcoat and creating the perfect environment for trouble to brew.
Conduct a Thorough Hull Inspection
Now's the time to get up close and personal with your hull. Take your time and give it a detailed, hands-on inspection. Don't just rely on your eyes; run your hand over every square inch. You'll often feel imperfections you can't see. You're hunting for any sign of trouble that needs fixing before you seal everything up with wax or paint.
Here's what to keep an eye out for:
- Blisters: These little bubbles or bumps in the gelcoat are a classic sign of osmosis, meaning water has snuck past the outer layer.
- Cracks: Look carefully for hairline cracks, paying extra attention to high-stress areas and spots around fittings.
- Deep Scratches or Gouges: Sometimes, even with careful scraping, you can leave a mark. Any gouge that breaks through the gelcoat is a priority to fix.
Finding damage can be a bit of a letdown, but it's way better to find it now than to discover it a season later when it's become a much bigger headache. The good news is that most minor issues are completely fixable. For a lot of boat owners, learning the ropes of repairing gelcoat scratches is a game-changing skill that saves a ton of money.
Repairing Minor Damage and Restoring Protection
If you spot any minor chips or gouges, it's smart to tackle them right away. If you leave them, these little openings become invitations for water to seep into the fiberglass laminate, which can lead to serious structural problems down the road. Our Epoxy Resin Kit is your best friend for these kinds of repairs.
The two-part formula mixes up to create an incredibly strong, waterproof bond that’s perfect for filling those imperfections. It cures to a rock-hard, durable finish that you can sand perfectly smooth, making the damage disappear while restoring the hull's solid defense.
Once your repairs are fully cured and sanded, it's time for the final, most critical step: rebuilding your hull's protective barrier. A freshly scraped hull is a vulnerable hull. You need to create a shield that protects it and makes it tough for marine life to get a foothold next time.
Applying a quality polish and wax isn't just about making your boat look good—it's about creating a slick, hydrophobic surface that's your first line of defense against future barnacles. It seals the microscopic pores in the gelcoat, protecting it from both the elements and biofouling.
Applying Polish and Wax for a Lasting Finish
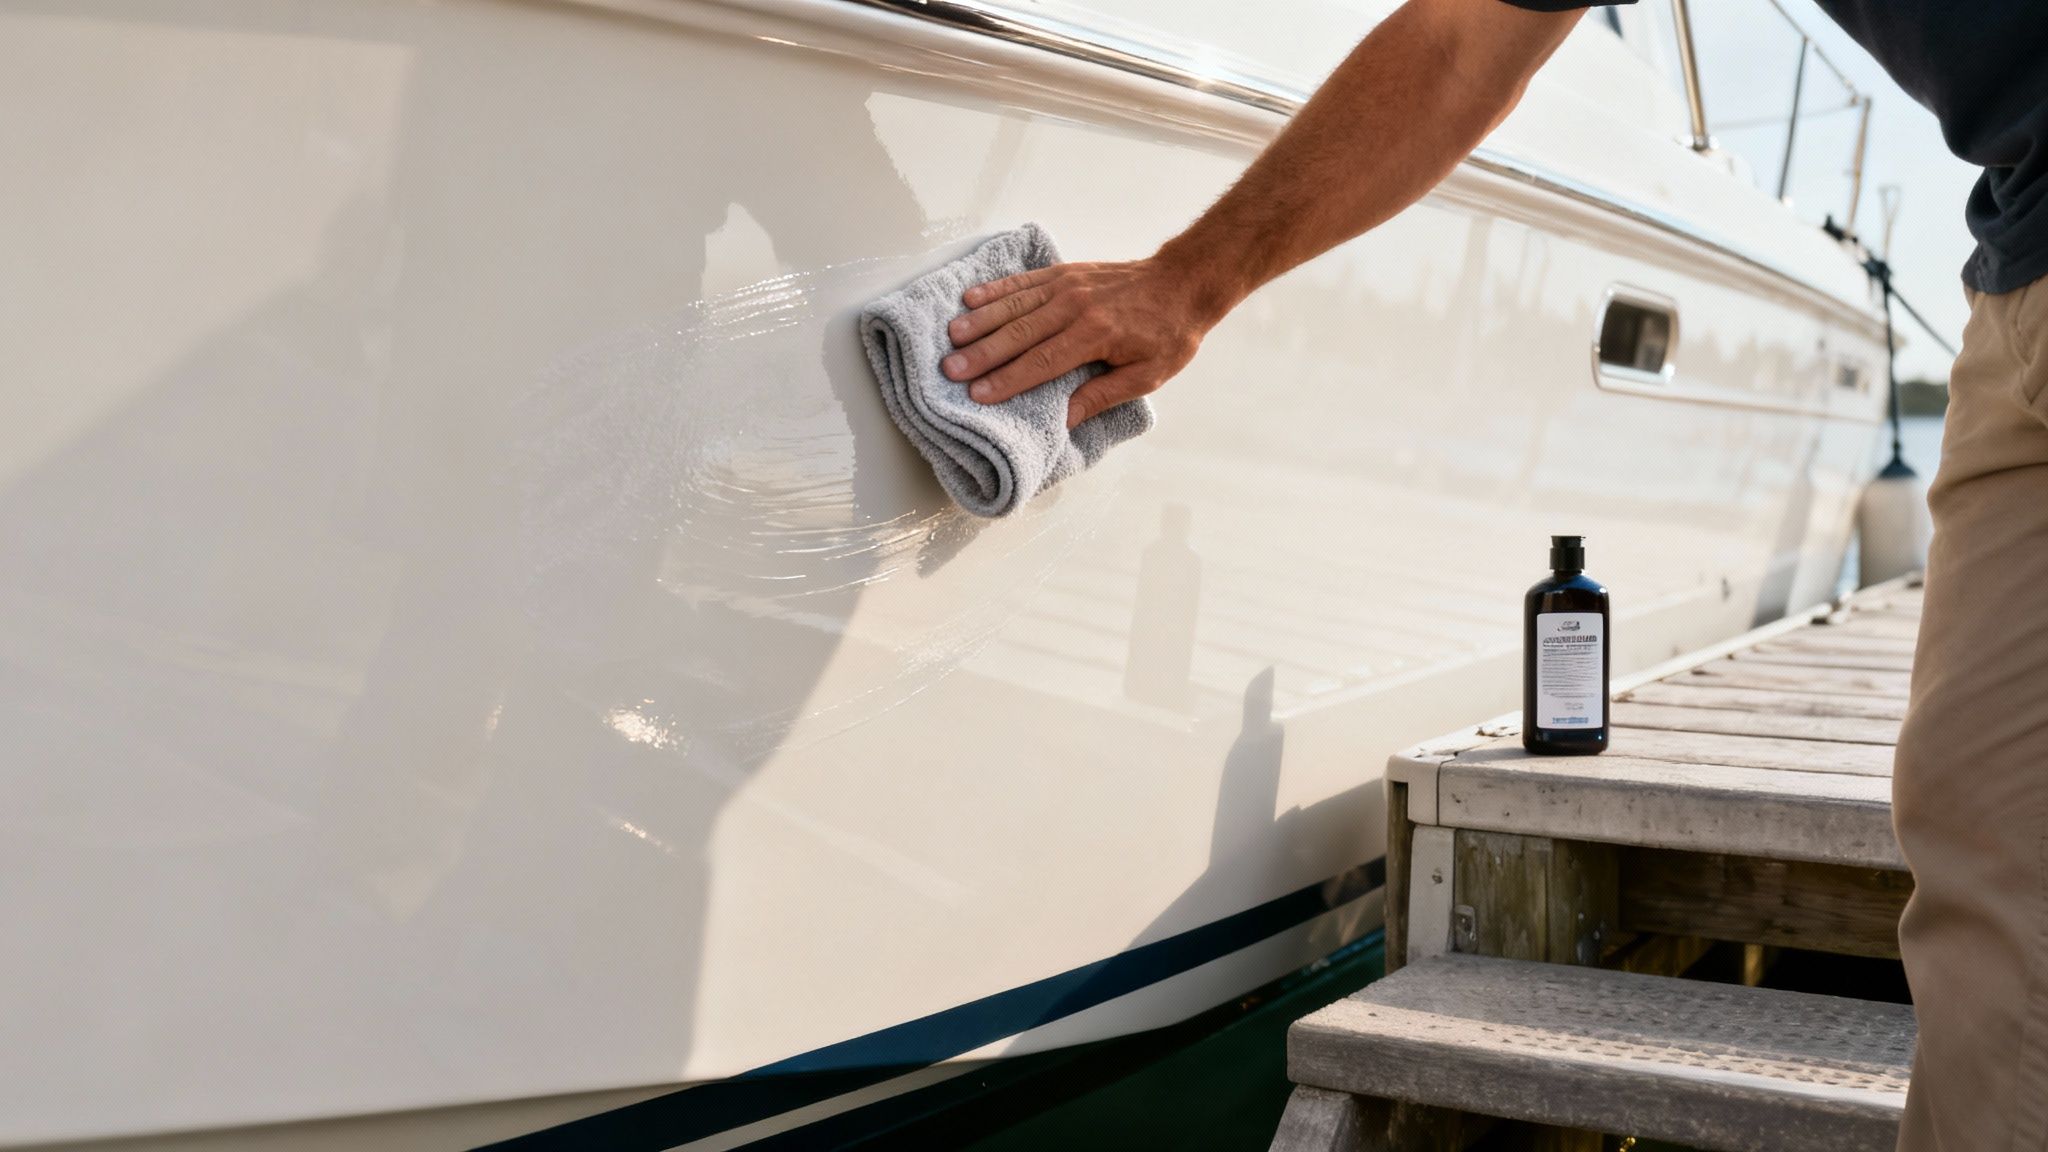
Kick things off with our Marine Polish with Wax. This stuff is a fantastic all-in-one that knocks out light oxidation and fine swirl marks while laying down a solid layer of high-grade carnauba wax. Use a clean microfiber applicator pad and work it in with circular, overlapping motions.
The key is to work in small, manageable sections, about 2x2 feet at a time. Let the polish dry to a light haze, then buff it off with a fresh microfiber towel. This process doesn't just bring back a brilliant shine; it fills in those tiny pores in the gelcoat, creating that slick surface we're after.
For an even tougher, longer-lasting shield, follow that up with a dedicated coat of our Premium Grade Marine Boat Wax. This adds another durable layer of protection, giving you that deep, wet-look gloss that will keep your hull protected for months to come.
Winning the Long Game with Smart Prevention
The best way to deal with barnacles is to make your boat a place they never want to call home. After all the hard work of scraping, scrubbing, and polishing your hull, the last thing you want is to do it all over again next season. Shifting your mindset from reactive cleaning to proactive prevention is the real secret.
You don't just want to win a single battle against barnacles; you want to create an environment where the war never even starts. This means building a multi-layered defense that starts with the right foundation and is backed up by simple, consistent upkeep.
The Foundation of Defense: Antifouling Paint
Your first—and strongest—line of defense is a high-quality antifouling bottom paint. This isn't just a cosmetic touch; it's a specialized coating loaded with biocides that actively repel marine organisms looking for a place to latch on. Think of it as a force field for your hull.
There are two main types to consider, and the right one for you really depends on how you use your boat.
- Ablative (Self-Polishing) Paint: This paint slowly wears away as water flows over the hull, constantly exposing a fresh, potent layer of biocide. It’s a fantastic choice for most of us, especially if your boat stays in the water for long stretches.
- Hard Antifouling Paint: This option creates a tough, non-eroding surface that leaches biocides over time. It's built for faster boats or vessels that are frequently trailered since the hard finish can handle more abuse from scrubbing and transport.
Applying this paint correctly is everything. To make sure you get the maximum protection for your effort, check out our complete guide on proper boat bottom painting techniques.
Preventing barnacle growth isn't just about avoiding a tough cleaning job. It’s a direct investment in your boat’s performance and fuel efficiency. A clean hull is a fast hull.
The numbers don't lie. A hull covered in barnacles creates significant drag, which can spike your fuel costs by 10-40%. For anyone who cruises regularly, that can easily mean an extra $1,000+ a year at the pump. Prevention isn't just a good idea; it's smart money management.
Consistent Cleaning Creates an Unwelcoming Surface
While antifouling paint is a powerhouse, it’s not a "set it and forget it" solution. Your next layer of defense is simply a regular cleaning schedule. Marine growth always starts as a soft, slimy biofilm—the perfect welcome mat for barnacle larvae to settle in. If you get rid of the slime, you stop the problem before it even begins.
This doesn't have to be a huge chore. A quick, periodic scrub of the waterline and hull makes a world of difference. Grab a long-handled brush and our biodegradable Boat Soap to easily wash away that initial slime before it turns into a five-star resort for stubborn critters.
Proactive Habits for a Cleaner Hull
Beyond paint and scrubbing, a few other habits can help keep your boat barnacle-free. These are simple adjustments you can easily weave into your regular boating routine.
- Frequent Use: A boat that’s always on the move is a tough target. The constant flow of water over the hull makes it much harder for larvae to get a grip.
- Freshwater Rinses: If you can, rinsing your hull with fresh water after a day on the salt can kill off many marine organisms before they have a chance to establish themselves.
- Consider a Hull Cover: For boats kept in a slip, a bottom cover can shield the hull from sunlight and marine life, dramatically cutting down on all types of fouling.
In the end, it’s the combination of these strategies that offers the most robust defense. To learn more about how general upkeep helps prevent marine growth, take a look at these simple boat maintenance practices. By being proactive, you'll save yourself countless hours of back-breaking labor and keep your boat performing exactly as it should.
Common Questions About Removing Barnacles
Even with a solid game plan, you probably still have a few questions rolling around in your head. Let's tackle some of the most common ones we hear from boat owners.
How Often Should I Clean My Boat Hull to Prevent Barnacles?
Honestly, it really comes down to where you boat and how much you use your vessel. If you're in warm, nutrient-rich waters like Florida or the Gulf Coast, marine life grows at an astonishing rate. In those areas, a quick scrub at the waterline every few weeks is a smart habit. A full haul-out and deep clean should be on your calendar at least once a year, maybe even every six months if growth is aggressive.
On the other hand, if you're boating in cooler, less active northern waters, you can likely get away with one thorough annual cleaning. The best strategy is always just to keep an eye on things. If you can see or feel a layer of slime building up, that’s your signal to get cleaning. Wiping off that initial biofilm disrupts the whole cycle and stops barnacles before they get a chance to latch on.
Can I Use Household Cleaners on My Boat Hull?
We get this question a lot, and the answer is a hard no. It might seem like an easy way to save a few bucks, but household products like bleach, ammonia, or all-purpose sprays can cause some serious headaches for your boat. These harsh chemicals can easily damage your gelcoat, strip away protective waxes, and leave the surface exposed.
Even more importantly, they're often toxic to the marine environment. You should always reach for products specifically formulated for marine use. A biodegradable formula like our Boat Soap is designed to cut through salt, grime, and slime while being completely safe for your boat’s finish and the ecosystem you love to explore.
Using the right cleaner isn't just about getting the job done; it's about being a responsible boat owner. Marine-safe products protect your investment and the waters you enjoy.
What Is the Difference Between Hard and Ablative Antifouling Paint?
Knowing the difference here is crucial for choosing the right long-term protection for your hull.
- Hard Antifouling Paint: This kind cures to a tough, solid finish that slowly leaches out biocides to keep marine growth away. It's a fantastic choice for faster boats or any vessel that's frequently trailered, as it can handle the scrubbing and transport without losing its protective qualities.
- Ablative (or Self-Polishing) Paint: This paint is designed to wear away slowly as water flows across the hull. This "polishing" action constantly exposes a fresh, potent layer of antifouling agent. It's the go-to for most recreational boaters, especially if your boat spends most of its time at the dock, since its effectiveness doesn't depend on constant motion.
Is It Better to Clean My Boat in or Out of the Water?
This really depends on the scale of the job. For a routine, light-duty scrub—like wiping off that first layer of slime we talked about—an in-water cleaning with long-handled brushes is perfectly fine and super convenient.
However, when you're facing a serious barnacle infestation, hauling the boat out is non-negotiable. It's the only way you can safely and effectively get to the entire hull. This gives you the access you need for pressure washers and scrapers and lets you do a proper inspection for any hidden damage afterward. Pulling the boat is also the most environmentally responsible option, ensuring all that scraped-off debris, old paint, and barnacle shells are contained on land instead of falling back into the water.
At Better Boat, we know that a clean hull is the foundation of a great day on the water. Our family-owned company provides everything you need—from powerful, eco-friendly soaps to durable drill brushes—to tackle barnacles and keep your boat in prime condition. Explore our complete collection of premium cleaning supplies at https://www.betterboat.com and make your next maintenance day a success.


