


A Pro Guide to Boat Buffing Compound for a Mirror Finish
A good boat buffing compound is an absolute game-changer for bringing a tired, chalky hull back to life. Think of it as a specialized abrasive liquid or paste made specifically to cut through oxidation, light scratches, and stains on your boat's gelcoat, revealing that deep color and shine you remember.
Picking the right one isn't about grabbing the strongest formula you can find. It’s a careful process of matching the compound's abrasiveness—its "cut"—to just how much weathering your hull has endured.
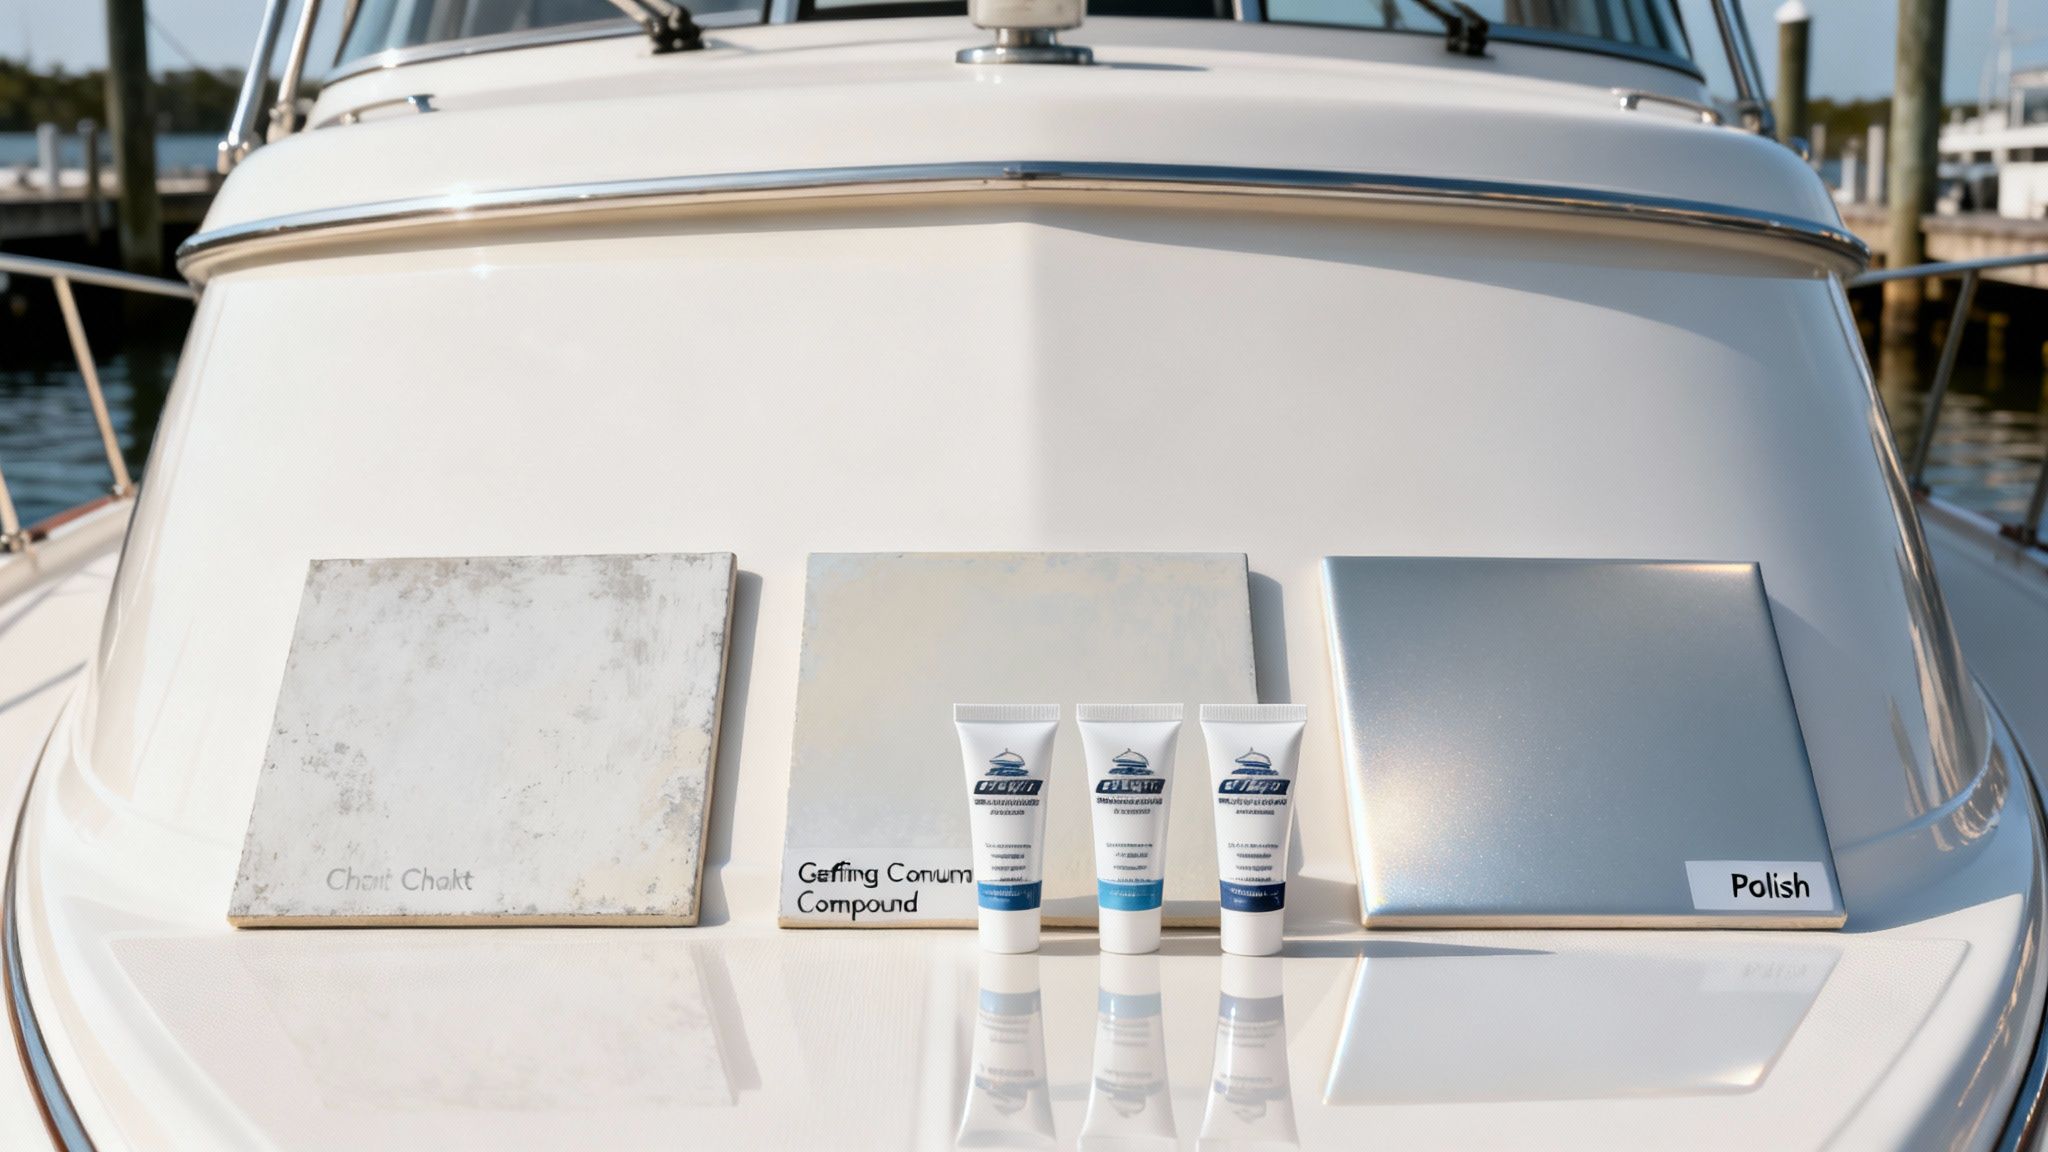
For a hull that looks like it is covered in chalk dust, you need a heavy-duty cutting compound like Marine Boat Rubbing Compound. For light haze or swirl marks, follow with Marine Polish before applying your preferred wax or sealant.
Why Your Boat Buffing Compound Choice Matters
Your boat’s gelcoat is like the clear coat on a high-end car, only it’s built to withstand a much tougher life. But even the best gelcoat eventually succumbs to the constant assault of UV rays, salt, and water. This breakdown results in that dull, chalky layer we all dread: oxidation. A boat buffing compound is your first and best tool for slicing through that damaged top layer to get to the good stuff underneath.
But this is about more than just a pretty shine; it's about protecting the long-term health of your hull. Gelcoat is only so thick. If you jump straight to a super-aggressive compound when you don't need it, you're needlessly stripping away that protective barrier.
The golden rule is to always start with the least abrasive product that will get the job done.
Assessing Your Hull's Condition
Before you even think about buying a compound, take a walk around your boat and really look at the hull. A few minutes of diagnosis here will save you hours of work and protect your gelcoat.
- Heavy Oxidation: Does the surface look chalky and dull? The classic test is to run your hand over it. If you pull back a palm full of white, powdery residue, you're dealing with heavy oxidation. This job calls for a true cutting compound.
- Moderate Fading: The color has lost its pop and looks a bit lifeless, but you're not getting that chalky residue. A medium-cut compound is usually the sweet spot here.
- Light Haze or Swirls: Your boat still has a decent shine, but it’s clouded by a slight haze or a spiderweb of fine scratches, often from washing. A fine-cut polish is all you'll need to dial it back to a mirror finish.
A quick test on a small, out-of-the-way 2'x2' area will tell you everything you need to know. If the compound you chose isn't cutting it, you can step up the aggressiveness. If it works perfectly, you know you've found your match without risking the entire hull.
For a deeper dive into the different products available, check out our complete guide to selecting the best boat polishing compound for any kind of restoration job.
Boat buffing product path: Start with Marine Boat Rubbing Compound for heavy oxidation, switch to Marine Polish to refine the shine, and use microfiber applicator pads plus clean microfiber towels for hand work and wipe-off.
Compound Selection Guide Based on Gelcoat Condition
To make things even simpler, here's a quick reference table to help you match your hull's condition to the right type of product.
| Hull Condition | Recommended Compound Type | Primary Goal | Better Boat Solution |
|---|---|---|---|
| Heavy Oxidation (chalky, dull) | Heavy-Cut Compound | Aggressively remove the top oxidized layer | Better Boat Marine Rubbing Compound |
| Moderate Fading (some color loss) | Medium-Cut Polish/Compound | Remove light oxidation and restore color | Better Boat Marine Rubbing Compound |
| Light Haze & Swirls (good shine) | Fine-Cut Polish | Refine the surface to a high gloss | Better Boat Marine Polish |
| Excellent Condition (needs protection) | Wax or Sealant | Protect the existing shine and add depth | Better Boat Boat Wax |
This approach ensures you're only removing what's necessary, preserving your gelcoat for many seasons to come.
Understanding Abrasiveness and Grit
The "magic" in any boat buffing compound lies in its abrasiveness, or grit. Just like with sandpaper, a lower grit number means a more aggressive cut designed to remove more material. A higher grit number indicates a finer abrasive meant for polishing and refining the surface.
Let's say you're bringing a neglected 10-year-old boat back from the dead. That heavy, chalky oxidation needs a powerful solution like our Better Boat Marine Rubbing Compound, which is formulated to cut through years of damage without excessive effort.
On the other hand, if you have a newer boat that just needs a spring refresh, you could likely go straight to a lighter polish like our Marine Polish and then lock in the shine with a compatible marine wax or sealant.
It's no surprise that the demand for these products is growing. The global boat polishes market is on track to hit around $450 million by the end of 2025. With fiberglass boats being so vulnerable to UV damage, the need for effective, easy-to-use restoration products isn't going away anytime soon.
You’ve picked out the right boat buffing compound for the job—now it's time to gather your tools and get the hull ready for its makeover. Trust me, you can't get a flawless finish on a dirty canvas. Having the right equipment ready to go makes the whole process a lot less work and a lot more rewarding.
The polisher is the heart of the operation. For most of us doing this ourselves, the choice boils down to a rotary polisher or a dual-action (DA) polisher.
A rotary polisher spins on a single axis. This generates more heat and gives it some serious cutting power. It's fantastic for chewing through heavy oxidation in a hurry, but it absolutely requires a skilled hand. One wrong move and you can create nasty swirl marks or even burn right through the gelcoat.
A dual-action (DA) polisher, however, is a different beast. It oscillates in a random pattern as it spins, a motion that is way more forgiving for the average user. This drastically cuts down the risk of swirls and burns. It might take a bit longer to cut through really bad oxidation, but its user-friendly nature makes it the perfect choice for most boat owners.

Choosing the Right Pads
Your polisher is only as good as the pad you slap on it. You'll mainly find pads made from either wool or foam, and each has a specific role to play. Our Wool Polishing & Buffing Pads and Foam Polishing Pads cover all the bases you'll need.
- Wool Pads: These are the aggressive ones, built for cutting. They do a great job of holding onto the compound and they dissipate heat well, which makes them the go-to partner for a rotary buffer when you're tackling a chalky, heavily oxidized hull.
- Foam Pads: These come in a whole range of densities, often color-coded to make life easier. A firm, coarse foam pad is for compounding, a medium one is for polishing, and a soft finishing pad is what you'll use to apply that final, protective coat of wax.
The real trick is matching the pad to the job. Trying to use a soft finishing pad with a heavy cutting compound just won't work, and using an aggressive wool pad for a light polish is like using a sledgehammer to crack a nut. Start with the right cutting pad for your compound, then swap to a finer pad for the polishing stage.
Prepping the Surface for Success
Before a single drop of buffing compound touches your hull, that surface needs to be spotlessly clean. Any salt, old wax, or general grime left behind will just clog up your buffing pads and stop the compound from doing its job on the gelcoat.
Start with a really good wash using a high-quality, pH-neutral boat soap. Our Better Boat Boat Soap is made specifically to strip away all those contaminants without being harsh on your gelcoat. Don't skip this step—it's one of the most critical parts of the whole process. After a good wash and rinse, dry the boat completely with clean microfiber towels.
Next, grab some painter's tape and mask off any areas you don't want the buffer to touch. Think vinyl decals, rub rails, and any metal hardware. Finally, look after yourself. Put on some safety goggles and a dust mask.
Getting a great shine is the goal, but responsible boat ownership always starts with safety. For a full rundown, this ultimate boat safety checklist is a great resource to make sure you've covered all your bases before getting back on the water.
And if you want to dive deeper into refining your technique, our guide on how to polish fiberglass has even more tips and tricks.
Mastering the Buffing Technique for Flawless Results
With the hull clean, taped off, and ready to go, this is where the magic really happens. We’re about to cut through that dull, chalky oxidation and bring back the deep, glossy shine your boat had when it was new. The key here isn't muscle; it's all about a consistent, controlled technique with your machine polisher.
This simple diagram breaks down the prep work. If you follow these three steps, you're setting yourself up for success.

Getting this sequence right means your compound is working directly on the gelcoat itself, not grinding in leftover dirt and grime. This is crucial for getting the best possible finish.
Applying Compound the Right Way
One of the most common mistakes I see is people slathering on way too much compound. More isn't better—it just creates a splattery mess and wastes good product. A little goes a long way.
Start by priming your clean buffing pad with just a few pea-sized drops of your boat buffing compound.
Pick a small, manageable work area, about 2'x2'. Before you even think about pulling the trigger on the polisher, gently dab the pad onto the hull in a few spots within that square. This pre-spreads the product and stops it from flying everywhere the second the machine spins up. Trust me on this one.
With the compound dabbed on, set your polisher to a low speed. A good starting point is around 1500 RPM. Now you're ready to start working it into the gelcoat.
Mastering Machine Movement
A swirl-free, mirror-like finish comes from a slow, methodical approach. You want to move the buffer in a cross-hatch pattern.
First, make overlapping passes from left to right across your 2'x2' section. Then, go back over that same area with overlapping passes from top to bottom. This pattern is your best friend for ensuring even coverage.
Keep a consistent, light-to-moderate pressure on the machine. You're guiding it, not forcing it. Let the polisher and the compound do the work. Pressing down too hard just builds up heat, which can easily burn the gelcoat and leave you with a blotchy mess.
Keep the buffing pad flat against the hull at all times. If you tilt the machine up on its edge, you’re concentrating all that friction into one tiny spot. That’s the fastest way I know to burn the finish or carve deep swirl marks and holograms into your gelcoat.
You'll notice that after a few passes, the compound starts to break down and look more translucent. That's your signal that its job is done. Switch the polisher off, grab a clean, dry microfiber towel, and wipe away the residue. You should see a beautifully restored shine underneath.
Now, just move on to the next 2'x2' section and repeat the process. It's meticulous, but the payoff is huge. This kind of annual maintenance is vital for combating UV damage on the 12 million registered recreational boats in the US. In fact, for the 65% of polish usage on fiberglass boats, buffing compounds are proven to restore a factory-fresh look that can boost resale values by up to 20-30%.
Tackling Tight Spots by Hand
Your machine polisher is fantastic for the big, open areas, but it's not going to fit everywhere. For those tight corners, around cleats and other hardware, or along thin accent stripes, you'll have to switch to buffing by hand.
The technique is basically the same, just powered by elbow grease. Put a small dab of boat buffing compound on a microfiber applicator pad and work it into the surface with firm, circular motions. When it hazes over, wipe the residue off with a clean towel. It's more work, for sure, but it ensures every single inch of your boat gets the same level of attention.
For a more detailed walkthrough of the entire process, you might find our guide on how to buff and wax a boat helpful.
Refining the Shine and Protecting Your Hard Work
So, you've done the hard part. After all that compounding, your boat’s color is finally back and the ugly oxidation is gone. But don't pop the cold one just yet—the job isn't finished. That freshly restored surface is now raw and vulnerable.
Skipping the final polishing and protecting steps is like building a house and leaving off the roof. All that effort will be washed away by the sun and salt in just a few months.
It’s crucial to understand the difference here: a boat buffing compound is made to cut and strip away that damaged, chalky layer of gelcoat. A polish, on the other hand, is a much finer abrasive that comes in next to erase the microscopic scratches left by the compound.
Our Marine Polish is the perfect follow-up to our heavy-duty compound. This is what creates that deep, wet-look gloss we're all after. Think of it as the final refinement stage, bridging the gap between brute-force restoration and lasting protection.
From Restored to Radiant
After a good pass with a quality marine compound, you might notice a slight haze or some very fine swirl marks. Don't panic; this is completely normal.
Following up with a fine-grit polish on a softer foam pad is the key. This will completely eliminate that haze and really make the shine pop, getting your hull ready for its final protective coat. While we're talking about gelcoat, some of the general principles of buffing for shine apply to lots of surfaces and help explain how layering different levels of abrasion creates a flawless finish.
This two-step process—compound then polish—is your ticket to achieving the best possible result before you seal the deal with wax.
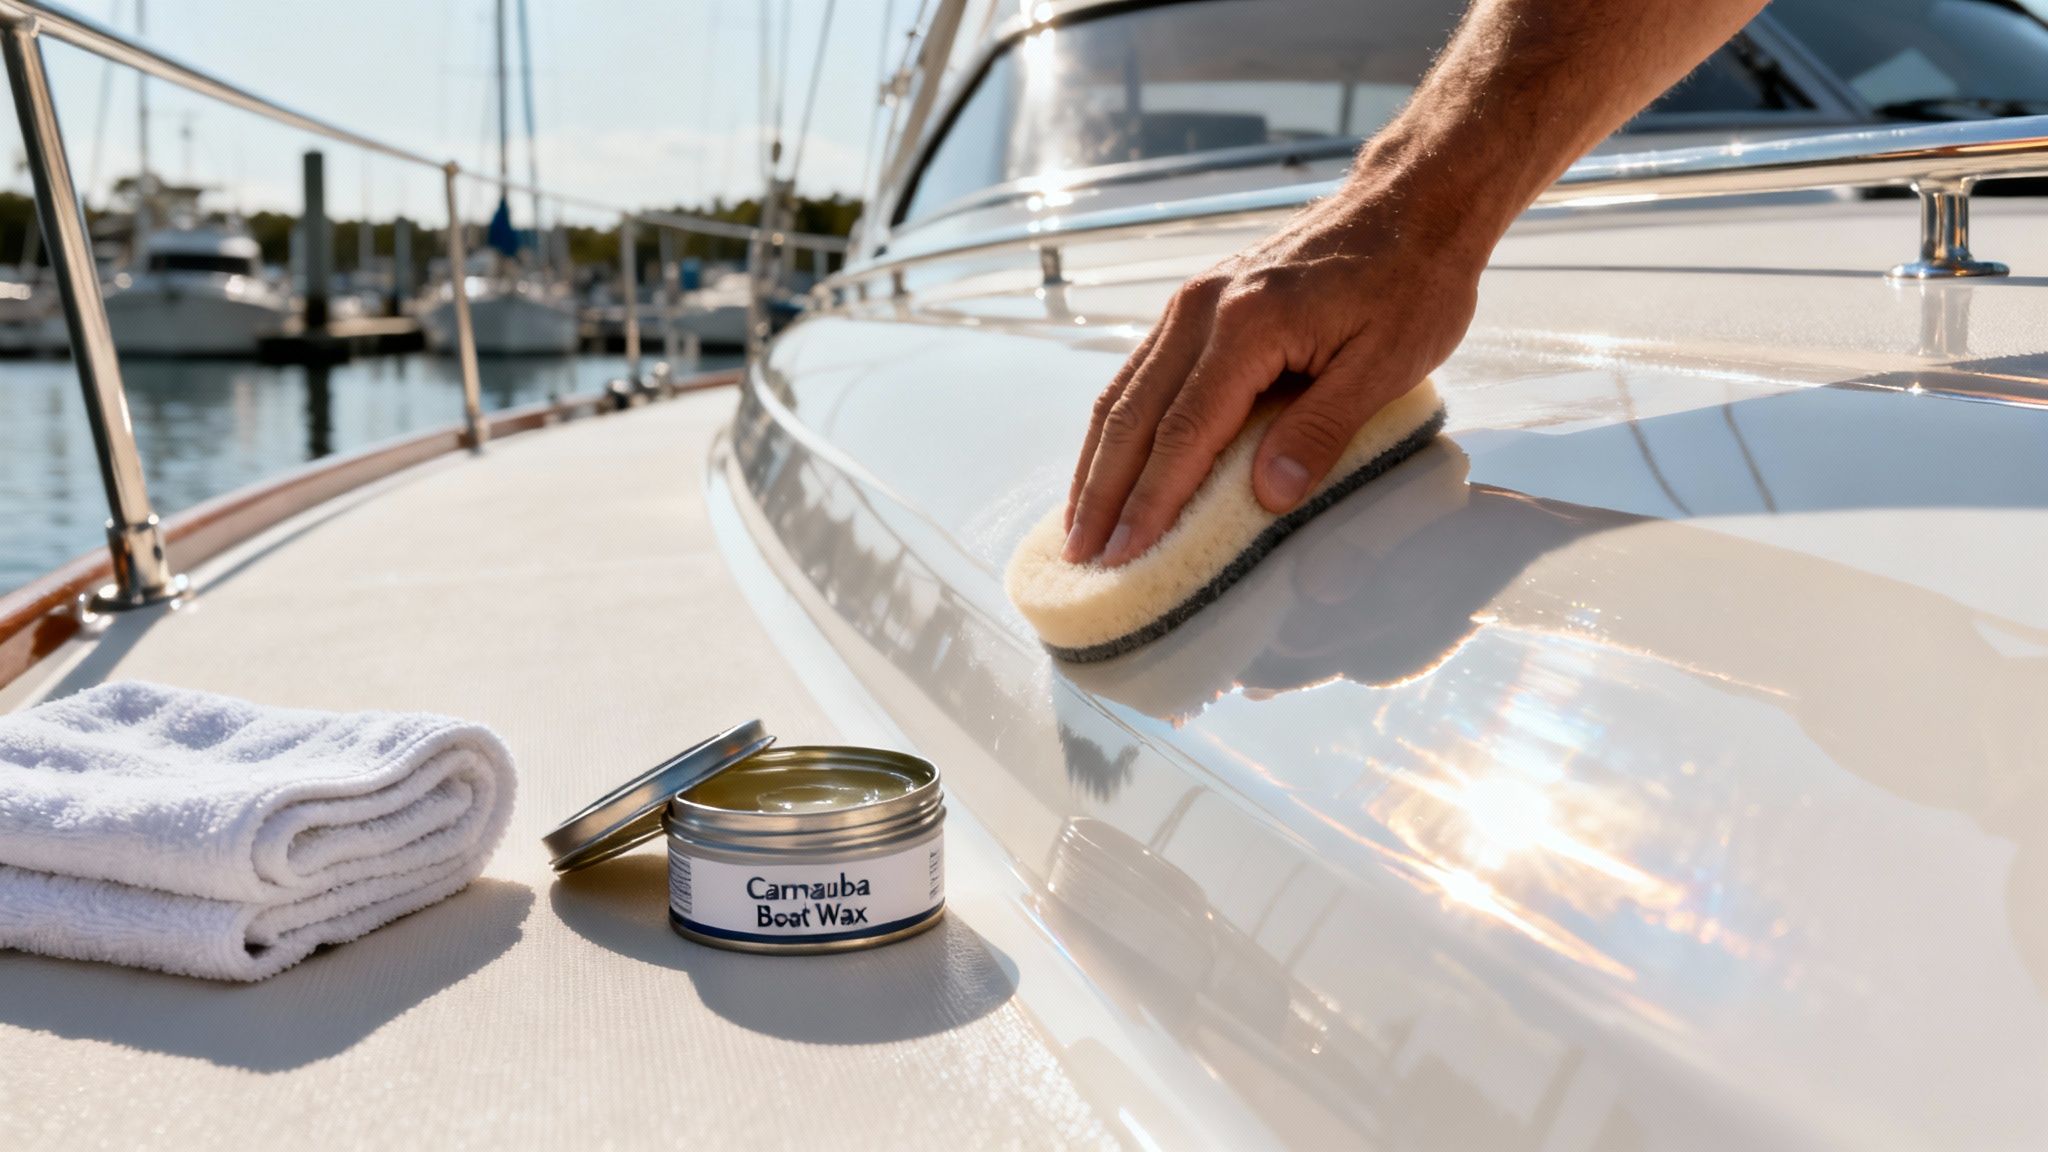
Locking in the Shine with Carnauba Wax
A freshly compounded and polished gelcoat is porous and totally exposed. Without protection, UV rays and saltwater will start their damaging work immediately. This is where a high-quality wax becomes absolutely non-negotiable. It creates a durable barrier that locks in your shine and shields the gelcoat from the harsh marine environment.
Pro Tip: Don't wait to apply your wax. The absolute best time to protect your gelcoat is right after you've finished polishing. The pores are clean and open, which allows the wax to bond deeply and effectively for maximum protection.
We always recommend a compatible marine wax or sealant for this critical final step. Carnauba is famous for the deep, warm glow it gives off and for its natural UV-blocking muscle. It’s the perfect way to lock in that brilliant shine you just worked so hard for.
Applying it is simple:
- By Hand: Grab a soft foam or microfiber applicator pad. Work in small sections, applying a thin, even coat in a circular motion.
- By Machine: Use a dual-action (DA) polisher with a soft, non-abrasive foam finishing pad. Keep it on a low-speed setting. This method is fantastic for getting a perfectly even coat with minimal effort.
Let the wax dry to a haze, which usually only takes a few minutes. Then, buff it off with a clean, plush microfiber towel. You'll be left with a slick, hydrophobic surface that sheds water and dirt, making your next wash-down a whole lot easier. It’s no surprise that 85% of premium marine care lines feature UV-protected waxes—they can cut future oxidation by up to 70%.
Troubleshooting Common Buffing Problems and Mistakes
Even when you do everything right—careful prep, the right boat buffing compound, a clean pad—things can still go sideways. Don't sweat it. Most of the common hiccups are surprisingly easy to fix once you know what you’re looking at.
Probably the most common issue I see DIYers run into is swirl marks, sometimes called holograms. These are those fine, circular scratches that show up in the sunlight, and they're usually a dead giveaway of improper technique.
Swirls are typically caused by holding a rotary buffer at an angle, using a dirty or overloaded pad, or choosing a compound that's too aggressive for the gelcoat's condition. The fix is usually straightforward.
Once you’ve finished your compounding step, just circle back over the affected area with a dual-action (DA) polisher. Switch to a much finer polish like our Marine Polish and a soft foam finishing pad. This gentler combination will smooth out those tiny scratches and bring back that flawless, deep shine you're after.
Fixing Burns and Haze
Another pitfall to watch out for is "burning" the gelcoat. This happens when you linger with the polisher in one spot for too long. The friction generates a ton of heat, which can permanently discolor or even damage the surface.
- Cause: Staying in one area too long, running the machine speed (RPM) too high, or leaning on the buffer with too much pressure.
- Solution: Always keep the buffer moving. Use slow, overlapping passes and let the tool and the compound do the work—don't try to force it. For most compounds, you’ll want to stick to the recommended speed settings, which are typically between 1500-1800 RPM.
You might also finish a section, wipe away the residue, and notice a dull haze or some blotchy spots. This is almost always because the compound residue dried on the surface before you could get it all off.
To fix this, just dab a small amount of fresh compound onto the area. This re-wets the dried residue, making it easy to wipe away immediately with a clean microfiber towel.
Keeping the surface clean as you go is a key part of getting a great finish. It’s the same principle as using a good boat oxidation remover before you even start polishing. Tackling these little issues as they pop up will make sure your final result is nothing short of spectacular.
Boat Buffing FAQs: Your Questions Answered
Even after you've stepped back and admired that incredible, mirror-like shine, a few questions might still pop into your head. That's perfectly normal. Let's tackle some of the most common things boaters ask after a big buffing job.
Think of this as the final polish on your knowledge, making sure you feel completely confident about what you've just done and how to maintain it.
How Often Should I Use a Buffing Compound on My Boat?
This is a great question, and the honest answer is: it depends. A heavy-duty boat buffing compound is a pretty aggressive product. You should only really break it out when you’re dealing with significant, chalky oxidation. For most boats, this might be a once-every-few-years kind of job.
For your yearly spring cleanup, a much lighter polish followed by a quality wax is usually all you need to keep that finish looking sharp. The best strategy is to give your hull a good, honest look at the start of each season. Use the gentlest product that will get the job done and bring back the gloss.
Can I Use an Automotive Compound on My Boat?
We hear this one all the time, and the answer is a firm "no." It's tempting to use what you have in the garage, but your boat's gelcoat and your car's paint are two completely different animals. Gelcoat is significantly harder and more porous.
Marine-specific formulas, like our Better Boat Marine Rubbing Compound, are engineered with abrasives that are tough enough to cut through oxidized gelcoat without causing harm. Car compounds just don't have the muscle for the job and aren't designed to stand up to the constant assault of saltwater and sun.
Stick with products made for marine gelcoat. Using the wrong stuff will just lead to a lot of wasted time and frustrating results, and you won't get that professional, long-lasting finish you're after.
What Is the Difference Between a Wax and a Sealant?
Both are your final, protective layer, but they go about their jobs differently. Knowing the difference helps you pick the right top coat.
-
A traditional wax, especially one with Carnauba, gives you a deep, warm gloss that’s hard to beat. It provides fantastic natural UV protection and creates a breathable barrier that many boaters love for that classic, rich look.
-
A synthetic sealant is a polymer-based product that actually bonds chemically to the gelcoat. This chemical bond means sealants often last longer than waxes. While they're incredibly durable, many purists will tell you nothing beats the depth and shine you get from a true carnauba wax.
Should I Wet Sand Before Using a Compound?
For most jobs you'll encounter—think light to moderate oxidation—wet sanding is total overkill. A quality boat buffing compound paired with the right polisher and pad has more than enough power to restore the shine.
Wet sanding is a serious, last-resort technique for deep, severe oxidation or heavy scratches. It actually removes a noticeable layer of gelcoat, so it's a job often best left to the pros. Always, always start with the least aggressive method first. Give a good compound a try before you even think about sandpaper.
Here at Better Boat, our goal is to make boat care straightforward and rewarding. Our whole lineup of marine products, from tough compounds to brilliant waxes, is designed to give you pro-level results without the professional price tag. See for yourself how quality products can transform your boat and keep it turning heads for years to come. Start with Marine Boat Rubbing Compound for heavier oxidation and Marine Polish when the surface is ready for gloss refinement.


