


A Guide to Boat Gel Coat Restoration
When your boat's finish starts looking dull and chalky, that's more than just a cosmetic problem. It's a clear sign that its gel coat—the critical protective skin on your fiberglass hull—is starting to lose its battle against UV rays, salt, and water.
A real boat gel coat restoration is a world away from a simple wax job, which often just puts a temporary shine over the underlying damage. What we're talking about is a comprehensive process to carefully strip away that dead, oxidized top layer and bring the fresh, vibrant gel coat underneath back to life.
This guide will walk you through everything you need to know to get a professional-grade finish and rewind the clock on years of wear.
Bringing Your Boat's Finish Back to Life
The whole point here is to restore both the appearance and the protective function of the gel coat. A healthy gel coat doesn't just give you that deep, mirror-like shine we all love; it's also the main barrier that stops water from seeping into the fiberglass laminate itself.
A successful restoration doesn't just make your boat look new—it literally extends its lifespan by beefing up its defenses against the harsh marine environment. Think of it as a smart investment in your boat's long-term health and resale value.
Why Restoration Matters Now More Than Ever
Proper boat maintenance is a bigger deal than ever. The global market for gelcoat hit an estimated USD 1.38 billion in 2023, and it's projected to climb past USD 3.3 billion by 2030. That growth is fueled by boat owners realizing they need to protect their investments from environmental damage.
The restoration process isn't a single action but a series of steps, where each one builds on the last to create that perfect finish.
Here’s the breakdown:
- Deep Cleaning: You have to start with a perfectly clean slate. That means getting rid of every trace of surface grime, salt, and old wax. A good wash with something like our Heavy-Duty Boat Soap is the non-negotiable first step.
- Oxidation Removal: This is the heavy lifting. We use a process called compounding, which involves using a specialized abrasive to carefully grind away the dead, chalky layer of the gel coat without damaging what's underneath.
- Polishing: Once the oxidized layer is gone, polishing comes next. This step refines the surface, smoothing out any microscopic scratches left from compounding and creating that deep, high-gloss shine.
- Protection: Finally, you have to protect your hard work. Applying a high-quality marine wax or sealant locks in the shine and creates a durable barrier against future UV damage and oxidation.
Each of these stages is absolutely essential for getting that showroom look. For a wider view on keeping your vessel in pristine condition, take a look at our complete guide on how to detail a boat. Now, let's dive into the specifics of each restoration stage.
How to Read and Diagnose Your Gel Coat
Before you even think about grabbing a polisher, you need to play detective. The single most important step in any gel coat restoration is figuring out exactly what you're up against. The condition of your gel coat tells a story, and learning how to read it will shape your entire plan of attack. A proper diagnosis saves you time, money, and a whole lot of frustration down the road.
Your first clue is usually the most obvious one. Just run your hand across the hull. If it comes back with a chalky, white residue, you've got oxidation. This is what happens when UV rays break down the gel coat's resin over time, leaving the pigment exposed. The amount of that chalkiness is your first big indicator of how much work you have ahead of you.
Identifying the Stages of Oxidation
Not all oxidation is created equal. A little bit of haze might just need a light polish, but a hull that feels like sandpaper is going to demand a much more aggressive approach, likely involving a heavy-duty compound.
- Light Oxidation: The surface looks a bit dull or hazy, and the color has lost some of its pop. You might see faint water spots that don't just wash away. It’s lost that "wet look" it had when it was new.
- Moderate Oxidation: The chalky residue is pretty noticeable when you wipe your hand across it. The color is clearly faded, and the surface feels slightly rough. This is pretty common for boats that have missed a season or two of waxing.
- Heavy Oxidation: This is as bad as it gets. The surface is completely flat with zero reflection, and a thick, powdery film comes off on anything that touches it. The color can be so faded you can barely tell what its original shade was.
Figuring out which stage you're dealing with is crucial. To get a better handle on this, check out our guide on choosing the right boat oxidation remover. It’ll help you match the right product to the specific level of damage you're facing.
Looking Beyond Simple Oxidation
While oxidation is the usual suspect for a dull finish, it's rarely working alone. A truly thorough inspection means getting up close and personal with your hull to spot the more complex problems that will change how you tackle the restoration.
Pro Tip: Grab a bright LED flashlight and hold it at a sharp angle to the hull. This trick, known as "raking light," is amazing for revealing the subtle scratches, swirls, and cracks that are totally invisible in direct sunlight.
As you inspect, keep an eye out for these common gel coat issues:
- Stress Cracks (Crazing): These look like fine, spiderweb-like cracks. You’ll usually find them around high-stress areas like cleats, stanchion bases, or sharp corners. They're typically just cosmetic and don't go into the fiberglass, but you'll want to address them.
- Deep Gouges or Scratches: Can you catch the scratch with your fingernail? If your nail gets stuck, it's probably too deep to just compound out. You'll likely need to do a gel coat filler patch before you move on to polishing.
- Blisters (Osmosis): These are actual bubbles or bumps in the gel coat, and they're a bad sign that moisture has gotten underneath the surface. This is a more serious problem that often needs a professional's touch before you can even think about the cosmetic stuff.
This simple decision tree breaks down that first look at your gel coat.
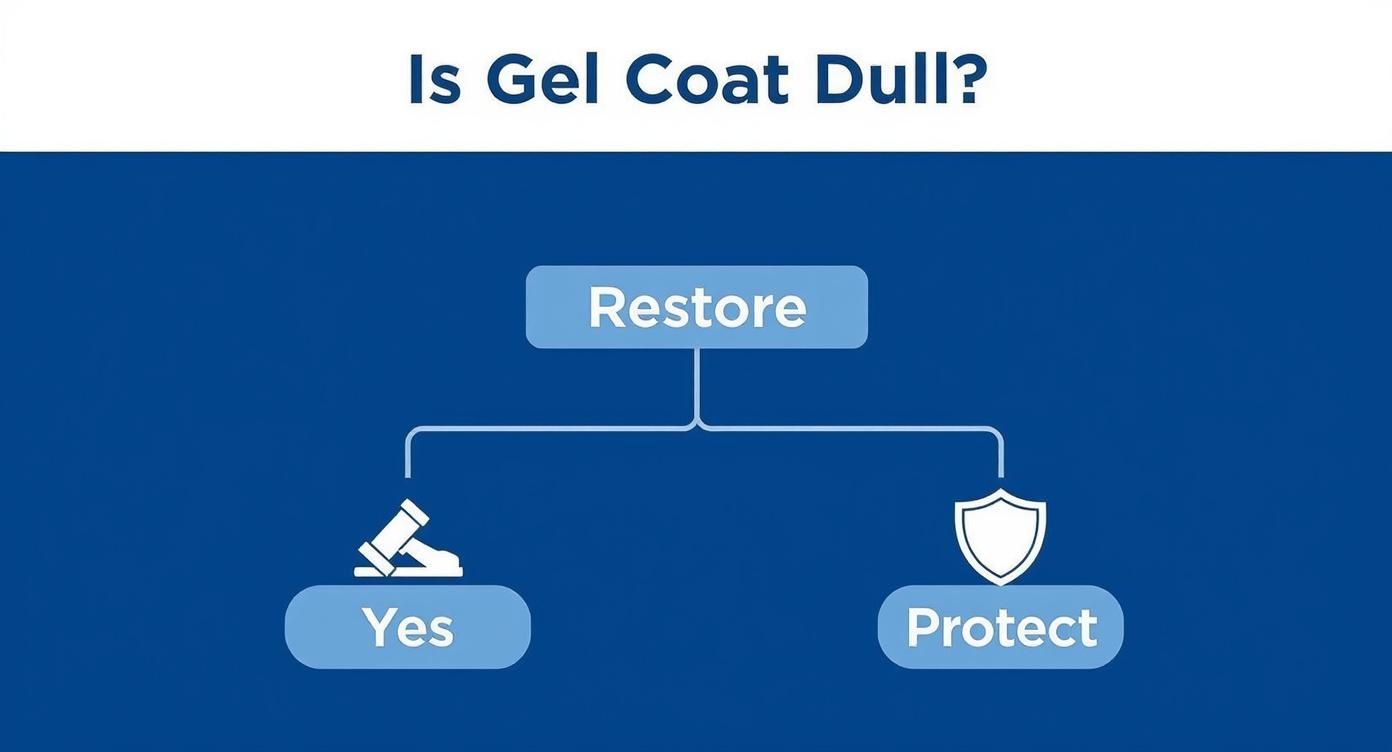
As you can see, a dull finish is what kicks off a full restoration project. If your finish is still glossy and healthy, you’re just on a mission to protect it. Once you've done this initial assessment, you'll know for sure whether you’re gearing up for a multi-step restoration or a much simpler protect-and-preserve job.
Setting The Foundation For a Flawless Finish
You can't get a mirror-like shine on a dirty surface. It's just not possible. Before you even think about grabbing a polisher, you have to create a perfectly clean slate. This is the non-negotiable prep work that separates an amateur job from a professional-grade boat gel coat restoration. It sets the stage for everything that follows.

And I'm not talking about a quick rinse with the hose. A real decontamination strips away years of built-up grime, old wax, stubborn mineral deposits, and those awful waterline stains. Skipping this just means your polishing pads get instantly clogged with dirt, grinding all those contaminants right back into the gel coat and creating even more scratches.
To do it right, you need a powerful cleaner that's up to the task. Start with a serious wash using our Boat Soap to lift off all the loose dirt, salt spray, and surface gunk. For the tougher stuff like black streaks or heavy waterline stains, you'll need more muscle. Our All-Purpose Boat Cleaner is what I grab to break down those stubborn spots without being too harsh on the gel coat itself.
Preparing The Surface For Polishing
Once the boat is spotless and completely dry, the next phase begins. This is where you clear the decks—literally—of anything that could get in the way of the polisher or get damaged in the process. Attention to detail here is what gets you that seamless, uniform finish.
Pro Tip: Never underestimate the power of a clear workspace. Taking the time to remove hardware not only protects it but also lets you polish every single square inch of the gel coat. It's the only way to avoid those tell-tale dull spots around cleats and railings that scream "amateur job."
Gel coat is the go-to for fiberglass boats for a reason: it's incredibly tough against water and UV rays. The whole point of this maintenance is to keep that protective barrier in top shape.
The marine repair industry is growing because boaters know this is key, and your prep work is the first step in reinforcing that protection. You can even discover additional insights on the gelcoat market to see how big this trend has become.
Removing Hardware And Masking Surfaces
Meticulous masking is the secret weapon for sharp, clean lines and avoiding expensive mistakes. Bottom line: if it isn't gel coat and you can't remove it, you have to protect it.
- Remove What You Can: Whenever possible, take the time to unbolt hardware. This means cleats, navigation lights, grab rails, and any other accessories. It gives you wide-open access to the gel coat underneath, ensuring a perfectly consistent finish.
- Tape Off the Rest: For everything else, high-quality painter's tape is your best friend. Meticulously mask off every non-gel coat area to create a protective barrier.
The key areas you absolutely have to protect include:
| Surface Type | Why You Should Mask It |
|---|---|
| Vinyl Graphics & Decals | A polisher pad can easily snag the edge of a decal, lifting it or tearing it in a split second. |
| Windows & Portlights | Compound and polish can permanently haze or scratch acrylic and polycarbonate, ruining your visibility. |
| Non-Skid Decks | The aggressive abrasives in a compound will smooth out the texture, making it less effective and ugly. |
| Rub Rails & Trim | Black rubber or vinyl trim can be easily stained or scuffed by the residue from polishing compounds. |
This part of the job can feel tedious, I get it. But it's arguably the most important step in preventing damage and achieving that flawless, straight-from-the-factory look. It ensures that when you fire up that polisher, you can work efficiently and with confidence, knowing every vulnerable surface is safe. This solid foundation is what guarantees a superior final result for your boat.
The Art of Compounding and Polishing
With the surface fully prepped, it's time for the magic to happen. This is where you get to erase years of oxidation and finally bring back that deep, wet-look gloss. The process of compounding and polishing is the heart of any true gel coat restoration, turning a dull, chalky hull into a reflective mirror.
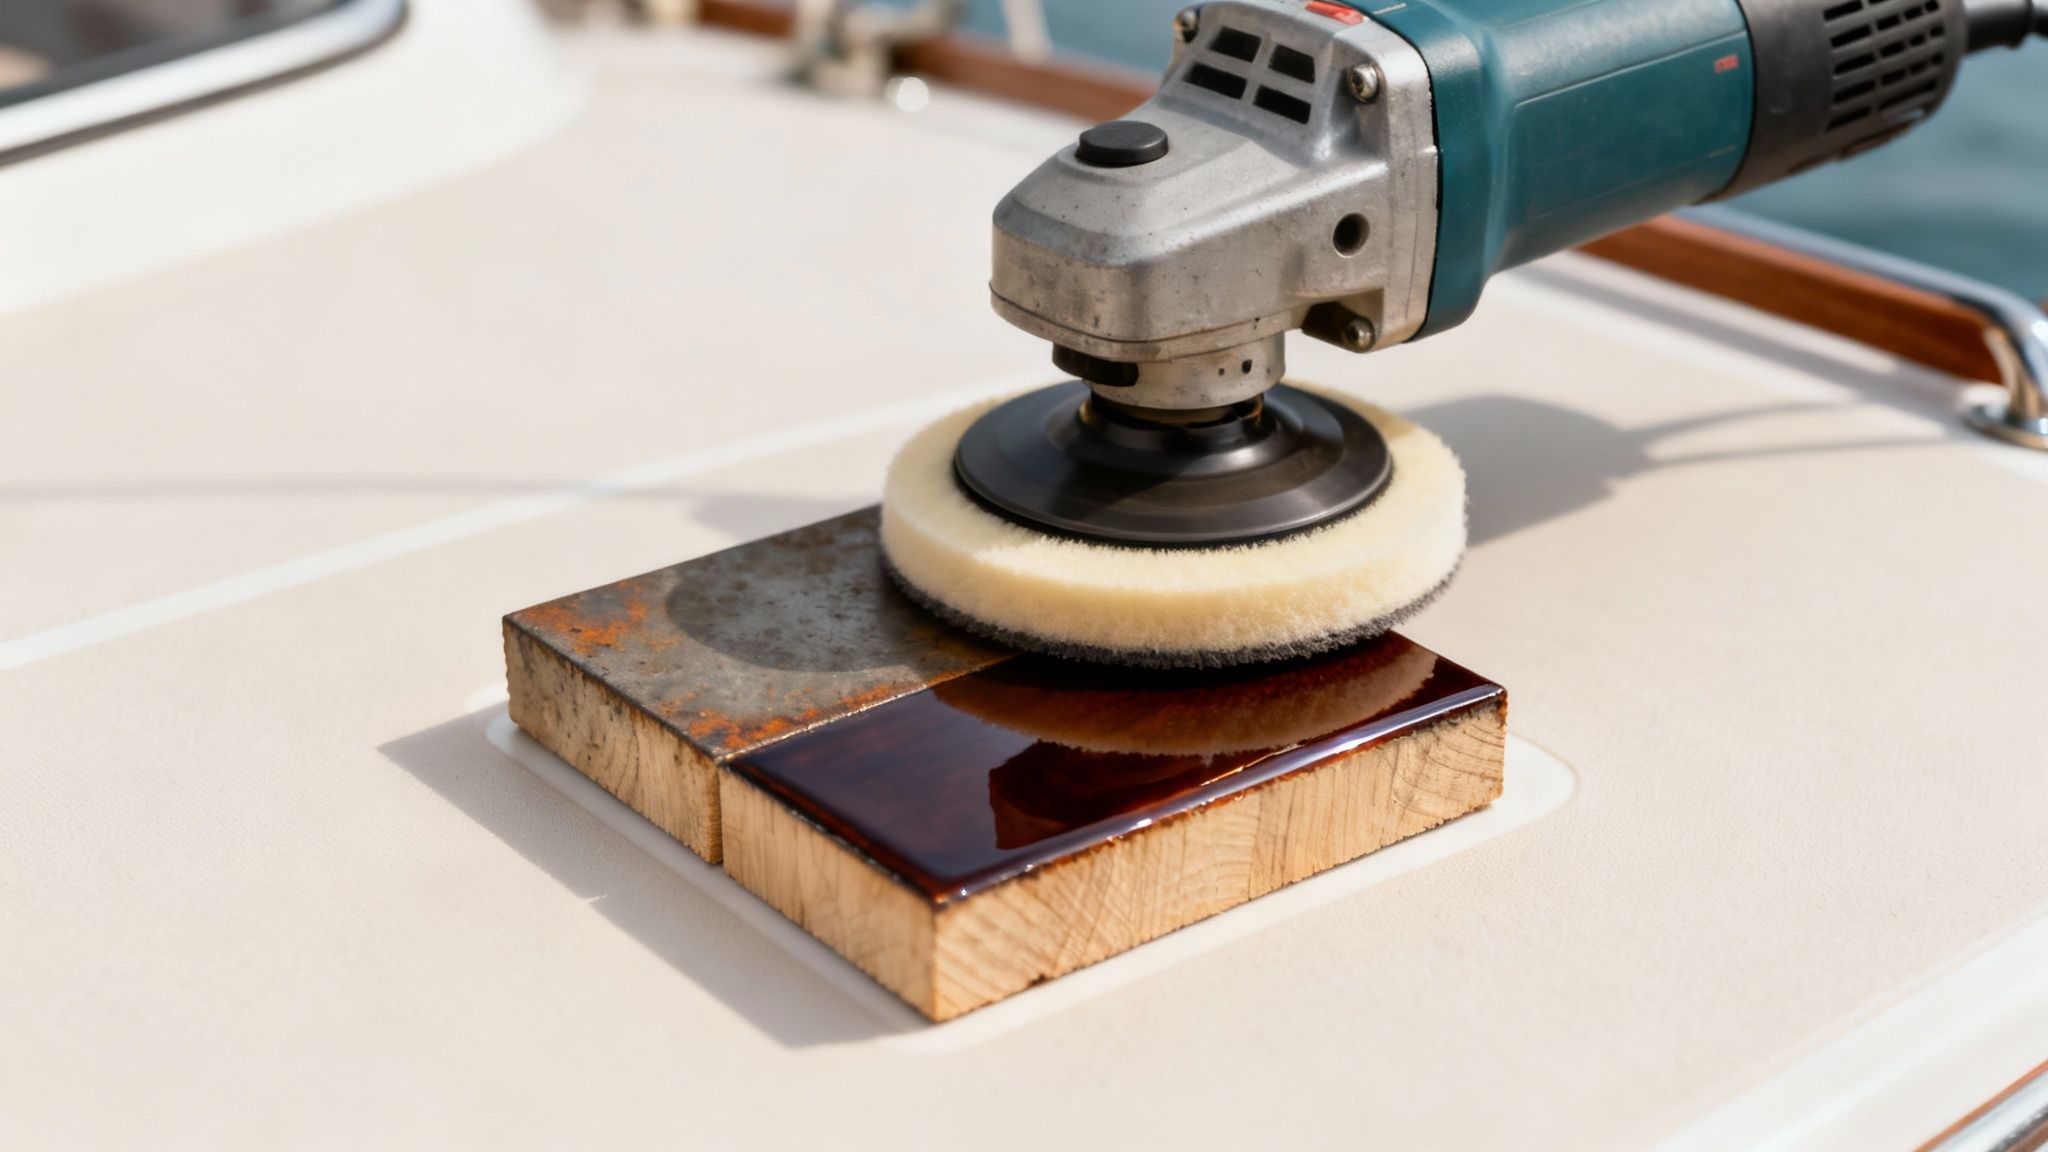
This transformation relies on a simple principle: controlled abrasion. You start with a more aggressive abrasive liquid (the compound) to cut away the dead, oxidized layer of gel coat.
Then, you follow up with progressively finer abrasives (the polishes) to buff out the microscopic scratches from the first step, refining the surface until it’s perfectly smooth and shiny.

Choosing Your Weapon: Polisher and Pads
Your choice of machine and pad is a critical one. It directly impacts both your results and how much elbow grease you'll have to put in. The two main types of polishers on the market are rotary and dual-action (DA), each with its own strengths.
-
Rotary Polisher: This is the heavy-hitter. A rotary spins on a single axis, generating serious heat and cutting power. It's the absolute best tool for chewing through heavy oxidation and deep scratches quickly. But that power can also be its downfall—if you don't know what you're doing, you can easily burn right through the gel coat or leave nasty buffer trails (holograms). It takes some skill to master.
-
Dual-Action (DA) Polisher: A DA polisher is much more forgiving. It spins and oscillates at the same time, which creates a random orbital motion. This generates less heat and is way safer for beginners, making it almost impossible to burn the gel coat. It’s less aggressive and takes longer to correct severe defects, but it’s fantastic for finishing work and getting that flawless, swirl-free shine.
For most DIY projects, I've found that using a rotary for the heavy compounding and then switching to a DA for the final polish gives you the best of both worlds.
Pad Selection: Foam vs. Wool
The pad you stick on your polisher is just as important as the machine itself. The two main options are wool and foam, and they each have a specific job.
- Wool Pads: These are your most aggressive option. The natural fibers cut fast and don't get too hot, which makes them the perfect partner for a rotary polisher and a heavy-cut compound when you're tackling severe oxidation.
- Foam Pads: Foam pads come in a whole range of densities, from heavy-cutting to ultra-fine finishing. A firm cutting foam pad can work for moderate compounding, while a soft foam finishing pad is essential for that final polishing step to really max out the gloss.
Here's a pro tip: Always start with the least aggressive combination that gets the job done. Test a small, hidden spot first. If a medium compound and a foam pad gets rid of the oxidation, there’s no reason to break out the heavy-duty wool pad.
The Compounding Process: Erasing The Damage
This is the "cutting" phase. The goal here is simple: remove the oxidized layer and any leftover sanding marks, leaving behind a uniform, hazy finish.
Start by applying a few dabs of a heavy-duty cutting compound directly onto your wool or firm foam pad. It's crucial to work in a small, manageable 2-foot by 2-foot section. This helps control the heat and ensures you can work the product in completely before it dries out.
Place the polisher flat against the hull before you turn it on—this will keep the compound from slinging everywhere. Start on a low speed to spread it around, then bump it up to a moderate working speed (usually around 1200-1500 RPM for a rotary). Move the machine slowly and deliberately in overlapping passes, applying firm, even pressure.
As the polishing compound breaks down, you'll see the chalkiness disappear, replaced by a dull but clean surface. Once the compound looks clear or starts to dust up, stop and wipe the residue off with a clean microfiber towel to check your work. The surface should be free of oxidation but will probably have fine swirl marks. That's perfectly normal.
Polishing For That Deep Gloss Shine
After you've compounded the entire boat, it's time to switch gears. The polishing stage is all about refinement. You'll swap your aggressive compound and wool pad for a finer polish and a softer foam pad—this is where a DA polisher really shines.
The technique is pretty much the same as compounding, but you'll use much less pressure. Your goal now is just to remove the swirls left by the compounding step and bring out the gel coat's natural depth.
Work in the same 2x2 sections, spread the polish on a low speed, and then increase it slightly. The polish has much finer abrasives that will smooth the surface to a high gloss. After a few overlapping passes, wipe the area clean and inspect it with a flashlight.
You should see a huge difference in clarity and reflection. This systematic approach is how you get a professional finish, and you can find even more details in our complete guide on how to properly polish fiberglass.
By patiently moving from an aggressive cutting step to a fine polishing step, you're methodically bringing that gel coat back to life. This process ensures you don't miss anything and rewards you with a brilliant, swirl-free shine that looks brand new.
Protecting Your Hard Work for the Long Haul
You’ve put in all those hours of compounding and polishing, so the last thing you want is for that brilliant shine to vanish in just a few weeks. The final, and arguably most important, phase of any gel coat restoration is locking in that finish with a tough layer of protection.
This isn't just about making it look good. It's about creating a solid barrier against the exact things that caused the oxidation in the first place—brutal UV rays, salt, and constant water exposure.
Think of your freshly restored gel coat as a perfectly smooth canvas, but it's completely exposed. Without a protective topcoat, it's incredibly vulnerable. The right wax or sealant acts as a sacrificial shield, taking the environmental beating so your gel coat doesn’t have to.
Choosing Your Shield: Waxes vs. Sealants
In the boating world, the debate between traditional waxes and modern polymer sealants is a big one. Both get the job done, but they work differently and offer a trade-off between shine, durability, and application effort.
-
Carnauba Wax: This is the old-school favorite, loved for the deep, warm, wet-look gloss it leaves behind. Carnauba is a natural wax that’s a real pleasure to apply and gives a fantastic shine. The main catch? Longevity. In a harsh marine environment, you'll be lucky to get a few months out of it before it's time to reapply.
-
Synthetic Polymer Sealants: These are lab-engineered protectors that chemically bond to the gel coat. They might not always have the same visual warmth as carnauba, but they more than make up for it with sheer endurance. A quality sealant can easily provide protection for an entire season.
-
Ceramic Coatings: As the newest player in the game, ceramic coatings create an incredibly hard, semi-permanent shell over your gel coat. They offer by far the best protection and longevity—often lasting for years. The downside is that they're the most expensive option and demand meticulous surface prep for a successful application.
For most boaters, the decision comes down to balancing that perfect shine with durability and how much time you want to spend applying it. For a longer-lasting, season-long defense, a tough polymer shield is hard to beat. If you want a deep-dive into the application process, check out our guide on how to wax your boat properly.
Don't think of protection as a one-and-done job. It's the start of a simple, consistent maintenance routine that is far, far easier than another full-scale restoration project.
Building a Simple Maintenance Schedule
Keeping that restored gel coat looking its best is an ongoing effort, and the market reflects just how critical this is for boat owners. The global marine gelcoat market, valued at around USD 4.2 billion in 2025, is projected to hit USD 7.5 billion by 2032. This incredible growth highlights how crucial proper protection is for maintaining a vessel's value and performance.
The good news is that keeping your boat looking great doesn’t have to be a major chore. A simple, consistent schedule makes all the difference.
-
Wash It Down Regularly: Give your boat a good wash every couple of weeks with a pH-neutral boat soap. This gets rid of salt, bird droppings, and other grime before it has a chance to eat into your protective coating.
-
Use a Quick Detailer: After each wash, a quick wipe-down with a spray wax or detailer adds a fresh sacrificial layer on top of your main sealant. It's a small step that can dramatically extend the life of your base protection.
-
Do the Water Bead Test: Keep an eye on the surface from time to time. If water stops beading up tightly and starts to "sheet" off in flat patches, that’s your tell-tale sign. It means the protective layer is wearing thin and it’s time to reapply your wax or sealant. This simple test is the best way to know when your hard work needs a refresh.
Common Questions on Gel Coat Restoration
Even with the best game plan, you're bound to have a few questions pop up during a gel coat restoration. Getting these sorted out is often what separates a frustrating weekend from a flawless, professional-looking finish. Let's tackle some of the most common questions we hear from boat owners.
Can You Compound a Boat Too Much?
This is a big one. Can you overdo it with the compound? Absolutely, yes. Your boat's gel coat is thick, but it’s not bottomless. Every time you run a compounder over the hull, you're shaving off a microscopic layer of that finish.
While a single, proper restoration is perfectly safe, getting aggressive with a heavy-cut compound every single season will eventually wear the gel coat thin. This makes it much more prone to stress cracks and future damage. The trick is to do the job right once, then protect that new finish like crazy so you won't need to do it again for years.
How Long Will My Restored Finish Last?
Everyone wants to know how long their hard work will pay off. The shine you just created is permanent—you’ve essentially exposed a fresh, healthy layer of gel coat. But how long that shine stays brilliant depends entirely on what you do after you put the polisher away.
It all comes down to the protection you choose:
- Carnauba Wax: You can expect 2-4 months of solid protection. It delivers an incredible, deep gloss but needs to be reapplied more often.
- Polymer Sealant: This is your season-long warrior. A quality synthetic sealant will give you 6-12 months of tough UV and salt protection.
- Ceramic Coating: For the longest-lasting shield, ceramic is the answer. It can provide 2-3 years or more of durable protection, but be warned—the application process is much more demanding.
No matter which route you go, regular washing and topping it off with a spray detailer will make any protective coat last much longer.
Can I Do This By Hand?
Technically, yes, but should you? Probably not. Tackling a full gel coat restoration by hand is a massive amount of work and rarely gives you the results you're hoping for. For a tiny spot or a whisper of haze, a one-step cleaner wax applied by hand might be okay.
But for anything more than the lightest oxidation, a machine polisher is non-negotiable.
A machine delivers the consistent speed and pressure required to properly break down the abrasives in compounds and polishes. Trying to restore an entire hull by hand will not only wear you out, but you'll likely end up with a splotchy, uneven finish that hasn't truly fixed the underlying problem.
What If I See Swirls After Polishing?
Don't panic! Seeing fine swirls or "holograms" in the finish is a common hiccup, and it's totally fixable. It usually boils down to one of a few things:
- Bad Technique: Moving the polisher too fast or not using enough product can leave swirls. The key is slow, deliberate passes.
- Wrong Pad: Using an aggressive cutting pad with a fine polish can leave its own scratch pattern. Always step down to a soft foam finishing pad for the final step.
- Dirty Towels: If your microfiber towel picks up a single piece of grit, wiping off polish residue can instantly scratch the surface you just perfected. Always use fresh, clean towels.
The fix is simple. Just go back over the swirled areas with your finest polish on a clean finishing pad. Use light pressure and slow movements, and that final refining step should clear things right up, leaving nothing but a perfect mirror shine.
At Better Boat, we know that having the right tools and the right knowledge makes all the difference. Protecting your investment starts with using premium products designed for the marine environment. Our complete line of marine-grade cleaners, waxes, and sealants gives you everything you need to get a professional-quality finish right in your own driveway.
Explore our full range of boat care solutions at https://www.betterboat.com and keep your vessel looking its best for years to come.

